amuckart
-
Posts
577 -
Joined
-
Last visited
Content Type
Profiles
Forums
Events
Blogs
Gallery
Store
Everything posted by amuckart
-
 I meant to add, a trick I heard about from Al Saguto for modifying patcher feet to not mark the leather is to dip them in the plastic dip hardware stores sell for tool handles. Tool-dip is one brand name. I haven't tried it myself, but it makes perfect sense. It would leave a smooth, but slightly tacky foot that would feed without marking.
 -
Hi Dominic, Leather points come in a variety of styles, you might want to look at fine tri-points for garment leather. Regular round points can be used in leather, but unless it's really old it was probably sewn with tri or lr points in the first place. If you haven't seen them already both Groz-Beckert and Schmetz have really good informational PDFs on their websites about the different styles of needle points for leather. The type of machine I would go for for this kind of work would be something like the Seiko TE-6B with the optional roller foot. This is a modern clone of the old Singer 17-class machine. I'm not sure if Dürkopp make one, I've only ever seen them done by Seiko. It is a cylinder arm machine with quite a small diameter arm for doing cuffs and the like. It is a drop-feed machine so you need to carefully adjust the feed dog height and foot pressure to reduce marking, but the roller feet will feed garment leather just fine and a well adjusted roller will often mark less than a regular foot. The machine has a 10mm foot lift by knee, and you can get a flat-bed attachment for it. There is a spec sheet here: http://www.seiko-sew...e-tf_series.pdf The other thing I would look seriously at getting is an Adler or Claes patcher in good condition. There is nothing like them for patching clothes and the little arms on them will get into places that no other kind of machine will. In good condition, with tight gears they will build a perfectly nice stitch. You might be able to do all your work with one if all you're doing is modifications and fixes, but it would be a great compliment to the Seiko. Your English is a darn sight better than my Italian, so don't worry about that!
-
How old is the servo driver your'e using? Modern ones should configurable to stop at almost any position you want. I don't know if commercial ones can do this, but I've seen a home-built servo controller that had a mode where the needle followed the pedal directly, so pushing the pedal down dropped the needle and lifting the pedal raised the needle. I don't know at what point it decided it had to transition through bottom dead centre though.
-
Hi Anthony, what is the thing under the cover.? It is a place where you put cams to do fancy zigzag patterns. Can I get a new tensioner.? Probably, but you'll want to look at domestic machine repair forums to find a source what about the bobbin area? If its as badly chewed up as the picture makes it look it probably needs a new hook at least, and likely a new shuttle race as well. Is it worth fixing? Only if you have a real attachment to it for some reason. It's not a rare or valuable machine, it'll never sew leather well, and if you want a machine of this model you can probably find one in much better condition for less than you'll spend on parts time and materials to get this into a state where it's useful.
-
Hazards Of Boiling Beeswax For Medieval Leather Bottles
amuckart replied to UKRay's topic in Leatherwork Conversation
I've done this a bit. I used a big baking dish over a bbq grill. The warning sign is smoke. The smoke point of beeswax is very close to its flashpoint, so if it's smoking, turn the fryer off and leave it for a bit. It sounds like you've got the right kit to extinguish a fire. Treat it just the same as a deep fat fryer fire. The most useful learning I got from hardening veg tanned leather in beeswax was to put it in a 50 degree C oven for an hour or two before hand to make sure it is completely dry. If there's any moisture in the leather it'll shrink and buckle as soon as it hits the hot wax. -
Chrome's a very different look to nickel. My machine is painted too, not that any of the pinstriping survives except on the hand wheel. There are bare metal parts - notably the rim of the hand wheel and the shuttle race, and it's those parts I'm thinking of. I wouldn't plate a whole machine
-
Does anyone know whether there were nickel-plated parts on first-quarter 1900s vintage (Serial #7536) Pearson HM6? My one is heavily patinated all over but there are bits of the hand wheel that look a lot like they were nickel plated and I'm wondering if this was likely, or whether they would have been bare metal. If I can find out enough about what the machine looked like in its original livery, I'd like to restore it to that, but I'm finding it very difficult of locate any information on what the original. Failing that I want to make it look good, but plausibly 19-teens. Auckland, where I live, is incredibly humid, and exposed metal will rust badly without near constant attention so I'm thinking of getting things like the hand wheel, shuttle race, and foot pressure spring electroless nickel plated when I restore the machine. Thoughts? Ideas? Pictures of machines in original condition? Thanks.
-
Hi L.G. Technically, a servo motor is any electronically controlled motor that incorporates a feedback from the motor to the controller to control the speed. The Quick Rotan you picture is also a servo, but is a far more expensive (and capable) proposition than the type discussed here. It used to be that servos like Quick Rotan and Efka were the only ones available for sewing machines, but now there are simple cheap motors available that lack the power, needle positioning, and configurability but still offer big advantages over clutch motors. In my limited experience the cheaper motors lack the low-end torque of the expensive ones but for 1/8th the price that's an acceptable compromise for most people not doing production work. Personally, on a machine as simple as most heavy stitchers I'd go for an SCR or PWM controlled high-current low-voltage DC motor. Current is what gets you torque in a DC motor, and there are 1HP 36V motors out there that'd drive the biggest machine through any material the needle is physically capable of penetrating and, controller included, still cost much less than a full-featured multi-input motor like your Quick Rotan. I'm slightly surprised nobody but Sailrite have gone down this track to be honest. They've gone for US-made, and the price reflects that but for the Chinese clone market you can get the same thing for a third of what they're asking.
-
Does Anyone Recognize This Old Imperial Machine?
amuckart replied to TSGLeather's topic in Leather Sewing Machines
It's a domestic machine. Looks like a clone - probably Japanese - of the Singer model 15. -
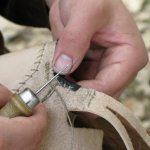
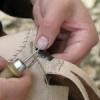
I was going to ask how you set up a machine/needle to get so little distortion of the leather around the exit holes of the needle, then I noticed the thread tails. I think in the second pic you've got the top-side of the work.
-
It's worth noting that these machines have a completely different feed system to the 3500 etc. The 2500 is based on a long line of machines that hearken back to the Singer 45k. They are what are called drop-feed machines. The feed is just like a regular domestic sewing machine. The only feeding action is from a feed dog underneath the material being sewn, which is pushed onto the feed dog by a presser foot (flat or roller). There needs to be a certain amount of pressure between the feed dogs and the foot for the material to feed. The 3500, 4500, and 5500 are all compound-feed machines in which the feed dog, presser foot and needle all move together to feed the material. Because of this the feed dogs can be completely smooth (or even omitted for some operations) and the material will still feed fine. Unfortunately my 45k is out of action or I'd post pictures of the bottom stitching.
-
I don't, yet, but it's very high on the list of tools to get made seeing as I have medieval style awls already. I've seen photos of a couple of reproductions but I've never handled one. I've seen photos of the one in the Museum of London too, but I'm not a fan of the shape of that one. I only got a regular style round knife recently but other than the handle geometry and the spike, I don't see the blade geometry of the medieval ones being much different from a modern round knife. They might be a touch thicker in the spine on account of being made of wrought iron with a welded steel edge, but until I get one made I won't know how well that holds up. Nobody's quite sure what the spike out front is for. There's a few plausible theories but as far as I know no medieval examples exist in good enough condition to know its geometry or whether it had sharp edges.
-
Any Comments On This Necchi Machine?
amuckart replied to reddevil76's topic in Leather Sewing Machines
Bluntly, the seller is lying about the capabilities of the machine in an attempt to boost the price. eBay is rife with that scam. -
Have a look at pergamena.net's goatskins I got a sample from them a little while ago that included some good thick goat. It's pit tanned though, so it acts a bit differently to modern veg tan. The calfskin samples I got from them were the nicest leathers I've ever handled, by a long long way.
-
I wouldn't know how to do this if my life depended on it, but I happened to be reading Jeff Mosby's site just now and saw a tutorial on roped borders linked from his tutorials page it uses one of Bob Beard's rope tool which you can find on this page.
-
Thanks for the extra pictures. Now to find out who else has those or if they're a weaver exclusive.
-
Thanks, I look forward to the feedback. Variable. The stuff I'm working with is 70 or so years old so it's a little brittle occasionally. Overall though, I like it. Making threads is a little time consuming, and a bit of an art unto itself but I think it's absolutely worth it in terms of the longevity of the final product and the ability to make threads to almost any thickness from a single spool. It does rely on good hand wax though, and making that is another skill again, but worth learning.
-
If the uppers are basically sound, I'd just take these in and get whole new soles put on them.
-
3M Make a product called Scotch Guard Protector that is advertised to be for suede. Anything that isn't waxy or oily and will dry and allow the suede to be slightly fuzzy should be fine. Suede is mostly chrome tanned these days, but the word only describes the surface treatment, not the tannage, so you can have veg tanned suede. Most of what we think of as suede is really skivers, the leftover stuff from splitting chrome leathers down to thickness. As far as I know, true suede is a brushed finish on full-grain leather. That was really an aside, the checkers board is almost certainly chrome tanned.
-
I've never heard of it but I use dry-spun 10/1 almost exclusively for hand sewing so I'll be really interested in what it's like to work with.
-
Any Tips When Sewing 12 Stitch Per Inch?
amuckart replied to chouinardragon's topic in Sewing Leather
The pitch you're sewing at shouldn't make any difference to the technique you use, just the size of awl and thread. There's a few threads on the forum about keeping your stitches even front and back. If the forum search isn't working for you try using google and appending site:leatherworker.net to the end of the search which will restrict the search to just this site. Absolute consistency is the key, and ensuring your awl is perfectly perpendicular to the surface of the leather in both planes for each stitch. The Art of Hand Sewing Leather by Al Stohlman is the standard reference people refer to, if you don't already have a copy that'd be a good place to start. -
That's very clever, thanks for the pointer.
-
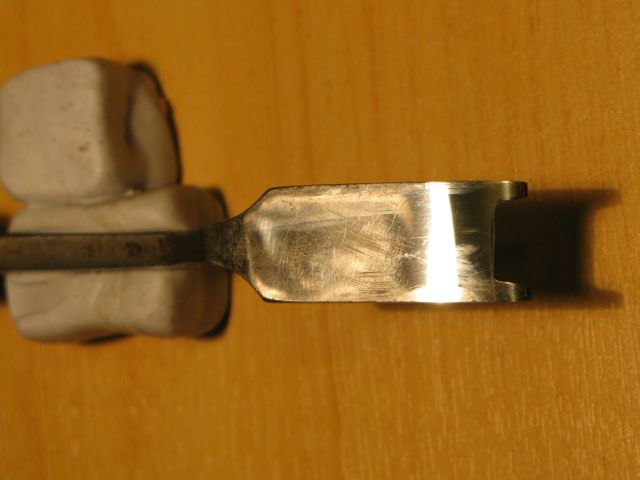
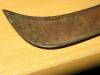
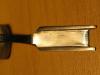
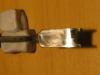
Sharpening that shouldn't take too long, or more than six or seven dollars in abrasives if you don't already have any. It's an extremely worthwhile skill to learn because being able to sharpen tools is one of the most important skills a leatherworker can have IMO. I recently bought a box lot of leatherworking tools from an estate, which included a rather nice, but long neglected Dixon french edger that was blunt and somewhat rusted. I don't have a 'before' photo of it but I've got a picture of a hook knife that was in the same lot and is in much the same condition as the edger was. Hook knife before: Edger after, front & back The back was easy, I took the corrosion off with 1000 grit wet/dry sandpaper laid on a piece of glass then worked through 15, 5 and 0.5 micron microfinishing sheets, again on glass. You could just go with regular 1000 grit to 1200 grit wet/dry paper then hone on a leather strop, but the 3M sheets cut faster. Use a small drop of baby oil to float the swarf. I used maybe three square inches of each sheet to do this. To do the groove I whittled a flat into a dowel then whittled the sides into a trapezoid shape until it was the right width, wrapped the abrasives over that and used it like an extremely fine file. On a new blade this probably isn't necessary but there was pitting on this one I had to clean up. You don't have to use dowel, I just happened to have a snapped off chunk lying around. All in all it took me less than 10 minutes to take the tool from unusable to shaving edges just fine. The size makes my one a slightly easier job than your really narrow ones, but with those you can just whittle a bit of wood into a long thin triangle section and shave off enough of the sharp edge to give you the width you need, or just fold a piece of abrasive paper over a cord of the right size and use that. This is my only edger, but if I had more (which I will, one day), I'd take a block plane and shape hardwood slips for each one and just charge those directly with honing compound.
-
I have a belt with that acrylic finish on it. Looks great for the first little while but after a few years the finish starts flaking off and looks terrible.
-
Adler 5-37 Only Bottom Feed? (Ser.nr. 30265)
amuckart replied to sandyt's topic in Leather Sewing Machines
Frobana/Gritzner are neat machines, built like clocks. Useless for anything other than outsoling shoes but quite good at that if you can get needles for them.