CustomDoug
-
Posts
605 -
Joined
-
Last visited
Content Type
Profiles
Forums
Events
Blogs
Gallery
Everything posted by CustomDoug
-

Stitch Length HELP needed Consew 287R
CustomDoug replied to CustomDoug's topic in Leather Sewing Machines
Not sure if posting a video to this website is as easy as posting photos is apparently, but I shall give it a try later today. Top thread tension: I mentioned earlier that my top thread was difficult to pull (too much tension thru the discs even when loosened).. I found the reason - I'd added a supplemental spring to the tension disc for heavier thread a few years ago (and forgot because I haven't used this machine in so long). I removed that extra spring and now the thread is much easier to pull thru at the end of a line of stitching - however, removing it did NOT improve my stitch length as I hoped it would. Nor did adjusting/centering the feed-dog.. & honestly the stitch length is no better than when I started this thread. Stitch too small at max adjustment w/138 thread. Frustrated. -
Stitch Length HELP needed Consew 287R
CustomDoug replied to CustomDoug's topic in Leather Sewing Machines
Duly noted, thanks. -
Stitch Length HELP needed Consew 287R
CustomDoug replied to CustomDoug's topic in Leather Sewing Machines
..OK, did both of these over the weekend.. and after a good fight, was finally successful !! So I then made the adjustments to the feed dog and needle bar from Uwe's video posted earlier (thanks again buddy). My needle length may be about 5mm now. Again, I'm using #138 thread - Uwe, can you get 6mm out of 138 thread with your machine from the video? Maybe it's just much for this machine??? NEW PROBLEM - now my machine is not pulling the material equally .. it seems to be pulling the top faster. Is there a common cause for this and adjustment ? -
Stitch Length HELP needed Consew 287R
CustomDoug replied to CustomDoug's topic in Leather Sewing Machines
That's a great tip Stelmack, I've made note.. -
Stitch Length HELP needed Consew 287R
CustomDoug replied to CustomDoug's topic in Leather Sewing Machines
Hi Uwe.. what an easy to follow and informative video you put together!! It's very helpful and appreciated. After watching it, I've gone from flying high on a cloud to crashing solidly to the ground in defeat. Unfortunately the head of almost every screw on this machine has been chewed up at some point in its life. And, wouldn't you know - I CAN NOT BUDGE the dang screw you alluded to in your video (first one, on the upper body, in the hole under the lever)!! and in trying, it's starting to get pretty chewed up too. I've added penetrating fluid.. then tapped it, then banged on it with a hammer to the screw-driver to try and loosen it, but no luck. Any suggestions for this issue? -
Stitch Length HELP needed Consew 287R
CustomDoug replied to CustomDoug's topic in Leather Sewing Machines
Hi Glenn, I have moved the feed dog to 1/2 tooth above the plate at full height. Thanks for that info. -
Stitch Length HELP needed Consew 287R
CustomDoug replied to CustomDoug's topic in Leather Sewing Machines
Man, I owe you one for going out of your way to help!!! Here's a video I found of a CW-8 machine (non lubricating or reversing), that I think the user is making adjustments to the stitch length manually but it's in a language I don't understand. See the video starting at 2:35 or so, thru to about the 3:00 minute mark. I certainly could be wrong but.. it's how I'd envision the adjustment procedure to go on my machine. Thoughts? -
Stitch Length HELP needed Consew 287R
CustomDoug replied to CustomDoug's topic in Leather Sewing Machines
Sounds good ... I also have the following parts list from the newer Consew version: http://www.consew.com/Files/112347/PartsBooks/287RB-2.pdf Of course if they're the close enough and you're more familiar with the Seiko, then by all means.. let's use yours. So, to recap - top stitches too short in forward (at max adjustment length), and Reverse acting funny (short on top & loops on bottom). Couple other issues I'm noticing [may or may not be related to the main problem]: -after sewing a line of stitches, bringing needle just past the top and lifting the foot - the thread does not put out easily for me to snip them off (I have to rock or sometimes manually reverse the hand wheel to get the work to pull out far enough). -Also, I keep getting the feeling my top thread tension is just a bit too tight despite having the thumb screw/spring loosened quite well. -
Stitch Length HELP needed Consew 287R
CustomDoug replied to CustomDoug's topic in Leather Sewing Machines


-
Stitch Length HELP needed Consew 287R
CustomDoug replied to CustomDoug's topic in Leather Sewing Machines
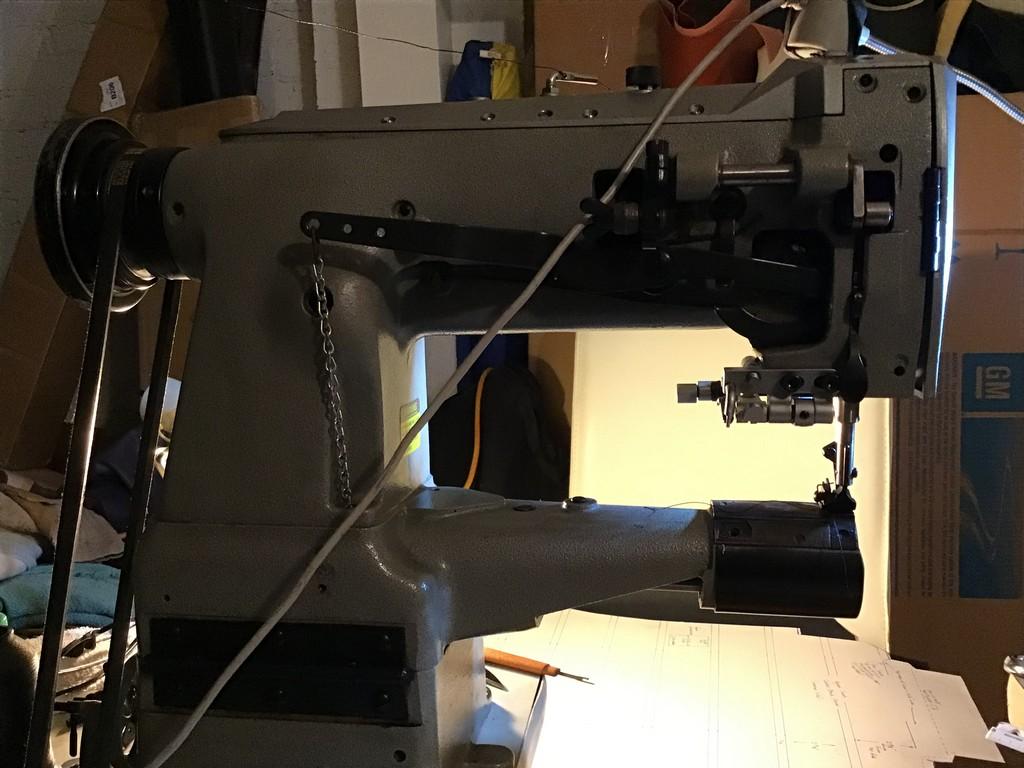
Hi guys... THANKS SO MUCH for y'alls help!! Uwe, you were real close with the Seiko.. the following is a picture of my machine, also a pdf of the newest version of it from consew. http://www.consew.com/Files/112347/PDF/287RB.pdf
-
Stitch Length HELP needed Consew 287R
CustomDoug replied to CustomDoug's topic in Leather Sewing Machines
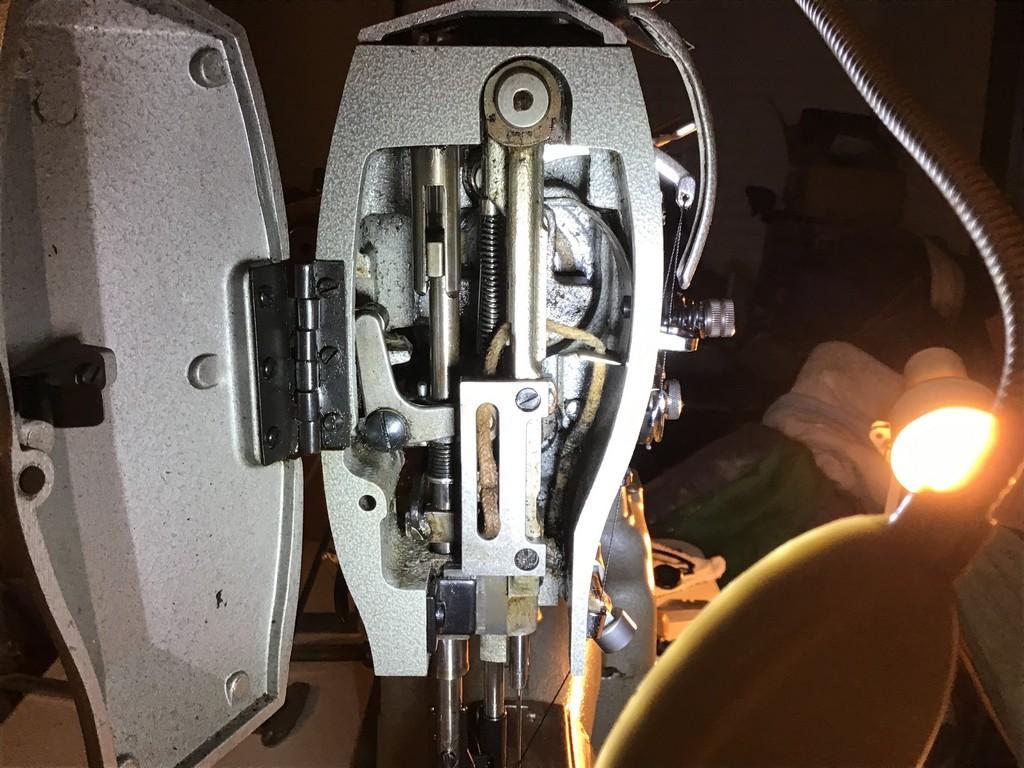
Ok shoepatcher touched on a couple items: first, my feed dog come real close to (possibly touches) the front of the plate during a rotation, and the back is a couple millimeters from the back when the FD comes to that side. So I need to adjust that - BUT HOW's IT DONE? Secondly, my feed dog did seem low (as Cowboy Bob pointed out in an earlier post) so I raised it.. maybe too much but my 'adjustment procedures' for a Singer 153Wxxx showed it should be 1.6mm above the plate. Would it being too high cause the looping stitches on the back side of the material (as seen in the above picture)? Here's my feed dog as it sits now: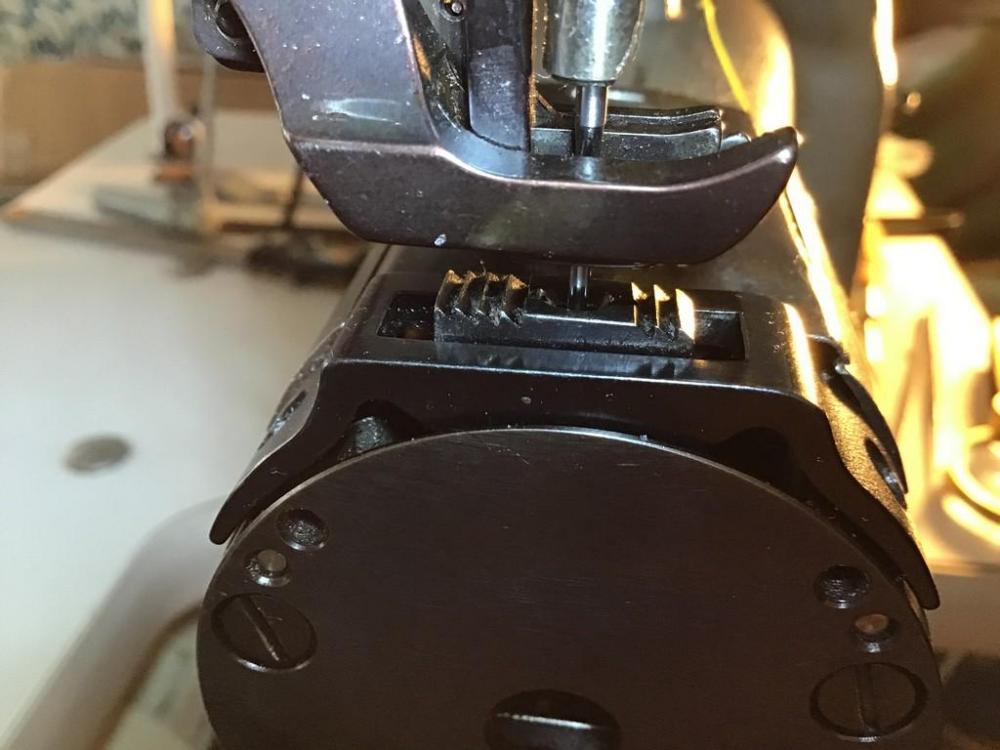
-
Stitch Length HELP needed Consew 287R
CustomDoug replied to CustomDoug's topic in Leather Sewing Machines
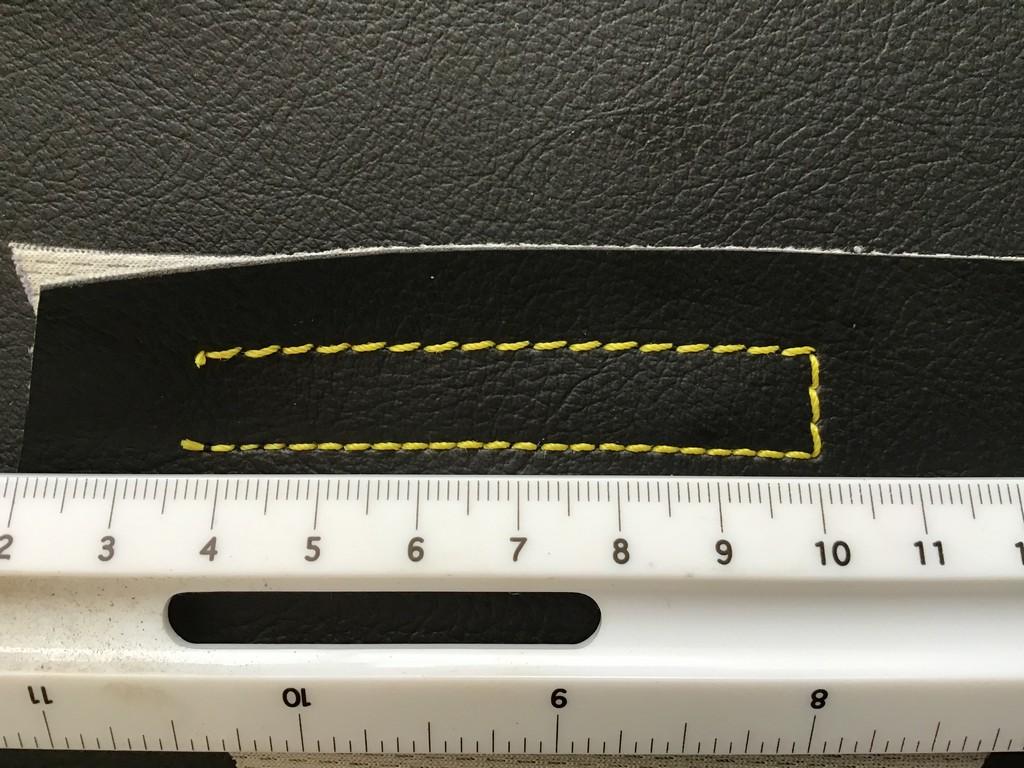
YES - There is definitely a problem with my Reverse ... the stitch length is even shorter than forward, and I'm loosing tension from the top thread (loops on the back side of sewn vinyl). Here's pics of this particular issue (Note: forward stitching = top row, reverse on bottom): BACK SIDE: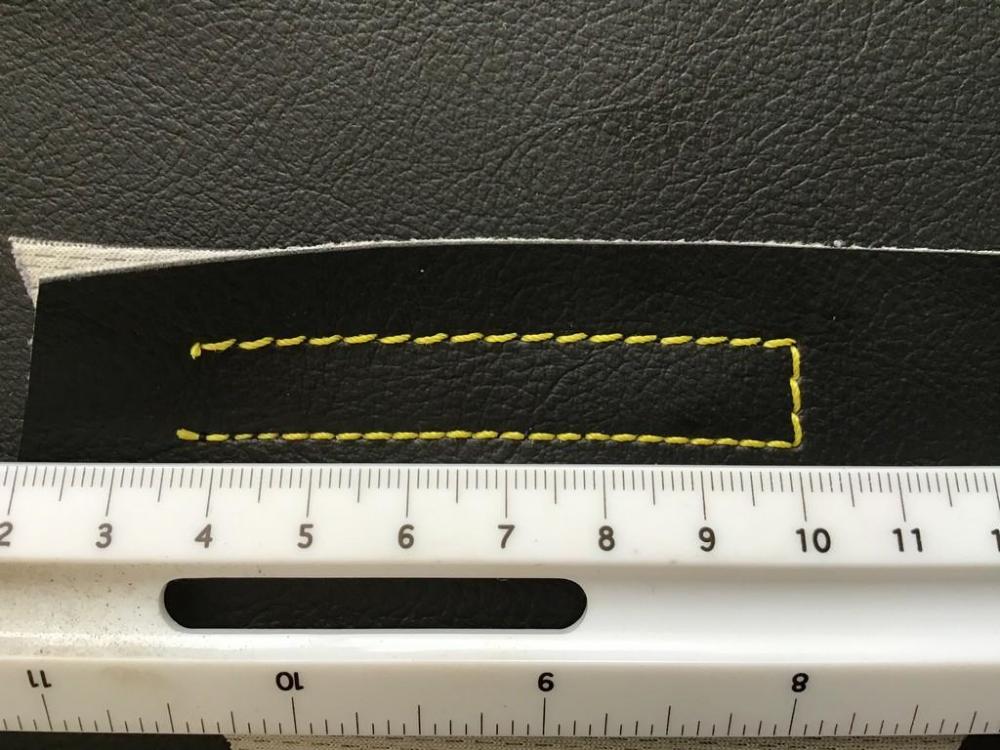

-
Stitch Length HELP needed Consew 287R
CustomDoug replied to CustomDoug's topic in Leather Sewing Machines
Cardboard got me 4mm holes... switched back to the vinyl and now a contrasting yellow 138 thread and it too showed a solid 4mm stitch length at maximum. I can't help but think it's an internal slip of a rod/gear. -
Stitch Length HELP needed Consew 287R
CustomDoug replied to CustomDoug's topic in Leather Sewing Machines
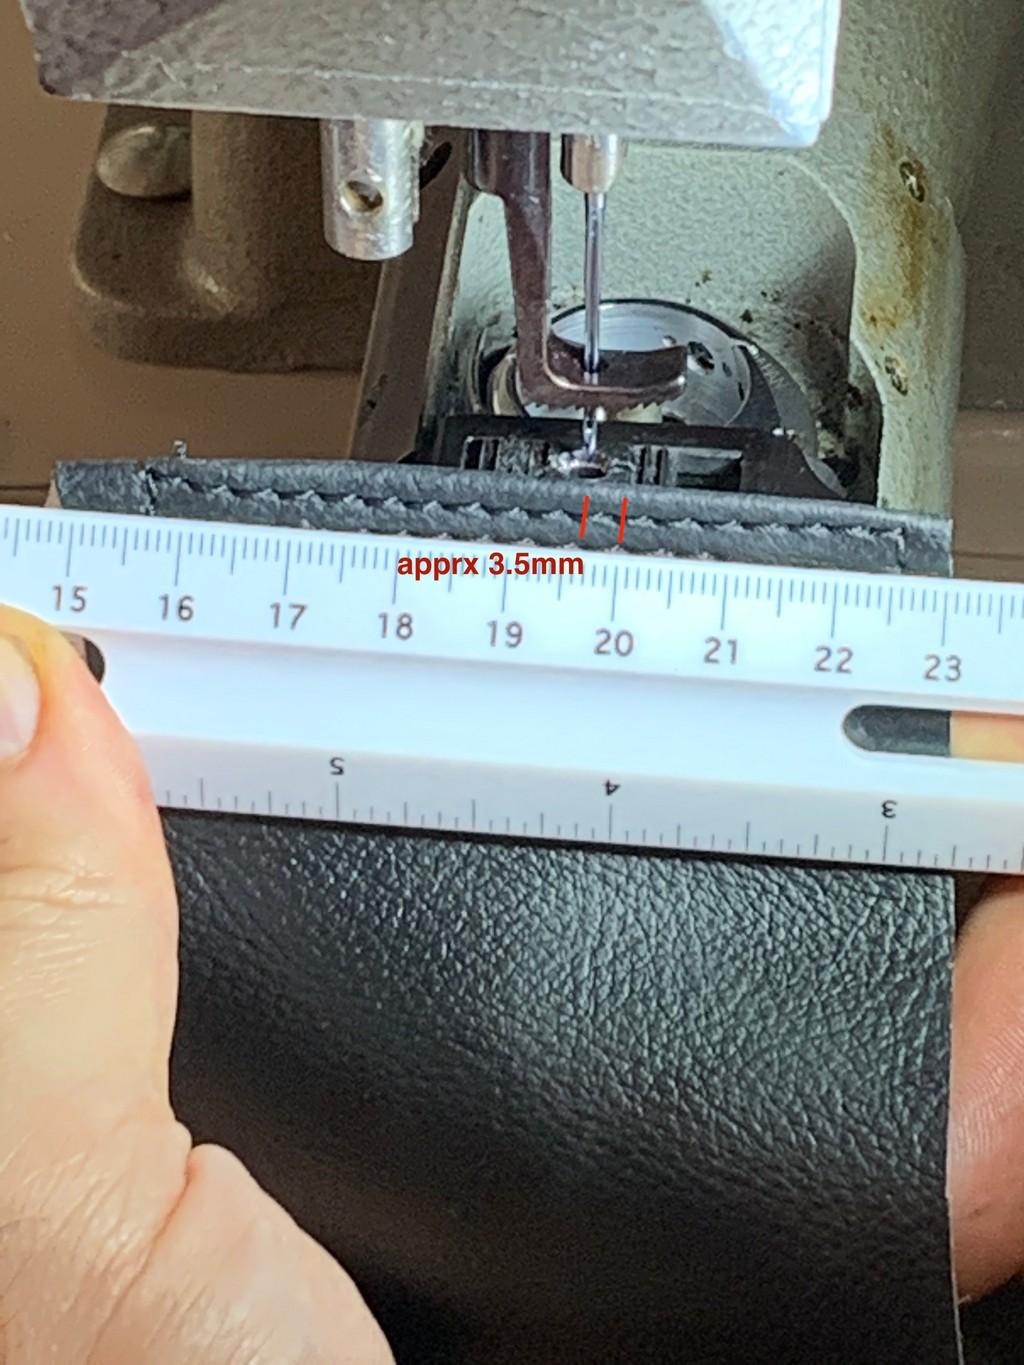
@Uwe Here's a shot of the stitches I'm getting on maximum, I'd say they are 3.5mm (pic actually makes them look better) [I've obviously removed the rear foot for the pics - but if it makes any difference the alternating foot is serated and the other is smooth] & again, size 138 poly thread... surely this machine will do bigger stitches than this?: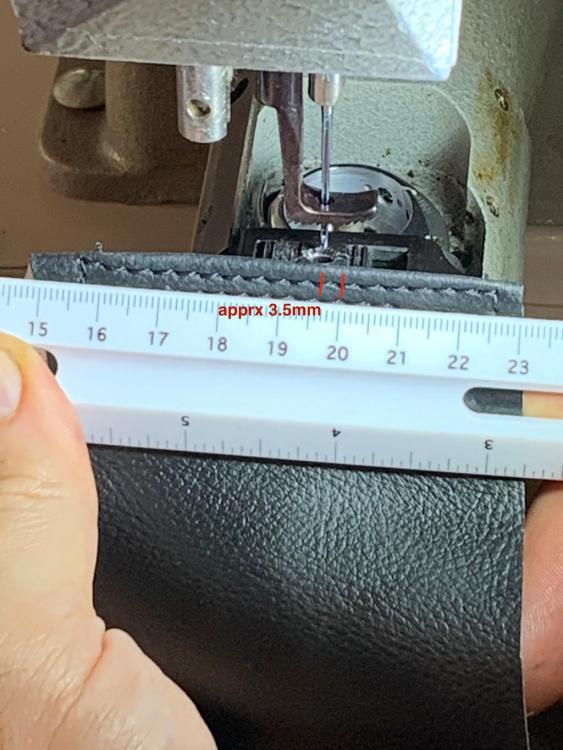
-
Stitch Length HELP needed Consew 287R
CustomDoug replied to CustomDoug's topic in Leather Sewing Machines
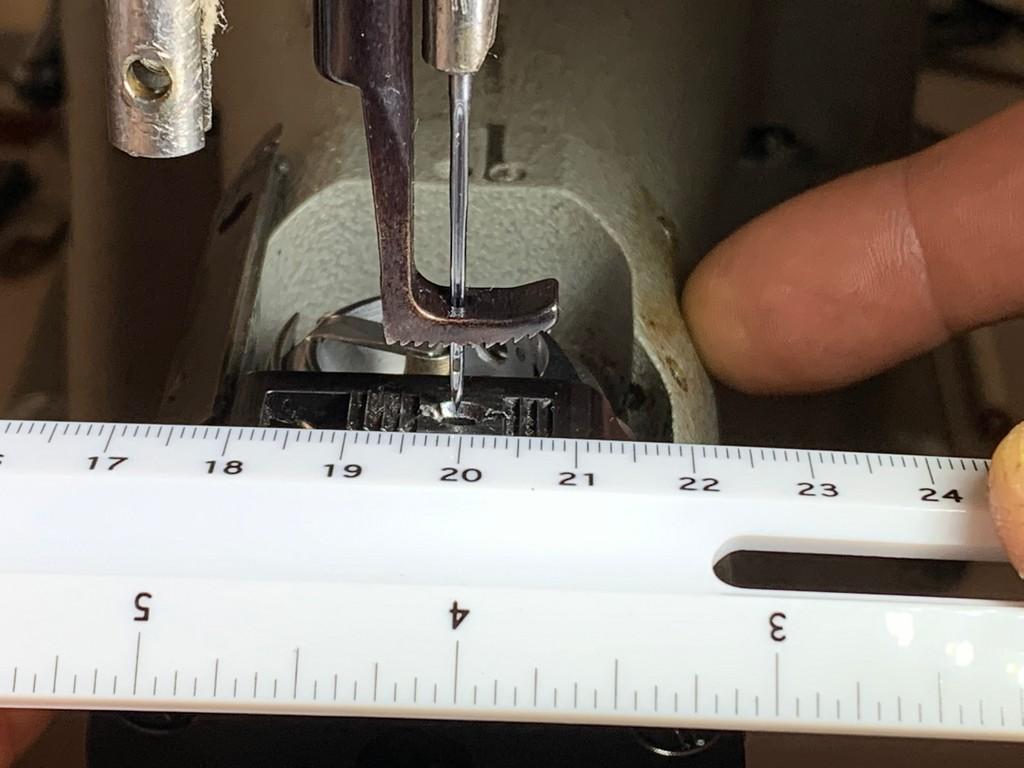
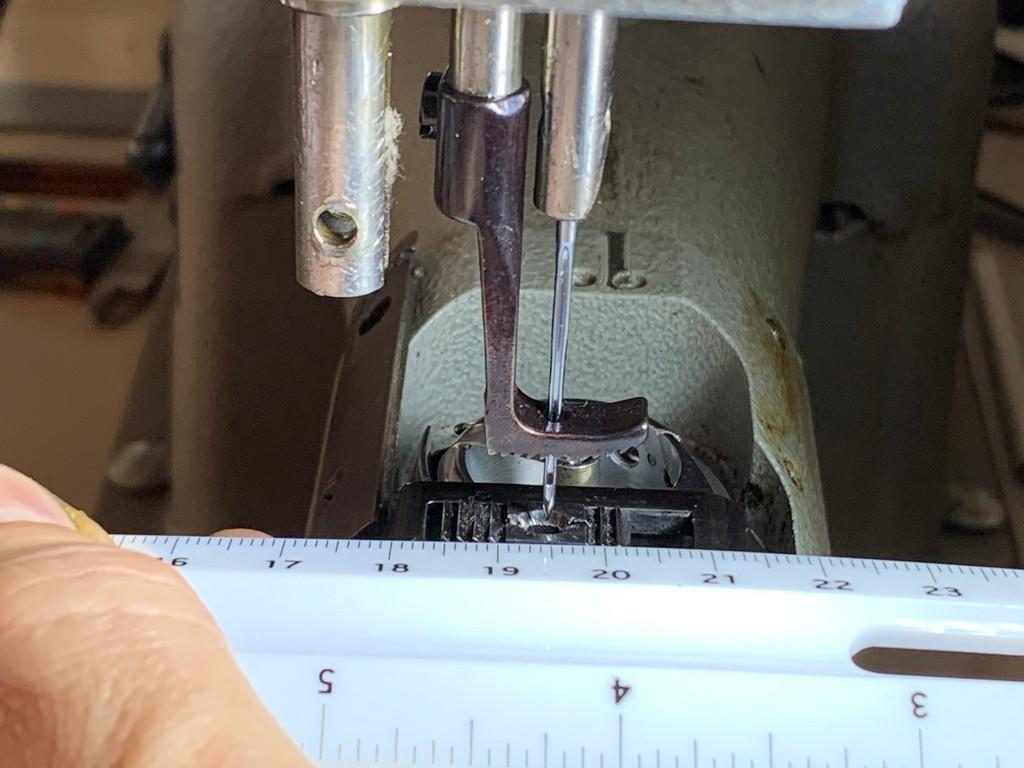
All the way forward: All the way back: Well, close to 6mm, real close to it when tested as you suggest. But it's not translating to the stitch.

-
Stitch Length HELP needed Consew 287R
CustomDoug replied to CustomDoug's topic in Leather Sewing Machines
..there is a large hole (maybe 3/4") just under the 'length-adjust-lever' on the front of the machine .. with a large screw inside of it. And also the same hole on the back-side directly in line with the front hole - which gives access to an Allen bolt. Are these there for stitch length issues? I think my alternating presser foot is only moving about 3mm on max. This machine should do 6mm IIRC. -
Stitch Length HELP needed Consew 287R
CustomDoug replied to CustomDoug's topic in Leather Sewing Machines
Ok, that is good to know.. -
Hello - I'm using a somewhat older Consew 287R (Japanese made copy of Singer cylinder arm 153Wxxx with reverse).. I'm attempting to top-stitch a French seam into upholstery vinyl using 138 thread, and the max stitch length is coming out too small. There is a stitch length & reverse lever on the front - I have it set all the way up... at the "5", which I believe represents 5mm per stitch, but these are more like 3mm and/or less. I have raised the feed dog in an attempt to correct the problem. One thing I'm noticing is that there is more resistance of the thread when pulling it at the needle end, then when pulling it from the bobbin (not sure if that has anything to do with the stitch length problem) - should the resistances be the same? Thanks for any help.
-
Skiving Machine Ripping Leather, please help !
CustomDoug replied to SonderingSusan's topic in How Do I Do That?
A picture of a dual motor set up would be a tremendous help. I looked but could not find one. Anyone know of a site with such a pic? Doug C -
Skiving Machine Ripping Leather, please help !
CustomDoug replied to SonderingSusan's topic in How Do I Do That?
Do you have any specifics ideas for accomplishing this? I'd like to add a second motor also but don't know where to start. I'd think an adjustable servo motor would be ideal for slowing the feeder speed. Doug C -
Aniline finish vs. Drum dyed ? which is best ?
CustomDoug replied to CustomDoug's topic in Leatherwork Conversation
I mean the leather itself looks nice on the outside.. it's smooth w/ no pronounced graining - but the gray center just reminds me of lesser leathers I've used in the past. This is what had me wondering if this is a normal characteristic for "Aniline Leathers". Not that the center is all that important on a finished product I guess. Which brings up another question I've been mulling over - do Aniline finished leathers wear harder/longer without wearing thru, or would you eventually get wear-thru on an item that's constantly used (like pigments dyed leather)? Doug C -
Aniline finish vs. Drum dyed ? which is best ?
CustomDoug posted a topic in Leatherwork Conversation
I've always heard that generally speaking, Aniline finished leathers are superior because they are usually reserved for full grain hides, and also that cheaper leathers would have a white/blue/gray center. But after receiving some samples of Aniline dyed leather from one of the better French tanneries.. it dawned on me that these aniline finished leathers are not dyed all the way through - well I knew aniline wouldn't be drum dyed so I'm not sure what I was expecting! The samples I got are partially described as : " A full chrome French calf is tanned in the traditional French way with an aniline casein finish producing leather fit for a King! " - so is the light colored center not an indicator of cheap leather when it's aniline dyed or is drum dyed a better leather to search out? Doug C -
Belt Leather Cracking At Buckle Fold - How To Eliminate It?
CustomDoug replied to CustomDoug's topic in How Do I Do That?
OK - I'll be wetting the bends from now on. Is this necessary with FULL grain leather as well? -
Belt Leather Cracking At Buckle Fold - How To Eliminate It?
CustomDoug replied to CustomDoug's topic in How Do I Do That?
ok, got it. and umm... I don't suppose there's anything I can do about the cracked leather once it's there, right? I have some Pecards conditioner that I can use, any chance it'll visibly 'heal' the small cracks? I just skived the area as suggested and the cracks are still quite visible on the front at the bend area (not that I bent it very tight though, just checked loosely). Will the area be weak? The cracks look to be just the top surface, but are unsightly if nothing else. btw, this is a 3/4" wide strap of 8/9oz (now skived down at that area). -
Belt Leather Cracking At Buckle Fold - How To Eliminate It?
CustomDoug replied to CustomDoug's topic in How Do I Do That?
I'll give those a try. Thanks!