Rod and Denise Nikkel
-
Posts
423 -
Joined
-
Last visited
Content Type
Profiles
Forums
Events
Blogs
Gallery
Store
Everything posted by Rod and Denise Nikkel
-
Welcome on board. Good to have someone from the "English" world here as well. Totally different ball park than what we do. Same goal - make a good "interface" between horse and rider that fits them both and helps, not hinders, either. But very different approach to doing it. Glad to have you aboard.
-
Bruce, So as far as we are picturing it, the thing you don't like about the corners of the cantle is when they come too far forward on the bar, which goes along with them going down the bar a long way. That leaves them sticking out front of the center of the cantle a long way so that is what "eats" your leg. Have we got it yet? Question as far as the groundseat goes. How much do you think your being involved in fast competition type riding such as cutting affects the way you like to be positioned in the seat? Would you build a similar seat for a recreational rider on calm horses just trail riding most of the time? Greg, You are correct in that the bar length is shorter with a Taylor cantle compared to a tree with a regular cantle with all the same specs (with the exception of dish). Here goes the "technical explanation" as to why. When we make a tree, we have 6" of wood behind the cut in the bar for the cantle. All our markings for the fork and cantle cuts are made on the inside edge of the bar where the cantle gullet meets the bar. So while the front corners of the cantle end up the same place toward the outside edge of the bar, the mark on the inside edge where we start the cut is close to an inch further forward. We then measure 6" back from there to the end of the bar and so the bar ends up close to an inch shorter in total. Since the rider is also sitting further forward in a Taylor cantle (as I hopefully explained well enough in the last post) you still have adequate bar surface area behind them. Maybe it will help in understanding what is going on to change the way of we think about the angles. Rather than thinking about the angle getting flatter on a Taylor (which causes us to picture the front corners of the cantle moving back), think about pulling the apex of the triangle further forward. This is what is really happening in how we mark and cut out the bars. Hope that helps. Keep asking questions if it still isn't clear. Denise and Rod
-
As far as seat length and thigh length comparisons from Taylor to regular, you actually get the same thigh length for the same seat length on both. (Rod and I disagreed about this point until we had enough data to convince me that he was right...again. Sigh...) While it appears that what you are doing is taking moving the corners of the front of the cantle back so the thigh length should be longer, actually what is happening is that the rim of the cantle, from where you measure both seat and thigh length, is staying in the same place and the center of the cantle is what is moving forward to change the angle of those cantle cuts. So yes, your rider is sitting further forward in the seat with a Taylor cantle because the front face of the cantle has moved forward, and whatever low spot you are putting in the seat has also moved forward. As such, the front corners of that cantle will be further behind his legs than with a regular cantle. But the actual measured "thigh room" is the same - on our trees at least. Seat length measures the same. Thigh length measures the same. But top of cantle gullet to top of fork gullet would measure shorter (though the last thing we need is another place to measure on these trees!)
-
starting my own saddle shop
Rod and Denise Nikkel replied to saddle maker's topic in General Saddlery Discussion
Like the previous writers have said, you first need to determine what type and quality of saddle you want to build. Then you can figure out realistically what you need to charge for it to cover the time and materials you are putting into it. Some people make their money on low margins and quantity, and others on quality and charging for their skill and labour. All part of the business plan. There is a thread on the forum somewhere (try the search function or ask Johanna) about how to price your work. Worth reading. Our recommendation is that you go with rawhide covered wood trees. (OK, so we're biased...) There are lots of other types for generally lower prices, but the higher quality saddles always seem to have wood and rawhide trees for some reason... There are a number of companies who turn out large numbers of trees, such as Steele, Lewis, Baties, Hadlock and Fox, Bowden Brand, Superior, Timberline, and others. Some of these cater mainly to the production saddle market, though I believe (correct me someone if I am wrong) they will all deal with individual saddle makers. Most saddle makers we talk to who use production trees go with Bowden Brand, Timberline, Superior or Hadlock and Fox. Their prices, just from a quick look on the net, seem to generally run in the $200 to $250 range, give or take a bit. Then there are the hand made trees made by individuals. You will hear names like Bill Bean, Glenn Christman, Sonny Felkins, Keith Gertsche, Rod Nikkel, Rick Reed, Ben Swanke, Warren Wright and some others. Their prices are often about the $450.00 mark, give or take $65 - $100. Some makers find that the difference in price is made up for in the decreased amount of time they need to take in building the saddle due to the better tree. The problem is finding a custom maker who can take you on because they tend to be very busy, and their backlogs generally vary from long to extra long. Hope that information helps you out. Take a read through the threads on this forum in the Saddles and Tack sections. There is lots of good information there, and some of the topics wander a bit so while the forum is still relatively young it is possible to read them all before you go for your training. It will be worth your while, since there are some good makers on here. As for leather, we will let them tell you about that. It is another whole realm of options. All the best in your endeavors. -
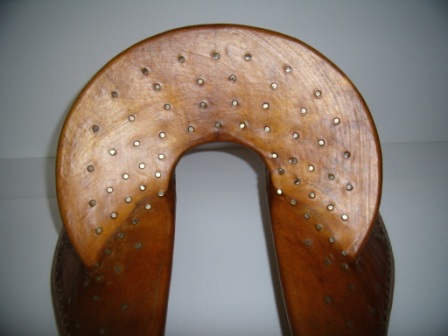
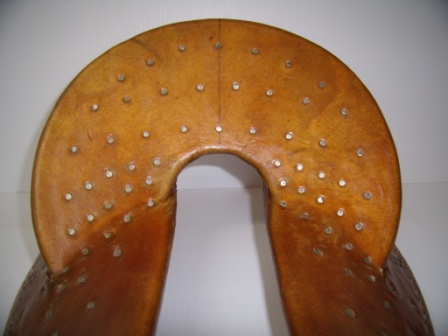
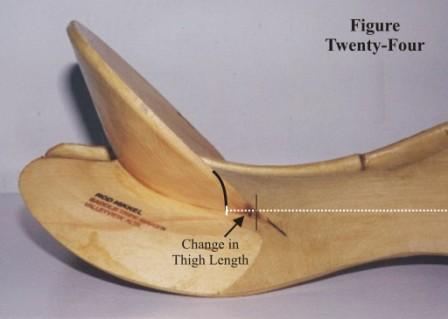
Alan, Good questions and thinking material. It seems we are trying to work toward the same goal - putting the seat in the tree to be most like what the saddle maker wants his groundseat to be so he has less work to do. Clarifying what that might be (for different makers, because it is not only tree makers who do things differently) is what we are aiming to get out of this thread. A question for you is, "What is your definition of a Taylor cantle?" because I don't know if we are talking about the same thing. (We know of at least 3-4 definitions.) When we make what we call a Taylor cantle, a number of things change but the basic cause of those changes is the amount of dish it is physically possible to put into a cantle. (Warning: Technical material in this paragraph. Please skip if you get bored by details... I have a couple of pictures of similar trees taken, unfortunately, at slightly different angles. The first is a regular cantle, more stood up angle, 5 " tall by 12" wide. The second is what we call a Taylor at the same angle and height, but 11 1/2" wide. The difference in our trees (remembering that every tree maker does things differently - especially with cantles) is best seen in the angle of the row of nails where the cantle meets the bars. It is much sharper in the regular cantle than the Taylor. That angle is consisten within the two categories of regular and Taylor regardless of the amount of dish they have, but there are limits on the amount of dish that is possible to put into each type. The maximum dish one of our Taylor cantles has is 1" simply due to the geometry of how they are made. The minimum dish one of our regular cantles can have is 1" in the more laid back angles and 1 1/4" at the more stood up angles. There are other changes necessitated by the change in angle, but this is complicated enough already and Rod keeps telling me to keep it simple.) So we can't really compare between Taylors and "regulars" because they generally have different amounts of dish. If we could, they should feel pretty much the same, because even with the differences between the two, so much depends on the shaping of the cantle. Like so many other parts of the tree, the measurements can be the same but the shape can be very different. My understanding of what Bruce is saying that he likes the cantle to blend nicely into the bars at the front (the area we call seat blend) and not be like a couple of two by fours joined at an angle. That blend can be made smooth, though differently, in almost any type of cantle, though a cantle whose specs require a very stood up slope to the front of the cantle is the most difficult to make nice. In our trees, Rod makes the low spot ahead of where the cantle joins rather than the base of the cantle regardless of the specs of the cantle. So the slope comes down the front of the cantle and continues down onto the bars for a short distance before starting to climb again. Just like fitting a tree to a horse where you have to put it on and see it because you can't compare between makers any other way, the best way to find out what a seat is like is to sit in it. Being able to sit in a bunch of different trees really would give you the best idea of what you want. I would hope that most tree makers, custom or factory, would be open to someone visiting and checking things out that way. I know we are, though we generally don't have too many trees around at a time, and we are rather off the beaten track. (We do have electricity and running water up here though. And no igloos - in summer... ) I know a lot of saddle makers who "test drive" their saddles as they build the seat. But it also depends on who you are building the seat for. Rod spent a lot of time sitting in the saddle he made for himself as he was working on the groundseat. He loves it. Fits him perfectly. I don't like it at all because we are built very differently. So for him to check the groundseat by sitting in it if he were to build me a saddle would do no good at all. (The thread Blake started on groundseats for men versus women would be a very interesting read if more saddle makers added to it.) I would think by the time you get as much experience as the guys you were learning from have, your head would know the shape you are after so your butt wouldn't need to test drive it anymore. Hopefully some of this helps you understand the factors that affect the construction a bit better. If I understand both you and Bruce correctly, you are both trying to build a seat that lets people "sit on their pockets" and round their lower back more. Is that what you are saying? Or are you saying that having a sloping seat gives more support to "the W’s" area while the rider is sitting straight so they don’t slouch back? Bruce, I can't quite picture what you mean when you talk about "the front corners of the cantles. Some will curve around more the front and others will blend down the bar." Here is a picture of a tree with a "normal for us" cantle, but a curved line drawn where we can take off that front corner for "leg cut". (Please ignore all the other writing.) Is that difference what you are meaning? Or could you explain more? Thanks, Denise (for Rod, who is sane enough to be sleeping by now)


-
Alan, Lots of food for thought in your post. You hit a number of different points, most of which we see as a saddle maker's responsibility, though the tree maker can help or hinder him in his work by how the seat is made in the tree. 1.) Slope of the face of the cantle and how it affects the ground seat. You say a couple of things here that I would like to clarify a bit so we are talking about the same thing. At one point you mentioned "a straighter cantle back" and at another you talk about "a shallow angle on the inside of the cantle" and at a third you talk about "tipping the cantle backwards." It is important to understand that while these things are all related, they are three separate things that are independent of each other. In making a cantle, the angle – whether the cantle is tipped back a little or a lot – is the first of these three parts cut because that cut is what makes the cantle fit onto the bars. That angle is only seen if you look sideways across the rim of the cantle. That angle is what we look for when we check to see how “laid back†or “stood up†a cantle is. The angles of the back and the face can be whatever we make them after that within all cantle angles. Once that angle is set, the amount of dish and cantle height combined determine the slope (or angle) of the face of the cantle, which is vital to how you want to make your groundseat. The amount of dish is set (and measured) at the top of the cantle gullet. That point will stay the same compared to the rest of the tree regardless of the height of the cantle. As you increase the cantle height, the top of the cantle rim moves further back from that point, resulting in a “shallower angle†on the face of the cantle. So if you determine the type of slope you want for the face of the cantle, you would have to change the amount of dish you order depending on the cantle height. For a taller cantle you need more dish to get the same slope you have on a shorter cantle. We were once asked to make a tree with the slope of the face of the cantle a specific number of degrees off the table. We had never measured this before, so it took some figuring but we were able to do it. We thought it a rather silly request, but after consideration we have since measured that angle on all our trees. Now it was a rather silly request because that angle is affected by how the bars are shaped, so between makers the numbers mean absolutely nothing. Even within our own trees, the numbers mean absolutely nothing other than allowing us to compare the slope between cantles with different heights, angles and amounts of dish. So we haven’t talked a lot to saddle makers about this yet because we don’t want them to get hung up on certain numbers, since, as we’ve mentioned, the numbers mean absolutely nothing and yet without numbers, how can we discuss it? And yet this slope is probably what most helps or hinders a saddle maker as he builds his groundseat. As for the back of the cantle, that is the last thing that gets done, and as long as there is enough wood for strength, it is strictly cosmetic. 2.) Rider position relative to the horse. What a can of worms that one is. The truth as we see it is that the rider is going to sit in the lowest point of the saddle, regardless of where that point is placed, simply due to the effect of gravity. No amount of trying to "go with the horse" can move you further forward for more than a step or two before you slide back into the "pocket" placed there by the saddle maker (unless you have a totally flat seat which leaves you moving all over the place - not necessarily a good thing). The fork type has no bearing on this though with a slick fork there is nothing to stop your legs from going further forward over the sides of the fork, whereas with a swell fork, those swells would hold you back. However, the shape of the seat is what really keeps the rider in one place. As far as being able to move forward with the center of gravity of the horse, the only way to do that at speed would be to ride a jockey saddle placed right over the withers above the front legs. I (Denise) learned that one by experience in my younger days when I was told I could ride only this one horse, and only bareback because she was so grossly obese that nothing would fit her well enough to use. She was a mutton withered, barrel shaped horse to start with, and you literally had to press down to find the top of her withers amongst all the fat. There was nothing you could use to hold you back on this horse, and at a lope, her knees, as they came up, hit my feet. I consistently ended up at the base of her neck above her front legs. That was where the "center of gravity" put me. This is why Rod feels the whole idea of being "over the center of gravity" is not worth while considering. It is just not possible in a western saddle at most gaits, no matter how it is made. The western saddle was originally designed for long hours of use. It has a lot more surface area under the bars to distribute pressure better, and the aim of a well designed tree and saddle is to stay out of the horse's way as much as possible so as not to interfere with his normal way of going. (There is a lot involved in that in many areas.) For the rider, the goal is to be in the best position possible for the horse to most easily carry their weight for long time periods, while being both secure and as comfortable as possible. Being over the horse's center of gravity at all times doesn't fit into that scenario. 3.) Rider posture. All sorts of "experts" argue about what is the "correct" body position of the rider. And yes, the seat you build in the saddle dramatically affects the rider’s posture. But that is in the saddle maker's domain, and would make a great thread if you wanted to start it. We're staying out of that one. The answer to your last question, “Can't we design a tree that will make it easier for the saddle maker to fit the rider into the position that is most beneficial to balanced/centered riding?†is yes. The opinions on what that “most beneficial†position is varies between saddle makers. We have the capability to make the cantle the way you would like. The purpose of our question is to find out from saddle makers what it is that that they find the most beneficial in regards to the way a cantle is constructed that helps them make a good ground seat. This is not just for our information, but hopefully the discussion will help any saddle maker. (Without sending their brains for too long a swim.)
-
I make rawhide all the time, but this is a new method to me. Clarifying: You have the water at 136 to 140 degree Farenheit first. Then you put the hide in the hot water for 6 to 8 minutes. Right? You say you have to watch it carefully. What are you watching for? How do you know when enough is enough? How does it ruin the hide? How large a hide can you do at one time? You have a picture of a stick you use to scrape the hair off. Any particular shape to it? Could you use something metal, like the side of a rasp, to do this? Thanks, Rod.
-
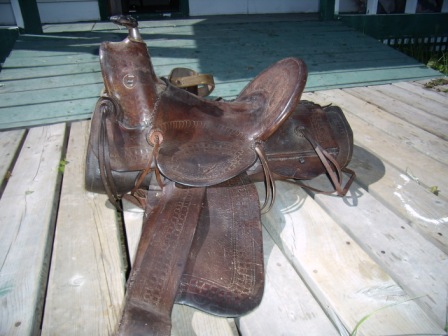
We stopped into a small, rural museum close to Grande Prairie, Alberta during our couple of days away. Our very spry 84 year old tour guide happily showed us around. He also showed us a saddle that had been donated only the day before, with the history that it was probably built in the 1890's. It has had some hard wear over the years and is now a victim of severe neglect, not to mention a very crude modification as what where probably square skirts were cut off to make rounded skirts. However, the maker's mark, which appeared on the seat and the back corner of both skirts was quite clear: A.B. Duke, Chinook Mont. In my extremely limited internet search ability, I was unable to come up with any information on this saddle maker. Any one out there know anything about him? The museum would be interested. Thanks.

-
What cantle height do you prefer
Rod and Denise Nikkel posted a topic in General Saddlery Discussion
Seeing KAWs saddle with that tall cantle set me to wondering again... We have built cantles from as low as 2 3/4" (a copy tree from an old, broken saddle) to 6" tall. Some makers have expressed concerns with tall cantles catching a rider in the back if things "get western". Other don't think it is a problem. While cantle height is often rider preference, height combined with angle and dish also affect how the groundseat is built. Questions for the saddle makers: What cantle height do you prefer and why? How does it affect your groundseat? Do you have safety concerns with taller cantles? Are there any cantle heights you would refuse to build on and why? -
Kevin, Glad you found this forum. It is a great place to exchange good information. Any pictures of that Tipton you made that you want to post? Rod
-
do you want an apprentice?
Rod and Denise Nikkel replied to ETW Grumpy's topic in Leatherwork Conversation
At a show once we were told a story about a saddle maker we know who does excellent carving. The guy in the next booth said, "Yup. He came in to my shop when he was just getting started and asked if I would be willing to teach him about leatherwork. I did what I usually do when someone comes in and asks that. I told him to go to Tandy and buy a kit to make a wallet or belt or something. Make it, bring it in to show me, and I will talk to you about it. Usually I never see them again." "I told that to this guy, and didn't see him for a couple of weeks. I figured he was like the rest. Then he came in an handed me one of the most professionally carved wallets I have ever seen and asked, "Is this good enough to start with?" Then he went on, "So I taught him everything useful I could...in about an hour. And he has done the rest himself." I guess the ones who are serious about learning to work in leather will do what they are asked and work on their own too just because they really are interested in the craft, not just "the job". This was one guy's way of weeding out the ones who really didn't want to put much effort in, and yet be able to help the ones who would. In this case, as this guy would readily admit, the pupil surpassed the teacher pretty quickly. But he got the encouragement to continue and some tips that got him going better right off the bat. So helping people get started can have its shining moments. Figuring out who to help, or who you would want to learn from, might be the challenge. -
Need to buy a saddle
Rod and Denise Nikkel replied to candyleather's topic in Choosing the Right Saddle for the horse(s)
Candyleather, Intersting link, and a lot wider variety of saddle types than is typically found in North America. Unfortunately, there is not much that can be told from a picture that will help in choosing a saddle for fit. First question is, "What type of riding do you want to do?" That determines the basic saddle type you are looking to buy - ie. English, Western or some of the other ones at your friend's place. After that, you really need to try the saddle out to see how it fits your horse, how well he can move in it, etc. There are really no numbers, descriptions, etc. that allow you to compare fit between different Western tree makers. And some of those saddles look like they have very different trees in them than a Western saddle, which complicates it even more. Next, you have to try them out to see how they fit you - size and comfort as well as if you like it or not. You have to at least sit in them to find out if they are the right size, since all the numbers in the world generally won't tell you how you will really sit in the saddle and if it will feel "right" to you. So we aren't really much help. I would like to help you figure out what one to buy, but anything to do with fit for and the horse is so non-standard in the industry that we can't tell you any more than the truth: You have to try it out for both yourself and the horse. And the rest is pretty much personal preference as far as style and type of saddle goes. You, however, have a great advantage over the majority of saddle buyers these days. You know enough about leather and stitching etc. to determine the quality of the job that was done in making the saddle. So many people buy "junk" thinking it is good just because they don't know better. Denise -
Do you drill trees for strings or not?
Rod and Denise Nikkel replied to bruce johnson's topic in Saddle Construction
Yes, rawhide string is the best. We use deer hide which is a nice weight to use as is. It is extremely strong and sucks in tightly. Once it is dry, if they get cut they will not unravel. Some tree makers use calf lace, either because they can't get deer or because they prefer it. Nylon string is only on cheaper trees, and if it gets cut, it will unravel. Rod -
Do you drill trees for strings or not?
Rod and Denise Nikkel replied to bruce johnson's topic in Saddle Construction
Steve, My reason for saying I prefer not drilling is that I make the trees & it makes me squeamish (kind of like a doctor poking holes in me!), but done well as you described it I think is very good. The problem with screwing or nailing is when there is a wreck. If the string is only through the buttons then you have only pulled that out & reatachment is a challenge. If the string is through the jockeys or rear housing then the whole thing can get ripped out. Rod -
Do you drill trees for strings or not?
Rod and Denise Nikkel replied to bruce johnson's topic in Saddle Construction
The reason not to drill is because it lets water in and can rot out the wood where it has been drilled. I have seen a number of old trees that we have duplicated where the wood around the strings was rotted but the rest of the tree was OK. I have also seen some good quality saddles where things were put together tightly and they didn't have the problem. So I think if they are well done, they should be OK, though I prefer not. (Denise types. Rod likes being a dictate-or.) -
David, Thanks for your answer. Sounds very hi-tech, sci-fi, expensive and fun to watch. Amazing what you learn on a forum about leather working!
-
Responding to Dave the diaper motorcycle leather man: Your company’s research sounds similar in some ways to what is happening here. And different in some ways. The similarities are the time consuming part of getting all the measurements and then being able to use the information constructively. As I understand it, you were first of all trying to figure out what shape an “average†baby was, and secondly you had to figure out what to do to fit him. A difference is that we don’t want to fit just one “average†type horse that changes with growth. We are trying to find the average of a number of different shapes. The shapes tend to go along a spectrum, but there are a few types that don’t fit along the same line. And figuring out what all these shapes are, and what ones we can group to make an “average†is the really hard part. Horses vary too much for one tree shape to be used for all horses with just minor modifications, and the fit of a saddle is a bit more critical than the shape of a diaper. After all, the same saddle will be used day after day on the same horse and can cause long term physical damage if it doesn't fit, but if you did that with the same diaper… we won’t go there. Figuring out the shapes is what Dennis has been working on for years. What he is doing now is like your company taking all that research and giving the results to all the other diaper companies in the world, saying, “Here, this is what we found about the shape of a child as he grows. Use it if you can. Design your diapers however you want to fit the models we built, and tell us if you find that the kids you fit are shaped like this. We will change our model if the measurements you send teach us something we haven’t learned before.†I doubt that would happen in diaper world. It’s astonishing that it is happening in saddle land. I guess that says something really positive about the saddle making industry – and especially about Dennis Lane. Dennis is still collecting information to make his system better, but those of us who are considering using it will be going to the next stage (which Dennis has long since figured out for himself) – figuring out how to use the information we obtain in building good fitting trees and saddles. We may not need to change anything in what we are doing, but it will help tremendously in being able to communicate the shape we are trying to fit. Or we may find that there there are some shapes our current methods don't fit well. But it will be fun finding out. It is hard to admit that the diaper industry could possibly be ahead of the saddle making industry in any way, but, then again, if we had the money that was spent on diapers every year, or even every week… Not being a techie in any way - What is a stereolithograph and how does it work? In simple terms, please. (Very simple terms, please.) Any process that would make it easier to understand shapes is good to learn about. It is a very difficult, confusing area, but we are gaining ground. Thanks for your input.
-
Welcome to David from Australia. Good to have yet another tree maker on board, and looking forward to the input you will have here. (I don’t think osmosis works well across oceans, so you will probably have to type some stuff…) Being both a saddle maker and a tree maker gives you a different perspective than almost everyone else on the board. I would be very interested to read any comments you might have on saddle fit responding to the discussion in the previous threads on Riggings and Bars and Bottoms in the Saddle Construction section of Saddle and Tack. Looking forward to learning from and with you. PS. If you thought the States was nice, just wait till you get a chance to go further north…
-
Johanna, In response to your question: First off, I know how much optical illusion exists when you look at curved shapes. Even looking at something from two different angles makes it look different at times. So I wonder how accurate pictures would be assessing specific shapes. I would think they would need to be taken in a very specific, consistent way for the information to be useful. I would also think that putting a card on a horse would give you a more accurate idea as to whether the two were the same shape or not compared to using pictures. But then, I am not a tech person and I don't know what computers can do with pictures either. The big hold up in any system at all is getting a range of templates made that come from real horses. I don't know of anyone who has done the research to come up with anything as extensive as this before. Dennis has done what he could with the information he has gained. He is now asking saddle makers and tree makers (who should be well qualified in assessing back shapes and fitting trees, being as it is their profession) for feedback to see if what he has produced works for other people, if the horse shapes he has collected mainly from a wide range of horses is Australia fits in North America, and if there is anything people would improve in his system. He is willing and able to expand or change things if the range of templates he has don't work over here. So out of this world wide "experiment", so to speak, we hope that enough information will be gathered to get proper templates. Once that is set up, then "the sky is the limit" in how they may be applied.
-
On another thread Go2Tex asked, "what's the best way to store trees so they don't warp before they become saddles?" The quick answer is "on a flat surface that isn't a concrete floor". The long answer is a bit, well, longer. If we know why trees warp, then we know more about what to do to stop it from happening. First, we need to be clear that we are talking here about wooden trees with rawhide coverings. That is the only kind of tree we build, and so is the only kind that we feel comfortable talking about. Second, let's assume that the trees are built square to start with. Something you need to remember is that both wood and rawhide are natural materials, and as such, they move, (especially wood) and they will continue to move throughout the life of the saddle. I dropped a tree off at a saddle maker's one day. When I got there, I set it on his stamping stone, which happened to be in the sun, and it was dead square. We got talking, and a few minutes later I put my hand on the tree and it rocked! Not a lot, but it was off. He knew it had been square 10 minutes before, so we looked at each other, took it off the stone and set it somewhere else out of the sun, and kept talking. When we checked it a few minutes later, it was dead square again. These things will move. That is just a given. It is heat and especially humidity or a combination of the two that cause the most movement. Trees will equilibrate and adjust to changes in these, but it takes time. For the best results, keep the trees away from drastic changes in both of these. Keep them off the floor. Keep them out of the sun, away from the direct blast of air from the furnace in winter. Don't let them sit without airflow around them in damp conditions, and if you live in the desert (or desert like dryness such as Alberta in the winter) try to get some moisture into the air. The lumber people say that even for "furniture dry" wood like we buy (moisture less than 7%), it is best to have the humidity about 50% at least. I don't know an upper limit because that is never a problem here. It is when you get a new tree, recently rawhided and shipped from somewhere else where humidity is probably different from your place, that the risk of warping is highest. Even though the rawhide is dry when it is shipped, the tree, and especially the wood, still needs time to equilibrate to all the changes. Ideally, for that first couple of weeks, store it on a true, flat surface with some weight on it to help keep it straight while it adjusts to its new environment. Practically, storing them on a flat surface for that time period should be enough. Some things that are not advisable are storing them unevenly, with one corner sitting higher than the others. You may cause twisting by doing this as they may adjust to fit what they are sitting on. And it is also not good to store them with the front end down, especially on the floor. But practically, people store them hung up on a wall, sitting on a rack, stacked up -all sorts of ways. If you do have a tree that is out a bit, something you can do to straighten it out is to put a weight on the tree when it is sitting on a truly flat surface. Put a shim under one of the corners that always touch, which makes the gap between the table and the other corner bigger, to add more incentive for it to straighten out. Then leave it for a week or more. They often improve. While having a tree dead square is the ideal, we feel that because a horse moves so much under the saddle, in practice warping won't generally cause soring unless it is really severe or something else is wrong as well. (It would be nice to have research to see how true this is.) The maximum amount of "twisting" we would accept in a tree we are shipping out (though I don't think we have actually ever had this much) is 1/8", measured from the flat surface to the underside of the corner that lifts up at its maximum point. This amount means that, on a horse, there is 1/16" difference on each side. We don't know many horses that are that symmetrical. And practically, these things are being put into saddles that will be used on hot and sweaty horses, then thrown into the back of the truck when it rains or into the front compartment of the horse trailer at 105 degrees, before being slung over a pole in a barn to sit till the next use. How many of the trees in all the saddles currently in use are really still square? So our questions to the saddle makers "in the trenches", so to speak, are: How do you store your trees? Do you have problems with them twisting on you? Since it is you guys who see old saddles in for repairs, how often do you see trees that are warped? How badly do you feel a tree has to be warped before you see problems in fit that you attribute to that cause?
-
Go2Tex, We'll start a new thread (Storing Saddle Trees) to answer your question, so we don't change horses mid-stream - or topics mid-thread. Whatever... Thanks, Denise- post is here: http://www.leatherworker.net/forum/index.php?showtopic=1180 ~~Johanna
-
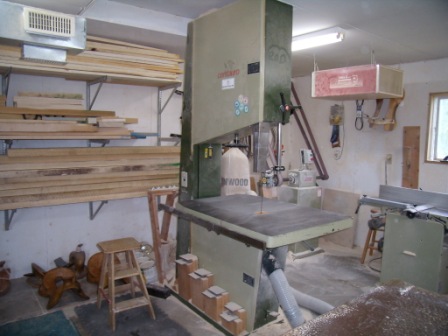
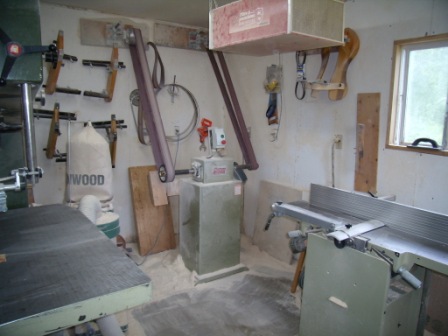
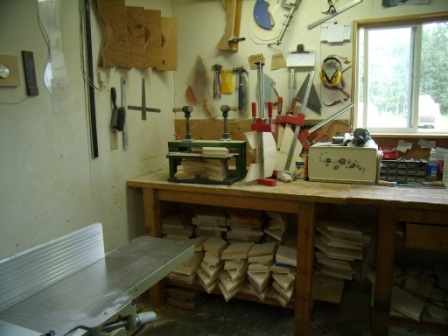
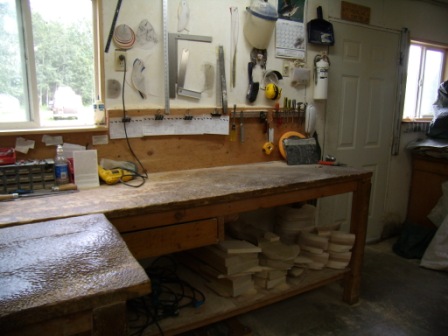
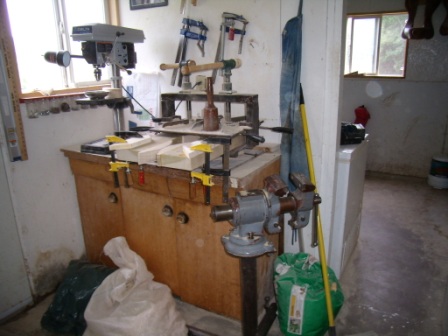
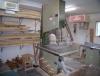
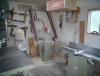
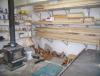
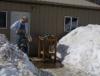
And now, for something completely different: Here are some pictures of our tree making shop, for interest's sake if nothing else. The wood working part is 20 x 16. It is dominated by the 32" bandsaw in the center of the floor. This saw is designed to saw logs into lumber. We need height for the jigs used to make the cuts on the bars for the fork and cantle to fit into. We use a 1/4" furniture blade on it so we can make the tight turns we need inside the gullets especially. The table tilts so we can cut at different angles, and the blocks in front of the bottom door are used to keep all those angles consistent. Behind the bandsaw is the modified belt sander. Rod uses the wheels at the bottom of the belts to shape the wood - the small one on the right for gullets and the larger one for everything else he does. It is amazing how much wood this thing will eat very quickly. Hanging on the wall to the left of the sander are the jigs used to make those all important cuts in the bars. And to the right is the 12" jointer/planer combination machine. You "joint" on the top, then the tables flip out so you use the underside of the same blades to "plane" or thickness the wood. Moving around the room, you come to the glue corner. There is a Wade fork in the glue press, with the layers for another Wade being laminated side to side in the clamps sitting on the bench to the right of it. On the wall to the left are jigs used to cut the cantles at different angles. Behind the glue press are patterns and other marking out tools, (plus the stack of orders waiting for us to get to them) while under the bench are specific sizes of laminated forks ready to mark out sitting behind stacks of wood pieces that have been cut, planed, thicknessed and edged and are awaiting their turn at the glue press. Moving along the wall is the large workbench. The next orders Rod is working on are on the cards hanging at the back of the bench, while the parts for those orders that have been marked out or already cut out ready for shaping sit underneath. This bottom shelf is also where Rod also stores his side grinders. There are more patterns and more marking out tools on the wall here as well. Behind the door is the drill press Rod uses for metal horns, and a second glue press with a set of bars in it. The drawers and cupboards contain other hand tools, small pieces of wood for horn caps, and other odds and ends. The vise on the stand gets dragged all over the shop and to the cement pad outside when the weather is nice. Rod clamps the wood in the vice, which can twist and turn all directions, and goes at it with a carbide wood carving disc on a side grinder, sending dust everywhere. Summer, when he can work outside, is much nicer in the shop. Through the door way is the 10 x 16 "rawhide room", which right now only contains the Great White Shelf (aka the freezer where the hide is kept until needed) and the small room with the furnace and hot water heater, etc. In the summer, making rawhide is an outside job. Below freezing (November to April here) Rod uses the rawhide room. It's walls are plastic sheeted to keep them dry. We try to fill the freezer in the fall before it gets too cold so that it is at least late January before he has to make rawhide inside. Past the doorway is the wood stove in front of storage shelves for horns (getting low at the moment) glue, varnish, etc. On the back wall is the starting point for all the trees - lumber. Different woods are on the different racks. Below the wood are trees in varying stages of drying sitting on 1" thick, totally flat pieces of marble, weighted, wrapped and "pounded" as needed. Summer plans for this year include adding an extra 12 feet out the north end of the shop to make room for a much better dust collection system. It will have a separate small room for the cyclone, and a "dirty room" for Rod to do his grinding in. It will also give us room for more bench space so Rod doesn't get in my way quite so much. Dust is what kills or stops the careers of a lot of tree makers, so we are looking forward to drastically decreasing the amount of it that we breathe. The last picture is just to prove that, in order to cut down on the dust, Rod works outside as often as he can. It was taken on March 24th of this year. PS. As for what we do with our scrap - we use it to lower next winter's heating bills!


-
Regarding cement mixers, anything that will hold either a side or a whole hide would work. I put in a side at a time unless I have a very small hide (for me), and I rinse two sides at a time. Julian Tubb, the tree maker I learned from, used a plastic barrel set up with a motor and some wheels to make it tumble. So anything can be used. The cement mixer I use is a small portable mixer with a moter that is probably similar to what you would get at Home Depot. I use two, 5 gallon pails of hot water with 2 cups of sodium sulfide flakes, and 2 cups of lime per side. The sodium sulfide breaks down the protein in the hair and dissolves it into a sulfury smelling mush. I was told the soap neutralized it, but I think it just really cleans up the hides better. I don't think neutralizing is necessary because the hide is not in the chemical long enough for it to really get into the skin, unlike the traditional lime process where it is in it for a week or more. To clarify, this rawhide making technique makes rawhide suitable for braiding. I don't mean to say that deer hide is suitable for braiding. It stretches too much for braiding, but makes great string for lacing trees. Rod
-
Rod and I called Australia a few nights ago and talked to Dennis Lane (whom Rod has talked with before) for quite a while about what he has come up with from his years of collecting back shapes of horses. Dennis now has his system to a point where he is able to share it with others. He is asking for input from tree makers and saddle makers (to start with) regarding how they see the system working, as well as to get an even greater number of samples in the data base. Jeremiah Watt and Pete Gorrell are both planning to write articles for various magazines describing the system. In talking with Dennis he is wanting to get as many saddle makers as possible involved so that his ideas can be tested and maybe improved with the aim of helping the industry as a whole. In light of this, we are posting the following information, which Dennis has previewed and approved. Dennis Lane is an Australian saddle maker and tree maker who has been self taught by necessity in a lot of areas, although he is always open to learn from wherever he can. He took a four week course in the early 90’s on making saddles and trees with Dale Harwood which is when he started building his own trees. He took the basics he learned then and has worked and figured and thought and expanded his knowledge and abilities ever since. One of the things he has always asked from all his customers is back drawings of the horses the saddle will be used on. He now has thousands of these on file, and he has taken the time to classify these into different shapes and sizes. If it works the way he envisions, these classifications will be a very useful tool to easily communicate the size and shape of a horse from an owner to a saddle maker to a tree maker. It would eliminate the error factor in making back drawings to send to tree makers, not to mention the time to get them between people. It could be used by an owner to monitor the change in shape of a horse over time and in different stages of use. They could see the amount of difference in their horse’s shape from spring to fall, for example. This would help them in choosing the correct padding based on more than just a guess. And if this system does get used by enough people, it could become a way in which some sort of standardization could come to the saddle industry. Dennis is the first one to say, “I haven’t come up with anything new. I have just worked to classify what we are all doing already.†And in one sense he is correct. Back drawings in all their various ways have been done for ages. There are all sorts of systems out there that have been developed to try to communicate back shape from an owner to a saddle maker and then to a tree maker. But what Dennis has been the first to do is get enough of this information together to be able to start to really classify the shapes in a useable format. He has then devised a very simple way for a horse owner to figure out what shape his horse has and give this information to a saddle maker. At this point, it sounds like it should work. So what is it? Jeremiah Watt explains it well on his blog on his June 4th post. (There is a link on the Trees, Aussie Treemakers and Jeremiah Watt thread.) Simplified, it is a system of cards that are placed on a horse’s back at specific points to see which one fits. There are three places across the back that get checked, as well as the area under the bar where the rock is determined. The card numbers are then communicated to the saddle and tree makers, who know what shape those numbers correspond to. Dennis has been working on this for himself for a lot of years and now has it to the point where he can’t see what more he can do by himself to make it better. He could keep it to use only for himself if he wanted, but he sees the benefit to the industry that could come if others wanted to use it. He wants to get input from other tree and saddle makers to see how his system works for other people, if there are holes that need to be fixed, or if there is anything that needs to be added or changed. He also sees the need to get even more information from other areas of the world to see what might be different from the range of horses in Australia that he has had the most access to. The first question we as humans tend to ask is, “Why is he doing this? What’s in it for him?†In talking with Dennis, we are convinced that he really does want to help the saddle making industry, the riders and ultimately the horses themselves. If anything ever gets to the commercial stage from his idea (and if it works as well as we think it may, we hope that will happen) we feel that he deserves to get some benefit from his work. But that really is not his main intention. In asking him the question of why he is doing this, his response is “It is an itch that I had to scratch. I went over to the States with the idea that if nothing came of this, I would have had a good holiday and talked to a lot of nice people.†But he wanted to see if there was interest in going any further with his project. He says he has been amazed at the positive response from makers to what he has been doing. This response highlights the need that is there and the promise that this system holds to meet that need. Dennis has taken this first of all to the tree makers who hand craft trees since they are a small group of people who would be the most likely to want such a system. He is sending out his basic patterns with permission to copy them (as carefully as possible to keep everything as consistent as possible) and send them to saddle makers as well to try out. He is asking for anyone using them to fill out a form with information on the horses – age, sex, breed, etc. – and the numbers of the shapes that fit them. That information can then go back to Dennis, and he can further refine his system if need be. He is asking for any ideas, suggestions, corrections, flaws, etc. from tree and saddle makers using his system to see if it really is consistent enough and easy enough to use to be a helpful tool in the saddle making industry. If so, then the next step would be to make it available to the industry in an affordable, easy to use format. Anyone who is involving in the saddle industry knows that there is no standardization in saddle fit. The terms Quarter Horse, Semi Quarter Horse and Full Quarter Horse mean nothing in comparing between tree companies. Even the measurements used by hand made tree makers, while more consistent, don’t mean that two trees with the same specs from two makers will fit the same. This idea has the possibility of bringing some standardization to the industry. The system is not designed to tell you about size and shape of a saddle. It is designed to tell you about the size and shape of the horse. This is the beauty of it, and why we see that it may actually work in this industry made up of fairly “independent†people. Each tree maker can build his trees however he wants to in order to fit that type of horse, and any saddle can be described as being built to fit a certain type of horse. But communicating what that type is could be simplified and consistent if this system really works. So if you are interested in this idea, there are a couple things you can do. If you get hand made trees, talk to your tree maker. He may already have the information and can give you his opinion on how he sees it working, and maybe send you the cards. You can also contact Dennis directly. You can Private Message us and we will give his e-mail address to you rather than post it here and risk Dennis getting severely spammed. The information we are gaining from this system is not new. But it is a new way of more easily and consistently gaining that information. Rod and I (plus others Dennis has talked with) are going to give it a try along with any of our saddle maker customers who are interested, see how it works, and report back to Dennis. We think has the potential to make life a whole lot easier for all of us in the saddle making industry, and a whole lot better for the horses we ride as well.
-
Would you use this tool?
Rod and Denise Nikkel replied to Rod and Denise Nikkel's topic in Leather Tools
Regis, That is one of the things I had already put on the plan for "the next one" if we ever get it. whinewine, I like the name of the Center Finding T Square. I know about center finding rules, but somehow had just never correlated this tool with that concept, though that is what it is. Thanks. Denise