unicornleather
-
Posts
77 -
Joined
-
Last visited
Content Type
Profiles
Forums
Events
Blogs
Gallery
Store
Everything posted by unicornleather
-
This Is My Singer 29-4 Cobbler Machine
unicornleather replied to BattleAx's topic in Leather History
Nice little machine, I have a Singer treadle 1915 45k I call it thumper, punches through 1/2 inch leather with ease. Weighs 200lbs though as it's all cast iron. I make leather belts up to work it. It was used in WW1 and WW2 to make tarpaulins I believe and an old cobbler had it before me although it's not a cylinder machine and cobblers usually have those, like yours was before you altered it. I have about 7 machines ranging from 1915 to 2007 industrial and domestic. My next purchase will be a 40" long arm machine as the local gliding school employ me to make them cable parachutes and my short arm industrials struggle with the length of the skirts! -
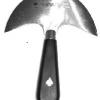
It's not a double head knife or a round knife, I'm with bear man the cutting angle would be all wrong for leatherwork. My photo (avatar) is a round knife, it's an entirely different handle than the one you have, Oz (English Saddler)
-
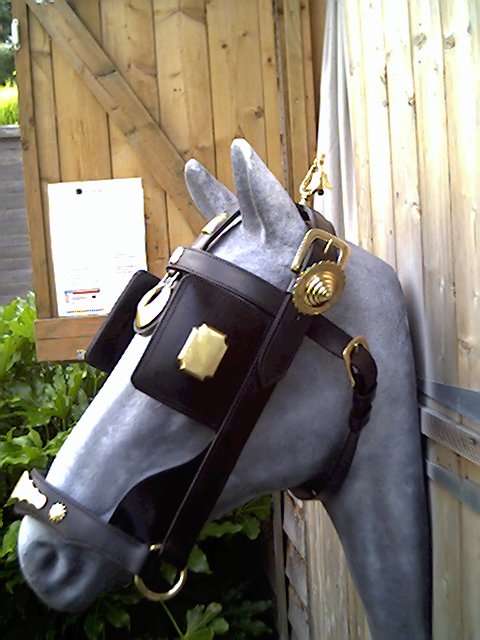
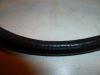
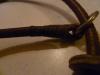
I have seen lots of so called "rolled" leatherwork on internet auctions and websites recently which is not rolled work. For anyone who is thinking of buying a piece of rolled work whether a bridle or a dog lead/collar here are a few pointers to look out for. IF you are happy with cheap imitations then fine, this article won't concern you, if you want the real thing read on. Firstly, proper rolled work involves splitting the leather thickness down, adding a central round core and "rolling" the leather round to give it the shape. Then it should be hand stitched down one side and then finally worked in a rounding block to turn the ends of the leather back over the stitching to hide it. . There's a LOT of work involved to make rolled leatherwork. When finished and smoothed over with a bone and stain, you'll see the edges of the leather but you won't see the stitches, this is proper top quality rolled work. Most of the rolled work I am seeing you can see the stitching and by looking at the stitching I can tell it's simply run through on a machine, the stitches don't last as long as hand stitched. I'm also seeing lots of round leather belting which are lengths of leather bonded together and shaped into a round form.We use it for belts on old treadle sewing machines, some time ago people started using it to make dog leads/collars even bridles but it stretches like mad. I have made a slip lead out of it for my Lurcher, it's cheaper but not as good or as strong as rolled work. The round leather belting will always break before proper rolled work. Proper rolled work costs much more than round leather belting because of the amount of labour involved so prices should give you a clue, cheap rolled work that you can see the stitching is probably machined or if it is hand stitched it's done by someone who doesn't know how to make rolled work properly, the stitches SHOULD not be seen as the leather turned over them protects them against wear and is an important part of the rolled work manufacture. Round leather belting is cheaper as you simply buy a roll of it and cut off the length you need to make the item. The turns on this belting (as in "turn" of leather round fitting such as ring or a buckle) are it's main weak point, even whipped and bound will not be as strong as proper rolled work. Next time you go to buy any rolled leatherwork and you really WANT rolled work, have a good look at it first, don't simply ask the sellers how it was manufactured, they don't seem to know as I have asked a few. Hope you can make sense of what I am trying to explain to you. I have attached some photos: The first photo if of a dog collar, it's a massed produced and is rolled but not made or used properly in the fact that you can see the stitches still, it's been made by a sewing machine. Not used properly in the fact that the stitches should face towards the animal it's used on, unlike in the photo. The idea is to turn the edges of the leather back over the stitches so you can't see them, it stops them wearing through or rubbing the animal's coat or skin when worn and is the correct way to make and use ROLLED WORK This second photo below is a driving bridle throat, I made it by hand and the little ridges you can just see are where the stitching is under the leather. We put the edges of the leather in a rolling block and gently work it in to this shape, the stitches last so much longer, won't rub the animal and this is the correct way to make ROLLED WORK. The customer would be presented with the good smooth side facing out,with no ridges where the stitches are under the leather showing or facing them. When this throat was new, the leather would have been much further down over the stitches to hide the thread more than it is today but this bridle IS 27 years old! Traditional saddlery is all about safety and presentation, some techniques were developed 200 years ago or more when horses were the main mode of transport. Infact in Victorian times brown Saddlers (term given to men who made gentlemen's riding saddles and bridles) would have had to use white thread so the customer could check your quality of stitching and work made with stitches of up to 16 to the inch not uncommon. Most bridles now use 8 to the inch and are machined. How many of you insist on white threads, often 12 or more stitches to the inch and inspect the bridle before you decide to buy it? Would you know hand stitching from machine stitching? Food for thought Lastly, the photo below is of ROUNDED LEATHER BELTING, people use it now for dog collars and leads, because mainly they don't know how to make real rolled work and it's quick, cheap and sells. It is not as strong as rolled work, will break before rolled work does and it tends to stretch where as rolled work doesn't if it's made well enough.I have seen it on bridles which is something I would not do or advise. You can see the difference in thickness where it's stretched, look at the far left, then the far right, the right is near to the original thickness of when it was made. It's a slip lead I made for my Lurcher so it's been used and a fit fluffy as the fibres get rubbed but you can see the difference to the real rolled work, the main weak link is the binding and underneath are a few stitches but this method of securing a turn of leather round the fitting is not as strong as a turn on rolled work. I mainly use this ROUND LEATHER BELTING for a belt to run my ancient treadle 45k Singer sewing machine when it's needed. Oz
-
Trimming Excess Or Made To Exact Size?
unicornleather replied to DavidL's topic in How Do I Do That?
In the saddlery trade we cut off excess and never cut to size. Leather is a natural product with lots of variables and cutting it to size is a bit of a gamble if one part of the hide is denser than the other you are stitching it to and the two sides can move slightly even if glued or tacked. It's far easier to trim off the excess then work the leather to gain the desired end result. Oz (English country Saddler) -
I get asked on UK horse forums how to make and care for veg tanned saddlery leather. Firstly a bit about oiling and veg tanned leather. NEATSFOOT OIL, is a popular choice to condition modern hides BUT although modern neatsfoot oil is still made from cattle-based products, it has a tendency to speed oxidation of the leather. If mineral oil or other petroleum-based material is added, the product may be called "neatsfoot oil compound". Some brands have also been shown to be adulterated with rapeseed oil, soya oil, and other oils. The addition of mineral oils may lead to more rapid decay of non-synthetic stitching or speed breakdown of the leather itself AVOID! You won't always see the damage to the fibres of the hide with the naked eyes and think it's ok to use it but you get down to the cellular level and look at the fibres under a microscope of hide oiled with neatsfoot and you'll see what I mean. LEATHER CONDITIONER: All veg tanned leather will lose moisture whether it's used or not, best thing to condition leather to make it last is any product without any silicone or preservatives (that some modern leather conditioners contain) includes, tallow, bees wax and lanolin or all 3 if possible. I make my own leather conditioner simply because I use so much veg tan in my trade, I have hides that I have hand dressed that are at least 25 years old when I first trained and are as good as new. Home made leather conditioner (traditional) recipe: My own recipe is a secret one I have perfected over many years but what I will give you a basic one, get hold of any beef fat (I make my own tallow but you can use beef dripping), beeswax and some lard (pig fat, again I make my own), do roughly a 50% beef fat, 25 % beeswax and 25% lard,gently melt it down on a low heat and mix it thoroughly. Let it set, when you use it if it has melted because the weather is warm, shove it in the fridge for 10-20 mins to get the right consistency. This is real old fashioned English Saddler's grease BEST WAY OF USING IT: Remember any moisture you add to leather whether water or leather conditioner can darken leather down, so if in doubt try a test area first. When conditioning the clean leather, wipe it with a warm wet cloth (just warm water) and whilst still wet/damp get some conditioner on your fingers, the heat from your hand and your fingers are by far the best way to apply any conditioner, it's a mucky job but forget sponges, cloths or brushes at this stage! By putting the water on first it acts as a medium that aids the penetration of the fats right into the fibres of the hide. The flesh side of the hide is far more porous than the grain side,try to imagine a funnel shape to the fibre with the wide open mouth end as the flesh side (flesh side is the underside where the flesh used to be) so allow a little more conditioner that side, you don't need alot anyway as it goes a long way. Rub it all over and massage it into the hide, then leave it to dry naturally in a dry room and not in any sunlight or near artifcial heat,it can take 3 days or more to dry out and be asorbed into the hide, depends how much you use! When it's dry, then get a lint free cloth, I use old bath towels cut up, the bobbly bits of the towelling act like a polishing stone and this is where it gets hard work, you need alot of elbow grease. It's basically good old fashioned saddlers grease which most saddlers, leatherworkers and cobblers would have made years ago and none of the commercially made rubbish you get today. The idea is to rub the hide fast and fairly hard, not too hard to scratch it, the friction heats up any fats you have left on the hide (the white stuff) and gets it further into the fibres to add to the already asorbed conditioner that you put on it a few days before. Lastly, this where it looks like I am contradicting myself about saying not to use oil on hides but I do, I use cod liver oil (NEVER neatsfoot as explained at the beginning)and wring a cotton cloth out in the cod liver oil so almost dry and put a very LIGHT film on both sides of the hide,wipe off any surplus and give it another gentle polish to buff it up with a bit of clean, dry bath towel, you are merely giving it a final dressing with the cod liver oil NOT conditioning or feeding it, it also gives the hide back it's leathery smell, a good trick of the trade to know if you sell second hand saddlery or leather, people love the smell of leather! When completed you should have hide that is fairly stuffed full of fat and wax which is what it was designed for and it will have a nice bloom/shine to it, it should feel slightly moist/clammy but not sticky, if it is sticky you need to rub it more, it should feel heavier too.The conditioning will act as a rain barrier to keep the wet out. Sorry for long post but I think it's worth mentioning all this. Happy polishing!
-
Are Pricking Irons And Pricking Wheels The Same?
unicornleather replied to DavidL's topic in Sewing Leather
Pricking irons are largely associated with the saddlery trade, wheels tend to be associated with shoemaking. As Saddlers we are trained only to use pricking irons, you can get much tighter into turns with irons, something that you can't always do with a wheel. -
Have you tried Batchelors in Balls Pond Road in N1? They used to have various machinery for sale when I used to go up there whilst training in nearby Cordwainer's College then based in Hackney but that was back in 1987 so they may not have machines anymore, here's their link http://www.jtbatchelor.co.uk/
-
Tooling English Stirrup Leathers
unicornleather replied to JC Javelle's topic in Saddle and Tack Accessory Items
As others have said, DON'T tool them, it will weaken them, we even have to use oval punches to make the holes in them as this helps stops the holes elongating with use. The reason that the flesh side of the hide faces out is to have the grain side sitting against the wearing surfaces of the metal eye in the stirrup irons and the buckle tongue on the buckle. Good saddles also have the flesh side facing out on the girth straps for the same reason and if I got a penny for every time a customer has said to me you have put my new girth straps on the wrong way round I'd be a rich man by now! Stirrups should be made from stirrup butt about 5mm thick, I use Oak Bark tanned, make my own 6 cord hemp threads and use stainless steel buckles for strength. Oz English Traditional Country Saddler -
I have the same book and yes I am using the same tools and the same techniques, Oz Traditional English Country Saddler unicornleather.co.uk
-
Did you find anyone for this post? Oz www.unicornleather.co.uk
-
Make sure the ends of the clam you are using are clean, if they are covered in leather they can get grubby and make the leather and stitching dirty. The beeswax on the threads will draw out any dirt, fat and possibly dye from the leather you are stitching and deposit it on the thread too. Use short lengths of thread instead of one long piece to keep it from starting to get grubby and change it often for a new piece. I use a clean white cotton cloth over the ends of my clam and clamp my work to be stitched inside it if I am using white or yellow threads. We used to cheat when stitching in Cordwainers (Saddlery college) on work that was going to be marked for our course work and if we got dirty white threads we'd use a little bit of Tippex correcting fluid on the thread, it made it look like new and we got better marks! Oz
-
English Bridle Vs English Rein Leather
unicornleather replied to Go2Tex's topic in Leatherwork Conversation
Thought I answered your question. Backs longer than butts tannage the same. Oz -
Hello Andy, Yes, I'd like to help you with hand made threads if I can, just ask me what you want to know. We do need to keep our ancient skills alive. Met a chap locally to me (surname Fletcher would you believe!) who was experimenting making his own Longbows, Crossbows, Bolts and Arrows as they were made in Medieval times. Amazing what you can do with a piece of seasoned Yew! His skills were obvious to see! I love ancient skills and crafts, I see you are into survival, that fascinates me too. Ray Mears used to live near me in Kenley and practiced his skills on the Commons there. Kenley is more famous for it's WW2 fighter station, home for many Squadrons of Spitfires and Hurricanes. How long have you been into leatherwork and what training have you had? Oz
-
English Bridle Vs English Rein Leather
unicornleather replied to Go2Tex's topic in Leatherwork Conversation
Yes, it is good, I have a pair of stirrup butts in my workshop, nothing like it on the market anywhere else! Oz -
English Bridle Vs English Rein Leather
unicornleather replied to Go2Tex's topic in Leatherwork Conversation
The tannage (veg) and finish is usually the same on the butt and back. Sedgwicks leather is not bad, there's a few companies over here still making leather, the best here I think is Bakers in Devon, they are the only Oak Bark Tanned tannery left in England very expensive but beautiful leather! The best leather we are taught, comes from the Aberdeen Angus cattle, it is slow to mature and allows the fibres of the hide to knit together better but with faster growing cattle the fibres tend to be "pappy" when made into leather and don't have the substance like the angus hide but we have to use what we can get!. Oz -
Hello, Have you tried my main supplier abbeysaddlery.co.uk ? They sell it from £2.40 per square foot plus postage plus the dreaded vat (Very Annoying Tax !) in 7 colours too OR one of my other suppliers is Leprevo.co.uk here is pasted below a few bits off of their site This pigskin is intended to be used on the leather side but is often clean enough to be used as a suede. Order Code Type Colours Substance mm Hide Size ft² Price / ft² 087 pigskin natural, brown black 0.8 - 1.0 10 to 15 £1.28 Pigskin suede comes in larger pieces than sheep nappa and has a wonderful drape. It is suitable for all fashion garments. Order Code Type Colours Hide Size ft² Price / ft² 021 Pigskin suede click here 10 to 15 £1.84 102 Pigskin suede click here 10 to 15 £1.46 If you are really brave and want a saddle to stand out try this!!!!!!!!!! This is made by a process which bonds metal foil to a pigskin base. It is a suitable weight for clothing but it is a luxury material not guaranteed to be dry cleanable and not machine washable. It is stocked in the following colours Gold, Silver, Old Gold, Old Silver, Turquoise and Fuchsia. Order Code Type Colours Hide Size ft² Price / ft² 024 Metallic foiled pigskin click here 8 to 12 £2.46 Hope this helps?? Oz
-
We still use pigskin (without bristles) on saddle seats as it is so hard wearing . Old harness makers taught us to use a hog's bristle when hand stitching very long fixed loops on harness as the awls were too short and not pliable enough to bend through the loops, still use that technique today as nothing has ever been found that is better! Oz
-
If you really want to lose the threads so they don't get worn or are unseen then invest in a Martingale Groover if you haven't already got one? You'll need a bone folder to use on the leather afterwards too. Are you just using a screw race or groover at the moment? They haven't got quite enough depth or width for some thicknesses of thread. Oz
-
Abbey do a Stainless Steel Stirrup leather buckle in that size, about 53p each plus vat and postage, Oz:)
-
English Bridle Vs English Rein Leather
unicornleather replied to Go2Tex's topic in Leatherwork Conversation
If you mean brible butt and rein back then bridle butt tends to be that , just the butt and you have a usuable length of around 60-65" you can get around 5-6 bridles out of one half pair of butts or 10-12 for a pair of butts. Rein back is mainly used for harness work where you'd need much longer driving reins of course, it can go upto 8 feet long or more! I use rein back for extra long dog leads too or extra long buckled up billeted reins on large Hunters, Warmbloods and heavy horses that are under saddle. Thickness of either should be between 3.5-5mm. Harness back is longer and usually but not always a little thicker 5-6mm It all depends where you buy from for the thickness, I believe you go by weight in the USA and not thickness? We like to confuse the issue over here in the UK and traditionally we use inches in measuring the length of the leather and millimetres in measuring the thickness! Butts and Backs are measured in pairs and shoulders are measured in square feet, told you, we like to confuse things over here! Where are you getting your leather from at the moment and what prices are you paying? I may be able to point you in a different direction for leather that is cheaper. Oz unicornleather.co.uk saddlebid.com -
Hello and thank you, I didn't bother to put a bit in the bridle as it was large enough as it was sitting on the full size plastic head (Thoroughbred full size NOT heavy horse size unfortunately)! Oz
-
Escutheon Pins are usually 5/8" to 3/4" and would be too long for these and are not rivets. As said previously they probably are bifurcated rivets. Escutheon pins are used to tack the makers name plate on English saddle up inder the skirts.
-
Many thanks and I will! If I can help with anything that the forum members are doing like any info on tools, supplies, methods, English saddlery etc I'm here to help if I can, Oz (Austin)
-
Hello from Caterham on the Hill in England, I found this site by accident and thought I'd jump on board. I'm based on the North Downs in leafy Surrey. Hundreds of horses in this area so plenty of work for me. Nice to meet you all and drop me a line if there's anything I can help you with, I am a Traditional Working Country Saddler, been in the trade 23 years or there abouts. I am traditionally trained to hand make English saddlish and harness and I also hold a Lorinery Certificate. I hand make from scratch most of my saddlery but do have a variety of sewing machines to work on textiles and some leatherwork as well. I hand make threads, same as it was done hundreds of years ago. I have a active interest in Medieval history and re enactment and have made a few bits and pieces including chain mail. I have made all sorts of things to my own designs, not just saddlery, ranging from leather bound tankards to leatherwaist coats, I enjoy inventing and designing new ideas. Austin (Oz to my friends) unicornleather.co.uk saddlebid.com