daveydude
-
Posts
60 -
Joined
-
Last visited
Content Type
Profiles
Forums
Events
Blogs
Gallery
Store
Everything posted by daveydude
-
That's really creepy - I like it!
-
Stunning work!
-
 Looks like 100% knife work to me - I like it a lot!
 -
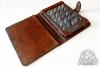
Kindle Case
daveydude replied to daveydude's topic in Purses, Wallets, Belts and Miscellaneous Pocket Items
Yes definitely - the larger the area, the harder it is to get it even. Actually next to impossible. -
Kindle Case
daveydude replied to daveydude's topic in Purses, Wallets, Belts and Miscellaneous Pocket Items
You can tell I've not attempted bevelling for a while - completely forgot about the spoon! Too late to fix it now the leather is dry & has a finish on it? Ken - yes I think I need to experiment with some different finishes. The spirit based Tandy dyes I have seem to be OK, but the all-in-one is very hit & miss. -
Gotta love those Midas tools!
-
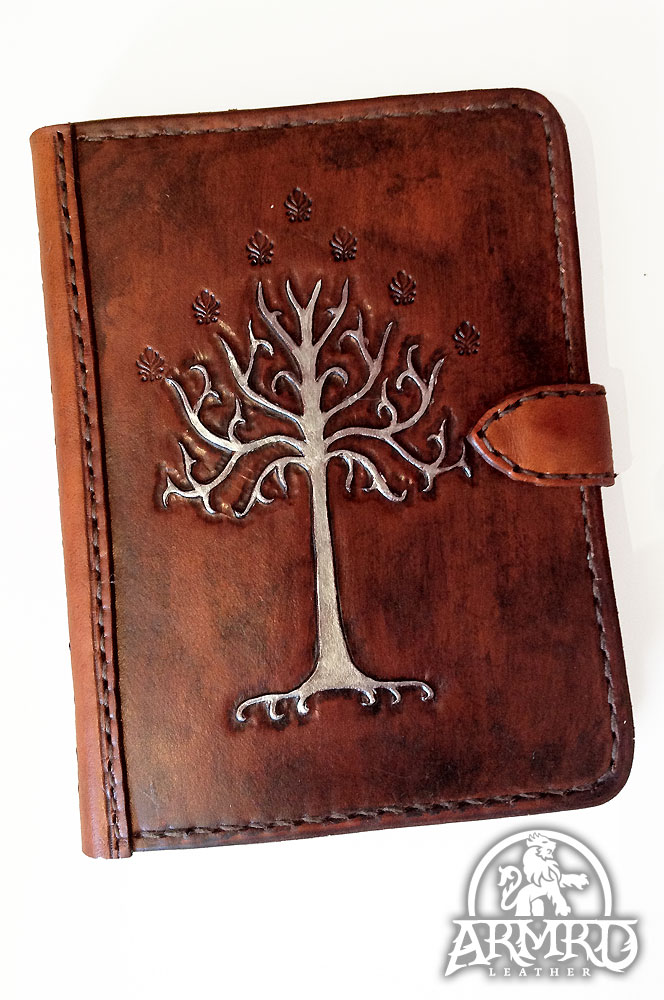
Here's my first attempt at a case for my girlfriend's Kindle. I know my carving isn't great, but this is only the 4th time I've really attempted it. It's quite an intricate design and I had trouble getting the bevelling smooth. Turns out navigating lots of tight curves & corners with a tiny beveller is a lot harder than gradual curves & straight lines with a bigger beveller! It's meant to look like an antique, hence the patchy dye job, but it ended up patchier than I wanted. I used Tandy's Eco Flo All In One, fudge brown, which always seems to come out really patchy. I have their acorn brown also and it seems a lot smoother. Maybe I got a bad batch, or am I letting it sit for too long before removing it? Anyway, I'll keep practicing - any feedback would be much appreciated!
-
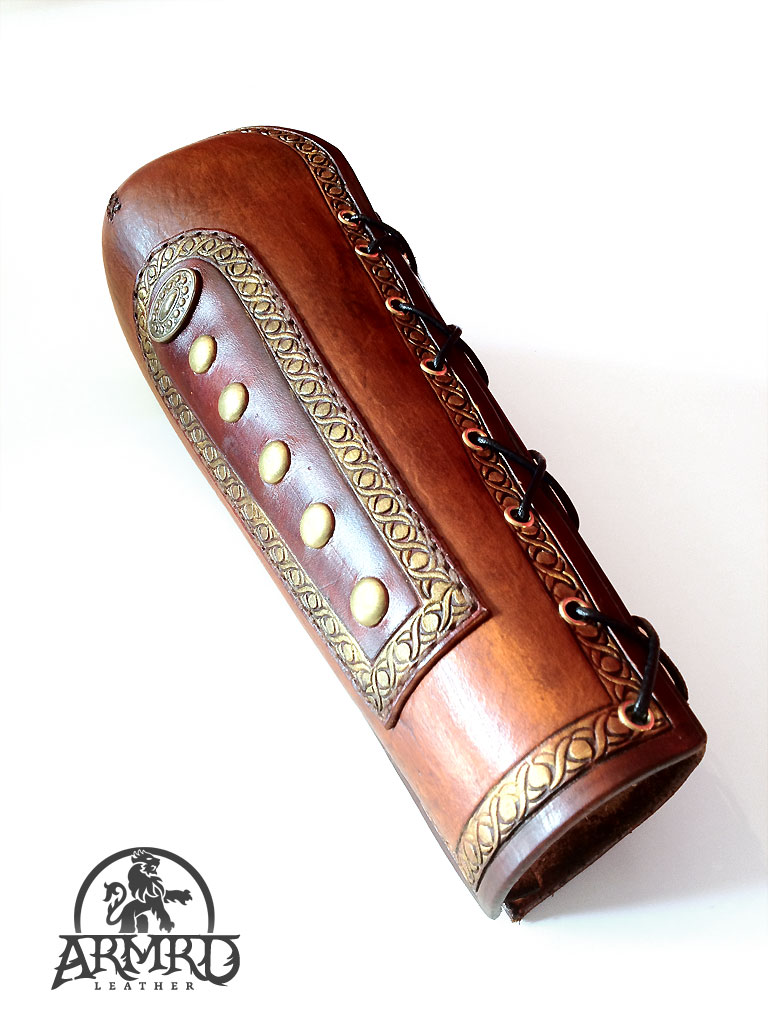
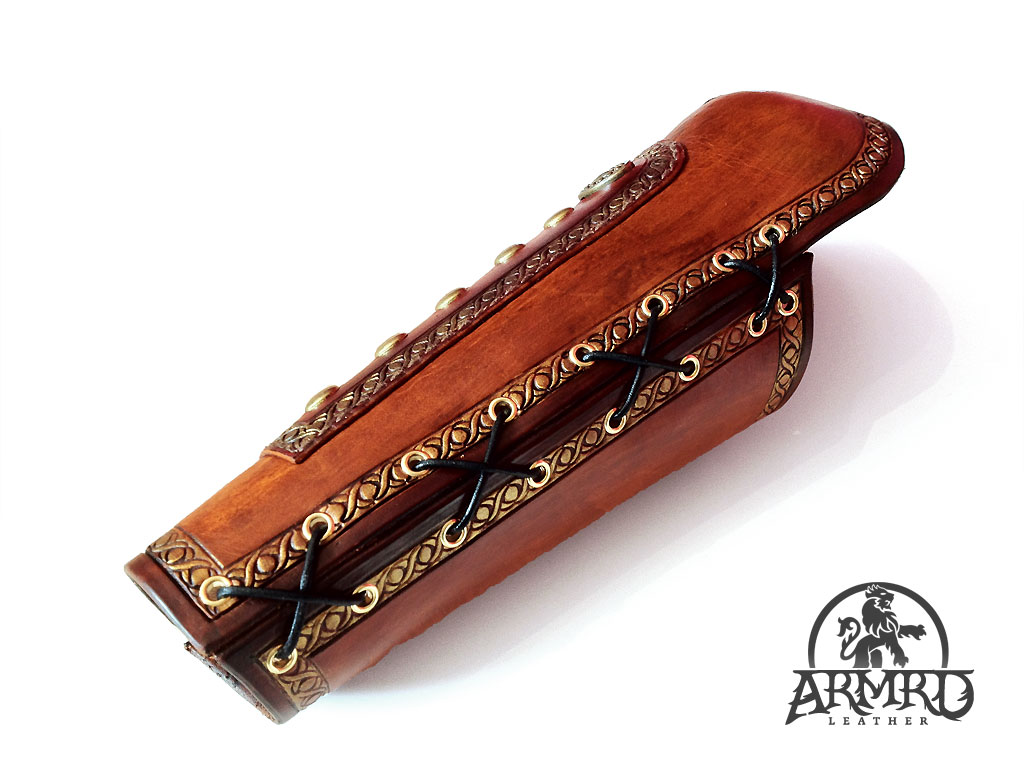
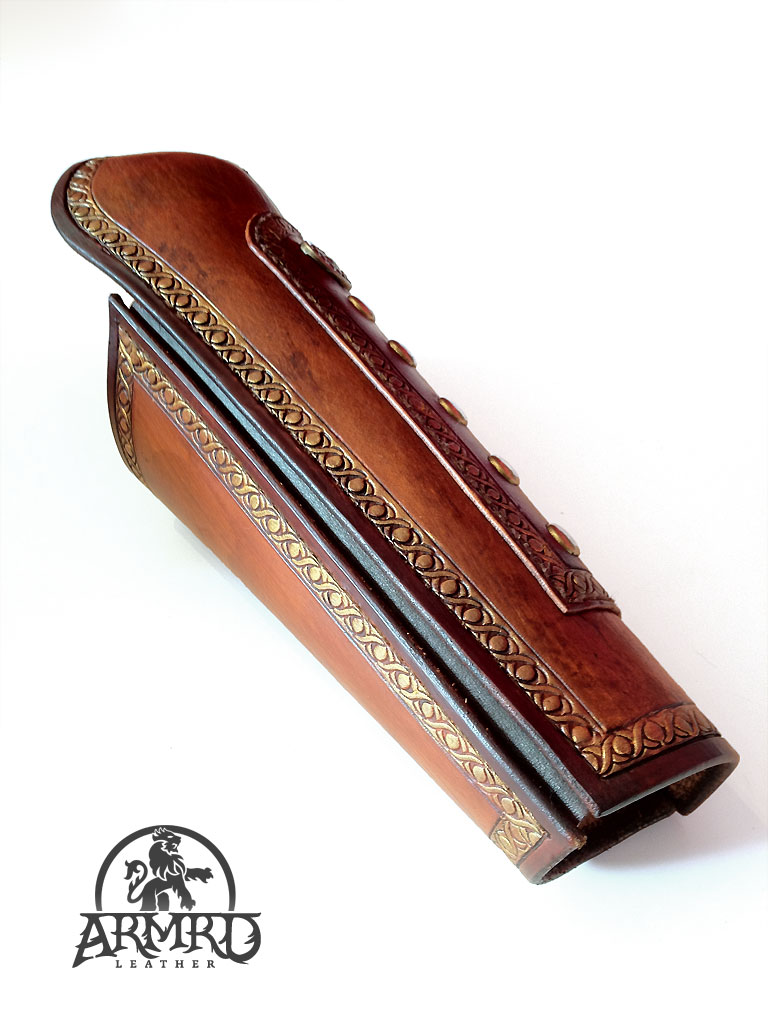
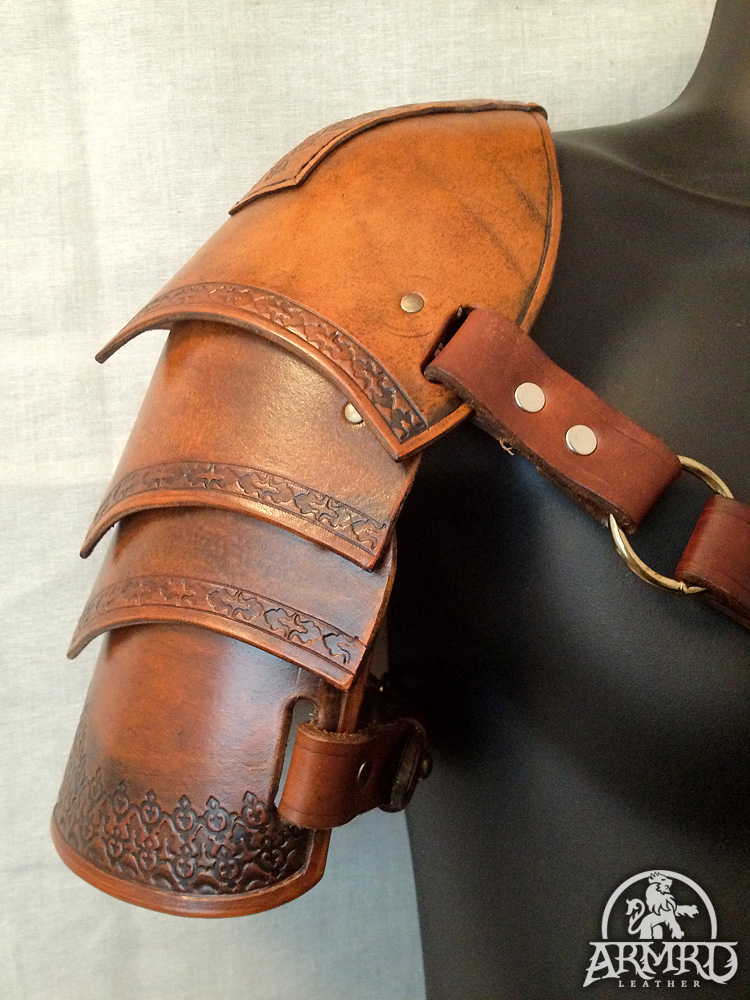
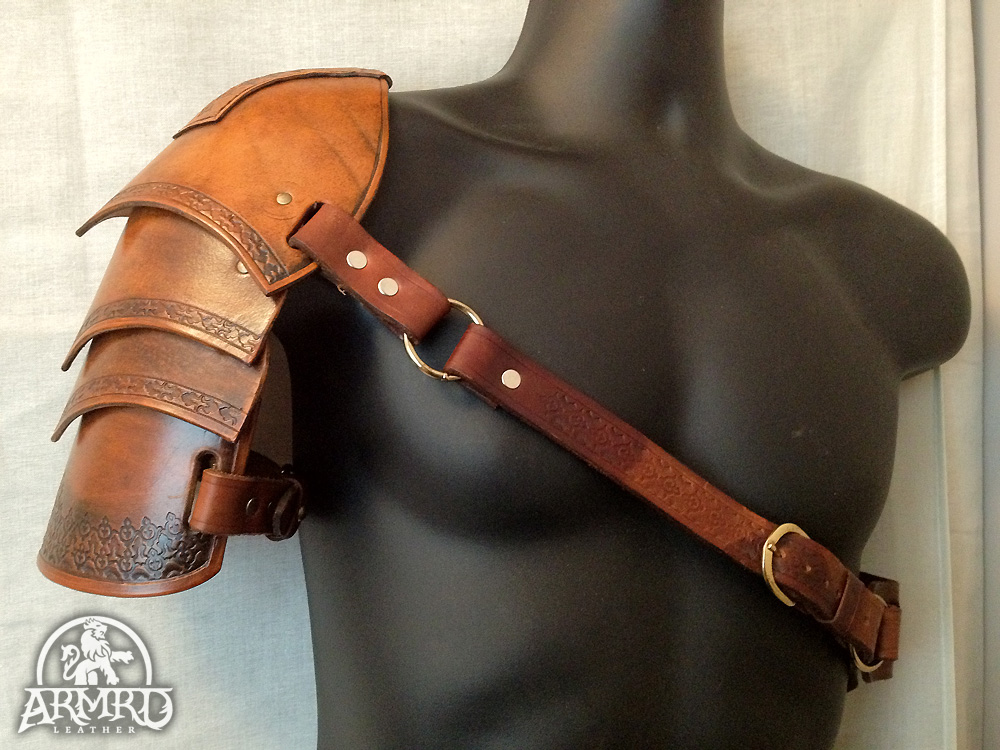
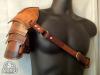
Never seen one of these done in leather so figured I'd give it a try. Two separate pieces encase the forearm via a flexible leather 'hinge'. Cupped elbow guard sits nicely & doesn't seem to impede movement. Studs are purely decorative, everything held together with stitching. I dry brushed the stamping with gold acrylic as an afterthought - I think it looks pretty cool for a costume piece.


-
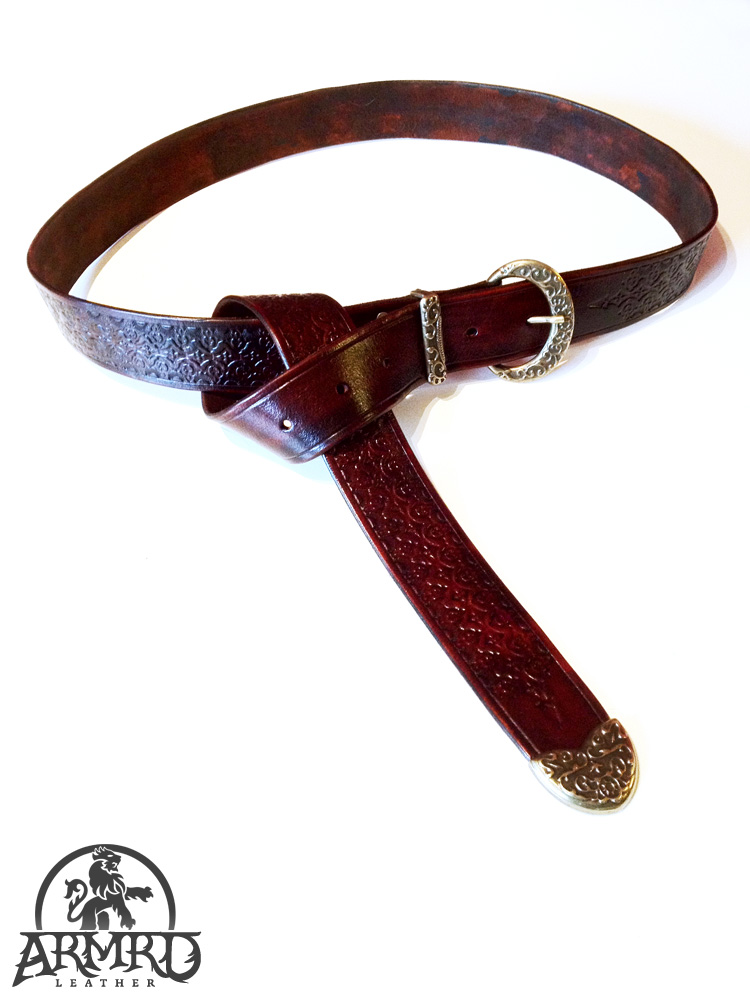
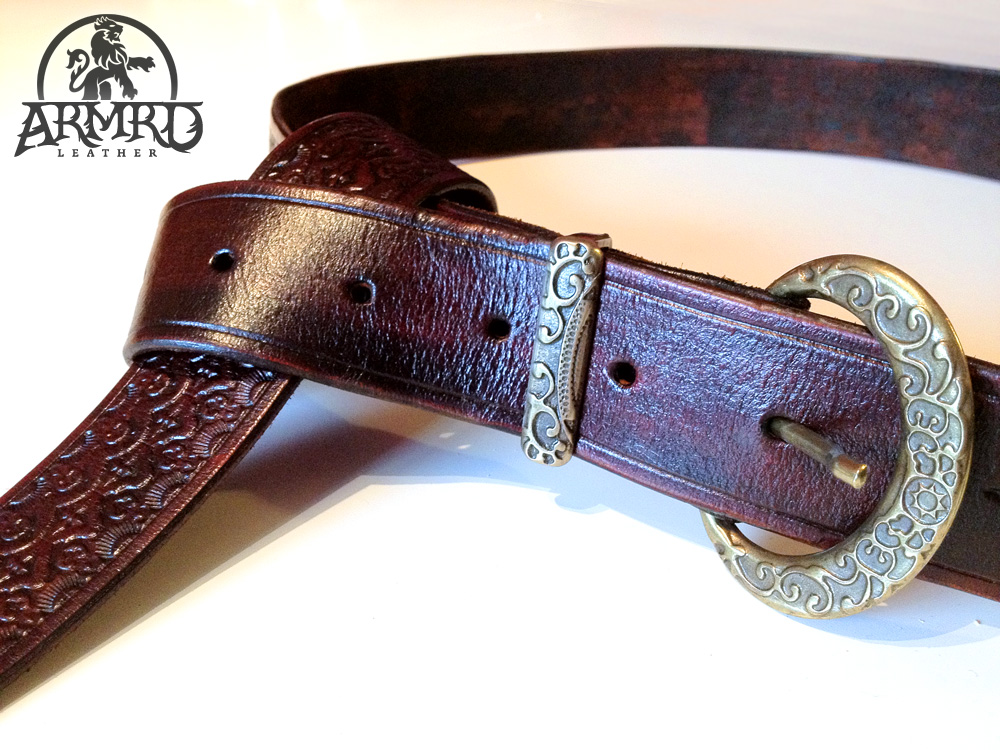
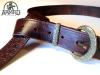
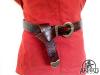
My first go at a belt.

-
Cheers Andy. Still finding my feet with everything, and I'm never entirely happy with anything I make, but I think I'm improving gradually. I'm not actually sure what weight that leather is, it's about 3mm thick though. Your bags are spectacular - I gave you a 'like' on Facebook
-
Here's a spaulder & harness I knocked up last week. Pretty pleased with it, seems quite comfortable to wear but I'll be fighting with it this weekend so I shall see if the template needs any adjustments!

-
This is one of the better Kindle covers I've seen on here, very classy looking. I've promised to make one for a friend - any chance you could show the inside of yours as I need some ideas on how to secure the Kindle inside.
-
Hi Don, welcome. Looking forward to seeing more of your laser cut stuff. Based on what I've seen of other folks' work I'm not a fan of laser decoration, but the cutting side of it interests me greatly.
-
Welcome from another Lincs leatherworker
-
You really went in at the deep end didn't you! I love it
-
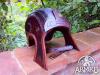
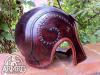
Here's my first go at a helmet - made in 4 sections, stitched together and wet moulded over a mannequin head. There was an unholy amount of stitching involved in this - I finished it a week ago and my index finger tips are still numb from all the needlework. I'm going to make the mark 2 version with fewer sections but I will retain the spiral seam because it helps add shape and I just like the look of it.
-
Nice helmets. What is the brass pointy thing on the first one?
-
Work In Progress - Shaped Breastplate
daveydude replied to daveydude's topic in Historical Reenactment
Thanks for the advice guys - I think I'm going to go with the waxing option. Carnauba Creme sounds like it should do the job, but I'll have to try & smooth the flesh side of the leather first I think. -
Work In Progress - Shaped Breastplate
daveydude replied to daveydude's topic in Historical Reenactment
Sounds like a plan. Chicago screws are ordered, thanks dude! -
Work In Progress - Shaped Breastplate
daveydude replied to daveydude's topic in Historical Reenactment
Thanks Jason. The leather is 3mm (6mm total at the join) so do you think a 1/4" (6.3mm) Chicago screw would leave enough play for the joints to move? -
Work In Progress - Shaped Breastplate
daveydude replied to daveydude's topic in Historical Reenactment
Quick question about treating moulded leather - what should I be using on the flesh side to prevent the leather getting wet and losing shape? -
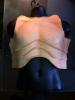
So following a tip from a video on YouTube (can't find the link sorry) I purchased a mannequin torso & proceeded to construct a shaped breastplate. I'm going for a cropped design as I'm also making a broad "hero" belt to cover my stomach. I'll outline the process I've used, not to say "this is how you should do it", more to fish for tips from you guys on better ways to do it, so your suggestions would be most welcome. 1. Sketched out the design on newspaper using my measurements & went from there to cutting the leather in 3 sections. I'm using 5-6oz veg tan. 2. Soaked the leather in warm water for about 10 minutes & pressed it onto the mannequin, working it into shape for about half an hour, and pressing into the deeper contours with my awl handle, taking care not to stab myself or any of my cats with the awl in the process. I didn't use boiling water or soak the leather for longer because I didn't want any shrinkage, and as far as I can tell it has worked out OK in this regard. This technique has only slightly hardened the leather but as I only fight with rubber LARP weapons I'm only really interested in the cosmetic look of the thing. 3. I added the flared edge at the bottom of each section after 24 hours or so, at which point the leather was still quite malleable. To form the lip I pushed into the pre-marked fold line with a modeling spoon to give it definition & did the rest with my fingers, but I'm sure there's a neater way to achieve this. Anyone? 4. The leather I used has a large hole / tear under the left shoulder which I'll explain away in character as an unfortunate run-in with an angry troll / orc / ex-wife / whatever tall tale I fancy telling at the time. So, inspired by a scene from Game of Thrones where Ned Stark questions Jaime Lannister's fighting prowess and mocks his spotless armour, I added a bunch more bumps, scrapes & scars with various blunt objects to give it that battle worn look. 5. Left the leather on the mannequin for a further 24 hours, and it is now pretty much dry. Here it is: Things still to do: 1. Round & burnish raw edges. Yes I know I should have done this before shaping the leather but my edging tool is still on order, and I'm impatient I'll do it very carefully when the tool arrives. 2. Colouring. I'm going to use the same stuff I used on the bracers & gorget in my other post, which is a combined antique & finish. However I'm toying with the idea of dying the leather a lighter brown before antiquing - I'm guessing this will give more depth to the colour. I'll test a few combinations out on scraps before I commit myself anyway. 3. Attaching it together. I'm still undecided on this - I want the armour to be flexible so I could rivet each part to 2 or 3 vertical soft leather straps on the back. This will allow the bands to move against each other nicely, but I'm worried they'll ride up my body as I wear it. So my current thinking is that I'll rivet the sides together to give it a fixed height, and use the suspended strap technique down the centre to allow for some flex. 4. The shoulders. I'm going to make some matching shaped spaulders. I'll probably shape these by stitching along curved lines down the centre of the shoulder to give a nice contour, and then bend around my upper arm with the wet moulding technique I used on the chest piece. I may use a strip of tooled leather to cover the seam, and extend it beyond the top of the spaulder to buckle onto the breastplate shoulder straps. 5. The back. I'm going to have a cape attached at the shoulders so I'm not too worried about having my upper back encased in armour, but I will make broad straps that follow the lines of the front pieces. These will wrap around my torso and buckle onto the sides of the chest piece.
-
Thanks for the beveling tip - I'll try that technique next time. As I mentioned earlier, I've found that running along the bevel with a modeling spoon can cover a multitude of sins - but of course I'd rather have a smooth bevel to begin with! The form on the front of the gorget comes 100% from the curves in the pattern so I can't take any credit for that. I did wet and shape the back of the neck a little though.
-
I appreciate that - thanks I know what you mean about "ruggedness" - of course that was totally intentional
-
Good stuff, thanks.