Suicide
-
Posts
406 -
Joined
-
Last visited
Content Type
Profiles
Forums
Events
Blogs
Gallery
Store
Everything posted by Suicide
-
Hi everybody. I need to lace together face2face 2 pieces of relatively soft but quite thick leather (8 oz buffalo) to produce a good "pucker" part. I am going to use 3 mm (1/8") lace. One piece's edge has 9 cm length, but the second pieces's edge is 36 cm (so about 4 times longer). I did test lacing having the same amount of holes on both pieces (I had 17 holes for 9 cm part - it is hard to put more holes on it without make them smaller in diameter) using mexican round braid method. So it gives me about 2 cm distance in between of holes on the longer edge (2nd piece 36 cm). Although I tried to put those "BULBS" caused by "reducing" those 2 cm into 6 mm while lacing under the lace, it seems inpossible to get a well-looking mexx braid having such a huge difference in distances between holes and having such a thick leather at the same time. So I have an idea to do not have such a "splain" gathering but make a folds on the longer edge and then lace them together or something like that. Can you please give me idea if such a method exists or what the technique should I use to achieve gathering and do not have anything off the laced row having such a differences in lengths? Thanks in advance!
-
 Thanks Happy New Year!
 -
Hallå! Tack ! that is exactly I'm looking for. I live next to Forssa, it is Western Finland, half way between Turku and Tampere. There are not much sole suppliers here, so far I have found 2 or 3 and all of them either don't have soling in stock or have unreasonable for private crafting minimal amount to order (like 100 m2 ) BR!
-
Hi guys, Can you please recommend any of suppliers for soling units/rubber/crepe sheets etc with REASONABLE pricing for oversea delivery (to Europe)? Or might be such an EU suppliers you are having deals with? Can find the only http://www.cobblersupplies.com but they seem are having absolutely crazy shipping prices to europe (For pair of units for $5 shipping appears to be $21 !! ) Thanks in advance!
-
Thanks, very appreciate
-
Hi Sylvia, I got this pattern from the "Craft manual of North American footwear" book with small adaptation and experiment with "triple" sole. There are somewhere at this forum a PDF with the page on how to make a pattern for these.
-
Hi guys, You perhaps will laugh, but for SOFTSOLE mocs I got that Chinese piece of.... cake and it surprizingly works. It is adjustable and made frm wood so you can pin pieces to it (not sure about pegs though). Guessing it won't work for hardsoles , but I'm going to give it a try soon
-
-
-
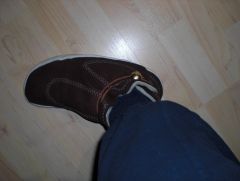
From the album: Navajo mocs
-
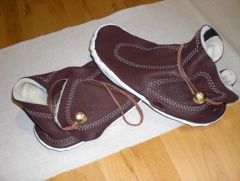
From the album: Navajo mocs
-
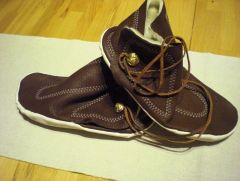
From the album: Navajo mocs
-
From the album: Navajo mocs
-
Thanks!
-
Hi everybody! Is there any special tool to snap rivet conchos? Or chould I just proceed with a common rivet setting tool? Thanks in advance!
-
Thanks for replies, guys! Just tried and it works! Thanks for such an idea. This is apparently what I see with mine But I so afraid of rewetting so I trying to start as earlier as I can. But cling film works pretty goo for me, thanks again for a hint. I got marble floor tile 30cm x 30cm x 1cm from our local construction shop. I put in onto this folding workbench. I also tried to put about 0.5 cm thick neoprene sheet between marble and workbench, but see no any differences with or without that sheet.
-
 Thanks for your feedback, Chavez. As I\ve got (never have used it so far though), All-In-One is not a dye but kind a mix of their hi-lite stain and acrilic sealer/finish, so it suppose to be on the surface, not goint into. (please correct me if I'm wrong). Yep, same story here with Tandy belt blank (surprise-surprise!) . Then I took it off the pack it still tight as a spring, so I had to ran it over the bench's edge several times, but even being cased it still tried to return to that spiral shape as it was in the plastic bag. Oh! I already oiled it once, but think I should do it one or two times more.
 -
Hi guys, I'm using Ecoflo dyes on my project (well.... I know... but this point out of discussion please ) and would like to oil leather to make it softer and more pliable. Leather is about 7-8 oz thick. The project is going to be multicolored so.... All I know and have seen till now is that oil will dark leather a bit ( I have seen the only oil effect on not dyed leather) So my questions are : What should I use first after tooling? If oil is going first, won't it kinda "resist" dyeing as Ecoflo are water based? If not, will it affect on final color much (I supose yes)? If dyes are going first, will project after oil application be affected as natural leather - darker than before? If yes, will this effect go mat be not completely but at least "less" after some days of oil drying? Any other precausions/suggestions on these? Would very appreciate. Thanks in advance!
-
That is what I completely agree with! Thanks, TwinOaks, it is definitely make sense. So thanks everybody for your pointed me the root cause. I'm going to practice with more Happy New Year!
-
Ah, understood now, thanks for clarification. Initiallly I thought OP refers to kind of tool or imprint part Sorry for confusion. Thanks alot for such a detailed explanation, it becomes clear to me now. I just always afraid to have leather more dry than necessary, so as soon as "dry looked" spots appear on the surface I usually start tooling. So at that time there are some damp spots are still on the surface. That most likely is my mistake there. Could you please also clarify what to do if during tooling leather starts feeling dry? We mostly have humidity here in continental Finland at this year season about 60% (+ airconditioner in the house) so everything dries pretty fast inside. Lets say with that belt blank - I went with tool along the blank middle line having 1 row, then I moved to the second row I noticed what I need strike heavily to get impression as good as in the 1st row. 3rd row I need hammer as hell but impressions becomes shallow and not good burnished.... on the 4th row I feel leather almost "dry". What should I do? Speedup my tooling so leatther won't dry and row-to-row increase strike force to get even impressions? Re-wet leather with sponge? If so, that part of it? All the blank? Or just the area which is still untooled? Or should I re-damp just small untooled area then wait, then tool it, then damp next area, wait, tool it etcetc? What would be a correct tactics to get well and even burnished tooling all around the blank? Thanks in advance!
-
Thanks a lot for all your input, I very appreciate it. So most likely it is casing... Let me please clarify this. That belt what faded was cased as per Bob's suggestions - damped, wait until "almost ready", packaged into garbage bag (may be I must kept it in there forever??? ), was sealed there overnight, then opened, wait a bit until ready and tooled. The piece I showed of course was not cased properly as I just wanted to see if it is my stamping problem or wrong moisture case. I just buffled a bit because impressions on the "cased like it should be done" (at least I hope it was "like it should be done" ) leather look much worse (to me) than that brutally damped and partially just embossed offcut. Excuse me newbie, sir , but what the "OP" is stand for? And how they should look like if leather stamped at the correct moment? It is good to know what I have to check in the future... Thanks in advance!
-
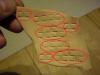
I took another leather scrap that I got from one of Holland's shop. It is much thinner than that Tandy's (I would say Tandy is about 8-9 oz to me, that one is about 4 oz). Well, I have made some investigations, please look at the picture attached. I damped piece very much (not soaked though) and made the impressions 1 right after damping (0 minutes from "zero" ) just by pressing tool by hand. After 15 minutes leather looked pretty "wet" and I made impressions 2. Serie of imprints are done by pressing tool by hand and separate imprint number 2 is done with poly mallet strike. I spent 15 minutes more by watching TV and then (30 minutes since "Zero") I made imprints n.3 in the same way - serie just pressing, separate by mallet. Leather was ALMOST ready for tooling but a bit darker yet. 20 minutes more (50 mnutes from "Zero") - leather went into "just as it has to be for tooliing" - almost original color and cool. I made imprints numbered as 4 in the same way as above. Finally I took a hairdryer and dry this piece in 10 minutes. So, what would be your sentense? To me it sounds like Tandy's leather from the belt kit is sucks - it is hard to compress by tool while tooling and it is losing depressed shapes as it is going to be dry (perhaps of grain layer is going to shrink while drying). I HOPE I\m wrong about that belt kit blank, so please give me your suggestions. Thanks in advance!
-
Hi everybody! I have kinda issue with my tooling here. Can you please have a look and suggest ? Thanks in advance!
-
Hi guys, I did tooling using basket stamp (x511 for instance) and initially had pretty good impressions there with solid brown color - leather was a bit damp at that time. Then leather had dried I noticed what impressions is not as "brownish" as then it was damp and less sharp. I decided let it be (no dies, finishes, oils etc were applied) and see what goes next. Now 2 days after I noticed 2 things: all the impressions are almost faded away and they lost that solid brown color and became more like leather natural color. So now it looks pretty much as I would tool the dry leather, may be even worse Can you please give me ideas what the problem might be there? Is it wrong leather (actually it was that "pink-ish" strap from the Tandy's belt kit)? Or did I do something wrong while casing (or may be tooling)? Thanks in advance!
-
Hi Skald, It is the same story about all specific supplies here in Finland. If you still need the Gum Trag, drop me a message - I can recommend you one ebay saller. He is in US but all the stuff I've got from him so far (including GumTrag) were delivered quite fast and seems didn't get frozen while transportation (at least they are working perfectly for me). Cheers
-
-