-
Posts
504 -
Joined
-
Last visited
Content Type
Profiles
Forums
Events
Blogs
Gallery
Store
Everything posted by lightningad
-
Looks exactly like the Blanchard I just picked up at an Antique dealers for just £15 ! An hour with Japanese water stone and it's got an astonishingly sharp edge...bargain of the year for me! Adam
- 8 replies
-
- head knife
- blanchard
-
(and 3 more)
Tagged with:
-
Andies Clone Bags 04
lightningad commented on lightningad's gallery image in Our Leatherwork Galleries
thanks... do you mean for me to draw up a pattern or a completed bag? i've never really drawn one up before other than the fairly basic design for a satchel. I tend to design and make as i go along. The method i find works for me is to use semi stiff card which i cut to the size i want then use staples to fasten along the stitch lines. Once I'm happy everything is working in card and i have a life-sized card satchel, then i remove the staples and I'm left with a pile of cutting templates. -
i'm with the marking only brigade - hitting it so hard the prongs pierce the leather will only knacker the Pricking Iron ! I use a very cheap Ivan iron, and a wooden mallet to whack it. Works ok til i can afford a better iron. To help keep the iron held vertically, i added a silicon putty (Sugru) around the shaft and molded it to my grip. Now i can hold it in the right position every time, and its less strain on my finger muscles - no more cramps after marking a big piece. adam
-
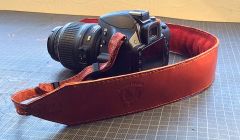
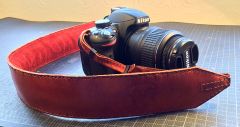
I've not had much time to work on leather projects for the past few weeks, so thought i'd post the only thing i have done...a strap for my new camera! Its an outer layer of British Tan dyed veg tan, then a layer of spongy foam, then lined with a Paprika coloured suede. Very pleasant to wear, and it feels very strong and secure. The hardware used is the plastic buckles that came with the manufacturers strap. Having used it for a few weeks, i now want to alter it to use some quick release hardware, as the strap can get in the way when using the tripod! adam
-
From the album: A Newbies Progress
comfy, classy and very strong. Although i want to alter it with some quick release hardware, now that i have lived with the strap for a few weeks!-
- camera strap
- nikon
-
(and 1 more)
Tagged with:
-

A Newbies Progress
Images added to a gallery album owned by lightningad in Our Leatherwork Galleries
I started leather crafting with a Tandy Kit Christmas 2011 and now i'm hooked. Everything here is made from my own designs and patterns. There are more that i still need to photograph... -
From the album: A Newbies Progress
finally got myself a decent dslr camera, so the first thing that needs changing is the strap! The free ones that come with the camera are just too obvious to any budding mugger...so i made a padded leather strap lined with red suede using the plastic buckles from the Nikon strap.© ©2014 Barking Rooster (Adam Taylor)
-
- camera strap
- nikon
-
(and 1 more)
Tagged with:
-
At last! managed to get my website properly updated, and looking rather classy (in my opinion!)
-

iPad Case & Presenter 14 - Pen Holder
lightningad posted a gallery image in Our Leatherwork Galleries
From the album: A Newbies Progress
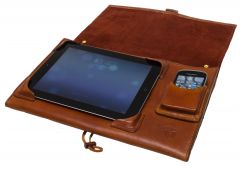
One final view of the left side. The pen holder is visible, and you can also see that the bottom of the case tapers. This is done to allow the folio to sit better on a desktop when its propped up on the rolled cover. During the design phase I had made sure the rear pocket would be large enough that the taper would not force the writing pad to rise up out of the back.© ©BarkingRooster 2014 / Adam Taylor
-
From the album: A Newbies Progress
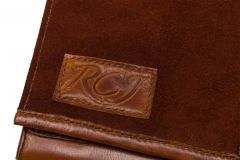
My client wanted her initials on the case, so i embossed a little patch and stitched it on. The final job before delivery!© ©BarkingRooster 2014 / Adam Taylor
-

iPad Case & Presenter 11 - Toggle Detail
lightningad posted a gallery image in Our Leatherwork Galleries
From the album: A Newbies Progress
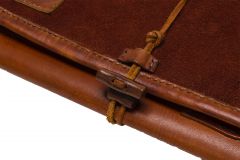
I made the toggle fastening mechanism from some pieces of scrap leather laminated into a strip which i then sanded down to a cylinder shape and burnished up to a glossy finish, before drilling two holes for the thong to pass through. The thong is long enough to pass right around the case and loop back over the first toggle. A second toggle was used to pull up against the first allowing it to stay firmly held in place. Two leather guides were stitched onto the case through which the thong passes to prevent it from slipping off© ©BarkingRooster 2014 / Adam Taylor
-

iPad Case & Presenter 10 - Business Card Sleeve
lightningad posted a gallery image in Our Leatherwork Galleries
From the album: A Newbies Progress
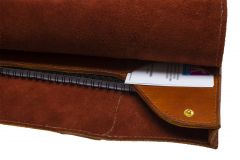
I decided to put the pocket for the writing pad and loose leafs at the back of the folio. This way they are available when needed, but kept out of the way. Its approx 2cm deep to take a reasonable amount of paper, and I also put the business card sleeve at the back also. Again, so they are readily available but stored out of the way.© ©BarkingRooster 2014 / Adam Taylor
-
From the album: A Newbies Progress
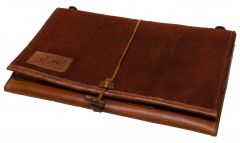
Can't resist incluing a picture of my logo taking pride of place on the front of the folio!© ©BarkingRooster 2014 / Adam Taylor
-

iPad Case & Presenter 07 -Right Side
lightningad posted a gallery image in Our Leatherwork Galleries
From the album: A Newbies Progress
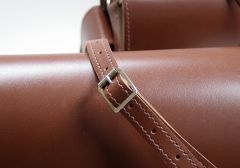
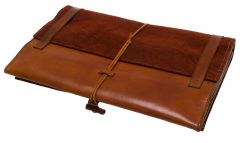
This view shows the leather straps that are used to hold the roll in place. A popper on each allows it to be quickly put into action, and a second set of studs allows the straps to be held securely when not in use.© ©BarkingRooster 2014 / Adam Taylor
-

iPad Case & Presenter 05 - Left Side
lightningad posted a gallery image in Our Leatherwork Galleries
From the album: A Newbies Progress
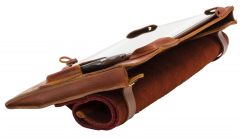
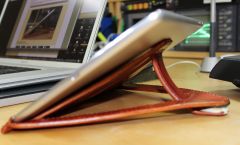
The suede cover was made so that it could be rolled up and held in place at the back to prop up the folio at a suitable angle for using whilst sat at a desk.© ©BarkingRooster 2014 / Adam Taylor
-

iPad Case & Presenter 03 - Back View
lightningad posted a gallery image in Our Leatherwork Galleries
From the album: A Newbies Progress
The rear view shows the suede cover is actually attached quite far down the back. Theres a reason for this which will become clear on later images.© ©BarkingRooster 2014 / Adam Taylor
-
From the album: A Newbies Progress
This is the folio with the cover in place. Made from a double layer of Paprika coloured suede which compliments the British Tan colour of the leather really well.© ©BarkingRooster 2014 / Adam Taylor
-
From the album: A Newbies Progress
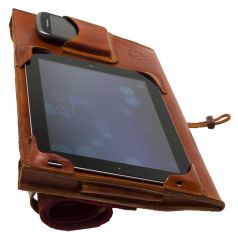
Asked to make a business folder that could be used with an iPad, and this is the result. Designed to be used during showroom presentations, so needed to be comfortable to hand hold whilst showing videos. Other requirements were a phone pocket, a slot for business cards and a storage compartment for holding a writing pad and loose pages. I also found out the client was left-handed, which informed quite a few design decisions including the layout of the technology and even the placing of the pen holder on the left side! I'm happy to say my client is delighted with her iPad Case. (and i'm very proud of it too.)© ©BarkingRooster 2014 / Adam Taylor
-
depends on what you want to achieve - you can glue and stitch, you can just glue. If you want to fold the edges thats also possible. These two images are of my second wallet - no glue used, just stitching. I made the pcokets for the cards using a purple satin, that was stitched to the rear of the main pocket face. The satin cuts down on the overall thickness and it looks quite flashy too! (I did cheat slightly and used double sided sellotape to hold the satin in place whilst i stitched them into position.) I did not fold any edges, just used a wooden burnisher to smooth the edges of the leather. edit - looking again - i didnt burnish these edges very well !! thats something that improves with practice. The great thing about leatherwork is that its really easy to have a go and find a way that works for you. There are very few hard and fast rules - if it works for you, its probably right! adam
-
Hey Jud, im also in a small town 6-7 miles outside Manchester! Wonder if its the same one? I get my thread from LePrevo - its pretty cheap linen thread but it does the job. Ian Atkinson who's videos you mentioned is also Leodis Leather who sells Tiger thread on Etsy. Its worth getting some to try out, and Ian is certainly the most cost effective way to try it, as the thread is usually only sold on bi reels costing close to £30 a go! You can get a really cheap diamond awl blade and handle from Le Prevo (mines from there) and as long as you spend some time sharpening it first, it should be perfect for making your holes. It also looks much better than the round holes a woodwork awl will make. As for buying leather - we're out of luck in this part of England…the nearest is J Woods Leather in Silsden, nr Keighley. You can go and look through the offcuts pile if you want a bargain, or via mail order. Le Prevo have been quite helpful - although the time it takes them to process orders seems very slow. I have also bought some lovely veg tan from Rolfords (Northampton). The biggest problem with mail order is not seeing before you buy…and the only way around that is a long journey! rgds Adam
-

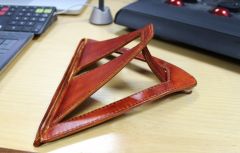
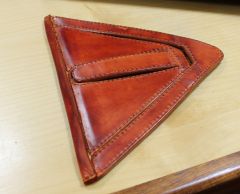
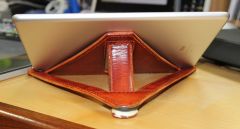
A Leather Ipad Stand - An Instructable!
lightningad replied to lightningad's topic in How Do I Do That?
yes - very stable. Its made from 2 layers of 2mm thick veg tan, with a 1 mm layer of styrene inside. -

Magnetic Round Knife holder
lightningad commented on lightningad's gallery image in Our Leatherwork Galleries
- 2 comments
-
- round knife
- sugru
-
(and 2 more)
Tagged with:
-
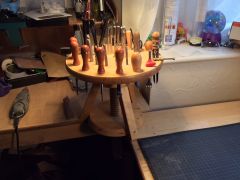
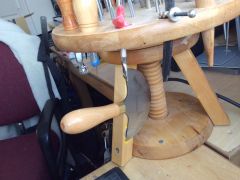
Blimey! that was a fast response! Its only just been posted…thanks for the kind words. It was one of those serendipitous moments when i realised i didnt have enough wood to make the rack i had in mind then shoved some junk out the way and saw the old stool - the idea just clicked! 2 hours later i have a really cool tool rack!
-
Its been a while since i posted on the forum, so i have just upload a couple of ideas posts - a litle thank you for all the useful tips, hints and general friedliness found on his great site. Ths is the second of those posts…hopefully it might inspire some creative ideas for recycling your own old stuff. I just posted a breakdown on Instructables.com showing how i converted an old wooden stool into a really useful tool rack. What do you reckon? not bad for 2 hours work and the £2 paid for the old stool a few years back! http://www.instructables.com/id/Leatherworkers-Tool-Carousel/ the round knife is held safely out of the way using two magnets embedded into the leg. adam
-
From the album: A Newbies Progress
A simple tool carousel that holds all the tools i want close at hand when leatherworking. Its made from a recycled adjustable wooden stool with a rotating seat. The legs were chopped off, then holes cut for the tools. It was bolted in the corner between two perpendicular benches, to allow the spiral shaft to remain, and thus it can still spin and rise/fall as required. A coupke of magnets were embedded in the rear of one leg so my round knife can be stored safely out of the way but remain instantly accesible.© ©2014 Barkingrooster.co.uk


