Jump to content

chancey77

Members
  • Content Count

    1,313
  • Joined

  • Last visited

Everything posted by chancey77

  1. Well it was going through the pedals...but they where off...the only thing it seems was on was the reverb...but next video will be a side by side with an absolutely dry amp! Like I said I just put him on the spot...but it is all there...next one will be post mod!
  2. GREAT COLOR CONTRAST!!!!!!!!!! Great Job AGAIN!!!!!!
  3. Excuse me it is an original Esquire...not a nocaster...but he is one of eh best techs in the world! If you talk smack maybe Steven Seagal and all his multi millions in original blues guitars will pay you a visit......Cause Scott is his guy to touch and handle all of them:) BTW...I WANT AN AMP!!!!!! OK I have edited a small vid.... This is just put together and I put Scott on the espot. There is no mods done at this point cause I had to give it to the client while we went on tour...but Scott will have it this week and begin the mods. Compensated saddles,orange dot re-wire the toggle and bone nut, and pups are on order...maybe next week it will be finished after our next round of shows.
  4. Set up is a custom made set of 11.5,15,19plain,28,38,56 I am tellin' ya, there is no tone lost. Bridge is set though a hole in the leather, so it is flat mounted to the body, and the strings run through it. Compared to a Vintage hot roded Nocaster, if you closed your eyes you would never hear the difference between the two guitars. I did do a small video, but Scott insists on doing a better one...but lets see if I can edit a smaller version of him just playing it.
  5. IT SOUNDS ABSOLUTELY BOSS!!!!!!!!!!!! There is no difference in My Guitar players Nocaster and this one! Sustain dies out only about 1 second before his! And it is because of the Plastic Nut that is on the stock Fender Neck...but a bone one will quickly fix that problem and we may get 3-5 seconds more sustain. The leather had NO EFFECT on the tone.
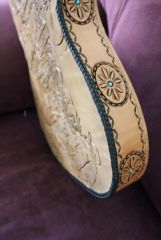
  6. ALL DONE!!!!!!!!!!!!! Except the pick up Bezel.
  7. GUITAR ALL SET UP!!!!! What is really awesome is the leather and the way I designed the bridge hole now has NO EFFECT ON THE SUSTAIN!!!! I was so relieved when we had 2 Telecastors and 2 amps and the sustain was only fraction of a second off, but that is the plastic nut that Fender put on the neck...now after I am done lacing it, the nut will be replaced with a Bone one, and we will modify the tone selector and add an orange cap. But it is AMAZING!!!!!!!!!
  8. OH YA!!!!!!!It has been a very good day! The Back lace is complete, picked up strings and jack plate and longer screws for all the hardware, then Scott Wired in all the electronics in between taking a break on the Gretsch he is re-fretting..59'6196! AWESOME GUITAR! and then I took this bad boy home and started on the front lace...2morrow the set up continues and then we plug it into the Vibro King and Silverface Bassman and CRANK IT UP!!!!!!!
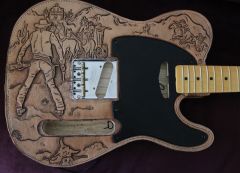
  9. ELECTRONICS IN THE TELE!!!
    1. Cyberthrasher

      Cyberthrasher

      How it sound - I want video!!!!

    2. Sylvia

      Sylvia

      yeah, play that twang thang.

    3. chancey77

      chancey77

      I want it all done to...but it still need to be set up...this is a high precision instrument...intonation and string gauges must be set, new bone nut and saddle heights...

      you will get video!!!

  10. From the album: Chancey77 Custom Leather

    READY FOR LACE

    © chancey77©2012

  11. From the album: Chancey77 Custom Leather

    3 hours of Triple Loop Stitch (TLS) for the back piece.

    © Chancey77©2012

  12. From the album: Chancey77 Custom Leather

    Basket Weave Guitar Strap

    © © leatherworker.net

  13. The guitar is now all glued together and the lace work has begun...there is 3 hours of lace about a bit more than half has been finished now on the back.
  14. Yep who needs pockets anyhow????? I had a chance to make the guns better and also cut out a rider that is coming from the front as well, so all the cowboys match on the back...one dead and 2 in the gun fight. I am glad I had an opportunity to fix a couple things that where bugging me!
  15. now getting to make holes and LACE THIS BAD BOY UP!!!!
  16. 2 thumbs up from THIS GUY!!!!!!! GREAT JOB!!!!!!
  17. From the album: Chancey77 Custom Leather

    It is all coming together nicely:) I think Big Iron is the first song to be played on this guitar!

    © Chancey77©2012

  18. You got that right!!!!...Not to mention all the guitar playing I have to do..so far 7hrs a day rehearsal sched to get ready for the tour...my hands HATE me right now:)....You just got to push through that S***T! It's just Pride F'k*n with ya! He has already ordered another body, and a neck with rosewood, so it will suit the black one...this one the Good Guys Win...in the Back one...THE BAD GUYS WIN!!! LOLOLOLOLOL
  19. OH YA GETTING CLOSE!!!!!! Just have to oil it up/clear and antique it...then the fun part lacing it all together:)
  20. The bags look GREAT! But go get yourself some small zip ties...it holds everything real nice and is much easier to put on instead of all that sewing thread:) Keep Pounding! C
  21. String Ferrules pressed, and holes punched. Top in the making...again:) I am glad I had the opportunity to re-do it, it gives me a chance to fix some things I wish I would have done better the first go around:)
  22. Sides done...working on the new top for the tele now:) W/ some minor changes...

  23. In the top of this section is a pattern called Triangle Bag which is a pattern for a swing arm...All the measurements are there and shapes for your use:) RDB: GREAT BAG BRO!!!!!!!! KEEP POUNDING!!! Maybe one day I'll get a sewing machine....I have actually have had a couple but they just looked cool in the corner of the shop and never got used:) hahahaha By The way... The best solution I have found for attaching these kinds of bags ( because of the chain/belt) Is using the 2 bolts that hold the Chain guard on for the top section, and if there is no chain guard...then: Use a 2 U bolts with a metal bracket on the inside of each set of bolts.... If you smell what I'm cooking.... Dang I had diagram...but I guess it is MIA! DANG!!!!!! But here is a view so you can see....just make a cardboard templet of the back line it up on the bike...then make the holes in the template and transfer the holes from the pattern to the ready made bag....but you are a smart guy and probably WAY AHEAD OF ME ON THAT!!!!! On the picture below of the frame I just used the 2 bolts holding the chain cover and washers...It isn't a huge bag so it really won't ever carry much weight, so 2 bolts on top and 2 U bolt on the bottom are MORE than enough.
×
×
  • Create New...