bruce johnson
-
Posts
4,401 -
Joined
-
Last visited
Content Type
Profiles
Forums
Events
Blogs
Gallery
Store
Everything posted by bruce johnson
-

Whose Mark Is This? Probably Continental European
bruce johnson replied to bruce johnson's topic in Leather History
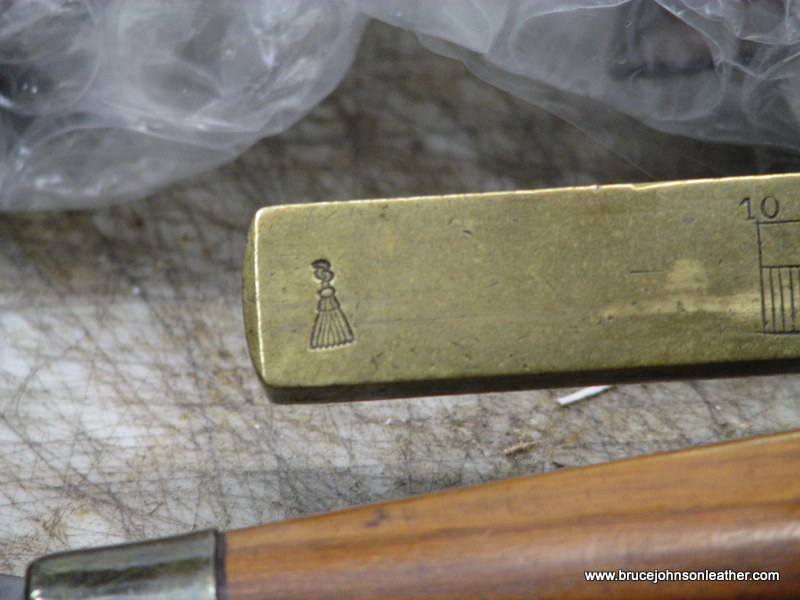
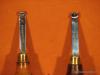
Thanks guys. It is marked in cm out to 10 cm, but has some more bar length than the Blanchard 10 cm versions. It is like the old Blanchards in most other respects. Nice smooth sliding of the fence. -
Used to be they used double cap rivets that are too long for the thickness of the leather. If you lightly set them in the slots, they slide. Now some are using the rivet back conchos the same way.
-
Somebody is going to be very happy with these.
-
Another satisfied customer here. I sent Terry a Dixon and later a Blanchard to have for patterns. He has the patterns for both on hand. I had the first prototype of the Dixon and it has yet to be need anything but a light stropping. He made a Blanchrd for me to try recently and just as good as the first Dixon he made me. As far as new plough gauges, Dixon and Vergez-Blanchard still make them but it is great to have source of quality replacement blades through Terry Knipschield.
-
A trick to use with a compass is to tape a scrap of leather down in the center with blue painters tape. The scrap takes the mark and the tape pulls off cleanly afterwards.
-
I was in a shop a couple weeks ago and he had a few of them. They do seem pretty comparable to the Osborne #150 punches except for the welds being a little rougher and no paint. He thought they were a little sharper straight out than some of the Osbornes. The regular price on them was about $20 more than the Osbornes from Springfield, but on sale they are better.
-
Is This A Leather Working Tool? $5 At Auction
bruce johnson replied to Tallbald's topic in Leatherwork Conversation
Good buy, they usually run $75-125 in the antique/vintage stores. Chandlers seem a little less common. It's a hand crank pinking cutter. Had a guy tell me they were originally designed for cloth and he uses one I found him on canvas bed trap material. I tried the one I had on chap and did OK with the pressure adjusted up a bit. It rolled right through chap but wouldn't go as well on 4-5 vegtan. -
Harness leather is usually a veg tan leather that has been treated with oils, waxes, and greases in proprietary mixes depending on the tannery and the different types of harness leather they may be producing. Some can be pretty "dry", some waxy, and some pretty greasy/oily. Some of these treatments are going to repel dyes or inhibit penetration to any great degree. Treating with the solvents may strip some of the compounds off the surface that the tannery added and allow some level of dyeing to happen. Still I don't think it is going to do as good a job as it does on plain vegtan leather. I don't buy harness leather anymore. I chose several years ago not to compete with everyone else selling clicker cut harness lather tack then. I had a good relationship with a rep at a now closed tannery and he steered me towards what I do now. Occasionally I need "harness leather" for loop ends for reins or repair work. I pick a nice firm section of skirting leather and oil it with an oil of choice - pure neatsfoot or olive oil. Some I oil pretty heavy for more color, some lighter. Once the oil has settled, I go back and dress it with a paste conditioner. He was not a Tandy rep or affiliated, but he recommended I use the Dr Jackson's Hide Rejuvenator as the paste. Pretty cheap and works well. I apply it in several thin coats and lightly heat it with a hair dryer to soften it and help it penetrate. That works for me and I end up with a good feeling leather for my needs. On some of the repair work I need to match color. I dye the leather, then oil. then paste and most of the time can get pretty close. The dye goes on the plain leather so I get a good penetration.
-
Problems With Tandy Pro Strap End Punch... Please Help
bruce johnson replied to RoosterShooter's topic in Leather Tools
Just to weigh in here because I have a lot of punches, makers, and times when they were made to compare. I didn't measure every punch, but did several randoms off my bench and what I have for sale. I checked maybe 50 here - a mix of English points and round ends. The wood handled punches are all less than 1/16" except for 1-1/2'' HF Osborne that is a full 1/16" over. The HF Osborne forged punches are mostly dead on but a few are less 1/16" oversized. The CS Osborne forged punches are mostly less than or right at 1/16" oversized. The "CS Osborne Made in England" forged punches are all less than 1/16" over and very consistant. I have a few arch style (CS Osborne #150) punches. They vary the most. The 1-3/4" English point on my bench measures 1/8" over, the rest all measure right at 1/16" or less except one dead on. The dead on one is the round end 1-3/4" arch punch on my bench. -
Edge Creasing Tool?
bruce johnson replied to SooperJake's topic in Gun Holsters, Rifle Slings and Knife Sheathes
Jake, I have a section of them on the single line creaser page. They start at about half way down the page. Here is a link to the page - Large/Layer Single Line Creasers . -
Edge Creasing Tool?
bruce johnson replied to SooperJake's topic in Gun Holsters, Rifle Slings and Knife Sheathes
You can also do this with creasers. The larger size creasers like the CS Osborne "layer creasers" or Gomph's equivalent "round edge creasers" will do the edge bead. The next one can be done with a push beader or beader blade. For that deep effect on the inside bead, I have used a edge creaser and followed the track from the first pass in both directions. -
I have had them from 8" to the tip up to 18" or so. There aren't dimensions in the old CS and HF Osborne catalogs I have, but going off the perspective of the handle looks like they were maybe 10" or so in the CS Osborne 1897edition. They were used in different trades too. I sold a long one to an old guy who used to work in a mill. He said they would fold the end of a sack over three or four times and then run the awl through pleats as far as they could gather. They'd pull a string or lace back through. It made a sort of running stitch and seal the end. I have seen them sold as "ham stringers" too.
-
It is a collar awl. The edges are sharp enough to cut. It is pushed through the leather, the lace is fed into the eye, and then pulled back through and brings the tip of the lace with it. The next stitch the lace is carried forward with the push. Originally used for making horse collars. They can also be used for carrying saddle strings through the tree for repair work. The edges on some are blunted and I have heard those referred to as "drawing awls". They can be used for pulling lacing strings back through a braid like on saddle skirts and rear jockeys without cutting the braid. .
-
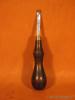
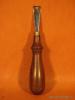
I got this plough gauge that is a real dandy. I have seen references to this maker's mark before but can't recall who it is. Any help is appreciated. Thanks, Bruce

-
Some people do have pretty severe reactions to the dust from cocobola along with other woods. I think when Big Sky Dies were still in Michigan they were having them made from hard rock maple. There's a guy on Ebay from Utah that has one listed about every week. He works with some exotic woods it looks like.
-
I heard Kevin Kolasch at Double K Leather bought HideCrafters recently. I don't know what all he has moved to St Louis yet, but worth a call to see if he has any. I have one of HideCrafters seat sticks and it is about 24 inches at least. Pretty Ok piece of lumber.
-
I have the whole floor area of my shop covered with them except under the shelving systems. I have not dropped a knife that I can remember since I did. Before that concrete had a magentic attraction for knives. I was always fixing an edge on something that fell blade first to the floor. FWIW, I have them under my stamping bench and cutting bench that I also rivet on. I do have a 150 plus pound granite surface plate inset in my bench and set rivets on an 80# anvil I sling up on the cutting bench. Their mass helps a lot to negate any dampening from the mats, but the mats have sure made the whole shop quieter. One thing i'd recommend is to tape the joints. I used black duct tape and has held up for about a year and half. Otherwise the seams filled up with stuff and even with their weight sometimes an edge would lift trip me up.
-
I am attaching pictures of a few types of edgers that will do a good job on slots. If they display in the order they load, I am good here. Not all bisonette edgers are made the same. The first picture is an older CS Osborne bisonette. It doesn't have a lot of bend at the cutting hole. It is great for running down a straight edge or gentle curve.l The leading edge of the hole will ride on the leather like a training wheel and the cutting angle is consistant. On tight inside curves though it can raise the cutting edge away from the leather. The second image is an old Rosecrans bisonette. They were made with a lot of bend at the hole. They will do a tight curve easily. The third image is a Gomph round bottom edger. With the open toe design, I can do most all inside curves pretty well and they sharpen up easily and have a ton of life to them. The next picture are two old Rosecrans turnback edgers. They are designed for the tight inside curves. They are basically a bisonette bent over almost double. I have a side view of these as well in the last picture. These are all older tools I have or used to have. There are a few who make versions of all of these new now - Bob Douglas has new ones he makes along with Barry King and Jeremiah Watt.

-
Splitters, Nail Cups, Rein Rounders, And Hand Tools For Sale
bruce johnson replied to bruce johnson's topic in Old/Sold
I have sold the last splitters mentioned in the previous post. Today I added six more leather splitters. There are three Osborne #86s - two 6" and one 8". There are two Osborne Chase pattern splitters in 10" and 12". I also have one Randall Improved Chase pattern splitter in 8". Here is the link to the page - Leather Splitters For Sale . -
Edge Bevelers ... Which Are The Best?
bruce johnson replied to RoosterShooter's topic in Leather Tools
I ship to the UK, but it can take a while to get through the British customs. I have quite a few Dixon edgers as well as a lot of other edge bevelers. Here's a link to my website page with the bevelers - Leather Edge Bevelers . -
I use contact cement also. I rough up the can like Double U said. I put a thin layer of contact cement on the leather and let it dry.Then I put a second coat on and one on the plastic. Once they are pretty tacky then I stick it down. I press it around pretty good to get a good bond. I lay it face down on a towel and weight them overnight - usually a bench anvil and whatever it takes to make about 30 pounds or so. I also use the Smith Brothers cans and get them from Jeannie Willard. One of the real bright spots of people I buy from. She is just a peach on the phone and ships fast.
-
They are nice, and the bonus was that we collect things with Johnson name. These were made by Wm Johnson so it was a real cool deal to get them. They are slick for marking out rope can and rope bag parts. They are nice, and the bonus was that we collect things with Johnson name. These were made by Wm Johnson so it was a real cool deal to get them. They are slick for marking out rope can and rope bag parts.
-
I have added a whole page to my website today of wooden tools. There are three nice smashers or bouncers or seat slickers or whatever you were taught to call them. There are a couple wedge type and strap slickers including an Osborne marked steel insert model. Lots of edge slickers. These came from sets of old tools and are all in good shape. Some are CS Osborne Newark marked. You could be slicking with the same tool as a guy did 100 years ago. I also added some CS and HF Osborne draw gauges, a few different edge bevelers, and a HF Osborne Eureka channeler. Here's a link to the landing page for the tools - Leather Tools For Sale . Thank you, Bruce
-
Leather Strap End Skiver And Splitter Machine
bruce johnson replied to NewYorkerInSydney's topic in How Do I Do That?
I had typed in the #86 in error and corrected my previous post. It should have been the Osborne #84 splitter that has the handle and will do lap skives. Another handled splitter that will skive is the Heritage splitter/skiver. Campbell-Randall makes a handled splitter as well. Sorry for the confusion. -
Leather Strap End Skiver And Splitter Machine
bruce johnson replied to NewYorkerInSydney's topic in How Do I Do That?
The bigger problem here I see is with the chrome tan. For softer leather like that, I use a bell knive skiver. I can set them to level split up to about 2 inches wide. I have run straps through crosswise and done laps. Somebody may have some experience with the Scharr-Fixx unit for this, but I don't. Other than that - it's the knife or hand skiver. There are a few more options for vegtan here. A handled splitter like the Osborne #84 will level split if you tighten the handle down. You can skive laps by pulling the strap through as you push the handle forward. I just got in a Heritage splitter that is a handier lap skiver by design than it will ever be as a splitter. In fact I am pretty impressed with it on a few laps I have pulled through it to try it out. A crank skiver can also run straps through crosswise and skive easily repeatable laps. With either of those and a pull through splitter you could do laps and level splits and sure be under $1000. Edit - I had orignally typed that the #86 was a handled splitter. It is not and I had a brain freeze thinking about the #84 but typed #86. The post is now corrected.,