bruce johnson
-
Posts
4,401 -
Joined
-
Last visited
Content Type
Profiles
Forums
Events
Blogs
Gallery
Store
Everything posted by bruce johnson
-
I like the steel ones better also. If you can get one bought right, it has all the shims, a blade, and the screrws turn, good enough. Pretty much whether they are cast steel, brass frame with rosewood inlay, applied wood scale handles, or other variations they all work the same. There are some differences in handle size and shape but that's about it. The early ones didn't have a trigger too. Here's another factor and I have to share this. I sold some tools to a guy about a year ago. Every couple months he'd email and order a few more by number. He finally called a couple weeks back and we talked. He asked me to pick this time, he said he wanted me to pick the prettiest. His wife took down his pinups because of the grandkids, and he figured he might as well have pretty tools to look at now.
-
And a little more. HF and CS were brothers. HF Osborne was with CS for some period of time, maybe from the time or soon after CS bought the business from Wm Dodd. He left and started his own when some of the sons of CS Osborne were taken into the business in the 1870s. HF was sold out to the CS Osborne company in 1905 or so. Many of their tool patterns were the same throughout the run, but HF had some before CS did. As far as the tools themselves, there is probably not a lot of differences between many of them. Some HF tools are maybe finished a little better. The knife handles on the HFs are generally a little fuller than the CS knives. Some think the wood handles on the HF tools are prettier than the CS, but I have had pretty and "average" in both. There's just fewer of the HF tools around and that makes them a little more collectible. Back in that era though all the makers were competing against each other selling good tools to the men making a living with them. There were a few tools that had some choices on quality level, but by and large it was just one choice.
-

Blanchard Plough Something - Need Help Iding
bruce johnson replied to bruce johnson's topic in Leather History
I will be at Sheridan as an interested spectator. -
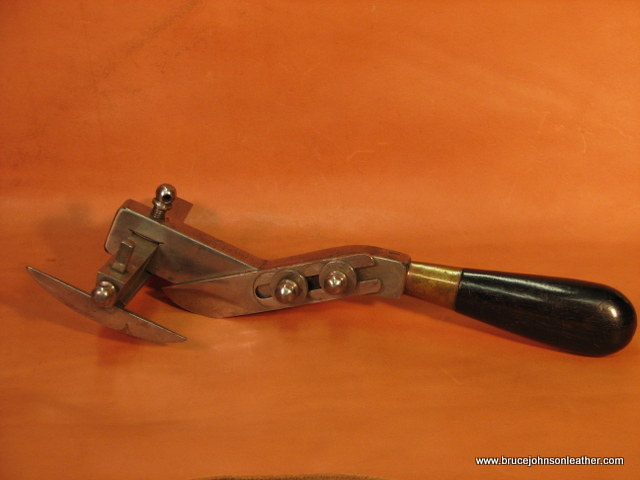
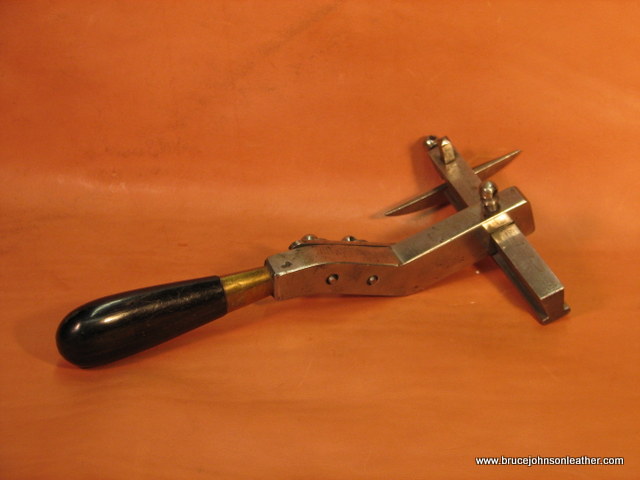
I got this a couple days ago and have never seen one like it before. Blanchard marked. It works like a plough gauge, but the blade comes down from the top and it runs over the leather. It looks like you could adjust the blade depth for a partial cut or drop further for a full thickness cut. Tor, Knut, and others - please help me out here! LOL. Thanks, Bruce


-
Another tool I get in some shoe and boot tool sets, some sort of creasing iron I am guessing.
-
Hard to say without another view of the head, but looks like it could be an edge iron for boot and shoe work.
-
Lip knife used in shoemaking mainly, but controlled cuts in other leather work too.
-
If it is vegtan leather then a crank skiver will do that with a smile. A pull through splitter/skiver does laps on straps but not a long edge. Every shoe repair shop should have a crank skiver, a 3-in-1, or 5-in-1 machine that will do it. If this is a one time project then I'd take it and have them do it. If it is a lot of pieces you'll be doing then investing in a crank skiver will pay off in consistant skives and no worries about cutting yourself with a knife.
-
Looking For The Right Tool For Snipping Copper Rivets
bruce johnson replied to kayrunp's topic in Leather Tools
It looks like the right tool, just the wrong size if the jaws won't open enough the get the shank of the rivet between them. -
One thing that comes to mind for me is the blade position. . If the distance from the rollers to the blade is too far, then the leather wads up against the blade and will split unevenly. That will be compounded by a wider strap naturally having more drag and/or a blade that is a bit dull. This can result in thin areas. I am not familiar with the Weaver, but have had Champions, Americans, and Landis 6" crank splitters. Most of these have stops that you push the blade up against to set the leading edge and then tighten it down. First thing I'd do is take the blade out, sharpen it and put it back in. If there aren't stops for the blade, then you want to the get the leading edge of the blade as close to the rollers as you can without the blade getting into them. The second factor may be the position of the bottom roller vs. the blade. If the bottom roller is set a little too far below the blade edge that could make it do what you are describing also. Firm leather will feed straight but softer leather might drape down in to the gap more. The top roller will compress the softer leather more and push it that way. You might try raising the position of the bottom roller up a bit more and see if that helps. If the splitter was originally set up for heavier leather and taking a fair amount off, then you may need to do some fiddling with the roller position to get it work the best for your use.
-
Ray, I think that little Hertiage splitter is pretty dandy for lap skiving. I usually have one or two around and I like them for laps. Push forward on the handle as you pull the strap through. Smooth and as simple as doing it on an old Osborne #84.They are kind of awkward for level splitting though. There isn't any locking mechanism to hold the level so you need to hold the handle forward against the stop screw with one hand while you pull with the other. If you are doing a long strap you have to stop and reset your hands every so often. The crown splitter is OK, but I don't know how often many people use them.
-
Barry King and Jeremiah Watt both have some different block stamps and are going to be under your $80 limit at $50-65.
-
Looking For The Right Tool For Snipping Copper Rivets
bruce johnson replied to kayrunp's topic in Leather Tools
I use compound action end nippers. The ac tion makes them cut much easier. Osborne makes a decent enough smaller one but if you hunt old antigue stores look for a pair of Schollhorn-Bernard compound action end cutting nippers. I buy them for $5-10 when I see them. Rarely are they worn much. -
They ought to be happy with those, I sure am with mine!
-
I have done a lot of orders that have used that letter set. I will give Ray's suggestion of Sharpies a hearty second. However, I find more control with the ultra fine point Sharpies in the tight spots and do the impressions of the letters themselves. In a pinch I use regular old find 'em at any office supply stores Pentel EnerGel 0.7 mm ball point pens and they stay pretty well. You can also outline the other type of stamped letters with them and fill with fine point Sharpies or dye and brush.
-
Rob, I did a bunch of those several years ago for a wholesale acct along wioth hackamore hangers too. I had a jig I made up from a stiff strap leather and tacks through it to mark the positions on the slits. a quick roll over the jig with a wall paper wheel and the points transferrred. I bought a cheap set of wood chisels and sharpened them up. I punched the slotsbetween the points with those and it worked well, Someone may be able to make you up a wheel with a chisel point and the spacing, but then you'd be looking at those machining costs plus a crank tool to run it on.
-
Jeremy, I use 794 needles in mine. The manual is mainly setup and parts with no operating or adjustment specs. Eyeballing mine with a ruler the top of the stroke is 3-1/4" and lowest point is 1-1/16".
-
Can Anyone Identify This Leather? Elephant?
bruce johnson replied to conceptdiba's topic in Leatherwork Conversation
Looks like it to me. -
I have Ferdco and pretty sure I have a manual that they wrote. I'll check tonight when I get home. I haven't found an exact match for the "peasant" thread they had, my favorite color. I haven't looked all that hard yet though, still working off spools I had stockpiled.
-
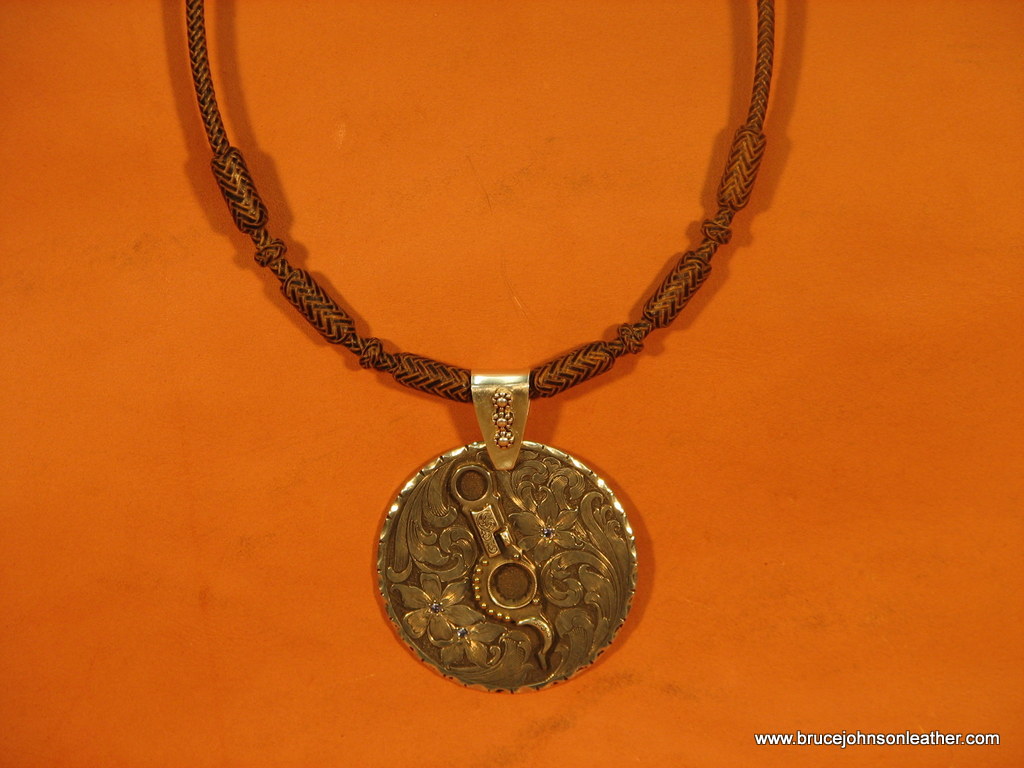
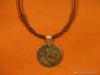
One of the cool things about this forum is the people you run across. I have admired Leatherpownder's braid work from his first postings. I am sure happy to have a set of his reins, small bosal, and another in the works. My wife has kind of been left out until now. I had this necklace pendant made up by Shawn Didyoung and Bret braided the necklace it hangs on. The dark rawhide and contrast from the beveling is super nice. She couldn't be happier.
-
How Do You All Handle Shipping?
bruce johnson replied to SooperJake's topic in Gun Holsters, Rifle Slings and Knife Sheathes
I ship mostly with Priority Mail as well. I use a lot of recycled packing materials to cut costs. I use UPS for the heavy stuff, I have had a good experience with their insurance for one damaged item. I also use UPS for shipping to a "moving target". I ship some to guys that are traveling. If they aren't where they thought they'd be, I can go on-line and do a re-direct to get it to them without it having to come back to me first to resend. My internationals are all through the mail. I give them the options of Express Mail, regular Priority Mail, and flat rate Priority Mail. The small flat rate boxes aren't tracked once they leave the US. Express Mail usually isn't much more than regular Priority and gets there a lot faster usually. -
Alamo, I don't know of anyone who makes them right off. The problem with that is a commercial supplier would have to go through the approval process and royalties probably. It would take a pretty big order to make that even a glimmer of interest for them to consider it. Somebody might have some other insight. I spent 6 years at Purdue. Lived at Shreve for a 1-3/4 years, until a little party deal got out of hand. I lived off campus the rest of the years. Lots of early morning breakfasts at XXX, Friday afternoons at Harry's Chocolate Shop. Sack of doughnuts at the Union. Good times.
-
I just checked four pretty good blades off #86s and here'e what they measure - These are all 1-3/4" measured on the bottom front to back so pretty close to or are original. The thickness of the stock at the back measures between 0.380 and 0.40. The blade angles are all 16-17 degrees. Two are slightly hollow ground - less than 1/16" at the belly against a straight edge on one. the other is a gnats whisker off flat, two are flat ground. One of the flat grinds is a Disston.
-
I have added quite a few nice hand tools to my website this morning. There are several #6 overstitchers which have been harder to keep on hand lately along with others in the 5 to 8 size range. Some nice French edgers in the wider sizes along with a lot of good Gomph round bottom edge bevelers in the smaller sizes. I also put on several nice sttich groovers in the compass and freehand styles. here is the link to the index page for the tools - Leather Tools For Sale Thanks, Bruce
-
The Other Hand Crank Sewing Machine....
bruce johnson replied to SteelcityK9Cop's topic in Leather Sewing Machines
If it was red or orange probably a Luberto Classic.