Birdman
-
Posts
79 -
Joined
-
Last visited
Content Type
Profiles
Forums
Events
Blogs
Gallery
Store
Everything posted by Birdman
-
Where Can I Find The Equivalent Tool Or Product In The Uk
Birdman replied to ClaireAshton's topic in Suppliers
A few years ago I used Bakers of Colyton . They do some very nice leather. The boss actually does/did a regular route around the UK delivering the leather personally. I did not have to pay until it was delivered and approved in my workshop. I would get a postcard from the firm saying that " their Mr.....would be in my area on...... and my esteemed order would b most welcome". Very quaint old English service from a thoroughly charming gentleman! http://www.jfjbaker.co.uk/ -
I thought this may be a good youth group project? http://leatherworker.net/forum/index.php?showtopic=56295 No stitching, just some 'safe' cutting and punching. And something to take home after one session? Every kid loves their dawg! Tip: leather needs to be soaked before bending and weaving for best results.
-
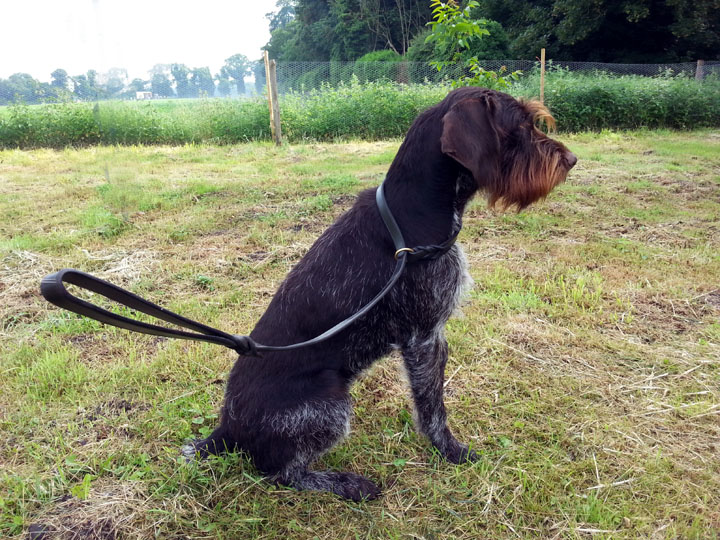
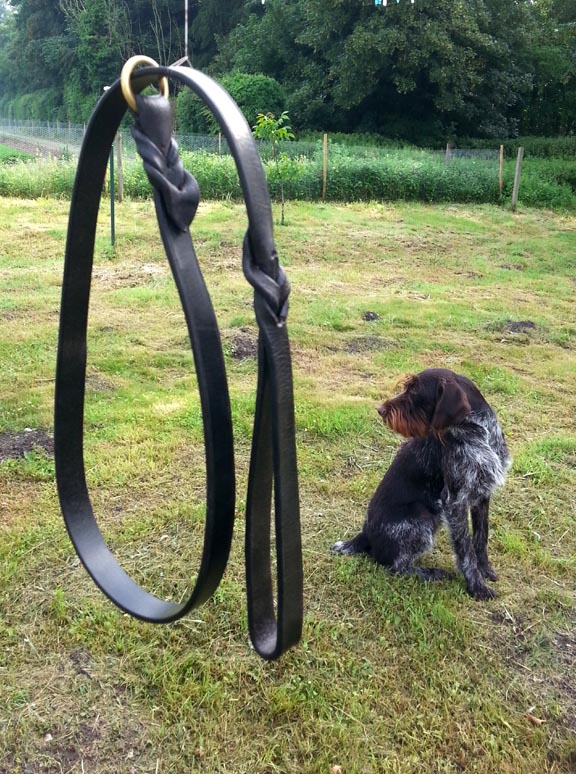
Having forgot one to many times to take the faithful hounds lead when going out in the SUV, I made up a new one from an ooooowhoops piece of scrap bridle leather. ( goofed making reins) Its not without its blemishes, but is very usable. Link supplied to 'Youth Groups'.


-
1) As a minimum stirrup leathers should be made from 4.5 ---- 5mm veg tanned stirrup butt. This is usually oak bark tanned. They are made so that the grain side takes the wear from the stirrup iron. 2)Better still is 'buffalo' hide. of the same thickness. It is more expensive, stretches under use, but if any leather is unbreakable, it's this stuff. Especially suitable for heavy use by the larger rider. Making leathers with the grain to the iron is not necessary when using buffalo. 3)'English Rawhide' of same thickness can also be used for heavy use. I think what we call rawhide is slightly different to what is called rawhide in the USA ? Ours is made by stopping the tanning so that an untanned centre creates a natural laminate. Very tough, but it does not flex like buffalo. It is traditionally used for Polo players equipment. 4)For children, good quality bridle butt can be used---again make so that the grain side is the contact with irons. Use 5/18 linen thread. All can be obtained from Abbey England. http://www.abbeyengland.com/en-gb/home.aspx They will do cut lengths of 1,2,and 3.
-
Looking For Eyelet Setter And Need To Know The Proper Name?
Birdman replied to miss v's topic in Leather Tools
Eyelet splitting can be solved by re-annealing the eyelet----just the 'male' part not the collar or 'female' part. This is can done (using normal workshop care and safety) by threading a few eyelets on to a wire and heating the eyelets with a blow torch until there is a hint of cherry red colour. Then allow to cool naturally. This softens the metal so that the impact and tool do not split the eyelet. The shine can be polished back if necessary. -
This might help? Several detailed pages. http://www.kingsmerecrafts.com/page86.html
-
Darn it! You mean I must stop eating shot game? Saddlers have been using lead blocks for centuries. I just don't know how we have survived! I wont be using your suggested alternatives, the first two are unstable under impact which can/will cause problems with a clean strike and cut. The third, well there may be a suitable plastic to use but I have yet to find one. But you raise a valid point. Lead is a poison. Dont eat it ( even with a little Tabasco) and don't chuck it about at high velocity either!
-
Sorry for the confusion. Starting from bench, lead block, folded newspaper, leather, punch, mallet. Re mallets. For the last 25 yrs I have been using a 12oz rawhide mallet that I bought from Abbey with no problems. Other sizes/weights are available. I couldn't find these mallets on their website so I suggest you give them a bell.
-
In addition to the excellent suggestions above....... You should also be using a lead block with some folded newspaper on top between the lead and your leather. This will stop damage at both ends of the crew punch and tbe newspaper stops the lead marking the leather. I hope this helps.
-
-
I use a leather covered wood block----flesh side up---that has had some automotive valve grinding paste worked into it. You mix coarse and fine paste about 50/50 and work it into the leather with some light mineral oil. Every now and then add a few drops more oil, and even less often work some more paste in as well. After buffing the blade, clean and polish off using the flesh side of suitably sized piece of leather (flat on bench!) kept for the purpose. A half teasppon of each scrounged from a car repair shop will last you for most of your saddlery lifetime. Cheap and cheerful and works as well as fancy compounds in a smart tin!
-
If you still have the 'broken' awl, and is the wooden type with a brass collar to stop the wood splitting, just reseat the blade. This is done by using two copper/brass coins either side of the blade ( stops damage to blade) and placing the lot in a small vice so that the part of the blade that enters the wood is exposed. Then place the handle on top of the blade and tap with a mallet. A touch of epoxy will often cure a persistent offender. If used, allow to set overnight! Abbey Saddlery and Crafts sell very good handmade blades in varioius sizes for insertion into handle of your choice. (I think they have a US agent?) I have a blade that is now well over 20yrs old and is about 1/2" shorter than new and the 'diamond' shape is now oval. With this in mind, be aware that an awl blade 'works in' with regular use and will 'blend' to its user. So the more you use it the better it gets until you drop it on the floor! Hint.
-
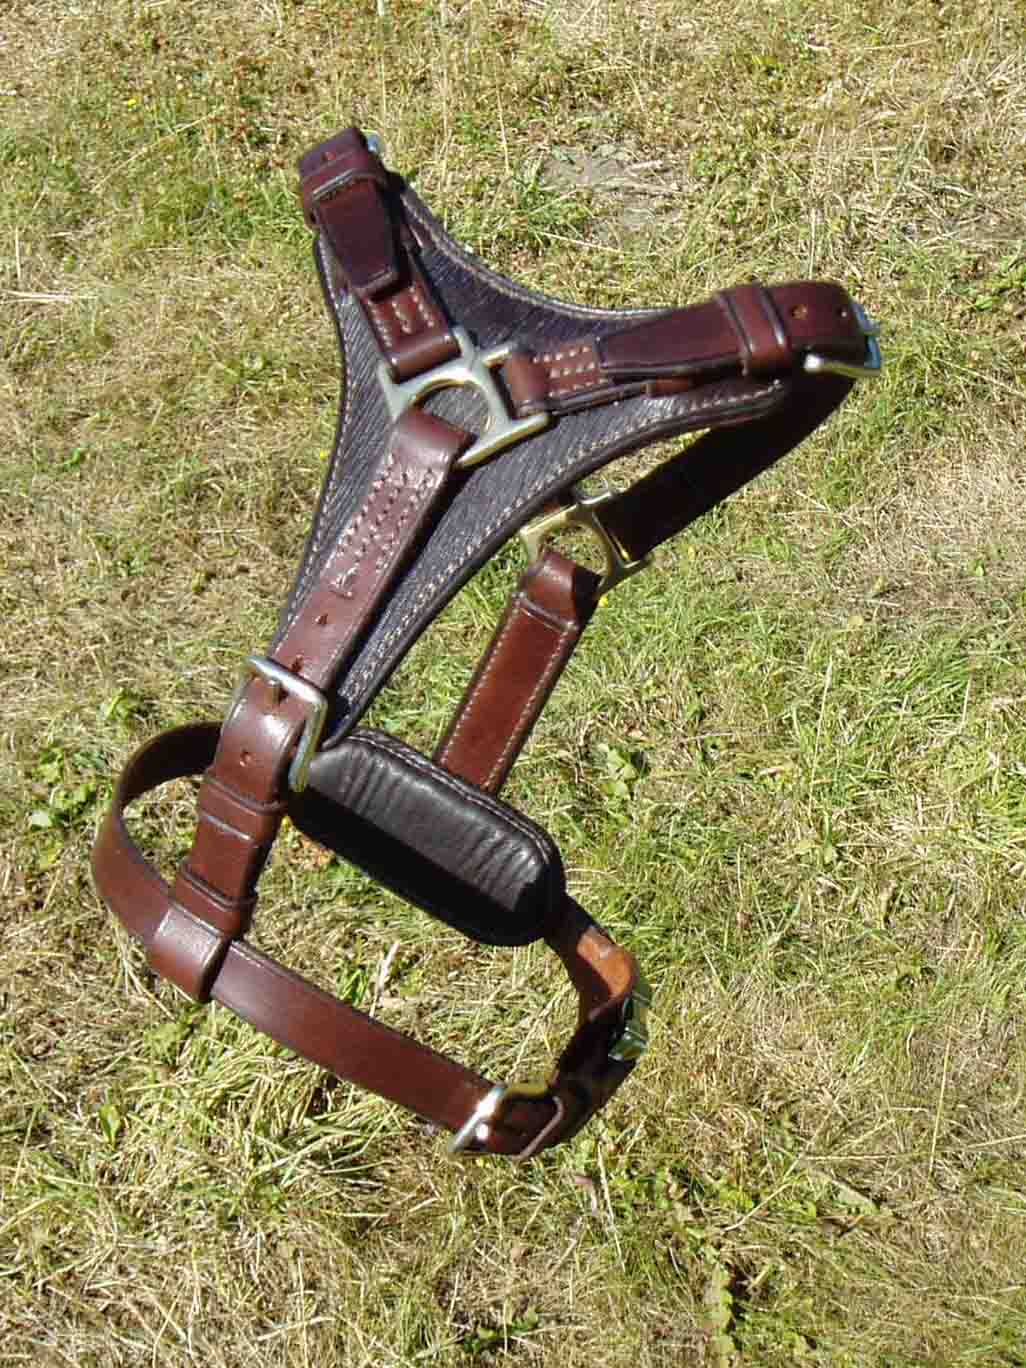
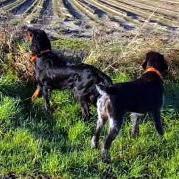
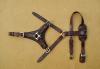
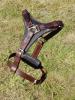
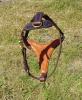
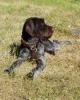
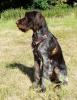
Thank you for your kind comments. The buckle guard is a migrated idea from 'English' type saddles. If I make another tracking harness, I will use slightly firmer leather for the guard.This has not buckled or shifted to date, but I think it may as it becomes more 'used'. tnawrot2......... Poppy is what we in the UK call a German Wirehaired Pointer. A Drahthaar is what they call them in Germany.The (UK) Kennel Club accepts Drahthaar as a GWP on to their register, but not vice versa! They have to be born in Germany to qualify as Drahthar and entered into their stud book. They also have to pass stringent hunting tests in order to qualify as breeding stock for registerable offspring. Not a bad requirement. Poppys sire is an imported Drahthaar and her dams side is not to far away from imported Drahthaar stock. The Griffon (Korthals Griffon) was of course bred using the Drathaar as foundation stock. I understand both breeds have a small band of very enthusiastic followers in the USA !
-
Ps. Hand stiched----of course!
-
A few months ago I acquired a new hound ------or did she acquire me? I made up the usual collars and rolled leather leads and decided a tracking harness would also have a use. I searched the forum for a pattern with no luck. So it came down to pencil and paper and reference to various picture on the net. It is a little bit baggy at the mid hole adjustments as the hound still has/had some growing to do and I may have to make some replacement straps when she has fully filled out. It is made with leather from the scrap box. The straps are split down stirrup butt, the body front is 'baghide', the back is kangaroo.

-
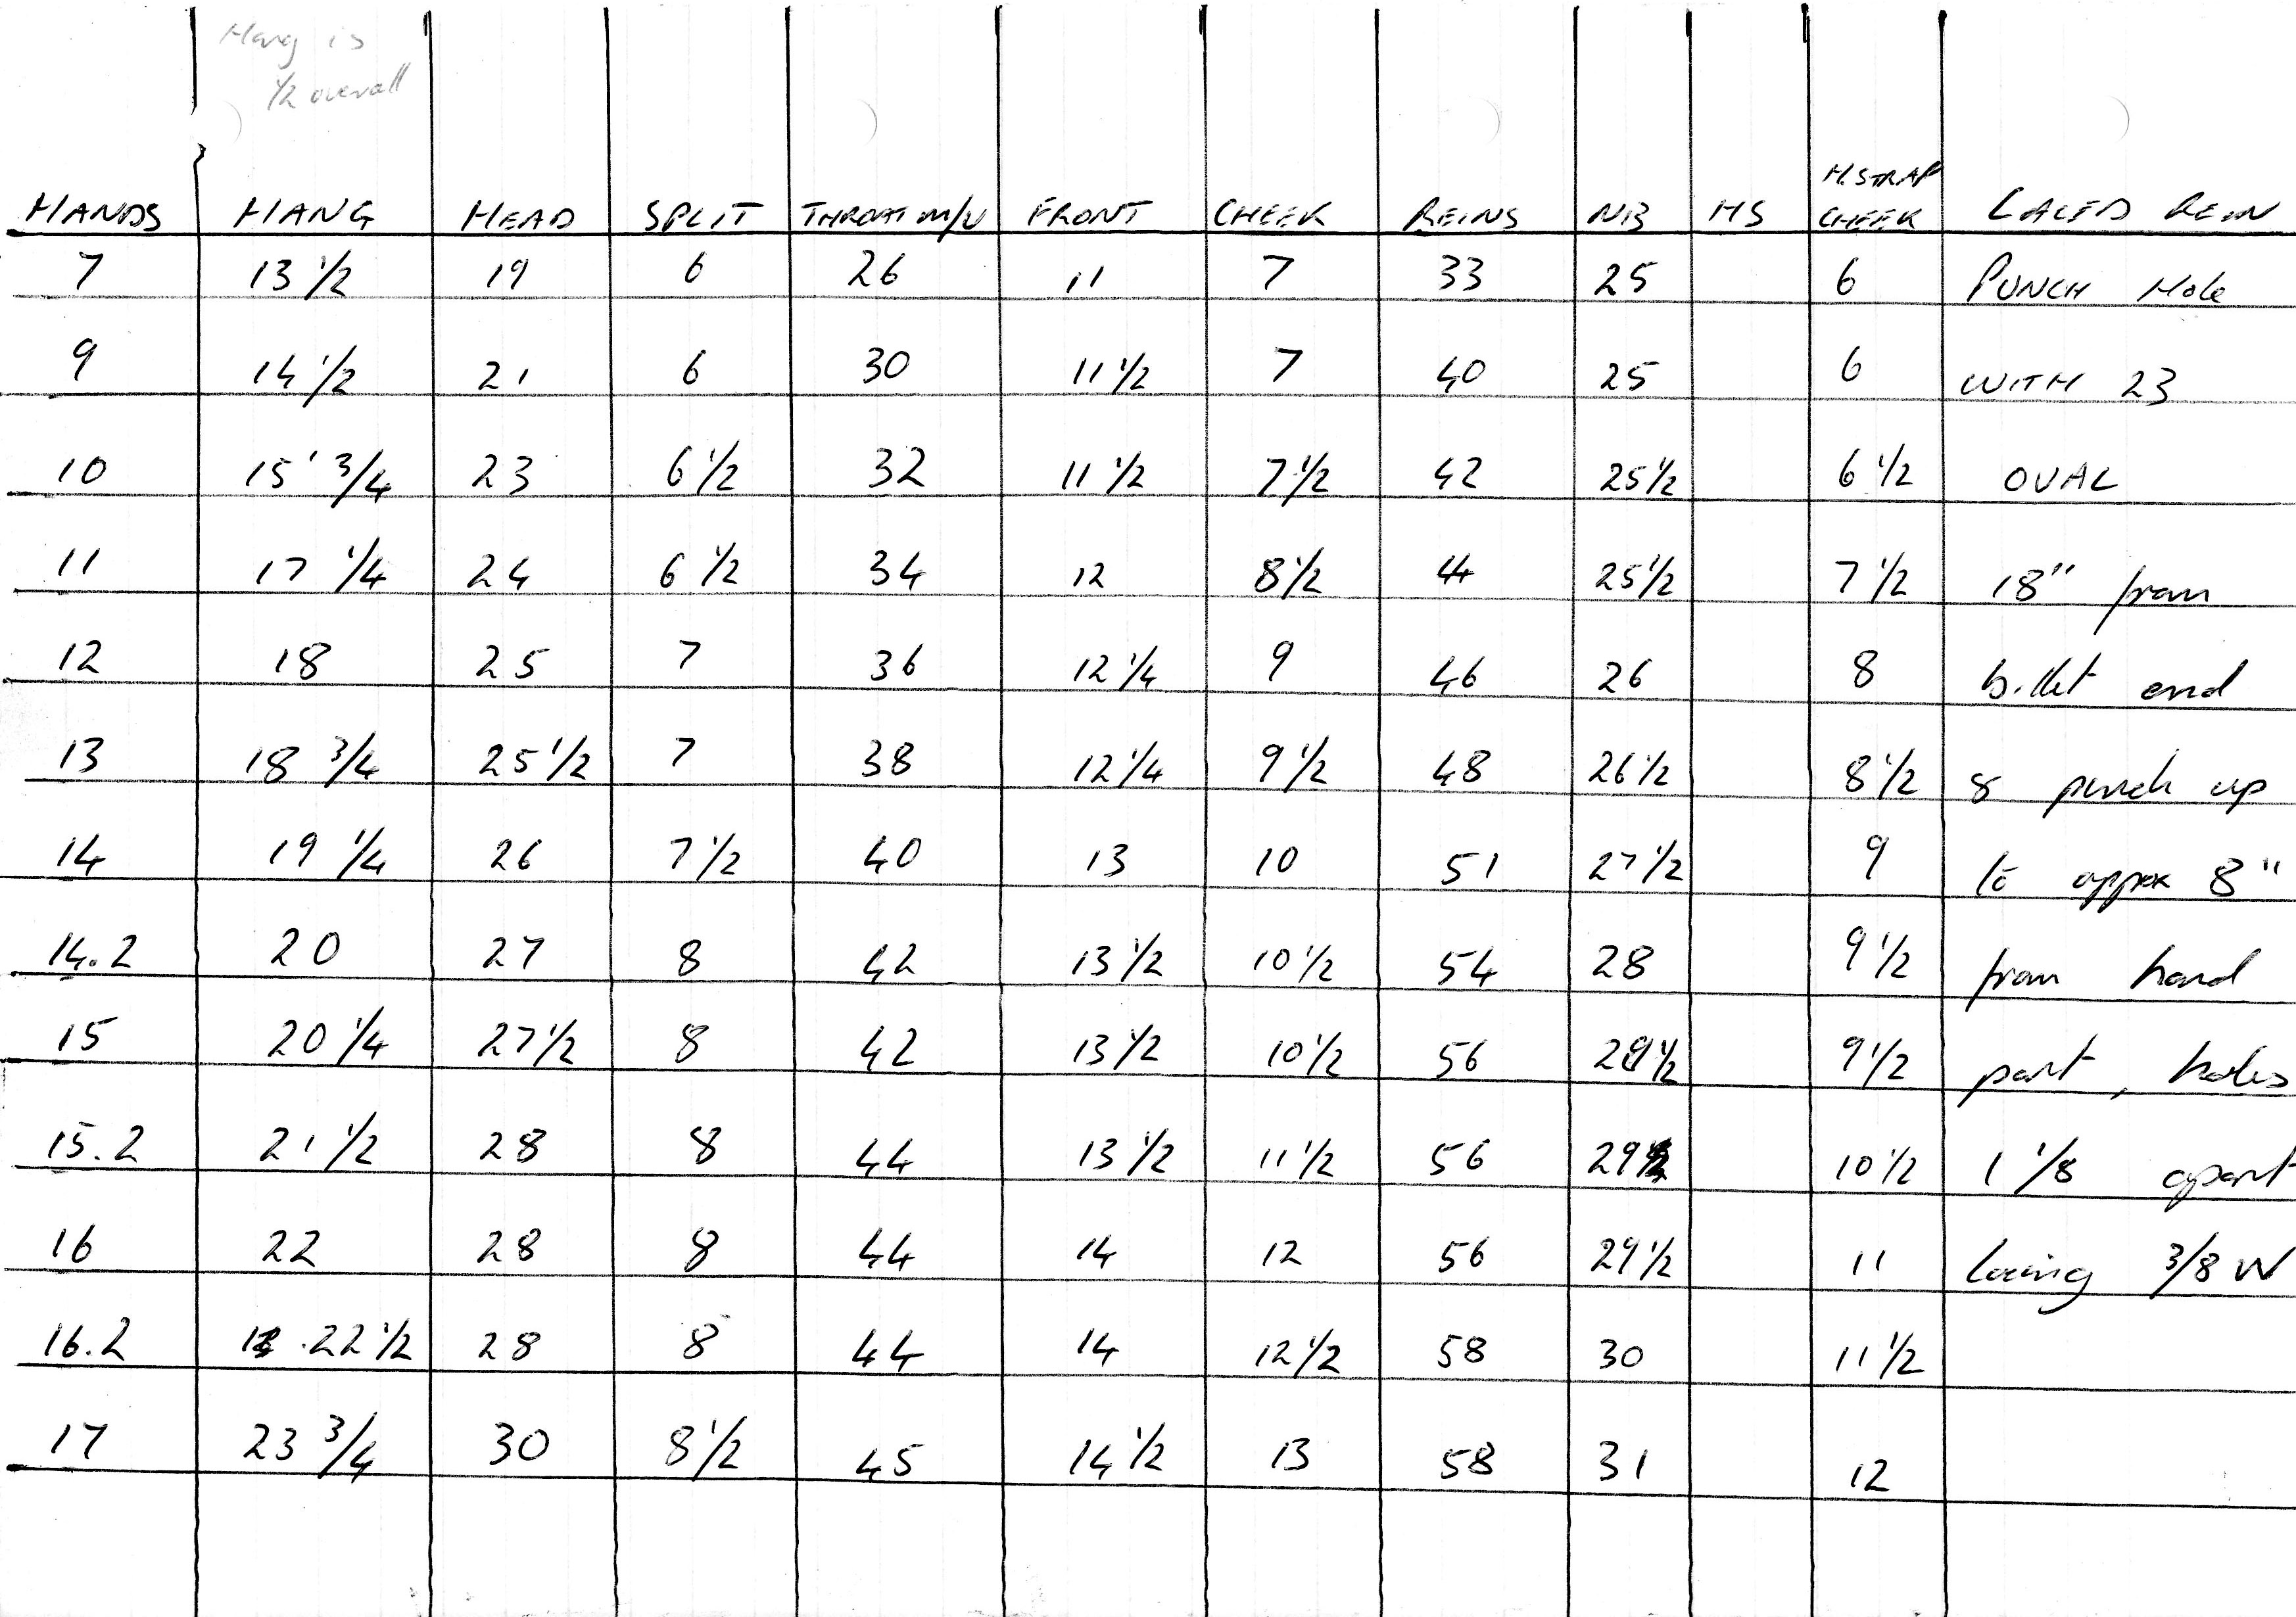
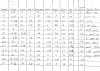
Sorry about the delayed response. For some reason the usual email notification did not happen and I do not check in very often. The sites mechanics are so frustrating. You are quite right in you point about the bit ring size. I should have made clear that the chart is for an English Snaffle Bridle, and this side of the pond, the snaffle bit has a standard ring size. (Except race snaffles which are larger.) The rule is to measure the corner to corner and deduct accordingly the ring sizes. ie If the corner to corner measurement is 46", then allow 1 1/2 " either side for a snaffle bit with 3" rings, = 43". Divide by 2 to get the 'hang' Alternativly, use an old headpiece and cheeks with the intended bit to get the measurement. Then find on the chart a hang size that is nearest your result. In this example "16h" Then, if no other accurate confirming measurements are available re noseband/browband/throat, follow the measurements on the chart. The bridle will fit regardless of the horses breed or size, unless it is a a 'one in thousands', in which case your confirmation measurements will throw up a warning. I note your comment on the cavesson fitting. The chart and formula are for a cavesson fitted and sitting 1" above the bit and allowing two fingers (flat) spacing. Traditionally, for the English show ring, the buckles of the bridle do have to be all on the middle holes and therefore in a straight line. If correctly measured, made and fitted they will be. A horses head changes size uniformly. The chart and above formulas have been used for a few centuries. It holds true in 99.9% of cases, regardless of actual size or breed. See origional post. You are also correct in that not all horses go in the same bit all the time. Owners do chop and change bits for some reason. This is a chart/formula for making a bespoke upmarket bridle, NOT A STANDARD FIT full/cob/pony bridle. Every horse is different ( as you say) that is why the chart has 13 size divisions and the formulas can always be used for any sizes not found in those divisions. If the purchaser wishes to change the bit/ring size, then they will either have to put up with the bridle not being a true fit (in show terms) with that bit, but an 'altered to fit' (in practical terms), OR better still, buy a second bespoke bridle! I hope this has resolved some of your concerns, do get back if there are any others.
-
Good choice of Scotch! You refer to 3 to 4mm leather, is this for wristwatch straps? Or a typo? Seems a bit heavy duty to me, but having looked on the www. at the straps available..... here is my twopenneth. Re stich marking. You will find that a pricking iron gives you a more accurate and cleaner mark than most pricking wheels. Occasionaly you may find an old wheel in a car boot sale that gives a just about acceptable mark at about 8/inch, but my advice is to get Dixons 1" and/or 1/2" pricking irons. For the work you are describing, 6/inch, 7/inch, 8/inch and 10/inch should cover your needs. And you pay for what you get. These tools used properly and cared for should last your lifetime. Cheaper imitations are just that. And you refer to a pricking chisel? Remember the pricking iron /wheel is just a mark making too that breaks the surface , not a hole punching tool. You use your awl on the mark for that! Re thread. 3/18 linen may be a little heavy duty for the work you are describing. Consider 3/25 linen for the smaller stiching. It is available in small cobs, but unfortunatly the colour range can be rather limited. Shop around. Needles. No4 blunt point harness. Also get a couple of smaller sized glovers needles. Cheap enough and no ill store. Awls, You may need to file down a small awl if you are doing some of the finer stiching. Rememeber to preserve the diamond profile! For fine stiching, I use an awl that has worn down through use. Abbey Saddlery would be a good starting point for all of the above. You will also find the staff their very helpful if you discuss your needs. They have loads of experience in the leather industry. Other threads. For the fine fancy stiching, silk thread would serve you well and give added value. You can get 3/25 silk or near to from embroidery outlets. I am not sure if he has retired, but their was a silk thread dealer in Suffolk. I think he was in Sudbury or Stowmarket. He sold quite small amounts to the embroidery trade. Try Google? Word of warning on silk thread....it is not man enough for bridlework except on fine show bridles on a well behaved animals in the showring-------------- no matter how tempting the fancy colours may be! Good luck! P.
-
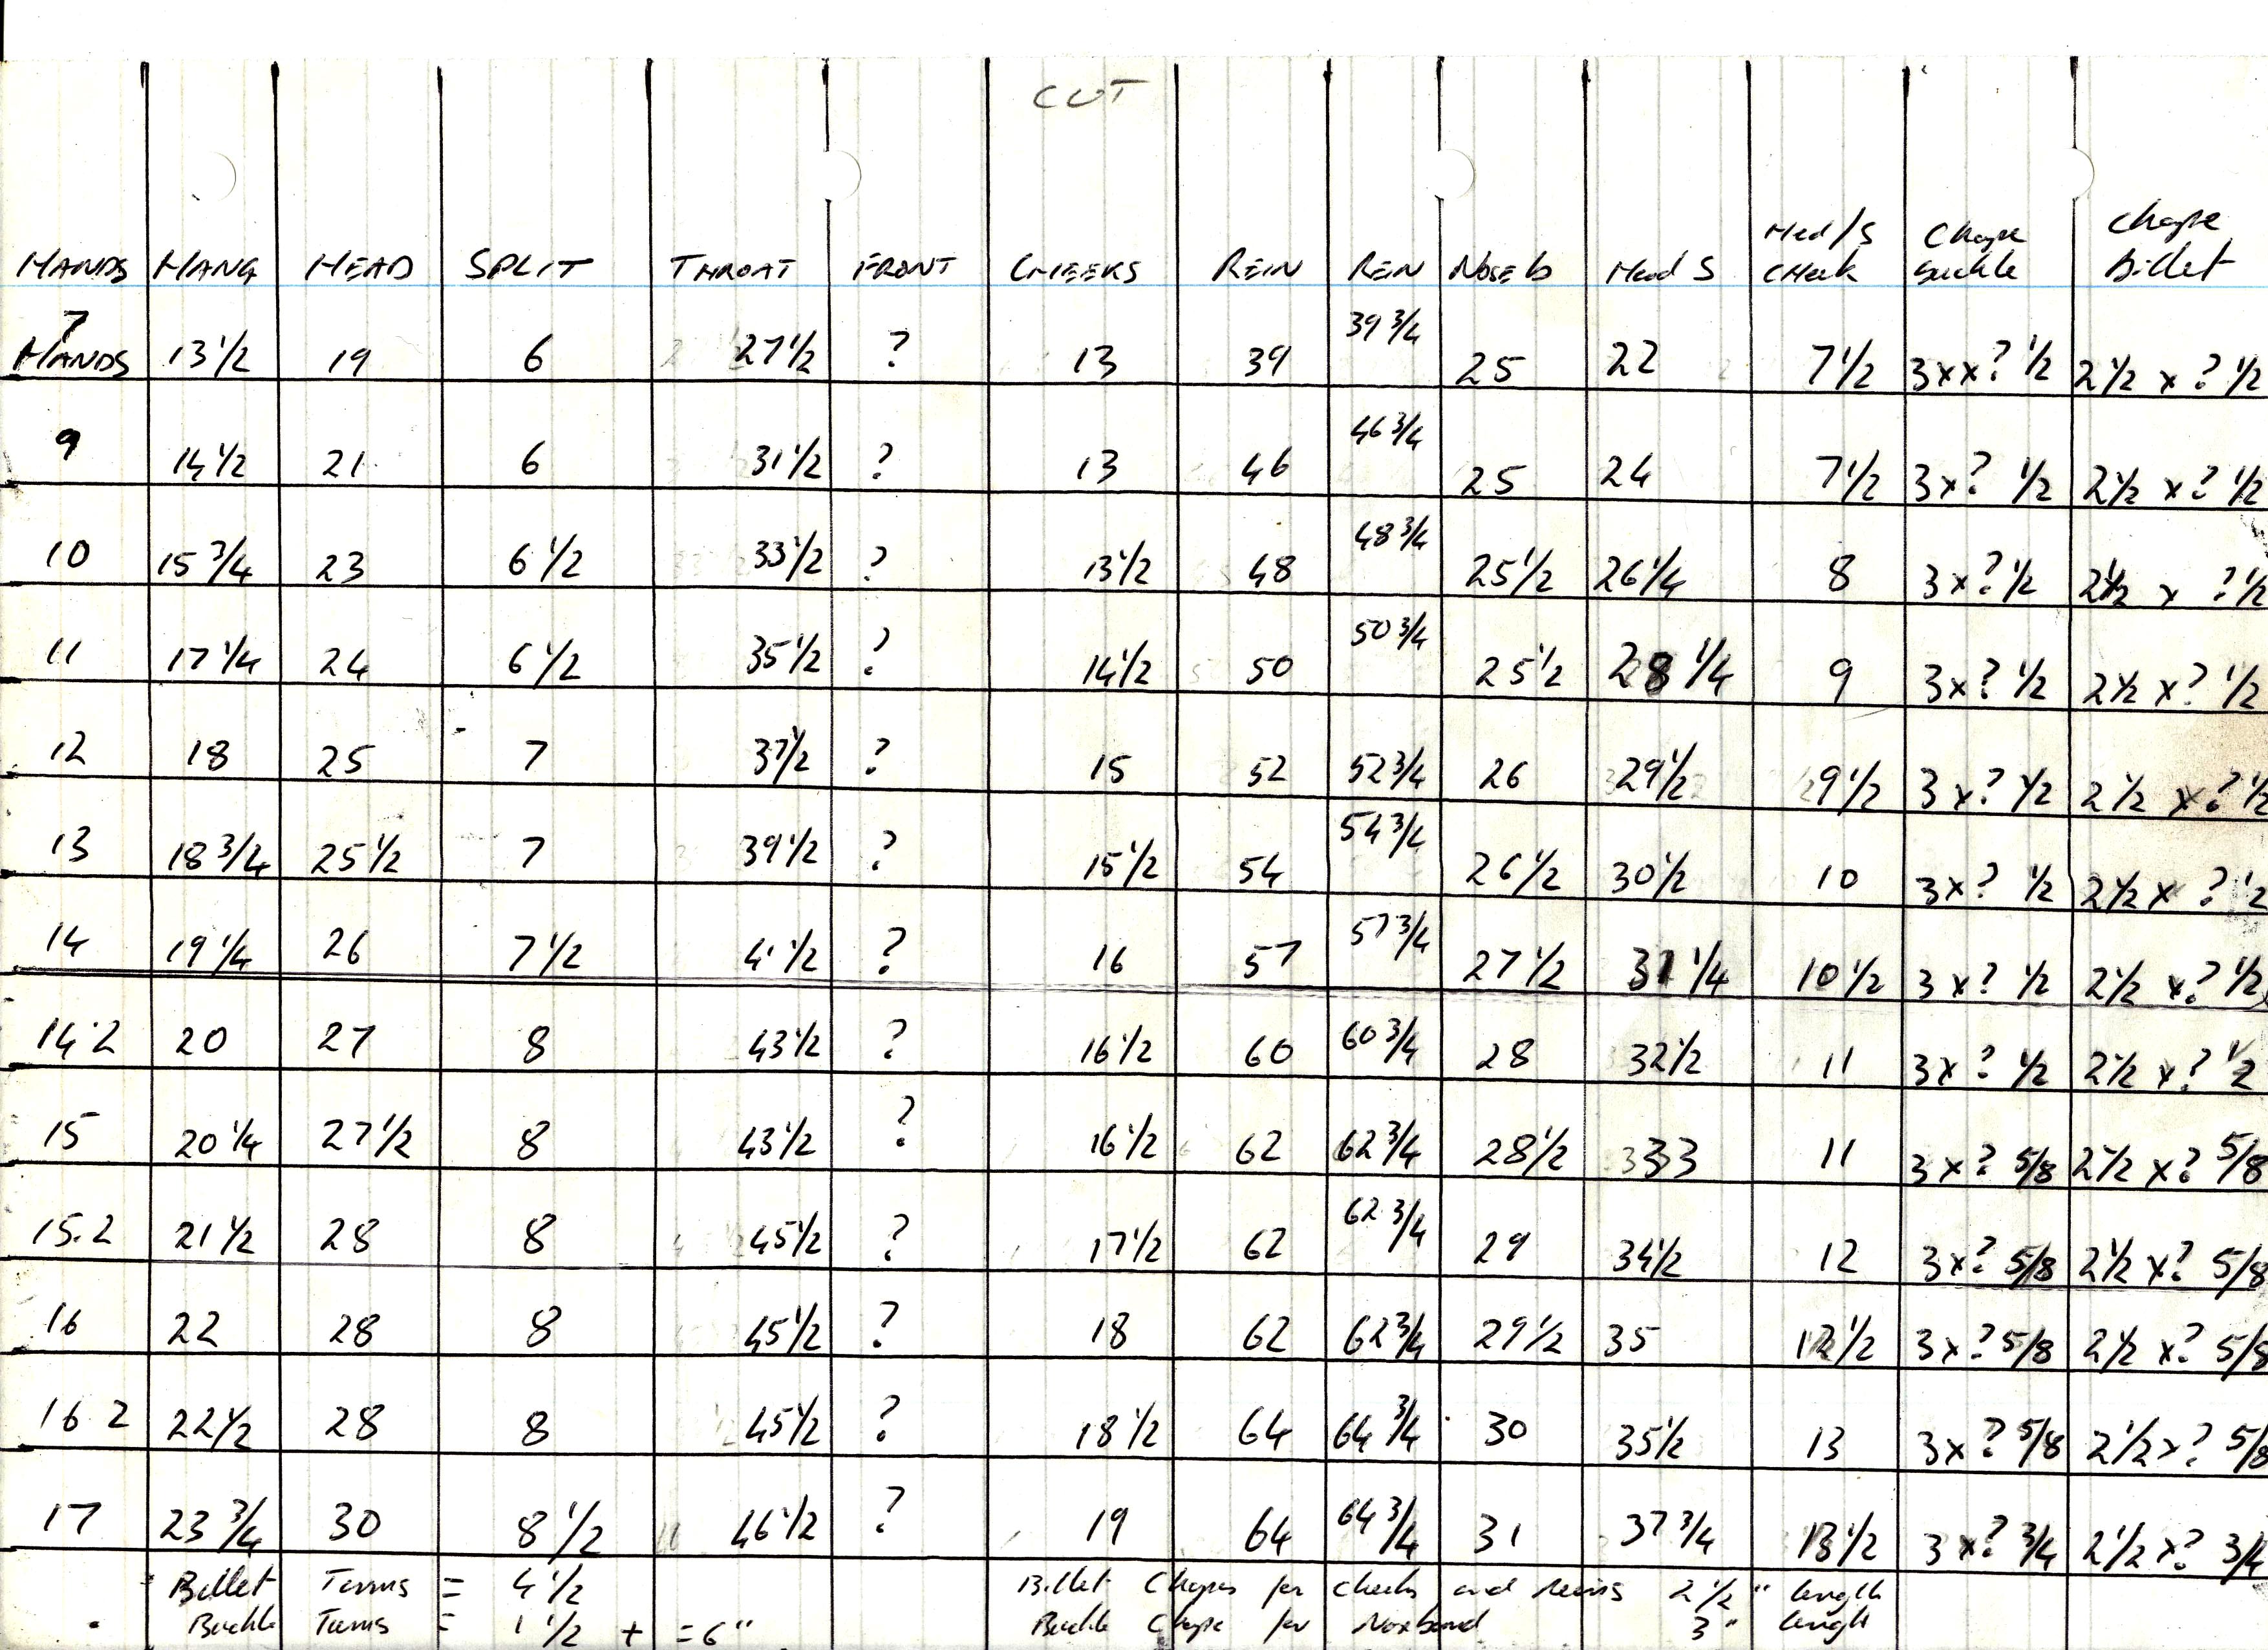
More notes................. All billet ends are 4 1/2" All billet hook chapes are 2 1/2" Nose band buckle chape is 3" ACCURACY IS ESSENTIAL WITH CHAPES! Noseband point is 4 1/2" plus another 1" for scalloping down to point width. Buckle holes are 1 1/2 from point then 5 holes 5/8" apart. All other buckes are 1" stiching with 1/2" allowed for the turn. Buckle holes for headpiece start 1 5/8" from point and are always an odd number ( to give a halfway) For most bridles 9 holes @ 5/8" will be right. Small bridles may need 7. Any oddities, measure a mid point and do the maths. Make one rein ( the point ended one) 3/4" longer (CUT SIZE) than the other ( buckle end) to allow for scalloping to the point and ensuring when made up they are of equal length. Browband (Front) stiching is 1 1/2". All bends are 1/2" and have been allowed for in the charts. On the Made Up Chart, right hand column, you will find my notes for making laced reins. When making laced reins, tighten the lacing as you work so that the rein gently wrinkles or corrugates. When in use, the rein will stretch and straighten and this prior tightening will stop the lacing from ending up loose. Enjoy!
-
Morning! I am having trouble cross referencing a link from within the Forum. I copy and paste the address bar details and the whole link shows in the draft copy. But when I submit the post, it only enters learherworker..... or similar. How do I succesfuly transfer a post from another thread to illustrate my own ? Best wishes, P. Name: Birdman ( Paul) UserName: Birdman IP Address: 85.210.191.169 Email Address: outofhood@hotmail.com
-
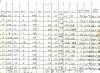
CUT SIZE CHART. These cut sizes make allowances for l the turns and stiching at buckle ends, the turns and billet ends of reins and cheeks etc etc
-
The forum 'Search' engine seems to be a bit hit and miss, but I have not found any posts that discuss the actual measurements for a correctly fitting English Bridle. When correctly made and fitted, all the buckles should be on the middle hole and in a line. Larros pictures below ( of his very fine work) display this admirably. http://leatherworker...=1( For some reason the full link will not attach HELP!) Idealy you should measure the horse yourself! Take a measurement from the corner of the mouth over the head to the other mouth corner. Wrinkle the corners to simulate the bit. This is called theCORNER TO CORNER measurement. We then have to do some maths to get the OVERALL measurement. As an example, if the CORNER TO CORNER is 46" long then we have to deduct something to allow for the rings of the bit. If using a traditional english snaffle, it will have 3" rings. So deduct 2 X 1 1/2 " ( allowing for each ring). This gives us an OVERALL measurement of 43". Obviously bit rings is a variable and will heve to be accounted for! Alternativly use a part bridle.....headstrap and cheeks with the bit fitted and adjust till a fit is obtained. This is now your OVERALL. So now, refer to the MADE UP CHART below. A quick word on the left column.....Hand size. 14.2, 16 15 etc are just figures you could number them 12345 etc or call them apples and bannanas. The do relate to a hand size and head size of horses from a past age, before the influence of the Arabian horse in breeding. This influence has resulted in smaller heads for a given horse height. The chart still holds true, as the relative proportions of a horses head have not changed. As an example, A 16.2 Thoroughbred will probably need a bridle for a 14.2 on the chart. Here are The Formulas that you can use to do what the chart has done for you. Cheeks-made up size: OVERALL minus Head divide by 2 add 1/2 split= ? Cheeks cut size: OVERALL minus Head divide by 2 add 1/2 split = ?? Noseband Headstrap made up size: Head plus Cheek minus 1/2 split minus 1" for sitting above the bottom of the cheek =? Noseband Headstrap cut size----as above, now allowances. Noseband Headstrap Cheek madeup size: Made up Cheek minus 1" for sitting above =? Noseband Headstrap Cheek cut size: Made up cheek size minus 1" plus 1 1/2" Or in another way add 1/2" to made up cheek size! Now you are wondering, he has slipped in something called Cut Size here? Have faith. Here is the Cut Size chart! You will note that the FRONT ( Brow band) column is empty. This because until you have decided the width of your headpiece, you cannot decide the cit size for the Front. So Use the Made Up size and add the 2 loops (over the Headpiece) 2 x 1/2" for the bend and 2 x 1" for the stiching.
-
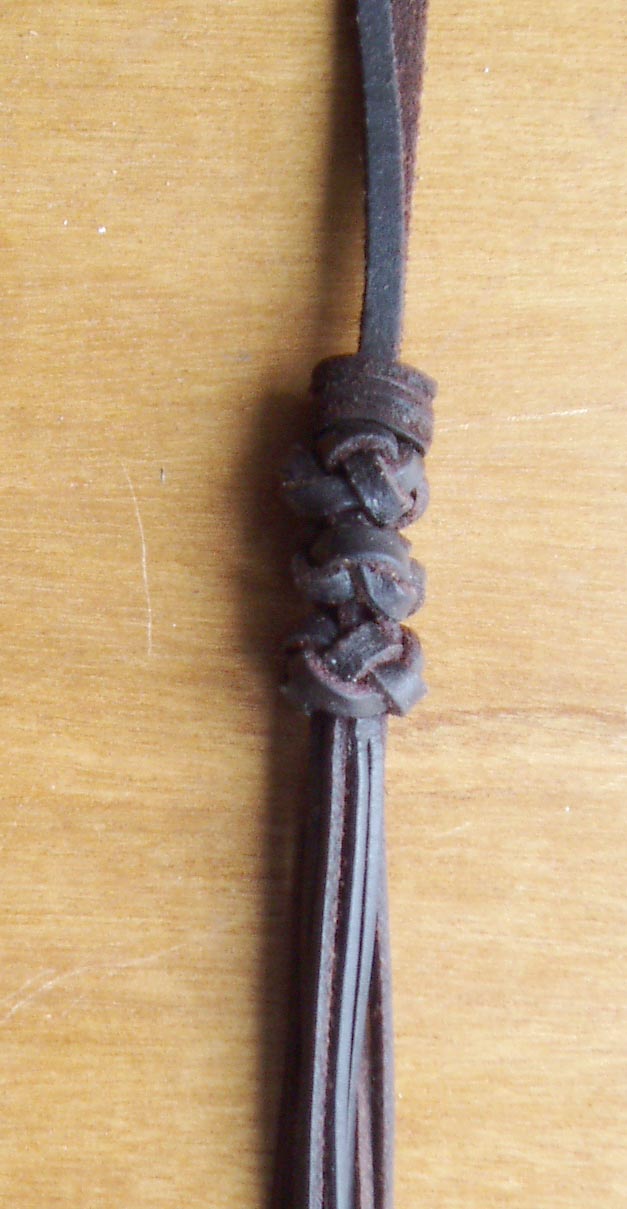
This link with pictures may be better than my drawing! http://www.falconryforum.co.uk/showthread.php?t=18469 Though I would add to the good instructions and pics that at the end of the first stage as shown in posts 5 and 6, do not tighten it so much as shown in post 6. Just tighten enough to just about stop it falling apart while you work. This will make it easier to do the second sgae of the knot and ensure that you can twist any strands so that the grain and flesh sides are the right way. you can then tighten each strand in turn . I hope I am not trying to teach my Grandad how to suck eggs, but if you need to loosen the knot a little, ( in order to manipulate some wayward strands) this can be done by taking exact opposite strands from the centre and tugging them outwards. Here is another link with animated knot tying. It deals with rope, but many can be transfered to leather. And you never know when you may need a good knot! http://www.animatedknots.com/ Regards.
-
Interesting observation. I to have experienced this curve. I had assumed it was because of my actions with the strap cutter. ie the user placed sideways pressure whilst cutting to keep the leather hard up to the straight edge of the cutter. And inadvertantly this pressure increased towards the middle of the cut more than either end as the operator was inclined or able to use more pressure? This curve becomes more exagerated with every cut. Sometimes I have had to use a straight edge to mark a line and then use a head knife to cut of a strip to re straighten the edge. I cut a 'nominal' 3/8" strip to use for looping so as to reduce waste! I suppose as the different "stretchability" of a hide ( in line with the spine as against across the spine) could be thought of as some sort of grain character and may affect moulding to a slight degree? I havn't realy done enough moulding to make further comment, so I welcome a more expert view! Regards.
-
Hello, Is this what you are looking for? The term 'Turks Head Knot' seems to cover a variety of knots that are on a similar theme? I found several knots called Turks Head that were similar to this one but tied differently! This one is easy enough. So if you want the diagram let me know and I will draw it out and post it. I look forward to seeing some pics of your dog leads as that is a project I also have in mind....hence the research on 'Turks Heads'! Best wishes.

-
Having the right tools for the job is definitly best, but you can 'make and do' in this case. It will take care and more effort than using an edge shave, before you do it, try this first on a piece of scrap leather from the making your cuff.. You may also learn a few things along the way! Use some fine sandpaper on a block ( at an angle) to gently sand the edges that you want bevelled. Notice if the surface is left smooth in one direction but rough in the opposite? Use an even pressure and continual action to keep the sanding as even as possible. You can always cut a new edge on the practise piece until you think you think you are getting it right . Then try it on your cuff . Go slow! As for staining the edge you could try making up some dye for yourself. It is not as good as purpose made leather dye, but it is useable, especialy if the budget is limited. Buy/obtain some walpaper size or walpaper ( powder) glue and some 'add to water' based fabric dye from a haberdashers (or even some general stores). Make a dauber or find a small artists paint brush to apply. Read and comply with the safety precautions on the box! Using a small jam jar put a small amount of the dye in the jar and add and mix the water slowly. Add more water if it is to thick. Aim to have about a 1/3 cup in the jar, then you have room for adjustments! Remember you are using a small amount of concentrate, the total of which would have made a bucket of dye to use with clothes! Then try the dye on a bit of scrap, if it is to thin add and mix a little more dye until your test piece is looking right. Then ( on the basis of the rough quantities above) add and mix about 1/8 to 1/4 of a teasoon of the walpaper size/glue. ie about a couple of pinches. Mix thoroughly (lid on jar and shake?) and try the dye on the test piece. Its OK to go over your earlier tests, or use fresh. Note that in one direction the dauber/brush may leave a rough surface and in the other a smooth. Apply with care to avoid run off over the part of the pece you do not want stained. Angling the work helps, as does not having a brush/dauber so loaded it drips! Now the important bit to get that shine. Try this out on your test piece if you wish. You need to get busy while the dye is still damp. I use a piece of well worn denim and if possible pull the work through denim using pressure from palm and fingers to put pressure on the stained edge. This makes it quite warm through friction. This action will shine the edge, Note (and adjust)any edge differences that happen when you change dirrection. If the piece is to small, place it edge up on your bench and use the denim and a finger again getting that friction warmth. If you are using dark dyes, the denim can be used for years and actualy improves with use as some of the dye becomes part of the denim. You could experiment with other cloths? If using lighter colours, you will need to bear in mind stain transfer to your new work and colour. Then ( if using dark colours) fold a sheet of newspaper over several times to make a useable sized piece. Pull the work though the gripped newspaper as before. Again it must be fast and firm enough to make the edge warm up through friction. Strangely, the cheap gutter press newspaers work better than the highbrow press! I think it is the cheaper paper and inks that they use. If you are using lighter colours, try a folded piece of A4 typing paper or sugar paper of a near match colour. One last tip... do all the leather cutting, shaping, edging, creasing dyeing and polishing etc before you fit the hardware. It's easier. You can always do some careful retouching and polishing of the edges to finish off. Experiment safely and have fun!