gottaknow
-
Posts
941 -
Joined
-
Last visited
Content Type
Profiles
Forums
Events
Blogs
Gallery
Store
Everything posted by gottaknow
-
You wouldn't use sewing machine oil in your car, so why try and use something different in your sewing machine other than what was meant for it? Regards, Eric
-
It's very plausible that water was in the oil for quite some time. How it got in there, I have no idea. I believe the screw pump for the top shaft is probably corroded and blocked. I'm going to drain the sump this week and fill it with clean oil. I'll save the old oil in a jar and let it settle out. Nears as I can tell, the intake is below the normal oil level, but closer to the top then the bottom. Because a screw type pump will always be in motion, it's possible if I can get to it with a .010 guitar string I can unclog it. I have 4 guitars and I use the old strings for lots of things. I won't spend a lot time on that, more than likely I'll develope a new manual oiling system for the top shaft. I have a short week coming up in my factory, I'll be flying to our two plants in Seattle to address some machine issues.Regards, Eric
-

Double Thread Singer 46K Fur Sewing Machine (Overseamer?)
gottaknow replied to alexitbe's topic in Leather Sewing Machines
That's very cool. It is an overedge stitch. Merrow makes the more common units. I have three of them. It's basically in the chainstitch class (no bobbin). There are several different variations, yours is for light fabrics. They are also common in the glove making industry. When you get to the heavy ones, they are reffered to as blanket stitch machines. I may have the engineers manual for your machine. I'll take a look. Nice find. Regards, Eric -
Triflow is a great teflon based lube. I do use it in the factory, just not on anything that even comes close to fabric, (rules out all the sewing machines). It, like most other lubes out there, stain. The best thing about Triflow, is the smell. Bananas. The other issues when running machines at high speeds, is that lubes that are thinner, blow past shaft seals meant to contain sewing machine oil. On a slow moving leather machine, this is probably not an issue. On a machine running at high speed, it'd be everywhere except in the machine. Stuff is really slick. As an aside, we use a really lightweight (3 oz) deer suede on Lycra equestrian pants. Even the sewing machine oil stains it and we have to replace it, so the machines in that line are wiped down twice a day. Regards, Eric
-
Heh.. Rather than place blame, I choose uneducated oversight. I see it a lot. I guess that's why I enjoy sharing information so much. Lord knows I won't be around forever, so pay it forward. I have been very fortunate to have had the experience and training I recieved. I've made my share of mistakes, it's part of the process. I had a Union Special 63900KD (actually I had 30 of them). It's a needle feed lockstitch with a gear type oil pump for the top shaft. The tended to lose their prime. The mechanic I was working for at the time told me to keep an eye on that particular machine, check the sight glass 4 times a day. The operator was setting front zippers and sewed wide open at 4000 spm. I was across the factory and began hearing a high pitched whine. As I was turning around, there was a loud bang. The top shaft froze up so tight, that it actually tipped the machine over frontwards. We had to part out the machine and I learned a valuable lesson. Regards, Eric
-
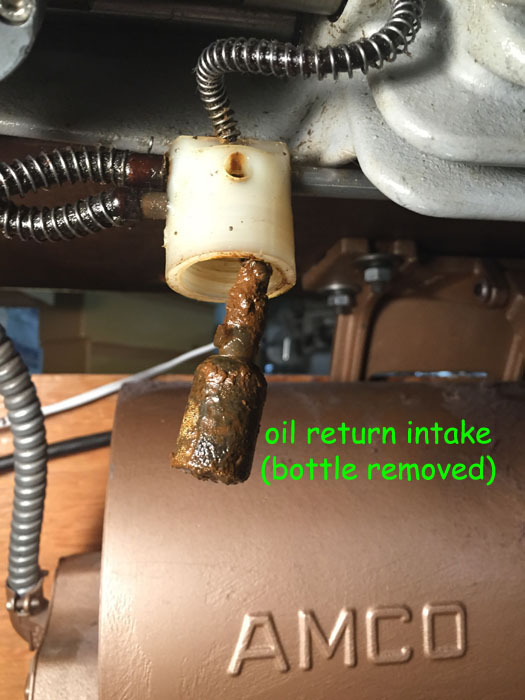
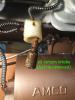
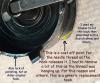
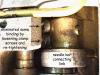
Here's one more picture of the oil return intake. I removed the plastic bottle so you can see the sludge on the intake. There hasn't been any oil movement through this portion for a long time. It went unnoticed since there wasn't any oil getting to the top shaft to be returned to the sump anyway. I like Tinkers theory that perhaps water was introduced via a contaminated container, and it likely went on for a while. Only other way I've seen this happen is through condensation inside the upper arm where it could have drained back to the sump. I don't think that was the case though, since the inside of the upper arm is fairly clean. Regards, Eric
-
Tinker, re-read the msds, section 4. It states that adding water can cause foaming if the oil is burning, as any oil will do. That refers to trying to extinguish it with water. The oil itself is not formulated with any water. Regards, Eric
-
This is the oil I use in all my machines. (see attached pdf) We have to use oil that we can clean out of fabrics with dry cleaning spot remover. This is really a great oil. Juki approves of its use in all their new machines and it doesn't void the warranty. I don't experiment with oils, it's too important. I'll actually use the same oil to help clean this 467 and stop the corrosion. Regards, Eric 4991.pdf
-
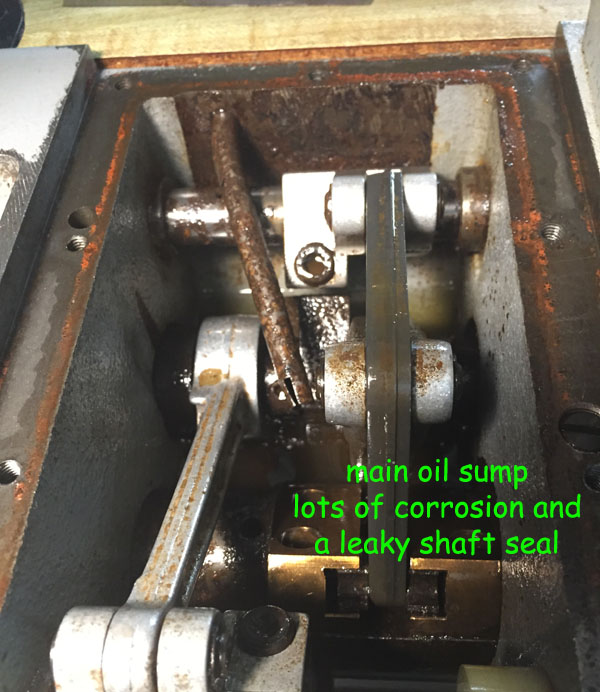
Ok, here's the pics that go with the earlier description of the oil issues. Oil to an industrial machine is like blood in our bodies. I've seen upholstery shops kill a new machine in very short order due to lack of oil. In the factory, we pay very close attention to oil. Not only the fill levels, but making sure the pumps are working. A machine sewing just half a day at high speed will seize. On the machines that require a higher rpm, the operator have to wind a few bobbins a day at high speed, rather than when they're sewing. The Juki 5410's will seize in less than a day if the top shaft is dry and the operator is sewing full speed. Machines that are purchased and used for leather, seldom see much speed. It's important to understand the oiling system. It's the first thing I do when I purchase a new machine. Anyway, the pics are attached below for the 467. It's easy to see the oil issues throughout the machine. I really think the wrong oil was used in this machine for a long time. There shouldn't be that much corrosion in a closed sump. As I stated earlier, any machine that uses a closed splash sump, needs to have oil with an anti-foaming agent. If the oil foams, it heats up and the chemical properties begin to change. At that point, it's not oil and leaves the type of residue I've seen through out this machine. When I have time to come up with a satisfactory fix, I'll document what I decided to do. At this point, I still think this machine will be useable, but with some added maintenance items to pay attention to. I'm very conservative with the use of solvent to clean newer machines that have sealed bearings. You can't replace the grease. As for the leaky lower shaft seals, unless the shafts are removed and the seals replaced, they will keep leaking. The timing belt will need to be kept somewhat clean to extend it's life. As a footnote, the timing belt on this machine is kinda whimpy. The rest of the machine is a rock. Regards, Eric


-
The problem with manually oiling the top shaft of the 467 is there's no access without removing the top and end cover. I will likely drill some strategic holes or install a top reservoir with some routing of wick tubes much like the old Singer 111's. Their is some damage due to lack of oil on this machine. I'm convinced now that an oil without an anti corrosion element was used for a long time. Regards, Eric
-
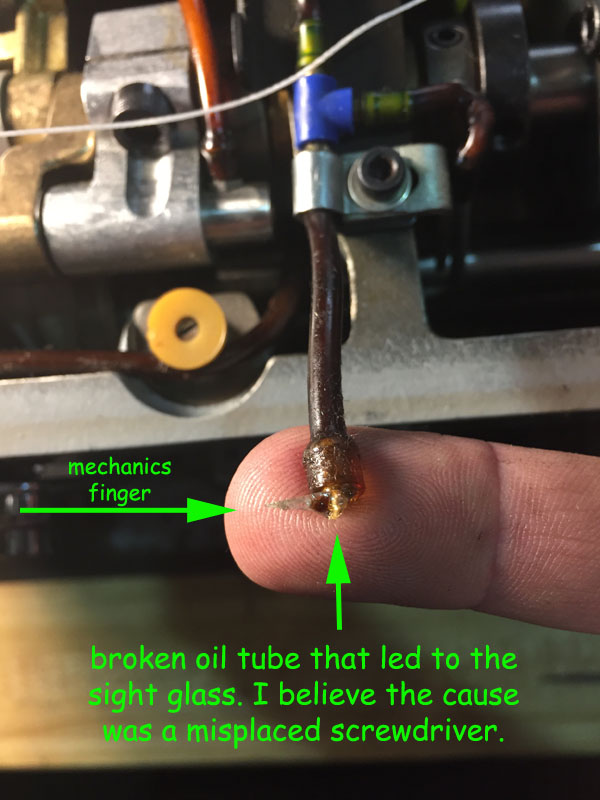
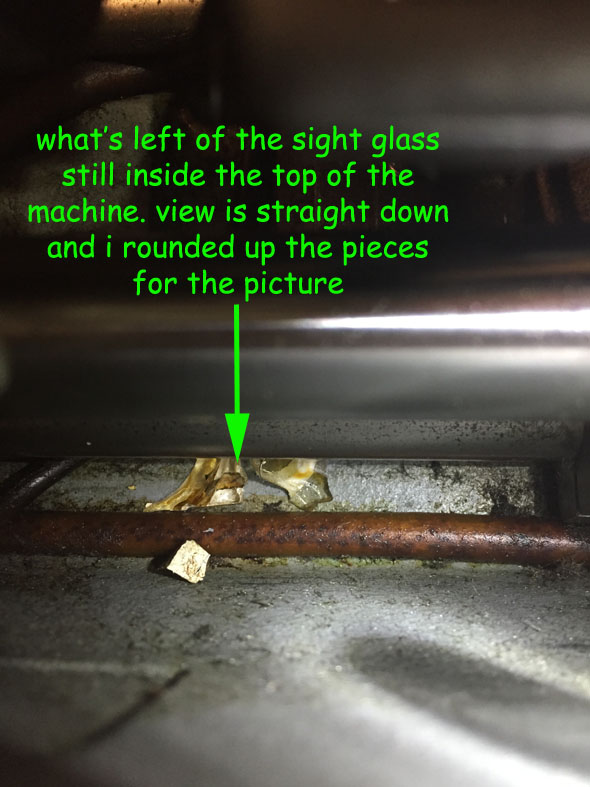
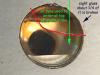
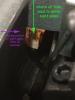
I spent a good amount of time understanding the oil system on this machine. It uses a combination of the following: 1. Oil reservoir splash- this is a closed compartment with a supply of oil. The bottom shaft as it rotates throws or "splashes" oil into strategic locations that contains wicks, transporting the oil to key locations. This is the ideal system for any sewing machine because it's not dependent on a pump. It provides the most complete and dependable system in my opinion. Union Special Corp. mastered the design of this in many of their chainstitch machines as well as their workhorse overlock machines. Machines with reliable lubrication live a long life. They do require mineral oil with an anti-foaming agent as the splash system is quite violent. Without the anti-foaming agent, you have a bunch of bubbles that don't flow very well. Ironic that many oil pumps depend on oil flowing through them to keep them lubricated and funtioning. An oil pump that runs dry will eventually fail. 2. Oil pump- oil pumps come in many forms. I know there is an oil pump in the 467. I believe that it's fed via a tube in the splash reservoir. That pump pushes the oil to a series of small tubes, some with wicks, some without. This oil pump supplies oil to the top shaft including the needle bar, presser bar, and all the associated moving parts. Very critical. 3. Gravity- this is common on older machines with an oil reservoir in the top part of the machine. Singer perfected this system in their original 111 series. It worked good for the top shaft, and the bottom shaft depended on oil holes that had to be manually oiled. The 467 has a sight glass on the front of the machine that indicates oil flowing to the top shaft and it's components. Many manufacturers use a sight glass so that you can make sure your top shaft is being lubricated. I stated earlier in this thread that the top shaft of this machine was bone dry. It's been dry for a very long time. I also posted a picture of a crank shaft that had some punch marks on it. I now believe the top shaft on this machine froze up at some point in its history and someone got it turning again by applying some local oil and hitting the top of the crank. The needle bar was jumping sideways when I first started looking at the timing. I hand oiled the crank and readjusted it's position. The movement is minimal now and I was able to get the machine sewing in pretty short order. The original hook was replaced at some point, probably from lack of oil. The generic hook had some issues, but I resolved that as I went over earlier in the thread. There are some broken components in the oil system. The sight glass has an entire corner missing. It just happens to be where the tube from the oil pump enters that verifies oil flow to the top shaft. It was likely broken by a misplaced screwdriver. It's tucked a bit out of sight where it would be easy to damage. I don't know at this point if the oil pump works. There are other indication that it doesn't. There's also a leaky seal on the right side of the bottom shaft where it goes through the main oil reservoir. This has caused the timing belt to soaked in oil. Rubber timing belts don't like oil. There's enough oil on this belt and the splines really aren't that deep (compared to say, a Singer 211). It's conceivable that the shaft timing could jump. I put some pressure on it, but it stayed in place. I've got pictures to show all the above, but it's late and I'll edit and add them to the thread this weekend. I did sew some nice heavy nylon webbing with no issues. Regards, Eric
-
I'm getting happier with the sewing, working on tracking down the lack of oil flow....stay tuned. Regards, Eric
-
Thanks for the kind words Uwe. To be honest with you, the average mechanic in a repair shop would never get into the detail that I do. The main reason is that in a repair shop, you can have a guy that's pretty good with timing, tension, and general repairs. They can work on a few machines during their day, making sure the machine will sew as fast as the guy or gal who's going to be using it. In most cases, that's not very fast. However, in a factory where the operators are paid by how fast they sew, their machines need to be set near perfect. We have operators sewing as fast as they can, 40 hours a week. I have to make sure that each machine is capable of doing that. Without getting into the depth and detail that I do, I would be considered a poor mechanic. That's about it in a nutshell. I know mechanics that have worked in a sales and repair shop for as long as I've worked in factories. Their jobs and mine are very different. We can both be successful, but in different ways. I do have issue with folks that call themselves mechanics and then charge a fee for things they can't figure out. People spend good money on their machines. To have a tech say it can't be fixed, then write you a bill just irks me to no end. Especially in the case of this 467. Ok, I'll get off my soapbox. Regards, Eric
-
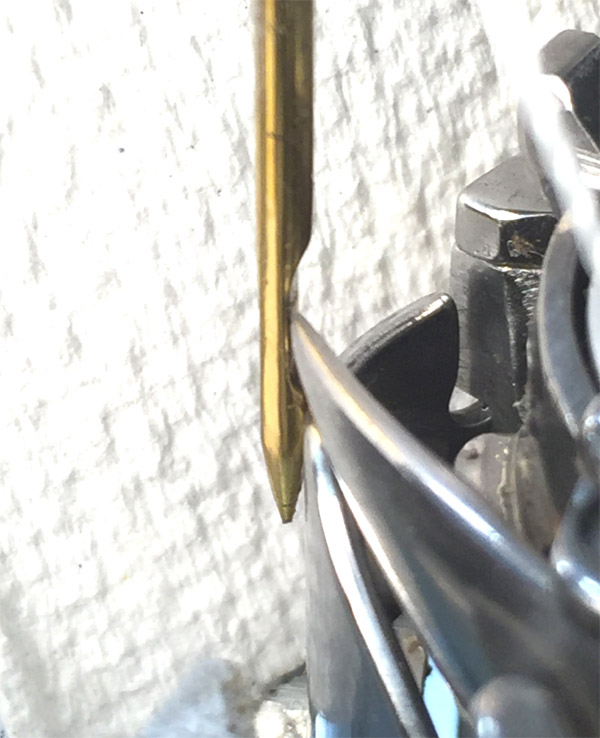
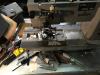
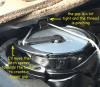
I mentioned earlier I suspect this machine has a generic replacement hook in it. I'm sure of it now. There is a little known feature of the bobbin basket that can drive a person nuts if you don't look for it. It's common with generic hooks. For that reason, I always try and use original replacement hooks in verticle hook machines. I've seen this issue with Singer, Consew, Brother, Mitsubishi, Juki and several others. Just before the needle thread is pulled up and the stitch set, the lip that sits in the race of the hook has a cast-off point. The makers of generic hooks don't seem to think it's important where that lip starts and stops. I had to remove some material from the basket to allow the needle thread to cleanly release from the hook. Not doing so required more needle tension, and even at that it was inconsistent. I've attached some pics to try and show this. This is extremely important when using heavy thread. Lighter thread may be more forgiving, but the T210 I'm using was hanging up right before the stitch was set. The other pic just shows one of my work benches. It also shows that I threaded the machine wrong before I put it in the table. (Yes even I do stuff like that!) I use old sewing stands covered with 18 gauge sheet metal and trimmed with aluminum. Make a great bench that is height adjustable. One of these days I take some pics of my shop in the factory. I continue to find ways to improve it. I hope you are all enjoying this process as much as I am, don't hesitate to ask questions if you have them. Regards, Eric
-
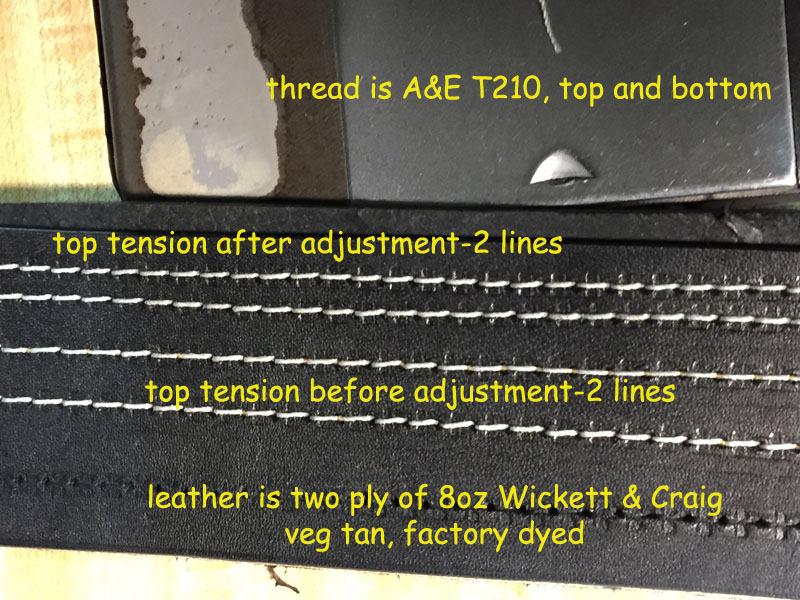
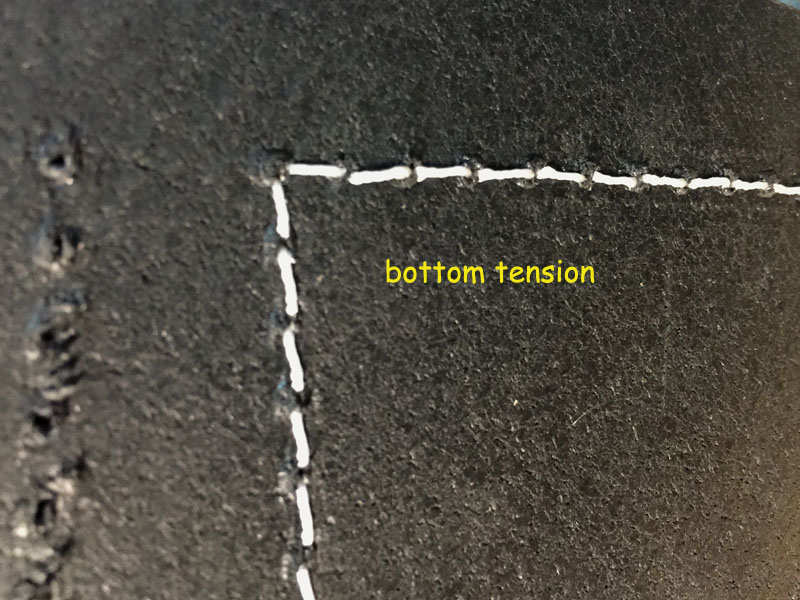
I put the 467 in a table today and did some initial test sewing. The table I had was for a consew 327 double needle with an old 70's Amco clutch motor, 220 3ph., 3400 rpm or some such nonsense. Needless to say, there were some control issues, but those old motors are work horses. The motor had no problems with 16 oz. of dyed veg tan, but for proper testing, I'll probably throw a speed reducer on it. The thread breaking issue is resolved. I was using the provided T210 thread for the needle and bobbin, but I believe the bobbin thread should be a smaller size. I've got some T138 I'll try. It handled the T210, but I'm not happy with how tight I had to run the top tension. That is a big benefit of using lighter thread in the bobbin. You can reduce the top tension which makes for an overall better sewing experience. I've attached some pics showing various tensions as I adjusted. I still have a very dry top end of this machine, and that will be next. Oh, as for the missing parts the tech mentioned, the only thing I've found so far is the bobbin winder tension assembly is gone except for the post. Easy enough to make a new one. I used the bobbin winder that was mounted to my stand. Regards, Eric


-
I like going through machines in the forum and hopefully take some of the mystery out of industrial machines. It can be really discouraging and even the cause of some leaving the enjoyment of leather work because of a machine issue. That, and the costs associated with having them adjusted and repaired. I've always believed that most folks can learn their machines well enough to make basic adjustments and troubleshoot problems, not detracting from the hobby or even a small business. Nothing worse than getting half way through a project and having something come up. As I've said before, I make a really good living as a head mechanic in a factory. My only compensation is hoping that I might help some folks solve problems. A wise man (dad) once told me that if you want to learn something, find someone who does it better and then pay attention. I was so impressed when I first joined the site the level of knowledge that was here and the willingness to help. I've been able to build my leather working skills by reading and practicing. Sewing machines are no different. Regards, Eric
-
The order of things I progress through are as follows, I seldom if ever skip a step, especially on a machine I don't know the history of. 1) Top and bottom shafts properly timed. 2) Verify needle class, new needle. 3) Needle bar height. 4) Hook timing 5) Latch opening 6) Feed dog height 7) Feed pressure 8) Bobbin tension 9) Needle tension 10) Final sew off Along the way, all the primary components get an inspection. Polish, replacing, etc. Regards, Eric
-
Hey gt2ride, The latch opener adjustment is one of the most overlooked and important settings on a verticle hook machine. It's function is to hold the bobbin basket open just wide enough to create a clear path for the thread between the tab on the basket, and the back of the "notch" in the throat plate. It's easy to check, and easy to set. Get a couple ply of whatever you're sewing on and sew down a bit on the right edge. That will allow you to slide the cover open, turn the machine over by hand and watch your latch opener. Turn the handwheel slowly in the operating direction and watch the needle thread. After the hook picks it up, it will carry it over the top of the basket where your bobbin is. The latch opener should contact the basket and rotate it slightly ccw, allowing the thread to cleaning pass. If not, loosen the screw and adjust it just enough for the thread to clear. If you have it open too much, you'll hit the front side of the throat plate notch with the tab on the basket. An easy check when finished is to turn it until it's moved the basket as far as it will go ccw, then push the basket by hand ccw. There should be a slight gap. I've attached a pic below so you can see it. Regards, Eric
-
The size of the gears, cams, connecting rods, top and bottom shaft timing are all engineered for the size of the hook and the rotation as it relates to the other components, not just the latch opener and take-up levers. My advice is to get a machine with the bobbin size you need. After 35 years, I will make modifications on machines if they are reasonable and won't affect the overall performance or function. Better off to sell or trade in your current machine for one with larger bobbins. Regards, Eric
-
Aside from the hook timing and the sharp feed dog hole, the latch opener is a bit tight with this size thread. When you decide to move up a size in thread, be sure to always check this adjustment. What's working with T135 may not be ok with T207. Even though this was just pinching a bit, the thread needs a clear path. Regards, Eric
-
Won't work. Take up lever and latch opener. Regards, Eric
-
Hey Tinker, The lack of oil doesn't have anything to do with the timing issues or the other things that have been out of adjustment. The binding and poor hook timing was done by someone who doesn't have the experience to do it correctly. I had to loosen the hook saddle and move it closer to the needle. That also involved setting the guard on the hook. I have a feeling this hook has been replaced by a generic one. I have seen people use the wrong oil in machines with wicks like this Adler. Even if it were the wrong oil, it would still wick and lubricate. Near as I can tell, the bottom of the machine has been getting oil, the top has not. Once I get it in a table with a motor, I'll figure out what's going on. On a machine used for home sewing leather at a slow speed, the lack of oil simply makes the machine run a little tight. If it were inline in my factory, it would seize up in a day. Regards, Eric
-
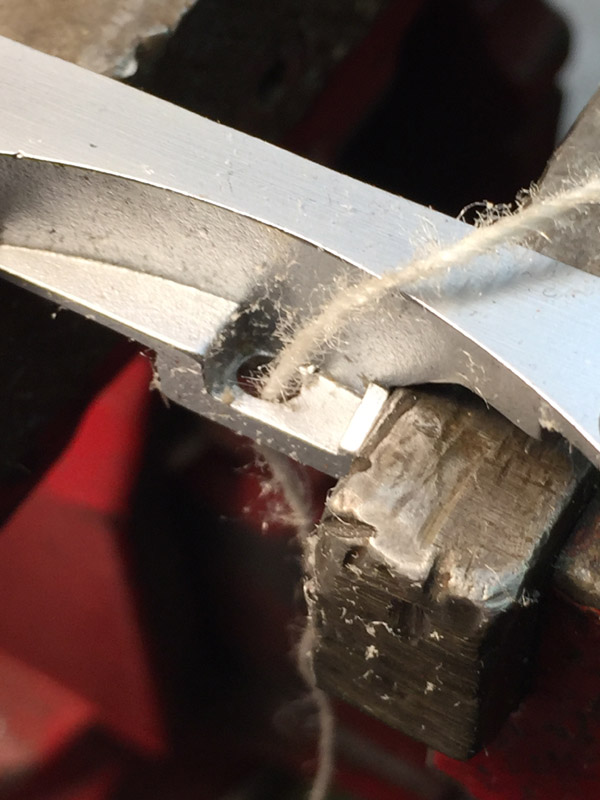
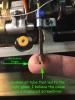
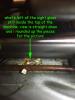
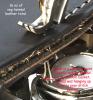
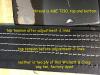
After taking care of the binding issue, I began to look at the common settings. I always start by checking the thread paths. It doesn't matter how well you can time and set a machine if you've got one or more components compromising your thread. I always check everywhere the thread runs. In this case, I knew from the video I had watched on this machine that something was shredding the thread. It was easy to identify two main things. The hook timing and setting to the needle as was shown in a previous photo, and today I discovered the bottom edge of the feed dog hole was like a razor in places. It's simple to test as the picture I've attached shows. I placed the feed dogs in the vice and "flossed" the hole with some thread. You can see the results with just a few passes of the thread. The other picture shows my remedy using emery cord. I was able to smooth the hole with good results and further testing left my thread intact. On lockstitch machines, the needle thread moves back and forth about 60 times for each stitch formed. These movements are very small, but a sharp edge can really tear up your thread. I reset the hook timing as the picture shows. I used a 2mm needle bar rise and retarded the hook quite a bit. I can now turn the machine over by hand and I'm comfortable with the timing. I do suspect that the hook in this machine is not an original Adler hook. I have some reasons to believe that, but I need to spend more time with it. The next step is to put the head in one of my tables and put some power to it. That will allow me to fine tune the settings and take care of the oil issue. Regards, Eric


-
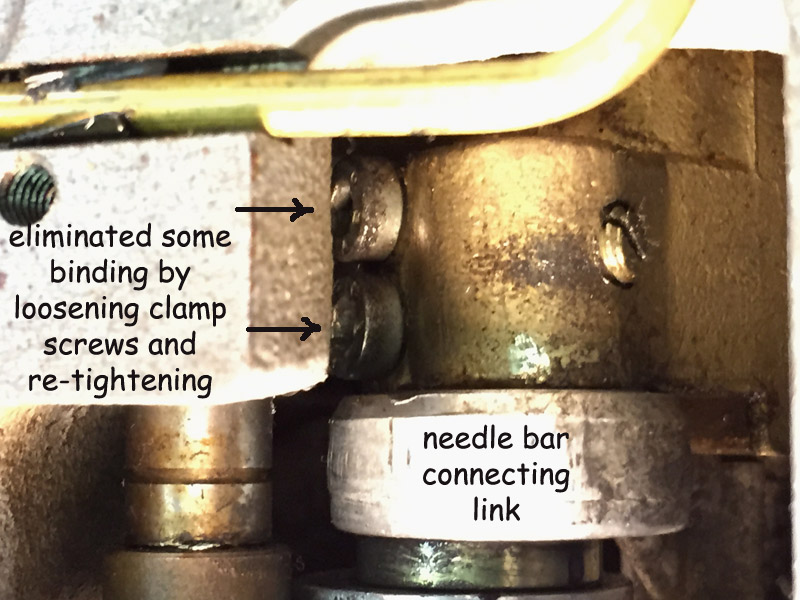
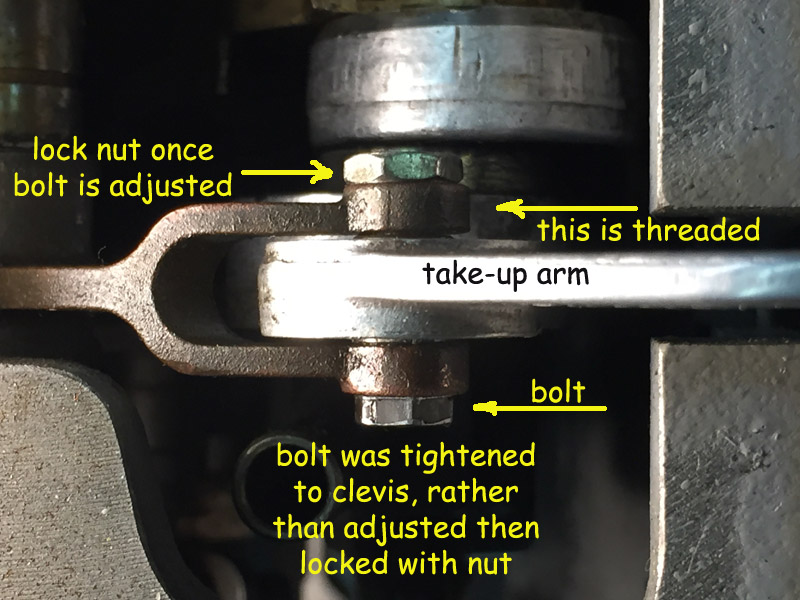
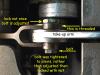
Before I adjusted the timing and other more common settings, I wanted to get rid of the bind that was moving the needle bar sideways right before loop taking time. I traced it through the seemingly miles of connecting rods and linkages in this machine. (kidding, kinda). It was primarily two things. I had suspected the needle bar connecting link because I noticed screwdriver marks on it. One of the things I do when I don't know the history of a machine is to follow the trail of worn screws and marks like I found on the connecting arm. This gives me a place to start as far those that may have come before me. I loosened the two clamp screws (shown in the picture) and gently tapped it with a plastic mallet. Connecting arms on bearings have a sweet spot where the run the best. Most of the time, the machine will actually set itself, which it did. I then simply tightened the clamp screws. There was still a bind in the take up arm which I could actually see. The threaded bolt was tightened all the way instead of just being snugged up to center the arm. The locknut prevents the bolt from getting out of adjustment. Cranking it all the way down was incorrect. I loosened the locknut, backed off the bolt a bit and then locked it in place with the nut. A simple fix. These two things eliminated the binding to my satisfaction. As the oil works its way around, the machine should loosen more. The specific bind I felt yesterday is gone. What I'm still feeling is a general lack of oil and should remedy itself. More to follow. Regards, Eric
-
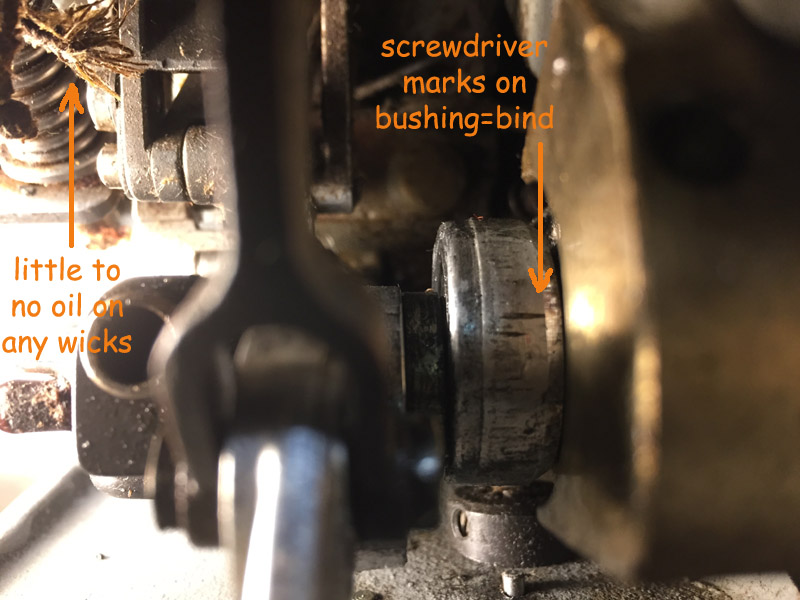
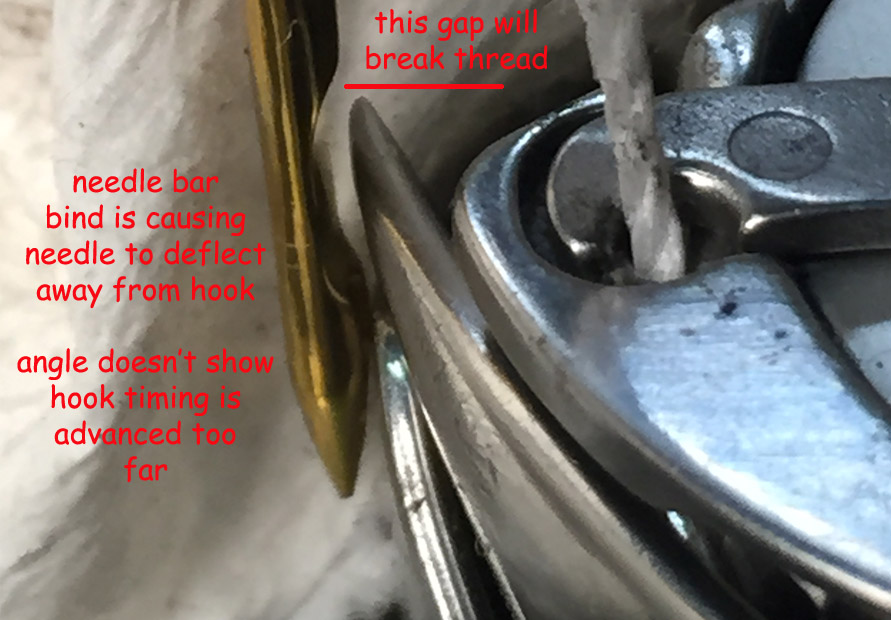
Received the Adler 467 from Venator today and started my trouble shooting process. I can see why it's breaking thread. The hook timing is advanced too far and there is a bind in the needle bar assembly that causes the entire unit to deflect away from the hook. This not only messes up the timing, but also causes the thread to abrade on the left side of the feed dog hole. This machine is also extremely dry. All of the oil wicks are bone dry. I've soaked everything in the mean time. There was plenty of oil in the reservoir, and when I get it sewing I'll trouble shoot the oil problem. The machine itself is in good shape overall. I see no reason why it won't sew good after I resolve the binding issue and the oil. My one comment about the Adler machines and I guess Pfaff as well is they use more moving parts to accomplish the same thing that other manufacturers do with less. Just more stuff to take apart I guess. I've attached a few pictures and will post more as I proceed. Regards, Eric