gottaknow
-
Posts
941 -
Joined
-
Last visited
Content Type
Profiles
Forums
Events
Blogs
Gallery
Store
Everything posted by gottaknow
-

Singer 281-22 Needle Feed - Reverse? 5/6 Oz Chaps Leather?
gottaknow replied to kc1200r's topic in Leather Sewing Machines
281-22's are a very versitle machine. They easily handle flimsy nylon up to garment leather. Aside from being needle feed, you can set the stitch length different for the top and bottom. This allows very lightweight fabrics to lay flat. Backtacking is done by sewing to the end, lifting the foot slightly, pulling back the material a few stitches and simply overlapping. A skilled operator does this nearly as fast as a reverse. These truly are an amazing versitle machine that we still use for production. I have about 40 of them. Regards, Eric -
Consew 226R-R With No Bobbin Tension......
gottaknow replied to LBennett's topic in Leather Sewing Machines
Hi Linda. I'm reposting my information on how to ensure that your bobbin tension makes it under the tension spring and how to check. That's the first (and most common) issue with vertical hook machines that lack bobbin tension. Insert your bobbin so that when you pull on the thread that it rotates counter-clockwise. On the front of the bobbin case, you'll see a vertical and slightly angled slot. Push the bobbin thread down into this slot. Leave about 5" there. Next, thread your needle and while holding onto your needle thread rotate the handwheel towards you. You'll see the hook rotate clockwise, picking up the needle thread and take it across and around the the bobbin. It will grab your bobbin thread and pull it. At this point, make sure the bobbin thread slides into the slot and underneath the latch opener hook and the protrusion on the bobbin basket. As you continue to rotate the handwheel, your needle thread will bring the bobbin thread up through the hole in you feed dog. Grab the bobbin thread and push down on the bobbin. Pull the bobbin thread while still pushing down on the bobbin itself, This ensures that the thread is under the tension spring. At that point, you should feel tension on the thread. If not, take a small screwdriver or needle and pry the tension spring away from body of the basket. Look for a wad of fuzz under the spring and clean it out. If that doesn't do it, remove the small screw that adjusts the tension. Place the tip of a flat screwdriver underneath the spring where the hole is for the screw you just removed. Turn the screwdriver blade sideways, holding it there while you push the end of the spring towards the basket, giving it more curve. You'll know you've moved it enough when you replace the adjustment screw and you have to compress the spring a bit. If you have trouble getting it started, Loosen the anchor screw on the right side of the spring a bit, insert the tension screw, then re-tighen the anchor screw. Hope that helps. Regards, Eric -
Singer 211G & 23/24 Needles And 138/207 Thread?
gottaknow replied to joeyrsmith's topic in Leather Sewing Machines
207 is really too much for these machines. Aside from proper tensioning, other issues are too light take up springs and pushing the latch opener to its limits. It may work, but will likely be inconsistent. Regards, Eric -
You were over the practical thickness for a 111. 3/8" is a good maximum thickness for those. 1/2" no matter the thread was really pushing it. Make sure whatever machine you choose that you know it's limitations. Have fun! Regards, Eric
-
Who Has Experience With The Older Quick Rotan Motors?
gottaknow replied to Constabulary's topic in Leather Sewing Machines
Those are the numbers I need. I do have the manuals for the 800 series motors as well. Regards, Eric -
Who Has Experience With The Older Quick Rotan Motors?
gottaknow replied to Constabulary's topic in Leather Sewing Machines
Oh, and I do have the 18 series technical info which is what you have. It's 21 pages which I can put into a PDF. Regards, Eric -
Who Has Experience With The Older Quick Rotan Motors?
gottaknow replied to Constabulary's topic in Leather Sewing Machines
I have a lot of info here at work for these. What series motor do to have? Regards, Eric -
Who Has Experience With The Older Quick Rotan Motors?
gottaknow replied to Constabulary's topic in Leather Sewing Machines
I should have all the manuals at the factory. I'll check when I get back there. Regards, Eric -
I knew you were a softy Wiz...
-
Anne Bonny's Locker & Able Sewing Is Back
gottaknow replied to Anne Bonnys Locker's topic in Leather Sewing Machines
Welcome back Darren. Regards, Eric -
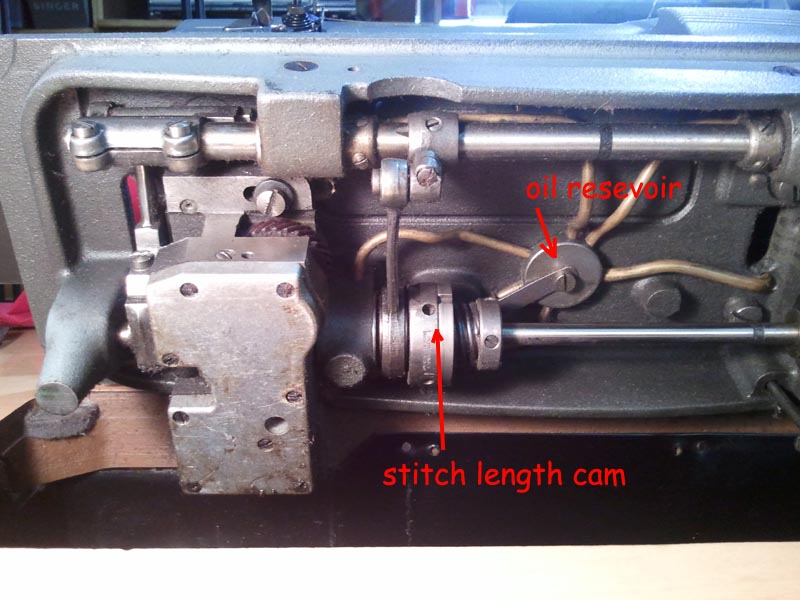
Your clutch is disengaging when you change stitch length because your stitch length mechanism is operating too hard. Soak it with sewing machine oil. It will eventually loosen up so you don't disengage the clutch. There is also an oil reservoir under the bed of the machine that has felt wicks running to critical areas. The fill hole is next to the stitch change button. Keep putting oil in this everyday for a while. It takes time to saturate all the wicks, as it doesn't happen very fast. Regards, Eric
-
Presser Foot Pressure? Tricks And Tips
gottaknow replied to joeyrsmith's topic in Leather Sewing Machines
Aside from the tip of the needle, they are the same. A leather needle cuts a hole in the leather, much like an awl used in hand sewing. The 135x16 is made for your machine as well as the 135x17, Regards, Eric -
Singer 211G Bobbin Case/hook Lube
gottaknow replied to joeyrsmith's topic in Leather Sewing Machines
From what you learned yesterday, you know that the bobbin basket remains stationary and the hook revolves around it. Put a drop of oil anywhere around where that bobbin basket sits in the hook body. The oil will migrate around the bobbin basket. You should do that each time you use the machine. When we run our 211's at high speed, we do it at each bobbin change. Regards, Eric -
The letters don't really indicate a certain stitch length, just an indication of where it's at. "A" is going to be longer than "D". Singer also uses numbers on some machines that indicate the actual stitch length. It's a rough guide at best since it depends a lot on what you're sewing and how the machine is set. There are some Singers, 300W chainstitches and 281-22 lockstitch machines that have separate adjustments for the needle bar travel and the feed travel. You can set those the same or slightly different as needed. A really nice feature for difficult sewing conditions. Have fun! Regards, Eric
-
As you turn your handwheel, you'll see the latch opener move left and right. In the farthest right position, it should be holding the tab back to allow your thread to pass cleanly. Do several stitches until you can really see what needs to happen. It's pretty straight forward. Glad my tip was helpful. Regards, Eric
-
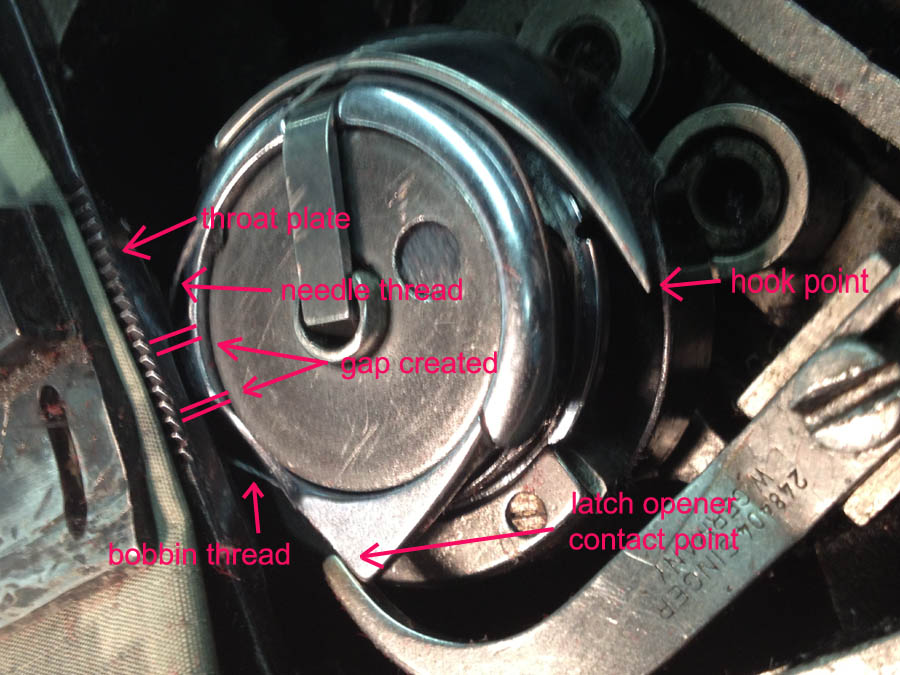
Yes, It is the J shaped hook with the single set screw. You make the adjustment just as the needle thread slides past the little tab. At that point the opener (J) should be pulling and holding the bobbin basket towards you to allow the thread to pull up smoothly. A 1mm gap when the thread is supposed to be pulling up through there will not work. It only has to pull the tab open about double the thickness of your thread. Regards, Eric
-
The first thing I would check are the two cogs where the timing belt wraps between the top and bottom shafts. Tip your machine back and clamp a pair of vise grips on the bottom shaft. (I use a piece of leather to protect the shaft) Hold the vise grips firmly and grab your handwheel, rocking it back and forth. If you hear a clunk, check the set screws on both timing belt cogs. There shouldn't be much play (depending on the wear of the timing belt). From there, you'll need to do a full inspection along each shaft. I usually start with the bottom since it's easier to get to and it's the one folks before you are likely to have messed with. Have fun! Regards, Eric
-
When you put the bobbin in, make sure the bobbin spins counter-clockwise when pulling the bobbin thread. Pull the bobbin thread down into the angled slot. Thread your needle, hang on to it, and rotate your handwheel towards you. Your hook will pick up your needle thread which will wrap over the top of the bobbin basket and pick up your bobbin thread. Pull the bobbin thread up through the hole in your feed dogs. To ensure your bobbin thread is in the tension place a finger on top of the bobbin, pull on the bobbin thread. This will pull the bobbin thread under the tension spring. Be sure to hang on to both threads when you start sewing. To adjust the latch opener, slide open the cover and sew some material through the machine. Leave the right edge of your fabric along the right side of your throat plate. That way you can see the latch opener adjustment. The latch opener pulls the bobbin basket a tiny bit counter clockwise. As your needle thread passes between the bottom of the throat plate and the small tab on the basket, there should be no pinching at all. The thread should pass freely. When adjusting, don't let it open too far as it will force the small tab into the front side of the notch in the throat plate. I attached a pic to make it easier to understand. Regards, Eric

-
As for doing French stitching on auto upholstery, I've seen a 300W set with a 3/8" gauge. It does work on foamed back vinyl and without bobbins, you don't have to worry about running out on a long seat seam. They are not for the novice mechanic however, as a chainstitch is way different than a lockstitch. They are good for boat upholstery because of the longer runs. I do have all the manuals, and I think they are online. They are really well suited for mass production. I'm using size 14 needles on Lycra clear up to size 22 on heavy denim. I've used Tex 40 up to Tex 130 thread. They are not fond of bonded nylon, but will work. Juki does make a nice 2 needle lockstitch with a walking foot. I recently set one up at an upholstery shop. I can't remember the model number. I set it with a 3/8" gauge and his seams looked nice. He was sewing foam backed leather on an Jaguar restoration. If I recall, the thread was Tex 90 and about size 21 needles. Regards, Eric
-
You can certainly sew leather with a 300W, but as Bob stated, it's a chainstitch machine, no bobbins and wouldn't be suitable for belts. We just completed 1000 or so heavy suede welding jackets for the US Navy using a 300W. The 300W is a beast. It's needle feed, some have a close coupled puller. We use them for flat felling denim, tin cloth, wool, etc. We also use them for topstitching after joining a garment with a serger. I use them for setting waistbands on jeans. I use needle system 62x57. The 135x17 class works as well which allows a wide range of needles. I've got 15 or so of these machines with various gauges. I'm even using one to set suede pads on Lycra equestrian pants. Here's a picture of the one I used for the welding jackets. Speed reducer, air needle coolers, and silicone treatment using Kevlar thread. Regards, Eric
-
Breaking Needles - How Much Should Shop Charge To Fix?
gottaknow replied to stanly's topic in Leather Sewing Machines
So did you get your needle problem fixed? Regards, Eric -
Breaking Needles - How Much Should Shop Charge To Fix?
gottaknow replied to stanly's topic in Leather Sewing Machines
-
To reset most clutches, the bottom shaft is held stationary as you rotate the hand wheel in reverse by hand there's a button on the bed you depress and hold as you rotate the hand wheel. On most vertical hook flat bed machines it's located next to the stitch length button. On a machine you're not familiar with, you can hold the bottom shaft with pliers (protected by a scrap of leather ) and rotate the hand wheel backwards. Regards, Eric
-
I Found A 112W116 And Need Some Help
gottaknow replied to SobelSaint's topic in Leather Sewing Machines
You will likely not have much luck trying to sew the thicker, harder leathers used to make holsters with this machine. Regards, Eric -
I Found A 112W116 And Need Some Help
gottaknow replied to SobelSaint's topic in Leather Sewing Machines
The 112 machine is a needle feed, (sorry, no walking foot and can't be adapted) double needle lockstitch. It can be used as a single needle machine by removing usually the left needle. (tighten the screw so you don't lose it without a needle). It looks like you have some single needle feet already which is good. I see your machine is set to a 3/8" gauge. That's pretty standard for light upholstery work on vinyl and lightweight leathers. You can use it to topstitch down an already sewn seam which is common to automotive work. It will sew on soft leathers with a leather point needle up to 3/16" thick. Past that, you'll start having issues with proper thread tensioning and the presser foot spring not holding your work down. I have doubled up the flat spring that runs along the back of the head to get more pressure, but you should really stay within it's comfort zone. If you search the forum for the Singer 111's, the setting are pretty much the same and a lot of the part interchange. Different gauge sizes are available, but unless you know how to do it, it's not for a novice. It is however, a good machine to learn how to sew and because of it's age, it's simple to learn the inner working of an industrial machine. (pretty bullet proof) Regards, Eric