Jump to content

prc77ro

Members
  • Content Count

    195
  • Joined

  • Last visited

About prc77ro

  • Rank
    Member
  • Birthday 06/06/1971

Profile Information

  • Gender
    Male
  • Location
    North Carolina
  • Interests
    Leather Carving, Hand Tooling, Knife sheaths, Holsters, Footwear, Inlays, Custom Leatherworks

LW Info

  • Leatherwork Specialty
    Holsters, Spur Leathers
  • Interested in learning about
    Hand Carving, Color Dye Techniques, Saddle and Tack
  • How did you find leatherworker.net?
    Searching for Custom Knife Sheath Making/ Using leather Dyes and Finishes

Recent Profile Visitors

9,170 profile views
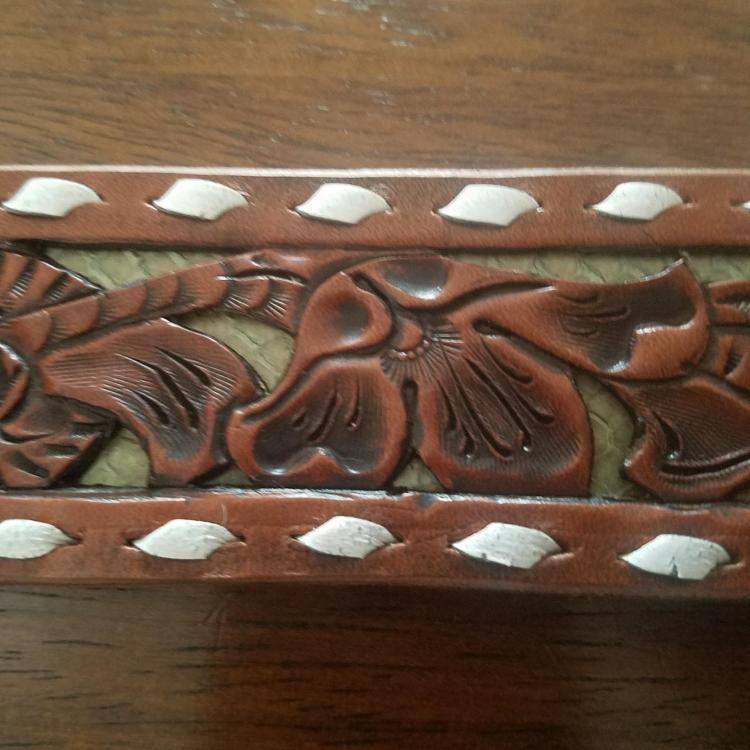
  1. Hi all, it's been some time since I have posted here. I am currently working on a filigree belt with buckstitcing. The issue I am having is that the white surface is cracking in some of the stitches. Is there any way to prevent this? The lace is several years old so that could be the issue or my slits are still to tight. I waxed the flesh side with paraffin and tried opening both sides of the slit with my fid. I even used much shorter lengths of lace.has anyone ever run into this and if so what did you do to prevent it. Im thinking its because the lace is old and the surface is dried out.
  2. The overall shape looks good. One of the strap loops is off on the mountain side of the scabbard. Did you tool either of the designs or are the both just drawn and colored? It maybe the quality of the photos but the colors on the flower side look too strong and wash out the design for me. If you used alcohol based dyes you can thin them down a bit to reduce the intensity.
  3. Don't know who said the AS Damascuss Head kife doesn't cut, I sharpened it from course to fine stones at 16 deg gave a half a dozen passes over some 1500g sandpaer then stropped it, then aplied several bandaids to several fingers and thumb. Virtually no effort required to cut a hide.

    1. Show previous comments  1 more
    2. howie696

      howie696

      My first real bad cut was one of those, they are very sharp :-)

    3. ReneeCanady
    4. BondoBobCustomSaddles

      BondoBobCustomSaddles

      Sharp it sharp!Once sharpened correctly, it will cut with ease. The quality and hardness of the steel will determine how long it stays sharp.

  4. dI use mainly Angelus Dyes they work well for me. If the Hi-Liter is water based then more than likely that's why it came off, especially if you didn't allow enough time for it to dry. AS Coloring Leather is a great book for dyes, and acrylic dyes and I was wondering if anyone has tried dyeing their piece brown or blue before using the USMC black to get less rub off? Oh one more thing, Neatsfoot oil darkens leather, like really dark if you put too much on. So if you don't mind your dye job being dark then use it, but I use Lexol because it doesn't darken the leather, before and after dyeing.
  5. just bought a C.S. Osborne scratch compass with 1,2&3 groover and a point for $51 I'm guessing that's decent?

    1. Show previous comments  1 more
    2. TRADERnel

      TRADERnel

      someone gave me one used as a gift but I need the 3 cutters that came with it but it looks well made

    3. prc77ro

      prc77ro

      you should be able to find the groovers at Springfield Leather or Zack White leather, they are a little pricey but you could also try ebay. When you do eventually get them take a round and flat mini file and hit the insides of all three of them then strop the outsides and they should cut fine.

    4. TRADERnel

      TRADERnel

      i got them in after polishing and filing it cuts but not grate i am going to try cleaning up the inside of it thanks

      just got my call from the shipping company that my cowboy 4500 is in yahoooo im going to pick it up tomorrow ....

  6. Finally received Ann and Al Stholman's Personal Patterns Portflio Volume 1

  7. also order a magic eraser form Springfield Leather, it will take dried or semi dried cement off of leather and dont forget the leather bleach too. Sometimes just rubbing with the eraser isn't enough, there will still be a spot where the cement was and you won't see it untill you apply the dye then its too late. Rub with the eraser, then wash and give a good scrubbing in the area where the cement was let dry and continue on.
  8. For the shoulder straps, in my opinion, I wouldn't lace them for comfort reasons, I would guess that once you finish lacing them they would be sorta stiff and would have the potential to rub in the armpit area. It also depends on the look your going for, do you want a refined high end look or are you going for the rugged, used, unfinished look( like a Banana Republic look). I use two different types of finishes on my edges if I want something more than just the burnishing. I'll use Fiebing's burnishing ink in black or medium brown, for this you really just need to have a decent edge, paint it on then either use a burnishing cloth by hand or a cotton buffing wheel to bring it to a mirror finish. The other edge finish I just started using is Fiebing's Edge Kote, Dura Edge. This stuff is awsome, you can paint it on burnished edges if you want or if your cut edges are pretty much perfect when you cut them you can just brush it on. It states on the bottle its flexible, won't crack or peel or rub off once it's dry. It does give a really good finish even if you only sand the edges. As far as the sinew, I have never used it, I have used Nyltex and am not really crazy about it. It's thick doesn't seem to lay as nice as waxed linen. The waxed linen is what I prefer, if I need it thinner i can pull a strand or two out, can't do that with the Nyltex. I know you can do the same with the sinew's so you dont have large stitches on an otherwise small project, keep that in mind. If you really want to be sure and have some scrap around try making an example so you can get an idea of what it will look like. Hope that may help some.
  9. Thanks to everyone who left suggestions for me for a new maul, going to try the AS brand got a decent deal on a 16oz brand new one. After having my K-BAR for so long I'm a little partial to leather handles.

  10. Thanks to everyone who left suggestions for me for a new maul, going to try the AS brand got a decent deal on a 16oz brand new one. After haveing my

  11. Looks awsome, did one myself so I know how much work you put into it. The color is terrific, I love the old rustic look, and you stiched the cartridge loops too, I chose to weave mine. If I can make an observation for future thought, the ends of the cartridge loops have a row of stitching and then the ends are cut? Why not taper them to match say the stitched ends of the billets and sew them down, may give them a little more finished look but that is just my opnion. You did a terrific job on the entire thing. Can I ask did you line the holsters and/or the belt? and are the Uberti's .45Colt or .45Schofield?
  12. I agree with all the advice given, the only thing i havent seen mentioned here is are you securing your holster in a stitching pony/horse? I also started drilling holes using a harness needle though, and held my sheaths in my had while pushing the needle through. Very, very time consuming. If you have not already purchased AS's The Art of Sewing Leather buy it and read it cover to cover. In the back are plans to build a stitching horse. for about $50-$60 in materials you can make your own and it makes a BIG difference. It's easier to see your overstitcher marks, how straight your awl is and if you practice, practice, practice the instructions in Al's book you'll be able to stitch a saddle stitch without setting down either needle or awl. I am now stitching about a foot every 30-45 min at 6 stitches an inch. I use an awl haft not a saddlers awl, that way I can change blades and its still comfortable in my hands. Also, one more thing to note: when I sharpen and strop my blade I push it along the length of the blade just as the begining of the video shows, so I don't change the angle's on the blade and don't drag it across a stone or even a strop because both will change the angles. I'm not 100% sure but reason tells me that even stroping or polishing the blade still leaves micro abrasions(lines) in the blade and that the awl blade would perform better and with less resistance(drag) if they were in the same direction as the point, if that makes any sense.
  13. Thanks, took me two days to make. If you can make it on your own its cheaper for one, plus then you can customize it as far as the sizes of the holes and how you want to lay it out. It would have been alot easier if I had access to a band saw, then I could have glued everything together and then cut the angles.
  14. I filled two Craftool tool racks, and a home made tool rack that was equal to two of the Craftool racks and decided to make a larger one this past weekend. I had a 4'X6' sheet of 3/4 Birch laying around so I drew up a plan and started cutting. Basically the racked is stacked layers of the 3/4" with the angled sides cut on my table saw. This I had to do in several stages as the rack is about 10" high and my table saw is only a10"(wich only gives about 4 1/2" cut at 90deg roughly) the finished product has a useable space of 19 7/8"L X 8" H which comes out to 9 rows of 23 holes and 8 rows of 24 for a total of (if completly drilled) 399. I left out the center section which leaves me with 323 give or take a hole to fill. now the only problem is it looks half empty! The third photo is my work bench to give a better scale of the rack.
×
×
  • Create New...