-
Posts
85 -
Joined
-
Last visited
Content Type
Profiles
Forums
Events
Blogs
Gallery
Store
Everything posted by cst
-
Excuse my ignorance, is there lead in this? What are the multiple layers of leather for? Thanks
-
Thanks for the replies fellas, I had taken that lever or finger out to see into the area thinking maybe something had come loose, I’ll put it back and try again. After a lot of reading I was wondering if maybe the safety clutch hadn’t engaged. Didn’t have a thread jam, but I don’t know what all can activate that. I’ll try those adjustments and see how she goes. Thanks again for your replies, now I won’t have to resolene my leather goods to protect them from tears as my old arthritic fingers pull all those stitches tight.
-
I just watched a video of a lady loading a bobbin into the machine and the tab definitely stayed in that notch, so I’m wondering why everything spins as it should when the the tab is out of the notch and locks up tight when it is in place.
-
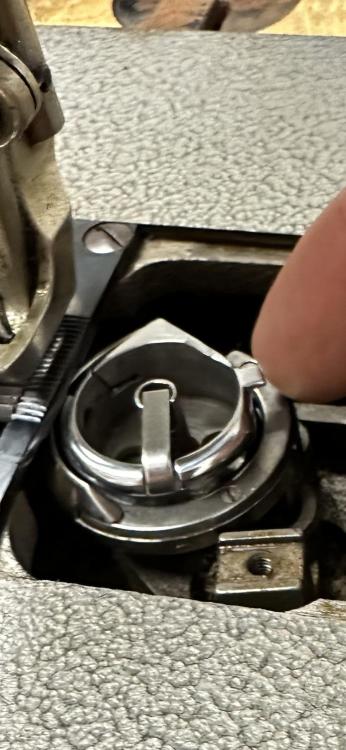
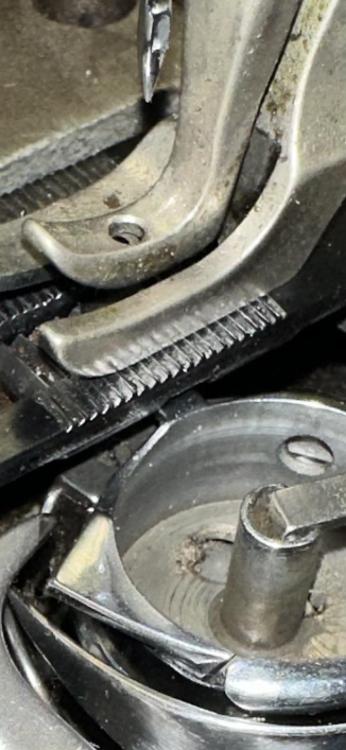
Thanks for the reply. I will look for those manuals. The machine I have came with two manuals, I guess a new one and an old one. I will re read those. With the tab in the notch, nothing happens. If I take the bed slide out, the machine cycles. I haven’t threaded the needle or the bobbin with the bed slide out, so I cannot say if it all works correctly. As you can see in the attached photo, that tab wants to rotate. Do you know the function? I got to a point this evening where frustration was overwhelming common sense and courtesy and decided to leave it for tomorrow.
-
What does that notch do? Can I grind it off? That tab on the bobbin carrier fits it perfectly. It will either hit the forward end of the protrusion that forms the notch or sometimes get all the way into the notch. At either point there is no more sewing. There has been some strong language and teeth gnashing, but I don’t feel as though that is appropriate in my store.
-
I bought this machine a while ago and it sat (well oiled) in my garage. I brought in to work to see holsters and belts and swapped the clutch motor for a small servo motor. I’m totally new to sewing machines, I’ve been hand sewing everything for twenty years and just don’t want to deal with my arthritis anymore. At least while sewing. So enter the machine. I sewed three lines of stitches on a belt blank just get to the feel for it. It is made of two layers of 8-10 oz bridle, which is the average for my holsters and some belts. Got the tension adjusted just fine and realized I needed to load up a bobbin to continue. Did that and when I went to reinstall the bobbin and begin the fight to get the bobbin thread in place (I struggle with this) I realized this little tab on the bobbin carrier was locked into a notch in the bottom of the bracket that guides the bottom feed foot. Don’t know what it is called. Vibrating presser foot? Don’t know. Anyhow the machine is locked up unless I lift the walking foot and take that bracket out.
-
I don't even use the ram foot when I'm stamping using my press (usually in the middle of the night) I just push right on the stamp. It doesn't seem to matter what size, shape or font. I just mash em down in the leather and get on with it. I might build one of Dwight's fences though. That is a good idea. I have an old cutting board that looks like prime fence material. Also, I glued a couple pieces of 1/8th" thick steel together to make my base. I put a magnet in the little crotch between the thing's legs and it holds the plate still. I covered the steel with tape, and found that if you are not square on a stamp (beveling etc) that tape will slide all over the place and then I cuss so much I shoulda just used a hammer in the first place. I took the tape off, and bought a push beveler and some spoons. It is slow, but works pretty well. This press is pretty good for lettering and big stamps and not bad for geometrics, but I can't tool with it worth a damn. Same goes for snaps and rivets. When I use the press, I bend every one. Maybe one day I'll drill a hole in the arbor, until then I have a rubber mallet and a 1/2" thick piece of rubber glued to the back side of my marble.
-

Pegasus Document Folder
cst replied to leatheroo's topic in Purses, Wallets, Belts and Miscellaneous Pocket Items
Well done! It made me think of The Diamond Age. -

Another Wallet
cst replied to JoeSnuffie's topic in Purses, Wallets, Belts and Miscellaneous Pocket Items
Looks great! -
Nice!
-
Analog clocks have hands that spin around pointing to numbers so you can tell the time. The direction they turn is clockwise. Looking at the clock face with the 12 at the top, they move towards the right. Anti or counter clockwise is the opposite.
-

Need Your Brains For A Tricky Situation. (Sharpening Awl)
cst replied to DavidL's topic in How Do I Do That?
If it was me, I wouldn't bother heating it. You more than likely won't be able to keep it sharp once you've annealed it. It'll likely bend at every opportunity also. Depending on how bent it is, I'd either take a hammer or pair of pliers to it. I got a couple of awl blades from Ludlow leather (I think) that I like pretty well. John James, about $5-6. They are inexpensive enough to keep a couple spares on hand. Good luck -
That is pretty cool. Boy, it was night and day between the project between having the background plain and then dyed. This makes me think I need to get some paint brushes. And one of those little bulls.
-
Now the background is dealt with, can I get some guidance on using the spoons to clean it up? Maybe a book or video recommendation? Or just some clear instructions. Thanks very much.
-
Thanks. I ordered one of those push bevelers and an f896 smooth round figure stamp as well. I figure I can kinda rub it over the rough stuff like a spoon only with a bigger surface area. It just occurred to me I could have used a teaspoon for that. I appreciate the help
-
I like that. Thanks. I'm going to go order one now
-
If another picture would help, here it is at the same level of humidity only a different angle
-
Thanks. That's some 3-4oz stuff I bought from TLF three or four years ago, that I've slowly been using up as welts. Once it is sanded, slicked and painted all the surface defects don't matter. I cut through in a number of places, maybe I need a heavier hand with my spoon. Or maybe I should go buy a shoulder of something heavier to learn on. I have one of those nylon swivel knife bevelering blades I bought a few years ago, but seem to have misplaced it. Springfield leather tells me they are all sold out and will probably have some more at some undetermined time in the future. Maybe.
-
Here I know it needs work, I just don't know what to do with it. This is my first attempt at beveling and I'm using spoons because I live in a no hammer zone. I know I need to cut the red wire, but all of a sudden I'm color blind. I know practice will help, both with the swivel knife and spoons, but I am not sure what to practice. I spent about two and half hours beveling and smoothing and rounding. I just am not sure what I'm doing. Wrong or right. The title of this should have been "I just am not sure what I'm doing" So, any advice? Sell my tools and soak my head? Are there instructional DVDs I can buy that focus on swivel knives and spoons?
-
I've got the sequence I like, but I can't remember how much shrinkage to allow. Say I've got to go 8inches, how long should my stri gs be to start?
-

Finishing Leather That Will Be In Direct Contact With Skin
cst replied to Koska23's topic in How Do I Do That?
I don't know about resolene, cause I haven't used it much. I have made several straps from vegtan dyed with Fiebing's oil and regular dyes and finished with leather balm with atom wax. None have bled color onto my arm or sleeves (I sweat a lot). I think the trick is to really give them a good buff once the dye has dried. And let the dye dry. Whenever I think I've buffed enough, I buff some more. I always finish buffing the dyed piece and the waxed piece with an old white t-shirt. It will let you know if any dye has come off. I also always put at least two coats of wax on. Good luck- 3 replies
-
- top finish
- top coat
-
(and 5 more)
Tagged with:
-
How about antiperspirant on his wrists before he puts the cuff on?
-
A few years ago I was given a bunch of that mission grain pigskin and used it to line various things. As I recall, you can put something like edge kote on and make a pretty decent edge. Also, I'm pretty sure I've seen Nigel Armitage use edge kote on his stuff so that would fit the design. You can cut the pigskin oversized, glue it to the cow, then trim them flush. Sand your edge well then do your edge kote and don't forget to burnish. I always went back over the edge kote with some wax and a slicking stick. It didn't look too bad. Another option is to get some veg tan pigskin for lining and then just finish the edges like you would normally do. If you roll the edges of the lining and extend them to the edges of the exterior leather there will be a small gap between the two. You could maybe hammer that flat then glue it down, but I never had any success making a good edge that way with the cheap stuff. Another option: on the goods japan website I saw a gum trag replacement that is supposed to be good for making a nice finish on the back of leather. I've not used it so I don't know how well that works.


