Sona
-
Posts
227 -
Joined
-
Last visited
Content Type
Profiles
Forums
Events
Blogs
Gallery
Store
Everything posted by Sona
-
Wow... well, beeing a cabinet maker I got a little tear in my (left ^^) eye hearing you wanna dye yew purple. But actually that shouldn´t be of my buisness, as you wanna do it I just once used some antik finish to handle a little dent in journeyman´s piece (a chest made of (natural) dyed oak) and it worked just fine. But I got no experience with dying a whole piece with leather dye. Just some hints from my side: - Be sure that it might (!) happen, that the colour will turn out to be not as even as you expect it. Wood has different parts like the "heart wood" and the "sap wood" where the material has different characteristics like the concentration of material, the form and way they "work" (like absorbing water and stuff" and some else. So most kinds of wood have some darker areas (mainly the "heart wood") and some lighter areas (mainly the "sap wood"). Even if I think they should turn out even (as it is a dye based on pigments) the colour shades might differ. - Before you apply any kind of dye you really wanna wet the piece of wood! Don´t soak it! Just add some water, let it dry completely and sand it. There are some who do this once, some who do this twice and some will do it three times as they raise the grain (right word? hope so ^^) i.e. from 150 to 180 to 240. The reason why you should do it is the following: As you apply the dye, the fibres of the wood will soak it in and raise. So even if your piece is really smooth before dying, it can turn out to be quite rough after it. If you add some water and sand it (not to hard), you just cut of the raised fibres, so they won´t come up again. The finer your sanding paper, the smoother the surface Be sure to use some fresh sanding paper and not to sand too much. Otherwise your would sand it down to a level that was not afected by the water and you can start over again. The point why this is important is mainly, that you shouldn´t (really!) sand the piece right after dying. you would just cut through the dyed surface as it is like 1 - 2 mm and the whole piece will look like ruined. - When you dye the piece, be sure to apply an even coat. Should be the same as with leather so you should know why and how and so on. - Let the dye sit for a minimum of 12 hours more like 24 hours to be sure it has dried completely. After that you may apply the first coat of your finnish. it really depends on how and where the bow is used, what finish to use. There are some real good finishes made from wax and oil, but I don´t know whether that might lift your colour up. If you wanna use a varnish (which might be a little interesting to apply evenly and in one row on such a piece), be sure you take a more flexible one as there are a lot that might crack over time through the use and strain of the bow. But - different to Matt´s post - there are a lot of oils and varnishes that won´t darken the wood that much (some not a bit), so it depends on what you are after. Your first layer should be a little bit thicker and should dry completely as you have to sand it in preperation for the second layer. A lot of it might soak in, too and so you won´t get a smooth surface. As I said above you really...really have to be carefull not to get to the wood itself at this point as you would come to the point you wanna do nasty things to yourself after sanding through the colour ^^. So therefore take some 320 grit, or even a bit higher. This is at least the point where you still can ruin it, or just make the difference for a nice and smooth surface (yeah, I know.... I mentioned it already....twice.....sry for that *laugh*). After that you apply the second layer, not as thick as the first one because this layer will just sit on top of the first one and won´t soak in that much. It just evens out everything. If you use some oil or similar stuff, you might wanna add a third layer, just to be sure (same step in between) So this might be really difficult if you are not used to it, as it is not a plane piece of wood. The form of the bow makes it a lot more difficult. But go ahead, give it a try and show us your results. Hope I could help a little bit . Oh yeah.... and be sure to make some scrap practice piece before you go for the bow
-
As I play samba (for those who know it - more samba reggae than the samba-style played in rio) and a friend and member of my group has birthday in a while I decided to make her a stick bag for carrying all the sticks while playing. I tooled the name of our group on the front side and painted it with some angelus acrylics. I hoped for the colour to turn out more neon-like (like it looks, if I paint it on a scrap piece of paper), but I still think it came out nice. If I´d do this again I think I would make a stitching grove on the inside for those decorative stitches, because sometimes the sticks struggle a bit with them. Apart from that I am quite happy with the result. Even though - if you have any ideas, tips or suggestions how to improve that piece, pls don´t hold back. For that it doesn´t matter whether it might be just design, technique or sth else Hope you like it. Right now I just filled it with my own sticks which look.... well some kind of "used" I think ^^. It´s just to show how it should work out for her. The straps are made to hold it to her leg (the lower one) as to two points of here belt (the upper ones) to avoid bouncing while playing/performing. [ist it possible that there are some changes about uploading pictures? I uploaded them somewhere else now, if the pictures are to big, just tell me.... I´ll size them down ^^]
-
 Oh, I just forgot to tell about how it turned out I tried to remove the applied resolene with some acetone, put on some colour again, let it dry and buffed the piece about one hour I think (it was the backside of a larp-armor) until there was just an unnoticable amount of colour I could lift up with buffing. I stoped at that time because I got the feeling, that state wouldn´t change anymore.... (and I was a bit tired of buffing *laugh*) So I applied the thinned resolene again with a slightly damped sponge rolled in some piece of fabric with like no pressure at all. After finishing the first layer I just wanted to throw the whole thing away.... actually the hole piece was covered bye a light purple again. i decided to give it a last chance, waited and applied a second layer of resolene and it turned out to become a really rich blue. I think I don´t have to tell you how relieved and happy I was So thx a lot again for the answers and hints! I kind of love this forum *laugh* Actually I think I learned how to apply this damn resolene in a way that fits me (and the product) ^^ (*HURRAY*)
 -
A Couple Of 10Th Century Magyar-Style Tarsolys.
Sona replied to Edvin's topic in Historical Reenactment
Thanks for the answer. I might ask you someday for a contact to that man Still awesome work! -
16 Euros? that´s nice. I looked on ebay again just to have a look at the prices... maybe it´s not about 200,- but at least 100,- Euros Hi Gerry, Why criticism? That pony looks really nice and it´s obvious that you thought about the construction before you started. I like it a lot The only thing I´d suggest is, that if you want to get up you´d have to spread your legs, pull the pony through them to the front and put it back on the chair instead of just placing it like half a meter away on the ground. That might be a little uncomfortable for me I think, but if it works for you, it´s just fine! May I ask what material you used as filling for the "pillow" ?
-
Really nice job. I like it! But I would exchange the cordless drill to fit the quality of the holster
-
Hi nmlvaio, first of all: welcome to Germany As I live near Munich, I don´t really now any shop around Ansbach, but a quick google search tld me there should be one in Nürnberg: Kromwell Pelart GmbH Thumenberger Weg 26 90491 Nürnberg Telefon: (0911) 58076-0 Sadly they don´t have a homepage and I don´t know them. But they should sell leather and tools.... maybe you just try it out. As Jazznow said leathercraft isn´t as popular over here, but we still got some nice stores I think. If you want to order stuff from the internet (from germany) there are a lot more options for you. The Beargallery in the south of munich has all Tandy and some Goodsjapan stuff plus some specials (but - as Jazz said - a little more expensive) plus Rene isn´t selling the stuff, he just does workshops and lives in austria right now. Her (ex-)wife sells the stuff, but I think she should be able to speak english But there are also others with lower prices on the same stuff like "Die Ledermacher", "Rickert-Werlzeuge", or those Jazz mentioned. (They also more or less sell the tandy + japan stuff) In Berlin is a Tandy-store, called "hobby Leder", you might wanna have a look at that and if you are going to the north of Germany (like Schleswig-Holstein) You might want to visit "Leder Detmer". They got a lot of leather and some tools, dyes and stuff. But sadly they mainly sell chromeleathers. At least my favorite shop (yet) is in Kiel (also S-H) called "Lederhandlung Klaus Flach". A really little store with nice hides, rawhides and - if you are interested - also flawed one (some look really interesting and, of course, are cheaper. Depends on what you are planning to do) Plus they also have a lot of tools, stains, threads, furs, and also sell bones, teeth from different animals, horns and all stuff you also might need for knifes, etc. A shop I´ll try out as soon as I got the money for it is "kappey". It´s not a "hobby-store", but sells tools for saddlery and stuff. It´s the only place I found for example pricking irons in Germany... the got a online catalog so I would give them a try. Even if I think, the stamping tools they have might be from Tandy, too...... So, have a nice timer over here. Hope this might be helpfull
-
Thx a lot for sharing Macca, you got some really nice clamps for sure. I thought about such a stitching horse (the one to sit on), but actually most you can get on ebay and similar sites are still in the range of 200 and more (in addition, I got no space for it at home ^^). But I believe they might be very comfortable to use. It looks like it´s made out of pine (at least the part to sit on. the clamp isn´t that clear). Do you know how old it is? I would have thought of a different material to use... The spring leaf on the german one looks really nice. I didn´t think of such a solution at all, but it won´t affect the space between the jaws which was kind of a downgrade of other clamps using this springs right between the jaws, because sometimes you might want to stitch quite large stuff where this litle piece is just annoying... I found a new (to me) kind of a clamp used by shoemakers. It´s quite small and hold between your legs, too but it has also a 90° angle while working. Therefore it´s really handy and nice for traveling I think. http://www.ckuit.de/bilder/gross/05.jpg (the thing above the shoe) Personally I like to work in the angled way, but I think it depends on what you are stitching. The 90°-way might be more interesting for other reasons... I don´t know, but I want to figure it out (and therefore I need more ponies *laugh*).
-
Actually there seem to be a lot (!) of people building their own clamps. i like that ^^. And like Macca said: Nice job! (Does it matter if it´s a boy(man or a girl/woman?) @Macca: I´d be very interested in such a collection as I build my own clamp some weeks ago and thought about some other forms to fit other needs while stitching. I´ll look forward to such a thread ^^.
-
thanks for the link, I´ll have a look at that
-
Mmhh... I buffed the piece like 5-10 minutes and after that it was blue... completely blue, no purple. The purple colour appeared right after I applied the resolene. But i thought the resolene would soak some dye out of the leather and just the purple remains. But if I understand you right, mike, it actually takes some of the colour away. But not from the dyed leather, but from the remaining pigments on the the leather surface? i mean, it would make sense since the main areas are stuff like the creases where I might not have reached the pigment while buffing.... Thx a lot for the answers! Even if I get upset about this I still might have learned sth
-
Hi Folks, I got a problem with fiebings prof. oil dye "Royal blue". I used it before, applied it normaly with a dampened sponge and covered it with Resolene, which I applied with a sponge, too. The problem ist, that it turned into a purple at some points, I think the resolene may take of some colour and this purple stuff just stays. At that point I recolored the piece and bought some aerosol-sprayer to apply the resolene. In a way it worked, but the spraydust wasn´t fine enough, so i got some points where the resolene got too thick (thinned it 1:1, tried to apply just a light coat so it would be covered) and there were some drop-like points where it (the resolene?) turned into some kind of red. In addition even this "light coat" was too thick, so the leather looks more like plastic. So I turned back to the non-spraying method. Thinned it too, let the colour sit for about 24 hours, buffed the leather like hell before applying and did the job with a sponge and with a cloth (tried both things out), and ...tadaa.... purple again. I don´t know what to do. Right now I neither have the space nor the money to buy an airbrush-set and I think there should be a method to apply resolene without ruining the whole dye-job. Can anybody help me with that? Greetings Sona
-
looks simple and clean. I really like it May I ask how exactly you handled tha rawhide? As far as I worked with it (maybe.... one or two times?) it shortend massivly in bth directions and I was unable to fortell the final measurement which made the whole thing really... let´s say I wasn´t happy with it ^^. But actually I like the look of it and so I might give it another try. So do you have any hint how to handle that stuff?
-
And be sure you don´t cut all the way through at once. Cut just like the first half in step one and then lift the fur up (at the point where you are cutting) with two fingers - one to the left and one to the right of the cutting line) and go very carefully through the piece, so you won´t cut any fur at all. Less messier and more hair on the piece you just cut out ^^.
-
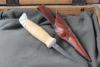
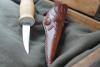
Knife Sheath - Kingfisher
Sona replied to Sona's topic in Gun Holsters, Rifle Slings and Knife Sheathes
thank you so much I think it´s just a funny form and thought it might be "...interesting..." for some of you. Didn´t expect that that kind of feedback. But actually I am quite happy right now -
A Couple Of 10Th Century Magyar-Style Tarsolys.
Sona replied to Edvin's topic in Historical Reenactment
Wow, really nice! What about the (brass?) frontpiece of the last one. Did you make it yourself or did you order it somewhere? -
Knife Sheath - Kingfisher
Sona replied to Sona's topic in Gun Holsters, Rifle Slings and Knife Sheathes
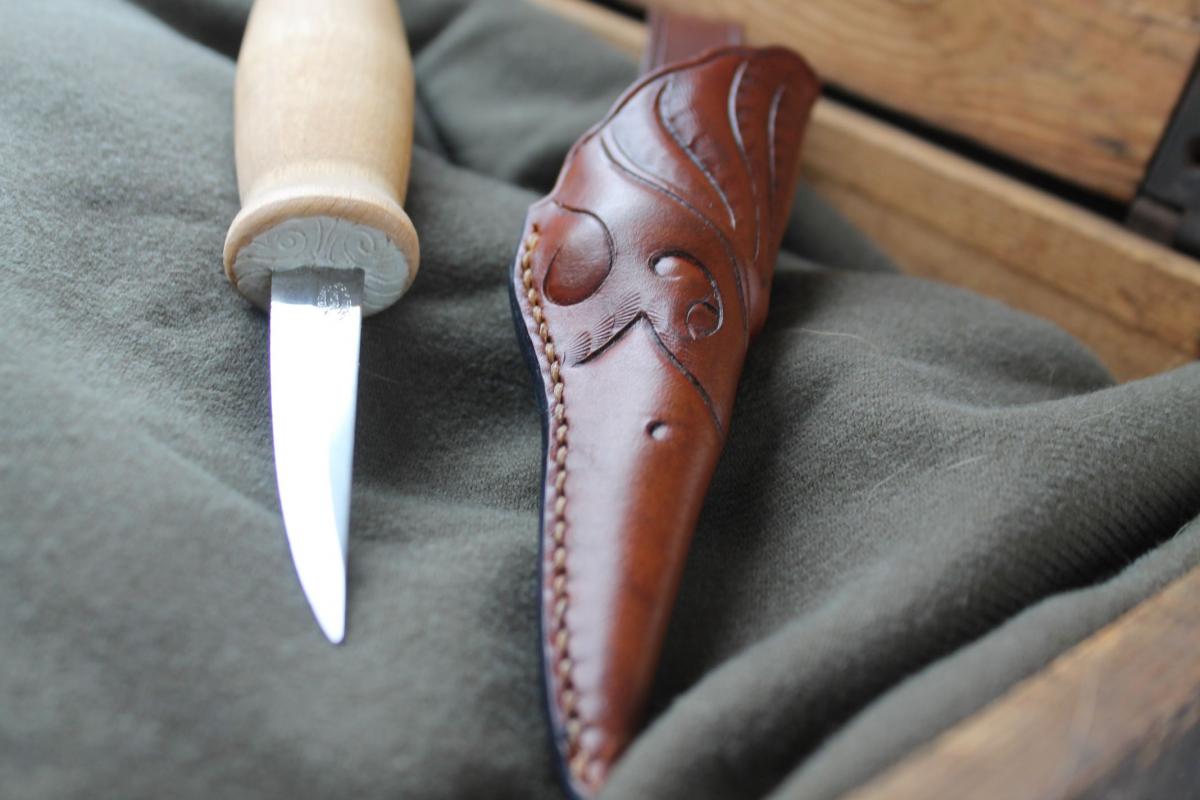
Thanks. The carves wood, neither as proffessional nor as a main hobby, but from time to time she does thinks like litte animal-heads on such a knifehandle and stuff like that. As she works with some really dull crap right now, her boyfriend bought this for her birthday and so she wanted a nice fitting sheath for it -
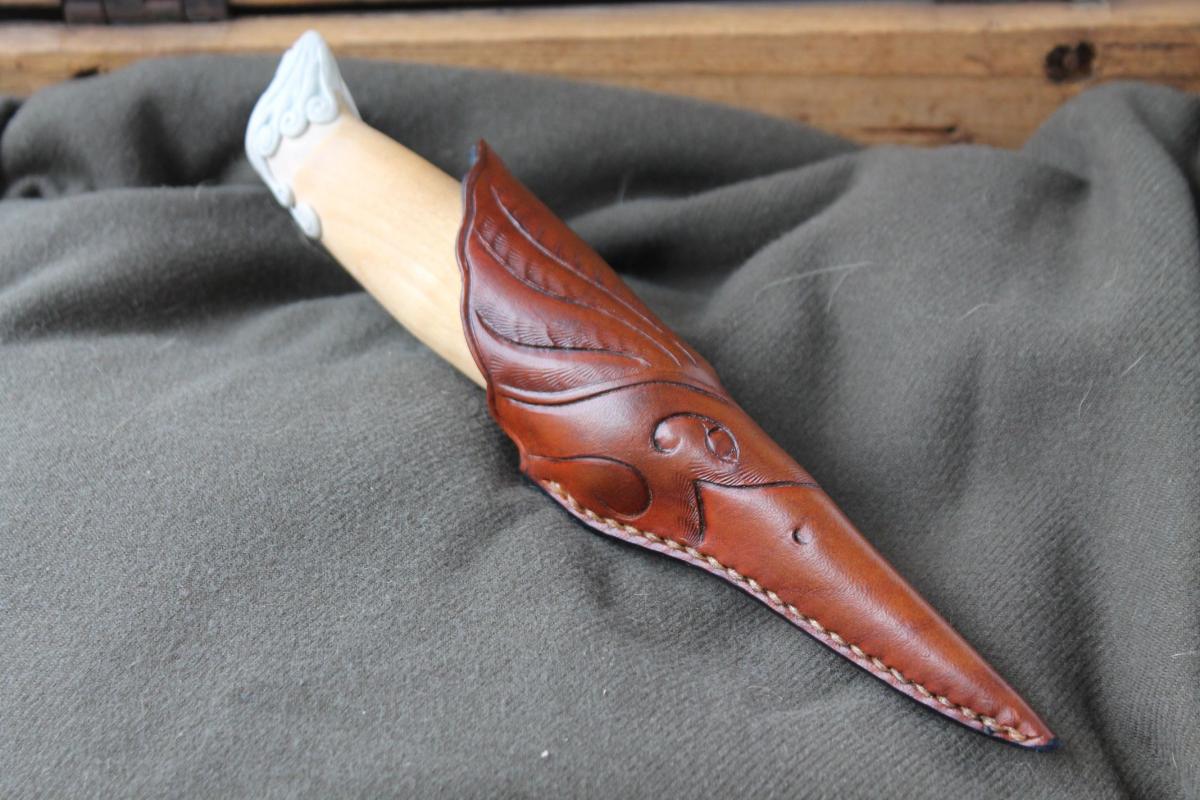
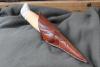
A simple sheath I made for the carving knife of a good friend. She wanted it to look like the head of a kingfisher, so I did my very best and came up with this. I like the result, even if you need both hands to pull it out, because of the form. The longer side leaves not enough space to use your thumb on the sheath to pull it out. But she knew that from the beginning and was totally ok with it. Hope you like it, too ^^
-
Danke dir Stohlmans Kloben wird aber wahrscheinlich auch darauf ausgerichtet sein, dass man ihn mit Hausmitteln nachbauen kann, oder? (Ich hab das Buch leider noch nicht) Das wird bei meinem schon schwieriger ^^. Writing a tutorial might be interesting. The biggest Problem might be, that I didn´t take any pictures while building this one, so it might be a little bit difficult to describe it. Actually, I might make me one or two more (for different situations while sewing). Even if it might take a little, I´ll try to keep that in mind and make some pics. Might be a lot easier... for me to write/describe and for you to understand ^^.
-
Thanks Jazznow. I live near munich, but originally I´m from S-H
-
Thank you You got some really nice ideas for your pony. Sounds as they´d be nice to-haves, and I think I might add one or two of them to my clamp. Thanks fpr the inspiration
-
Sry, my fault ^^. I just put the clamp on my left thigh and my right leg over the clamp. That´s all. It works, but maybe I´ll add some sort of leatherstrap to tighten it up while sewing or to pull the upper jaw with my right foot, if you understand, what I mean
-
Thank you. For the leather I just used a contact cement ("pattex") and used some clamps for a tight bonding. But some wood glue f.e. should work fine, too if you clamp it just giht to the wood.
-
wow, what a gorgeous piece of work. You really got some neat skills and btw, I just love your carving style
-
Haha I always hope, my english isn´t that bad, too ^^. It´s still kinda funny, to get a german reply here Actually I didn´t expect that *laugh* But still I am glad u like it. I worked a little with that clamp and I think, I will adjust some things from time to time, but for itself, it´s a lot of fun