

Johanna
-
Content Count
9,532 -
Joined
-
Last visited
Posts posted by Johanna
-
-
Bag punches ( also called "Slot Punches") are oblong. They are used for making slots in leather, usually for straps to pass through. Depending on what the slot's function is, I am not sure that an oval would do the job. I know folks that might use a 3/8 and a 1/2 to make a 7/8 slot, but one would have to be extremely careful, because you only get one chance to do it right, and you don't want any ragged edges or misalignment. I would call Kevin Hopkins at Springfield Leather and see if he can find you one, or maybe one of us has an extra we can part with. (Hint: Never give up on a leather or tool related search until you talk to Kevin!) That's odd that you can't find a 7/8 punch at HC or Tandy, because it's a relatively common size to use. Let us know how your search goes.
I'm looking forward to hearing about the class, and what you get out of it, too.
Johanna
-
If you used inexpensive (standard Tandy) hardware, coat the snap backs, where they touch the skin, with a dab of Neat Lac or clear nail polish. Nickel is a common irritant to the skin, and no one likes green bleed marks either. (I'm assuming they aren't lined?) Beautiful work, as always, Kate, and you're right, those plastic things are ugly. My daughters treasure their bracelets; the ones I made for them, and the ones we did together. Jim, I'm a Kate fan from way back. She has pics of her work she hasn't posted that would knock your socks off. (hint hint! Kate!)
Johanna
-
-
Bruce- Shirley Zanelli of Las Vegas has also shared some pics of her motorcycle seats with us. PM me if you want access to the adult area of the board.
Johanna
-
People used to ask me for deerskin scraps to clean their eyeglasses. Yesterday I got my first pair of glasses (bifocals, no laughing, people!) and a lecture from the optician never to wipe them on my shirt or anything except this blue cloth she gave me, or I will scratch the lenses and damage the protective coatings. What I want to know is how do you folks clean your glasses? Will deerskin hurt my glasses? I have plenty of deerskin scraps, but only one dinky little blue cloth. What do you do when you come in from outside and they fog up? Will occasionally using my shirt to clean them scratch them? Considering the price, I want the glasses to last until my prescription changes, and I know from years of buying sunglasses that scratches are awkward for me to see around.
TIA
Johanna
-
Great conversation, folks. No one wants to go broke. Some things I have heard and learned...
1. A satisfied customer tells 4 people. An unhappy one tells 11. (Southland Corp. 7-Eleven)
2. It's easier to sell things you believe in.
3. You know the price is right when they gasp, but reach for their wallet anyway.
4. You don't argue prices with the plumber, the doctor or the car mechanic, do you? Especially on a Sunday or holiday.
5. There are people you should send to Wal-Mart. You're doing both of you a favor in the long run.
6. Know when to send certain specialty jobs to a trusted colleague. They will appreciate it, and toss work back to you. It all evens out in the long run.
7. If you do custom work, insist on a deposit. That proves the deal is sincere, and if you never hear from the person again, you're not out your price of materials. Somewhere I have a beautiful Countess clutch purse that elegantly says "Edna".
8. If you can get the customer to hold, feel and smell the leather, you are more likely to get a sale. This is, of course, not scientific evidence, just personal observation.
9. I have charged $20 to set a rivet or two on an expensive broken designer purse with a straight face. It takes practice, but you can do it, too. Sure, it feels good to be "nice", and do it for free, but anything that calls you away from the bench costs money, and you have to charge for your time, and tool investment. You do not sell what you "do", you sell what you "know", same as the doctor and the plumber.
10. We can't compete with factories because of the volume they can produce, so our selling point has to be service, quality and custom work. In other words, to make a living at this, you have to be good. You know you are good when other leatherworkers buy your pieces as collector items.

I think one of the biggest obstacles leatherworkers have is not being good at sales, generally speaking. Very few of them enjoy the business side of doing leatherworking for a living, and fewer are any good at it. But no business can survive without sales, which is why many leatherworkers have day jobs. The Internet has become a great tool for promoting your work. If you have a website, make sure you add your link to your profile section in the User Control Panel. You might want to put your link in your signature, too. PM me if you need help.
Johanna
-
 Hello!
 I took a couple of days vacation, and I see some new faces on the board...glad to meet you, Bruce, and I'm looking forward to learning from your experiences, along with all the other new members who recently found us. I am humbled to have the opportunity to meet so many leatherworkers, and relieved that the board has attracted some experts to answer the questions. A reminder to all you newer leatherworkers- no question is stupid unless you don't ask it. We've got folks on the forum with expertise in lots of areas (Romey...I want that sharpening guide!!
)so take advantage of it. Fire the questions at them, and they'll respond. Post on the forum, so we can all benefit. Johanna
-
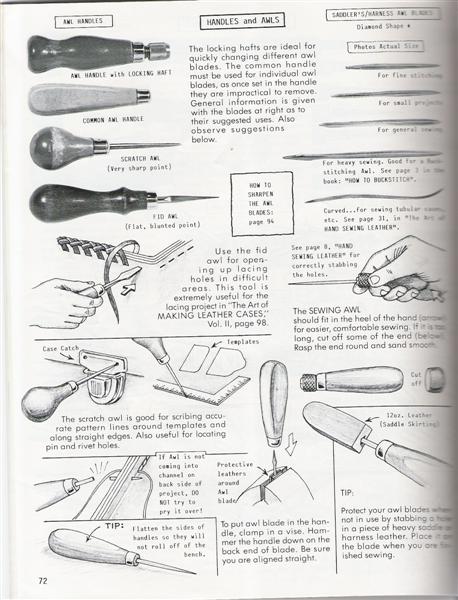
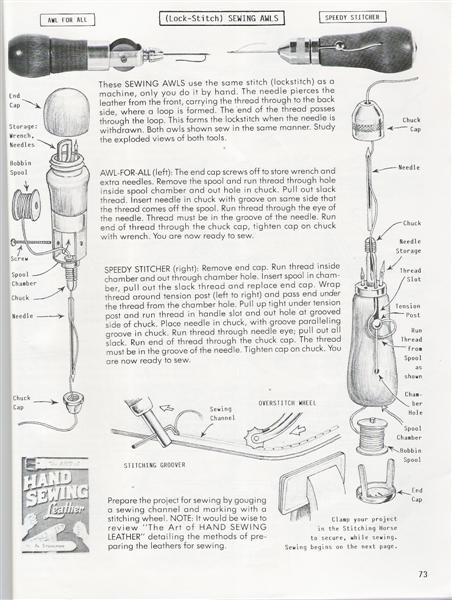
The book "Leathercraft Tools" by Al Stohlman (available from Tandy Leather Factory) has comprehensive instructions for the use and care of leather tools. How to use them, sharpen them, tips for getting more proficient with them...all illustrated and explained. It is one of the most useful books a leatherworker, experienced or not, can own. I've been asked some questions about awls- here is what Al had to say:
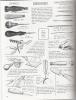
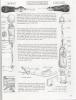
In this book, Al Stohlman explains the familiar leatherworking blades, and how to protect them, yourself and keep them sharp. He covers edgers, skivers, groovers, stitching wheels, draw gauges, thonging chisels, strap and bag punches, bone folders, mallets, setters, saddlery tools, modeling tools, wing dividers, head knives and so on and on. This is a book I would recommend to anyone. The detail is generous and the descriptions clear.
HTH
Johanna
-
-
Hello, Patrice! Your leatherwork is much better than my French! Don't worry, if you don't know how to say what you want in English, post in French, and someone will translate for us. Just keep on sharing and having fun!
What kind of LARP do you enjoy? I have worked with Civil War reenactors and SCA folks, and always admired the dedication for getting things period correct. I like going to the events, too- interesting people to talk to, and lots to learn.
Glad you found us, and welcome aboard!
Johanna
-
I arrived at my Tandy store one morning to unlock the door and open the store for business, and the front windows of the store were smeared with blood. Not ketchup, blood from a pig farm, I guess. That's what the officers told me. I was confronted by two activists, both wearing leather shoes. The woman began to scream at me that I was going to hell for killing animals to sell leather and the man attempted to keep me out of the store. After a few tense words, I went into the shoe store next door, and Mark, the owner, dialed the police and then escorted me into my store, ignoring the two lunatics with their pamphlets and accusations. The police arrived and told the two they were trespassing, and not to return to the shopping center. The police had records of other "incidents" with these two, and didn't show their customary patience. I filed charges for vandalism and terroristic threats, called my boss in New York to report the events, and spent the morning washing the windows. The next morning I went in early, and there were two more PETA people waiting for me. I tried to reason with them- in a strip chopping center, with Taco Bell, Subway, Krystals and Arbys, why were they focused on the leather store? Leather is a byproduct of the meat industry. No cow or deer is killed for their hide- people are omnivores, and they need to EAT. One of them explained they were against people wearing fur. "Look around! Do you see a lot of fur in here?" A couple of rabbits, a raccoon, a coyote, a hair on cowhide...no minks of foxes in that Tandy. I quickly concluded these people were no more rational than the blood smearers, and I asked them to leave the shop. My regulars, having seen the commotion from the day before in the paper, started arriving for coffee. Mike and Larry escorted the two to their car (leather seats) and we didn't have to call the police again. They didn't come back. Larry had a bumper sticker on his truck "I support PETA: People Eating Tasty Animals", so you know his thoughts on the matter, but I'm sure that it was Mike who persuaded them to find someone else to bother and not come back He trained K-9s for the Macon Police Dept. and was on the SWAT team. He has a way of speaking softly, but with authority. A few months later a lady came in with a lovely fur coat covered in red paint. She had been walking to her car when they stepped out of the shadows, doused her with the paint and called her an "animal killer". There was no saving the coat, sadly, and the paint-throwers were not caught or identified.
I followed trucks in Georgia that dropped dead chickens on the road, and I knew a chicken farmer who kept an alligator pond for sick or dead chickens. I know the chickens don't live the life of Joan Rivers' dog. But people who use terrorism and harassment to make their point, like Muslim extremists and abortion clinic bombers, have missed the point of their "humanitarian" efforts. Instead of pontificating at someone eating a steak, feed a hungry child. Rather than preaching to suburbanites, start a spay & neuter program in the neighborhood. Talk is cheap. Find solutions.
Johanna
:soapbox: getting down now...
-
Leather Molding Workshop
Roses & Masks
Materials needed:
Pencil or stylus
Utility knife.
Exacto knife
Straight edge
Paper & cardboard
3 to 5 oz. Vegetable tanned leather
Face form
Large Pot
Water
Drying cloth ( T-shirt, diaper, etc.)
OPTIONAL: Aluminum foil, pinking shears, dye
stamping tools, candy thermometer, hot plate
hair dryer
TECHNIQUE
Leather choice
Leather should be 3 to 5 oz. weight, with the 3 oz. being used for flowers, leaves or anything that you
want to have a light, delicate appearance. For masks or wearable items, nothing heavier than 5 oz. This
will give you the strength and durability that you need, but still be thin enough to work easily.
Pay close attention to the flesh side of the leather that you use. You want the nap to be as close and
tight as you can find, without 1ong rags left by fleshing. If you need to, the leather can be sanded lightly to clean it
up. You don't want to burnish the flesh side because this will restrict water absorption.
Leather preparation .
You can heat the water in your pan to about 120°. This will cause the leather to burn slightly,which will
harden the project more when it dries. (This is what the hotplate and candy thermometer are for).
Place the cut out project into the water: Depending upon how dry the leather is, it may take some time to
get to the proper water content. Usually, I put it in until it quits bubbling and squealing.
Test the leather by squeezing it while it moistens. It should have a uniform consistency. If you feel
stiff areas, squeeze and work these spots while they are under water and they wi1l soften up. IF you are using hot water, have a second pan of cool water nearby to avoid being scalded!
Once the leather reaches the proper consistency, that of modeling clay, take it out of the water and place
it on a drying cloth. Fold the leather and press on it to remove excess water.
The drying cloth should be something absorbant but tightly woven (old t-shirt or diaper) A cloth with a large weave or texture (like towels) should not be used because this will leave a textured print in the wet leather, unless this is the effect you want.
When drying leather, wrapping the project loosely with rubber bands may help hold it in shape, but may leave a line on finished leather. A hairdryer may be used to shorten drying time; but be careful not to use too much heat for too long a period of time, or the leather may dry out and crack.
PATTERNS
Roses
Both large and small patterns are cut out the same, basically 3 circles spaced 120 degrees apart around a
smaller circle; For my large pattern, I used a slicker and a nickel, for the smaller I used a film can cap
and an 8100 rivet setter.
For the leaves I used a free hand elliptical ovoid and a nickel.
For the Calla lily I used a free hand elliptical ovoid, but on one side I added an ovoid roughly half the
length of that side and half as wide.
FLOWERS
Open Rose
For open rose, you need two pieces cut to match the larger pattern. Wet them both then place one on
top of the other, both grain side up, with the center of the top circles lying over the slits between the
circles of the bottom piece.
Pull bottom petals up through the slits in the top piece, then holding the top petals between the fingers of one hand and the bottom petals in the other, pull both hands away from each other. This causes the petals to lock into the slits, eliminating the need for gluing and/or sewing. All of the petals should develop slight creases and both parts should come to sort of a point.
To form inner petals, crease all three along the center, then, working counter-clockwise, wrap them around each other so that they interlock. Placing a finger into the cylinder that forms will help hold, form and shape them.
Pull outer petals up and wrap them around the inner ones the same way. Pull and stretch the leather as you need to to shape the flower.
Make a circle of your thumb and index finger and put just the base of the flower into it, to hold it while you finish.
Roll each petal outward and pinch the edge near the center of the point to shape the petal. Each petal can be shaped and molded as you want until you get the effect desired. Place finished flower upside down to dry. This will help hold the flower's shape as it dries. After completely dry, then dye, stain, or finish as you want.
Rosebuds
These are made from a single piece of leather, usually a smaller pattern.
With grain side down, pierce the center of the base piece with an awl. Slip a wire with a loop on one end through the hole to use as a stem.
Slightly curl each leaf upward from the flesh side. Then working clockwise, tightly curl each petal around the one next to it. Once the curl has started to form, you can get it tighter by placing the flower on the table and placing your hand on it. While exerting slight downward pressure, roll the flower under your hand .
After the bud is rolled tightly, roll each petal away from the center and mold and pinch the edges to shape. Set aside to dry. After dry completely, dye, stain, or finish as you want.
Calla Lillys
Narrow side of piece could be skived on flesh side, if desired, before casing the leather. This would give
a thinner outside petal along the body of finished flower.
Start with flesh side down, then fold larger side of piece into the center.
Fold narrower side over this to form cone.
Roll back the edges and smooth out the throat of the flower.
Pinch and pull tip, then smooth and touch up shape.
Set aside to dry.
Leaves
For jagged edge leaves, they should be cut out using pinking shears to make it easier and more even.
With grain side up, fold each leaf along center line, then roll, squeeze, and pinch to get the shape that
you want.
3.) When you lay them aside to dry, use a finger to push straight down on the junction. This will flatten this
area out and allow the base of the flower to fit better on the leaves.
4.) After dry completely, dye, stain, or finish as you want.
MASKS
Basic mask
Use paper to make a basic mask pattern that will match the pattern to your eyes and to the contours of
your own face. This doesn't need to have any of the design considerations of the finished mask, this is
only to get your contours and sizes right.
Once happy with fit of basic mask, trace pattern onto flesh side of leather with the side of the mask
pattern that was against your face turned up.
For the eye holes, put marks in the comers of each eye and one at the midpoint top and bottom of the
pattern's eyehole. Using a straight edge, connect the comer dots across the eyehole.
Cut out the mask, then cut along the line running across the eyehole.
Cut curving line from the outside comer to the mark at the top midpoint then the comer to the bottom
midpoint of each eye. CUT ONLY TO THE MIDPOINT MARKS!
Wet leather then place it over the form. (If the form is going to be used more than once, it could be filled with plaster to give it more strength for molding.)
Make sure that the center of the mask matches the line along the bridge of the form's nose.
Mold and contour the mask to the form.
Fold back the the eyepieces and use them to form eyelashes. These can be rolled, twisted, or fringed. If tooling is desired, do it now while the leather is still wet and on the form. Leather should be thin enough and wet enough that the tools should only need pressed in and shouldn't require tapping with a mallet.
Leave on form and set aside to dry. After drying is done completely, dye, stain, or finish as you want.
Beaked Masks
These are different than regular masks because the mass of leather that you need to form the beak means that the eye holes have to be further apart and slanted. This is because when the beak is formed, the leather needed to get the height of the beak has to come from somewhere. If allowance isn't made, the eyes will end up on the side of the bridge of the nose.
Draw out the beaked mask pattern then use the basic mask pattern to place the eye holes. This is done (on the flesh side) by marking center lines down the bridge of the nose on both patterns.
Turn the basic mask pattern until the center line on it runs from the comer of the beak to where it intersects with the center line on the beak mask pattern. (You may have to visualize an extension of the basic mask center line).
Trace around too eyehole in the basic mask to transfer it to the beak mask pattern.
Repeat procedure for the eye on the other side.
Beaks are formed by folding leather along the bridge of the nose and lifting it until the eye holes in the leather match the eyes on the form. Contour and form it around cheeks and nose.
If beak is so large that it won't stand up under its own weight, it will need supported while it dries. This is done with aluminum foil.
First, get a wad of foil and shape it roughly to the outline of the beak.
Put it under the leather, then squeeze and contour it until it has the shape that you want for the beak. More can be added, if necessary, but the wad doesn't need to be solid. It needs to only be strong enough to support the weight of the leather.
If tooling is desired, do it now while still wet and on form, leather should be thin. enough and wet enough that the tools only need pressed in and shouldn't require tapping with a mallet. Leave on form and set aside to dry. Dye, stain or finish as desired.
John L. Henry Jr. Macon, Ga 1999
-
When you installed Office 2003 it probably tried to make Outlook your default email client. Outlook Express is the built in email client for XP. (The names make things confusing, don't they?) You can change that in the Control Panel, Add/ Remove section, left side "change access and defaults".
Your WAB (Windows Adress Book) should be here:
C >Doc & Settings> User> Application Data> Microsoft> Address Book> UserName> WAB
You may need to open OE, click "file" and "import" it back to where it should be
Holler if you have more questions!
Johanna

-
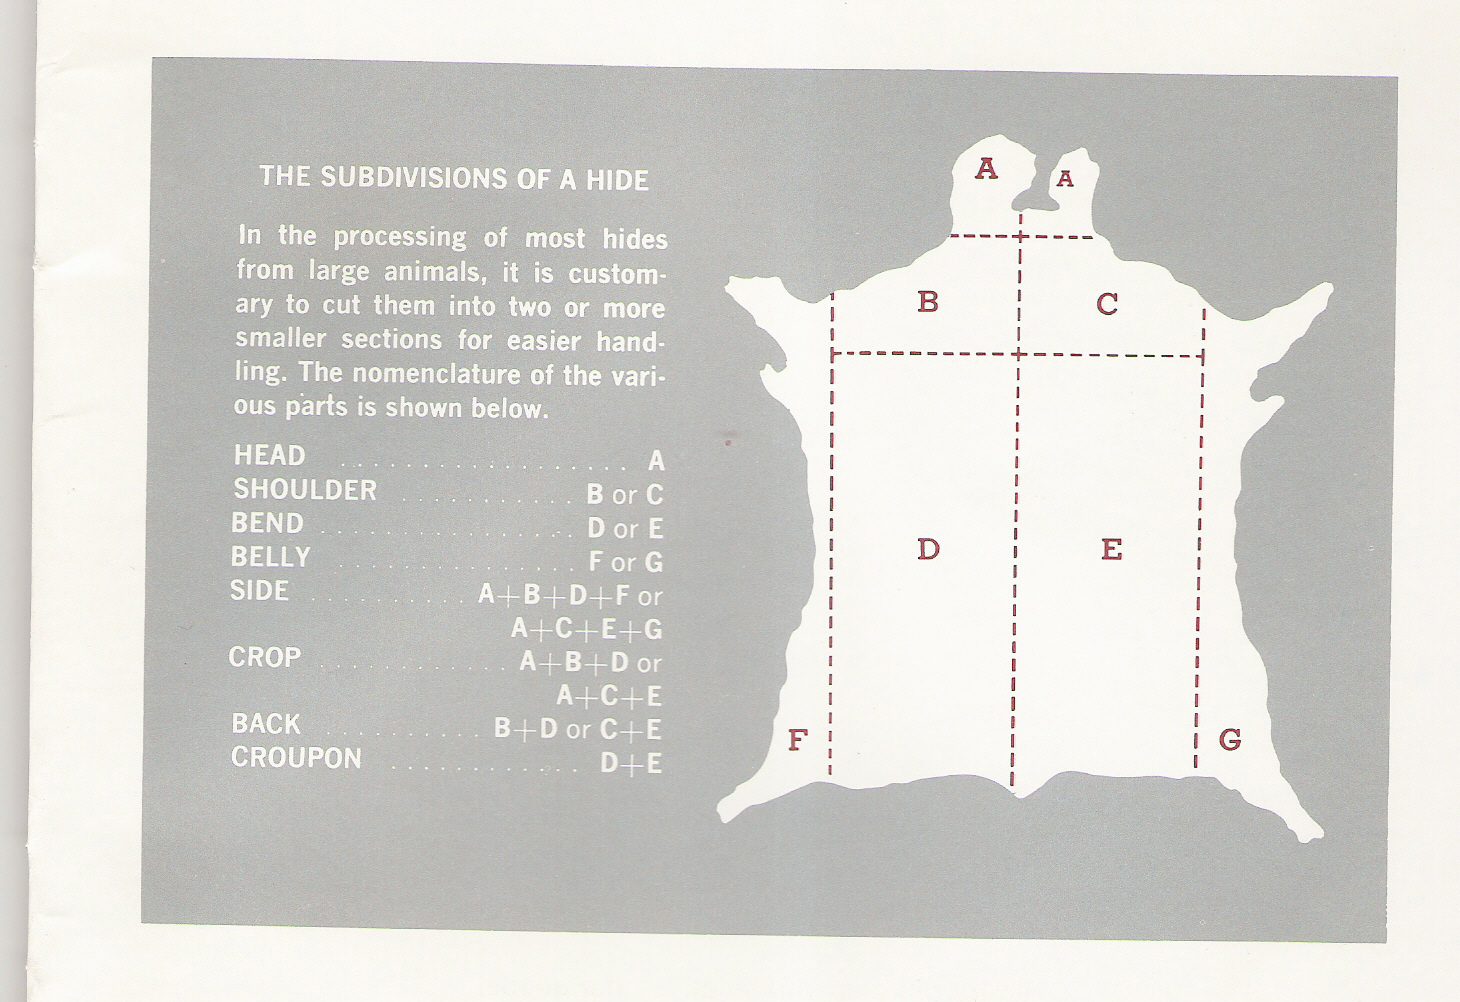
No two hides are the same. You can take sister cows, send their hides to the same tannery, and the two hides will have differences. No hide is the same thickness throughout, either. That's why leather "weight" is often expressed in ranges, i.e. 8/9 oz. or 4/5 oz.
The center of the whole hide is where the animal's spine was. The area by the rump is thicker than the shoulders. Hides are often sold as sides. If you cut straps, this is the most economical way to purchase leather. Double shoulders might be long enough for belts, or not, depending on the animal, but they are the "cleanest" looking parts of the hide. If you plan to carve the leather, you can save money buy buying leather with imperfections that you can work around, or cover up with tooling. Belly areas are soft and mushy compared to the shoulders and may not be suitable for a function that will place the leather under stress.
To keep this conversation straight, here is a chart:
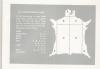
A, F & G are good for small projects, practice pieces, etc.
A,B,D &F is a "side"
B & C is a "double shoulder"
B & D is where you would get your straps from
I borrowed this from George Hurst's Hidecrafter Catalog
because I'm too tired to type it out right now.
When buying leather, consider what you plan to do with it. Every time a hide is cut, the price per square foot increases. If you can use the whole side, it's less expensive in the long run (because there is no such thing as "scrap"!) Buy from a vendor you have a rapport with- if the seller knows what you are doing, he can select a hide best suited for your needs. I would save a long side for a person who plans to make straps (belts) and I would save a pretty double shoulder for someone I know wants a piece with no blemishes, for example. Tandy catalogs used to refer to the "occasional range markings that add authenticity to your project" which is a nice way of saying, "Hey, this cow tangled in barbed wire or got caught on a roller at the tannery" but in truth brands and some markings can be interesting. Just make sure that any flaw in the leather is not expected to bear weight or be subject to stress. Any time you punch a hole in leather (even for sewing) you weaken it, too, so the smallest holes you can use are desireable. Often you will see purse straps sewn on in a triangular pattern- this is a way to distribute the "load" evenly and not rip out the stitches. Some people make the mistake of punching holes to close to the edge- after practice, you can eyeball it, but keep in account how much force will be exerted on those holes, and does the leather toward the edge have enough room to not be weak?
I hope I answered some of your questions, Regis, didn't mean to get off track.

Johanna
-
Cabela's is one of the world's leading suppliers for outdoor enthusiasts.
We can't touch these prices...we can offer a customer a custom item, or better quality, but not at these prices.

Johanna
-
Your wish is my command. Look at the bottom of the leatherworker board forum.
Johanna
-
I have a workshop for dog armor somewhere...we used to make the gear that the dogs wore when hunting wild boars in Georgia. Judging by the nicks in the leather when we did repairs, I would not want to tangle with a wild pig! Are you looking for decorative or functional armor, Hoyden? I need to rummage around (and find a scanner big enough for the patterns!) This is kind of like a stroll down Memory Lane looking at all these old classes and workshops. One thing about doing custom leather is that you never know which project is going to be next, huh?
Cheers from snowy Ohio!
Johanna
-
Awesome job, Dale. I like the realistic eyes and the flow of the manes, as well as the defined faces. You are an artist and a craftsman. Thanks for sharing!
Johanna
-
I was guided through a Georgia slaughterhouse by the boss, and he was especially proud that the only part of the animal that wasn't used was the "Moo". If people didn't eat meat, leather would be cost-prohibitive, because no one would raise cows for just their hides.
Johanna
-
I tell the kids, "Look at the pretty blankets!"
Johanna
-
Hey, David...I'd rather you do it here on leatherworker.net! More people will certainly see it, that's for sure! The magazine has less readers than this website. And I'll even volunteer to do a lot of the grunt work for you!
In fact, I would be thrilled! Johanna
-
A friend complained that it was too hard to use a compass or wing dividers to make accurate circles or arcs on carving leather. I have always used drinking glasses, plates, coins, cans, or any object that already is a circle and about the size I want. I suppose you could make a circle on a computer, adjust it for size and trace it, too. When I explained my shortcut to my friend, I realized how easy it was to overlook the obvious. I learned from an old man who had been doing leatherwork for 30 some years. He wasn't going to get a compass out, he would slap a saucer on the wet leather and use a stylus to trace a perfect circle. Same result, half the time spent, less margin for error. Wing dividers are great for planning where the next spot or rivet should go in the pattern, or evenly punching the holes in the belt, but they weren't made to do circles, and they don't do them very well.
There is an oval cookie tin downstairs that Jon Alger used to keep beads and button in, and that was the oval on many a 8 X10 book, bible or photo album cover, and there is a smaller candy tin with needles in it that went on quite a few smaller books, and big hipster wallets. There's a bunch of rectangle and square tins with all sorts of odds and ends. Sometimes what you need is right there in the shop, just look around. Johanna
-
The Pitt Pounders are near and dear to my heart. I had never heard of a leather guild until one day, while shopping at the old Tandy near Monroeville, Michelle introduced me to the president, Chris Kearns. I got to know some of the other members when I worked at the Tandy in later years, and when I went to Georgia, I tried to organize the Georgia Leathercrafters' Guild on the same principles of friendship and sharing that I remembered from the Pittsburgh guild. The Pitt Pounders co-hosted the IFoLG 2006 show in Butler last October, and now a new president has taken the reins, Kevin Cohn. I have no doubt the PPLG will continue on with the same traditions of courtesy, education and just plain fun. You can read Draper's witty monthly newsletters on their website PittPounders.org in the archive, and see pictures of the international show last fall. They accept members from all over the country, and meet once a month, for a meeting or a party or both (sometimes it's hard to tell!) All of the information is on their website.
Johanna
-
Thonging chisels have their uses- like doing the holes for a buckstitched belt. Punching out laced saddlebags. Mexican braiding and appliqué work done with lace. In fact, I was thinking about this, and I mostly use chisels where lace is involved, not for sewing with thread.
For lacing or hand sewing with thread, where two pieces must be joined together, I fasten everything tightly (twist ties, glue, tacks, whatever) and punch the holes with a tiny sharp awl. I always make both holes at the same time- I do not try to match two pieces of leather with holes punched separately, ever. I try to make the holes an bit smaller than the lace or thread. Then I pick up two needles and sew it. I keep my needles, both Life-Eyes and glovers needles, sharp by stropping them, and never use harness needles-too big and blunt. I never let go of the needle(s), same as lacing. That's the way I was taught, right or wrong, it's what I know how to do. I admire people who can sew 12 stitches an inch with an awl in the palm of their hand, but I'm not one of them. (Gesa thinks that's child's play!) I backstitch to finish off, and I pound both thread and lace with the back of my mallet when I'm done. I was told that "set" the stitches. Sometimes it seems like it does, sometimes I feel like I'm observing an old man's superstition. For hand sewing thread with thick (above 8/9 oz.) I don't use an awl. I do use a single or double punch, smaller than a chisel. I don't think Tandy sells them, I think my set is wood carving tools, but I could be wrong.
For you old timers out there, disregard: Tandy sells a "thonging chisel" and that is a one- two-four-eight toothed heavy handled tool you whack with your mallet. Some people know them as "gang punches". Same thing. You have to sharpen and strop these things or you will hurt your elbow. They aren't sold sharp, and without an edge, you work too hard to drive them through 8/9 oz. leather. A few minutes on a stone and occasional stropping will pay off.
Rotary punches are pretty useless because they limit how far into the work you can go. If you need to make round holes for rivets and snaps Tandy sells an inexpensive Mini Punch set. When the screw on tubes get dull, just get new ones. When you can justify it, invest in a better quality set that you can sharpen yourself, if you want to. If you want to sew pretty, buy the best awls you can afford.
Johanna


Looking for a 7/8" bag punch
in Leather Tools
Posted · Report reply
A stitching groover has a little "L" shaped blade that you run down your stitch line for a light trench to stitch in. It recesses the stitches. You can't go too deep, or you will weaken the leather.
A bone folder can be run over completed stitching to flatten the thread into the leather some, but I was always taught, right or wrong, to flip the mallet upside down and pound them in, being careful not to leave little circles in the leather.
Doggone it...gonna make me dig out the Bianchi video? Bet I haven't looked at that in more than 10 years! You piqued my curiosity now! Can't think of the tool that fits your description.
Johanna