Mike Phelps
-
Posts
105 -
Joined
-
Last visited
Content Type
Profiles
Forums
Events
Blogs
Gallery
Store
Everything posted by Mike Phelps
-
Works for me guys. Just had to zoom in a bit. On a continents wide view saw no ones pins. Zoomed in a bit and hey they're all here. My hat's off to whoever "fixed" it.
-
I'm sure there is but I haven't found one yet. I just use the denatured alcohol, it has a LOT of uses around here, then peel it off. Mineral Spirits works just as well to keep it soft until I clean up. Got a whole jar of different size brushes that are just used for contact cements, Barge etc. Found an old rusty can of turpentine the other day. I'm going to try it soon. Figure if I use enough stinking stuff it'll keep the in-laws and assorted nerdowells at bay.
-
A soap will just help the water soak into the leather instead of beading up on the surface. We do the same thing when applying herbicides, fungicides etc. It also might contain some anti-something or others to help prevent mildew.
-
S&W .460 Scoped rig
Mike Phelps replied to carpfisher's topic in Gun Holsters, Rifle Slings and Knife Sheathes
Nice looking little hunting rig. Those semi wadcutter, Keith type cast bullets in .460 ought to do excellent on wild hogs. -
It's probably a matter of personal taste. The tools I had when I started were the lightweight wooden and rawhide mallets but they aren't very efficient when your trying to tool heavy strap grade leather and punch holes and slits through it. After wasting a bunch of time and money on different tools finally settled with 2 & 3 pound mauls filling most every need at the bench.
-
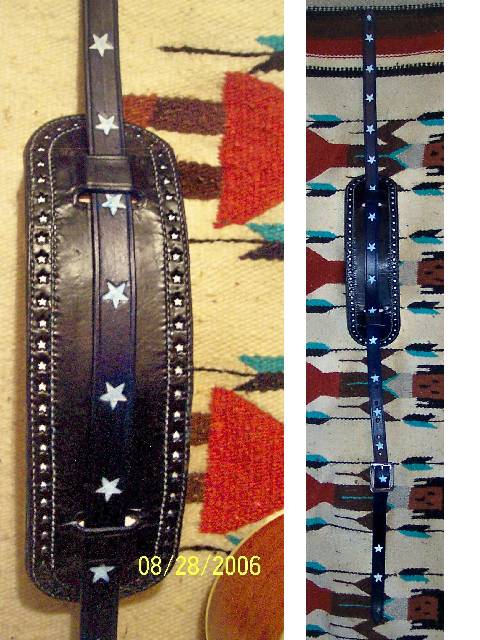
Hey gearsmithy, Here's what I have done. Paint with acrylic and let dry. Then paint several layers of rubber contact cement over them. Let dry and used dye. Then take an art gum eraser and remove rubber cement. Attached is some work I did done that way. The stars of the strap were painted, the strap dyed.

-
Hey Jim, The eye and hand coordination system is a marvelous thing. The whole thing of centering the tool and maul is all taken care of deep between our ears somehow. All hominids can do it, no conscious thinking required. In fact the less thinking the better. The broad flat surface of mallets and hammers only serve to give you a false sense of confidence. Strike a bit off center and the tool goes flying regardless of the size or shape of the head. The first time I banged a thumb and a nail went flying deep in the last century, my GrandPa pointed to the top of the nail and said, keep your eye here, it works. Everytime it's happened since it was because I was looking at the tip of nail, chisel, punch, tool and not the top. The main advantage of mauls over mallets is a lower center of gravity. Take a maul and mallet of the same weight and imagine a line running through the handle and out the head. The maul's working surface is much closer to this center line than the mallet's.
-
PRO DYE to ECO-FLO
Mike Phelps replied to Rayban's topic in Dyes, Antiques, Stains, Glues, Waxes, Finishes and Conditioners.
Hey Brian anytime you want a snakeskin give me a shout. I've still got a few rattlesnakeskins left from the spring hunt. Some have the scales still on some don't. Average about four foot. No heads, no rattles, even the coontail is gone. Just the diamond pattern. Have some shorter pieces left from different projects. -
Now that is some really serious knife work. Really impressive job on the coloring of the feathers also. Checked out your site and as impressive as your work displayed on the site is the one you posted here really puts it over the wall.
-
cover for the seat of my stool
Mike Phelps replied to Mike Phelps's topic in Furniture: Inlays and Upholstery
>Mike, sometimes mistakes are a good thing, look at penicilin.< Wouldn't have survived the Seventies without it! And that's the truth Ken. Like the old braider told Bruce Grant "Looks like it just growed there" Kev, Thanks. It was my privilege to work with and study under a "true artist" in residence some decades back. She was really something. She made this meal she invited me to eat with her that she learned how to make in Mexico. Chicken and dark, bitter chocolate. It really lit a fire in me. -
cover for the seat of my stool
Mike Phelps replied to Mike Phelps's topic in Furniture: Inlays and Upholstery
Thanks Ken. It's actually a mistake. It was supposed to be an eight string braid. Under two over two through the five hole but for some reason I made it under two over one through the fourth. I noticed it after I had about six inches done, didn't look too bad so went with it instead of dragging all back out. I think that's the second time I did the same "mistake". -
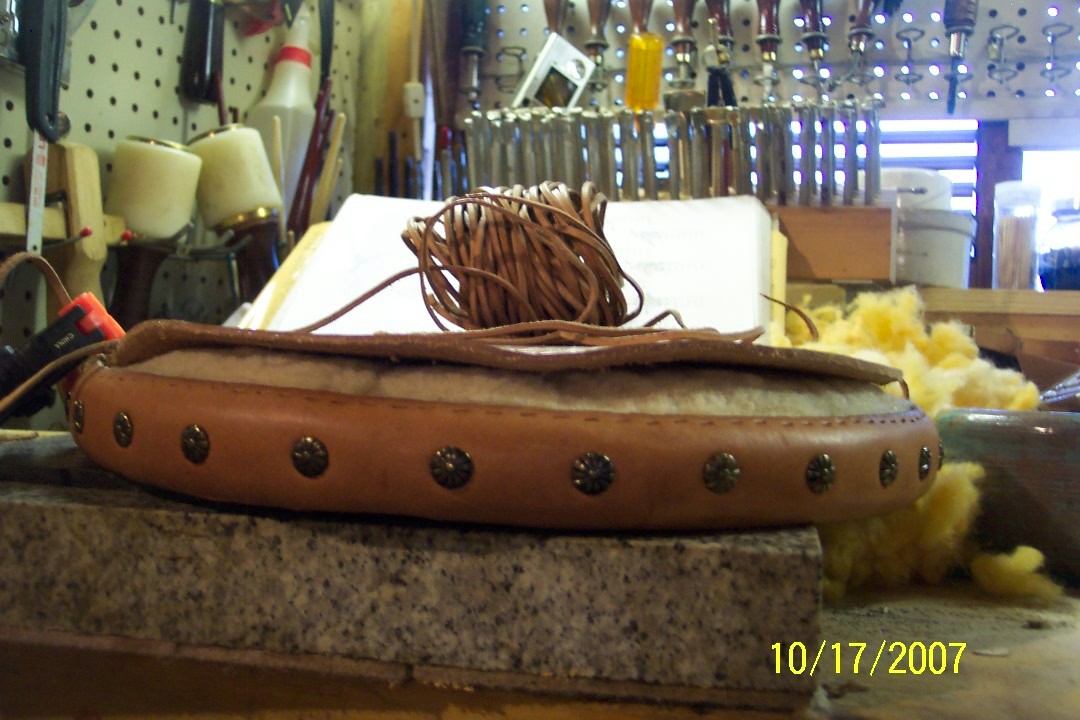
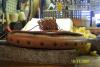
The cover for the seat of my stool was a POC as noted last week in the "Other" section. Dug around and found a strap cut from saddle skirting, 13-15oz and rock hard and a section cut from the same stuff from the flank that had a crease and some cuts in it. When I posted pics and description in the "Other" section it was only half done, well I finally got it finished so I can sit down and start doing some real work. I hate standing up at the bench. Tried my hand at doing a different type of "Splayed BasketWeave" than I've done before. I'll be glad when I replace that tool with one of better quality. The Bowtie on that thing just ain't right making it hard to work with. The finish is just warmed up beeswax rubbed into warmed leather with some wool. Cut my own lace and rubbed some saddle soap on it and ran it over a round edge burnisher then after it was laced put the beeswax to it and hit with another bigger burnisher. Never will I try and drag that much lace through slits in leather that thick and hard again. Had to worry every slit round before I could get the right angle to push the needle through the holes.
-
Morning Mike and Welcome I think Skidboot barked at me. Am I sure that bison skull was leather and not bone? Now I'm going to have to try my hand at embossing and carving pictures.
-
2007 IFoLG Competition Room
Mike Phelps replied to Johanna's topic in Special Events, Contests and Classes
Thanks to Johanna and all for posting pictures from the show. But for any of you that were there????? I've always been awestruck by Peter Mains work, especially the necklaces. The pictures he takes of them are truly beautiful and I have always wondered how they would actually look eyeball to leather? His skill at leather artistry, not withstanding, he has considerable skills at presentation and photography. -
nice, sturdy, swivel, seat stool
Mike Phelps replied to Mike Phelps's topic in Furniture: Inlays and Upholstery
Thanks Ken, I'll be glad when I get it done cause standing at the bench ain't much fun. Surfed by your site a few days back. That is some nice looking gear you guys turn out. The prices you get for them is outstanding. I've learned the hard way to not try and compete with the mega stores and their machine made/import goods. A person who paid $80 dollars for one of my early guitar straps would just have likely paid twice that or more, which he'll have to do cause I ain't giving them away at that price any more. -
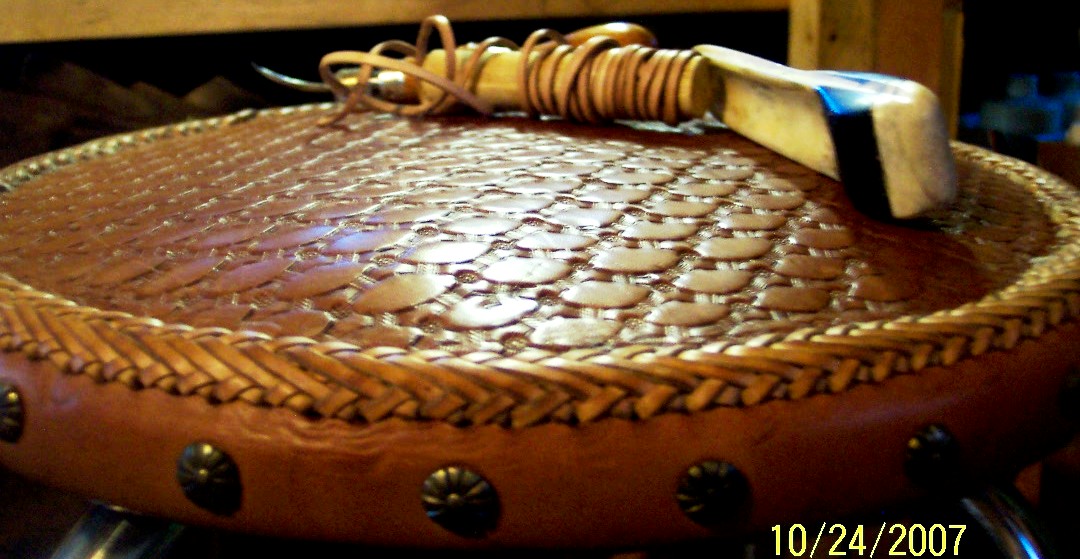
Have a nice, sturdy, swivel, seat stool. A knock off of the ones pricey ones you see a Auto Parts stores. I is actually a really fine stool, heavy duty ball bearing swivel mechanism, some kind of pressed, black, fiberboard[like masonite] three quarters of an inch thick, heavy duty chrome plated steel tubing legs and foot rail. The only draw back was that 3inches of cheap foam rubber for a seat pad and the thin plastic covering which blew out in less than a year. It had always been simmering in the back of mind to do something different with the seat but kept putting it off. Finally there was no putting it off any longer. It blew out so bad the foam rubber wouldn't stay. The idea of a leatherworker putting duct tape on it until he could "getuit" just didn't set well. Like the auto mechanic who starts is car with a screwdriver and has vice grips for door handles cause he just can't make time to "getuit" It was time "to get her done!" The original vision was to use the original foam and do a mitered seam using saddle skirting. But then I thought about all the air being forced out the foam every time I sat down working its way through the seam and bottom, the death of the OE seat. So after too little thought I came up with making the side and top of saddle skirting, using up a bunch of that fake shearling I've got and lacing it on with wide lace like those fancy chopper seats. I'd already cut some wide lacing, but didn't have any needles to fit it, an oversight on my part, the last lacing needles I bought were the small Arrow Brand with the eye and one prong, wholly unacceptable for 1/4in lacing. Finally I cam up with what is revealed in the pictures. I cut the side piece one and half inches shorter than the circumference of the base and laced it together, soaked it water and stretched it over and around the base, after I cut the lacing slits of course. Put upholstery tacks in it to make sure it stays in place, they will have to be replace with saddle screws because those tacks are going to back out of that fiberboard. Cut the seat top one half inch less diameter than the base and punched the same number of slits in it as the side piece has. Glued a bunch of scrap pieces of that fake shearling to the base and dug out a bag of trimmings of genuine shearling from trimming back the edges of guitar straps I make. Cut and beveled about 80 feet or so of 1/8 lace from lightweight veg-tan and set to work doing an eight string round braid. If I EVER do any thing like this again I'm going to punch round holes in that thick stuff and definitely use much wider lace, making sure I've got the needles to fit the lace.

-
All the straps I've ordered from Zack White have had a lot smoother flesh side than any I've ever gotten from Tandy LF. Notice I said a LOT smoohter not a little. I'd imagine their belt blanks would be the same. www.zackwhite.com Sure makes finishing the backs a lot easier. The grain side has always been blemish free and never saw a pasted spot yet. Appear to be cut from premium double bends or butts.
-
Using a creaser I don't cut the line. Just set the width on the adjustable and go. You can burnish the line as you crease as long as your careful not and keep the long side against the edge. You have to be careful going around corners with a tight radius, make sure you've got a firm backing and you casing is not to wet or it tends to pucker and pull away from the backing. I've also got a new free hand creaser that came with burrs and too sharp edges it is getting about right after several sessions on the rouge strap. It's kind of interesting as I can take and heat it up over the alcohol lamp and sear a nice crease. Got some fixed edge wooden ones and they are good for belts and straps with gentle radius at the ends, not much good for wallets. As often as not I just pick up either the large or small popsickle sticks I've polished an edge on the ends and use them along with a straight edge and free hand the corners. The new bone folder I made works great and is becoming my favorite creaser. I've got a new push beveler and either I'm using the wrong technique or it has other problems as the end just has a hint of any radius and the edges feel rough.
-
Any experienced strap makers care to share the basics?
Mike Phelps replied to Gray's topic in Guitar Straps
Okay, guys I found the rolled edge tutorial and uploaded it. Guess I should preview it and see if it's legible. Hope you find it useful, I know I have.
-
Any experienced strap makers care to share the basics?
Mike Phelps replied to Gray's topic in Guitar Straps
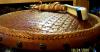
I've still got the tutorial Verlane sent me on doing a rolled edge around here somewhere, stored on CD, locked up in a hard drive on some PC or other and a printed copy. I'll find one on one or the other media and shoot you a copy. Jeff Mosby, guitar strap maker par excellence, a contributor to this forum and several others has one of the best tutorials on doing basketweaves. It's in digital format and is floating around on the WWW. Don't know if he has it on his site or not, but like all things on the WWW once it's there it NEVER goes away. All a matter of putting the right words into a search engine then sorting through all the results to find that gem. Before I put one together I'll look for his or someone can. It would be a nice addition to this forum. But basically here is what I do in relation to the one in the photo. Lay out a,one, 60 degree guideline with one of those plastic triangles, usually near the center, so you can work both ways. Now I use a heavy,24oz or 32 oz maul depending on how hard the leather is, place the stamp along the line and give it a light rap with the maul to set it so it won't slip then give it a good solid thump so it will leave a nice sharp, burnished impression. Then set the stamp on the other side of the line with the leg overlapping the other one, set the corner of the stamp so you can feel it in the groove left by the previous stamp, then bring it down so you can see it line up on the guideline, give it a light rap then a solid thump. Keep working both sides on the line like that. My early attempts at basket stamping used to wander around like a cow path. But putting a guideline near the center of project and getting those two rows done first, then stamping alternating lines and having the the work glued down to something that won't stretch helped. The reason I use a heavy maul is so I don't have to swing it. Just raise it with my fore finger and let it fall. I don't change positions just move the work along underneath me so my line of sight and angle of attack never changes. I just get comfortable and let the tools do the work. -
Any experienced strap makers care to share the basics?
Mike Phelps replied to Gray's topic in Guitar Straps
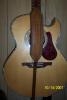
Thanks Romey! It's for sale, presently it resides at Dave's Music in Ada, Oklahoma. After several attempts and some instruction from Verelane @ Siegels Leather in California on how to do a rolled edge and how to properly do basket weave from WC of WC's Leather I got that one together. The shoulder pad has a curve to hug the shoulder achieved by cutting the piece for the bottom shorter than the top piece then spacing the same number of holes in each piece. You can't see it in the pic but it has a one inch thick gold sheep shearling pad glued and saddle stitched. -
Any experienced strap makers care to share the basics?
Mike Phelps replied to Gray's topic in Guitar Straps
Forgot some things typical range of adjustments on the one size fits all leather straps run from 33, 38 inches-58,60 inches. Lots of wasted leather huh Gray? I usually use anywhere for 6-8 oz leather all the way to heavy saddle skirting weights[you have to skieve the ends so you can get it on the strap buttons]. All I use is veg-tan and harness leather. although I've got a couple in the works using some chrome tan stuff in lighter weights. -
Any experienced strap makers care to share the basics?
Mike Phelps replied to Gray's topic in Guitar Straps
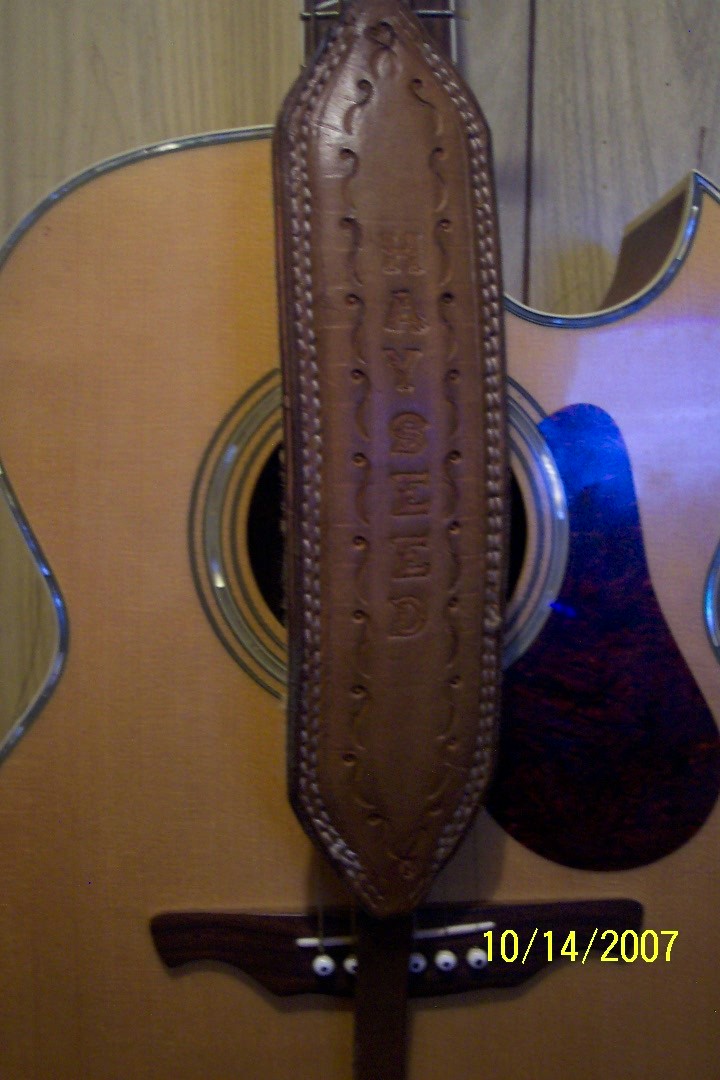
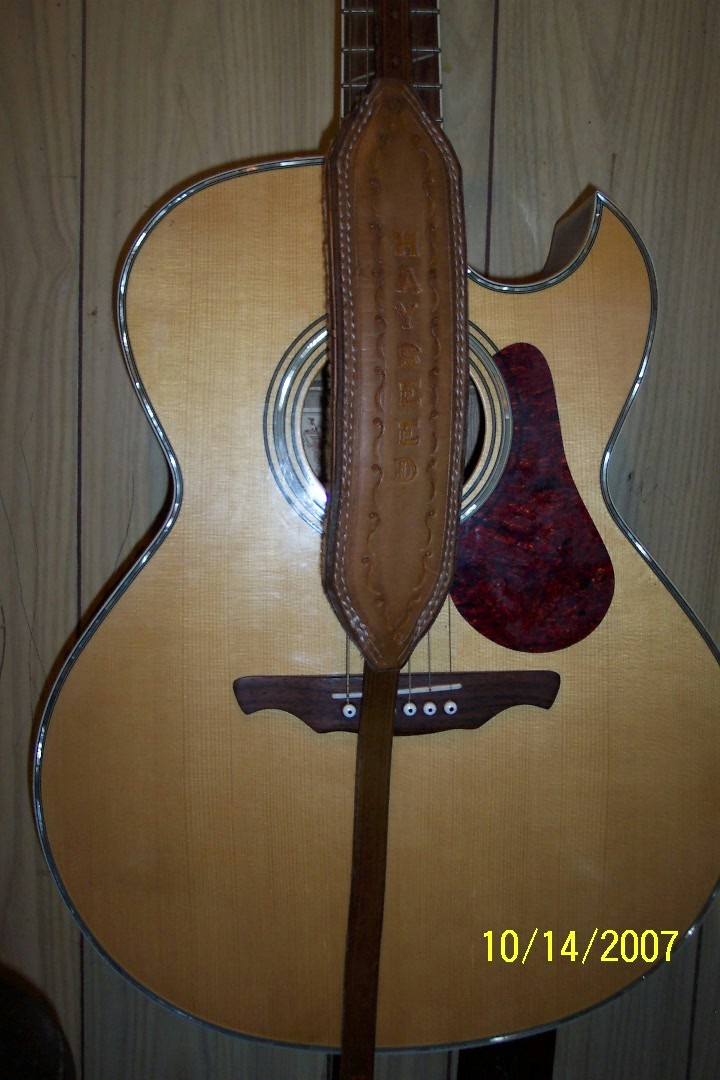
Gray, attached are pictures of some of mine. The blue one is the simplest. Just cut and wet form the slots for the strap to pass through. Acoustics are fairly lightweight so no padding is actually necessary, just nice. I use sheep shearling on my high end straps and the fake stuff on others. I glue and hand saddle stitch mine, mainly because I like the way heavy waxed thread looks. Trim the edges close so pulling wool through with your stitches isn't as big a deal. I usually don't line them as these buggers are longer than a fat mans belt and that is a lot of hours at the stitching pony. I just burnish the back sides real good with gum tarraganth. Strap buttons are one quarter inch in the throat. That's the one that attaches to the heel of the neck. Most acoustics come with a what is called an end pin at the bottom it is three eights of an inch in the throat. If it doesn't have one she will be adding a button like the one at the heel of the neck. Some acoustic guitarist just use a piece of latigo or shoe lace that double through the hole on the strap and tie it behind the nut. Length is a different ball game. On a custom strap for one person and one guitar you can cut the length to fit them at the longest position they will use, usually standing. Then add another hole to each end a few inches up the strap to adjust for sitting or getting up close and personal with the instrument. I take it she doesn't have a strap that she can give the length from hole to hole for already. If it has an end pin she can tie a cord to it then adjust it till she finds a good fit with it tied behind the nut and use that measurement for the longest she would need while standing. Using that method you can measure like that is the last hole in a belt and adjust from there. Just took a pic and added it showing the buckle end. That one has 12 inches of adjustment. Hope that helps. Feel free to contact me off list. I'm fairly certain that my email is listed in the members section. Mike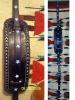

-
Nice looking little rig there TexasGeezer! The rig in my avatar over there is one I made for myself and one of my 1911 A1s. Like a lot of over folks I couldn't find any instructions on making rigs formed tight for pistols that were tight enough to be secure without flaps and straps and other junk. A member of the IILG forum, Art Schwab, made a few with straps and stuff and he sent me some copies of his patterns. I took the Jacquia Slide pattern he sent, made it a little taller, eliminated the strap&snap, added another line of stitches on the bottom[of the frame side, rear of holster] after the basic forming was done to tighten things up a bit, rewet and formed it again, after making some inserts from wood for the trigger guard, ejection port sight track etc and clamped it all up good and tight and let it dry. I wear it lot, use it area Practical/Action shooting matches. It works great. Made it from that cheap, heavy skirting Tandy sells. It is unlined, just used gum tarraganth inside to seal it from oils and moisture and resolened the outside.
-
what resource was the most help to you when you were new at this?
Mike Phelps replied to Johanna's topic in Resources
I took up leatherwork because I wanted a nice, clean, tasteful guitar straps but whenever I found something even close to what I wanted the prices were just outrageous [now I know why]. I had a bit of time on my hands and my mother in-law located a box of crusty old tools, hardware and really iffy institutional dyes and finishes for me. The tools cleaned up good enough to be serviceable. But I was still faced with a mountain of ignorance and a lack of raw material. But at the store my wife and I were operating at the time we had a couple of computers hooked to the WWW. Found suppliers for everything I'd thought I'd ever need. But hey we're talking about a guy trying to keep a small business afloat in a really tiny rural town, money is tight folks, if we have beans on Monday it's refried beans on Tuesday tight. So to keep from wasting money out of ignorance I fired up the search engines for "How To Leather Work" found a whole lot of ghost towns and/or aimless sites. Finally I came across the IILG. Pretty fine bunch of folks there. Wayne Christiansen, Verlane Destrange, gosh those two gave me insights and sent me detailed instructions on how to do things that I would have had to buy volumes of books to get otherwise. There are a lot of folks on this forum that were/are members there. I know Joanna's name was frequently mentioned while I was there.