Mike Phelps
-
Posts
105 -
Joined
-
Last visited
Content Type
Profiles
Forums
Events
Blogs
Gallery
Store
Everything posted by Mike Phelps
-
Very nicely done. Some of the smoothest beveling I've seen outside of Peter Main's. Nice handling of the backgrounder around the cat but the thing that impressed me the most was the way you handled the matting tool in and around the leaves. And you've kept it so clean and scratch free. Now that speaks volumes. I'd bet your workspace is so clean and well organized I'd be afraid come near it for fear some of my slovenly habits would somehow haunt it.
-
There is an analogy among competitive shooters that applies to this"You can shoot your way into the Masters Class with a stock factory weapon but to be competitive at that level you'll need to have it accurized". Nearly all my stamping tools are Craftool and I can do decent work with them. Do I have complaints about them, you betcha by the bucket load. The shafts are too small, the knurlings not deep and sharp enough to get a good grip, the tops of some are radiused, the tooling on one in may be fine and almost nonexistent on the other and that darn X513 was shaped like a parallelogram instead of a nice bowtie [just try doing a splayed basketweave with that thing. spent hours trying to figure that one out before I took the files to the ends of it, now it's short but usable]. Now that I have several years experience using these tools I know what to look for and I'm not shy about taking the files, hones, lappiing and polishing compounds to them so they will at least work in a satisfactory manner. I can't hardly wait until I have enough money in my pocket to make the two hour drive South to HideCrafters and check out the Pro Series tools they have. I hope that they will be able to continue to give us an affordable alternative to Tandy/LF/Craftool. Are the Bob Beard and other Professional tools worth the money they charge? You bet they are. Can I justify spending that kind of money on one? Rarely.
-
Good Morning Melody and big HOWDY from North of the Red River.
-
http://www.pccord.com/guitar_straps_links.htm Here is a link to a leatherworker in Australia I greatly admire Chantle Cordey. I think she is on the other side of the continent from you. But browse her site and give her a shout. She is usually answers emails rather promptly.
-
Nice Job Freak! I'm a big fan of ugly leather. The more bug bites, brands, scars, wrinkles the better. Nice looking stitches. Couldn't tell if they were lined or not. By Monday morning I should have pics of a piece of UGLY, cheap, importedsaddle skirting I'm recovering the stool at my bench with. Cut from the flank/hind leg area so it varies from rock hard,13 oz.-soft 8oz. It's got cuts, scratches etc. from laying under my bench for a year plus it had a serious wrinkle from the tannery. I bought the side during one of Tandy's manager clearance sales from the bottom of the stack for just over $1.00 per sq. ft. Long live cheap ugly leather!
-
fishing rod tube like in the Stohlman book
Mike Phelps replied to olandrea's topic in Sewing Leather
olandrea, When I stitched up the pool cue case I used a 2"X4" for a mold. On all the edges of the mold I put a nice smooth 1" radius with rasp and sandpaper. I used heavy saddle skirting[the cheap stuff that Tandy puts on sale] because I wanted it stiff enough to stand up to lots and abuse without any additional stiffeners. No external pockets because I wanted to keep exterior lines smooth so it wouldn't get hung up on anything and less area to get bumped. There are all sorts of design considerations to make when undertaking a project. The biggest one is by the "false economist". It goes something like "why should I spend as much or more for cue, quiver, rifle, bow, guitar case than what it's holding is worth" the answer is simple, because when you step up to the table, firing line, stage is your equipment going to be pristine, your arrows true, in tune. Take a bit of pride in you equipment and what your about to do. -
fishing rod tube like in the Stohlman book
Mike Phelps replied to olandrea's topic in Sewing Leather
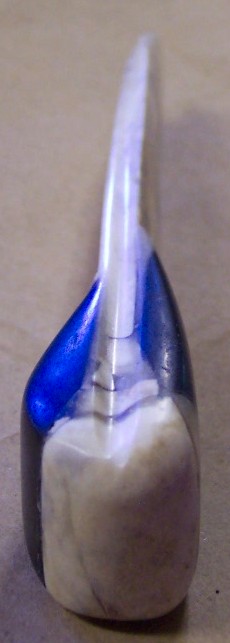
I made my own curved awl blade for doing edge to edge seams. Tried making one like in AS's book, but evidently the needles I used weren't high enough quality. I have one of those four in one tools with the large and small leaf shaped awls, scratch awl and lacing fid. I wanted the awl to be narrower than the smaller leaf awl so I took the fid haft and curved it like Al did the needle in his book then shaped it into a leaf shape with small half round files then round hones finally stropping it on leather glued to a dowel coated with rogue. I've attached a couple of pictures of the tool I made and one of the seam on a pool cue case which was the first time I'd tried edge to edge seams. When I made the holes I ran the awl through with it tilted at an angle as they should be. Then saddle stitched. I'm a big fan of saddle stitching.
-
The Fid and Folder were both made from the ham bone of an old boar I had. As far as a BEST choice. Not that I can tell. The larger the bone, mature cows and bulls, boars and sows, will have greater thickness and less radius once they are cut. Most of what you will find at meat markets will be the lower leg bones. Most of the upper leg and ribs gets sawn up and sold with the meat. Don't use the bones from cooked meat. They get too soft. Green[fresh] bone and horn stink when they are cut, it can get stomach churning if you use power saws/sanders. Best to saw the ends off and let them cure for a month or more, let the marrow dry out. If you can get some live meal worms they'll do the work for you and if you have them confined in a container will give the bone a nice mellow yellow color, a faux relic sellers trick. A rib bone would seem to have the right natural contour but the end will be soft and have to be filled with epoxy mixed with bone dust and there is still the problem of all that marrow inside to clean out. I've found it easier to use leg bone. I can cut them into quarters or thirds a lot easier with a hack saw than trying to split a rib with a coping saw. Then just use a dowel rod with sandpapers stuck to it clean out the dried marrow and work it into shape. Bones don't have any flats. If you are making something that requires it to have a flat surface or two get the biggest thickest piece you can find then get another one. When you start working it you'll see what I mean.
-
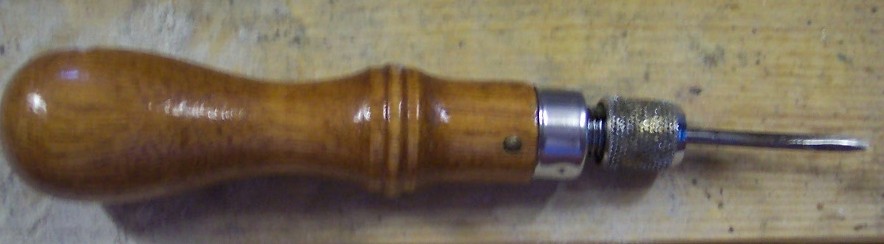
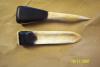
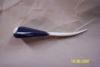
Got tired of using that old nylon folder. I was always having to sand and polish it to remove stains and remove burs. So I thought man if I'm going to have to maintain one of these tools it might as well look good. So I picked out some left over pieces of bone and horn and made myself one. It's got an edge slicker down each side, an eighth inch and quarter inch. I'm kinda proud of it. Going have to pay the meat company across the road a visit and get some bone to cut up and let cure. Stuff like this is kind of fun to make. Feels much nicer in the hand and after it's sanded and buffed is just so much better looking than nylon or steel.

-
Pretty Nice there K Man. Pretty nice. I know the skin is a bit pricey but if you have someone sitting in the buddy position it really helps if they are stuck to the seat tight and not sliding around. But then they way I rode once was all they ever mounted up behind me anyway except for a little ol gal from El Reno. But she was tiny and you never knew she was on the sissy pad unless she reached around with a left handed cigarette.
-
I've been in awe of your work for Clay since I first saw it on the IILG board several years ago. One of these days I'm going to attempt more than one oak leaf or feather in 3D. Hard to fathom the time, patience etal it takes for a project like that.
-
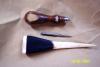
Thanks for the additional pic Jim. Those blades would be for the straight razors that take replaceable blades. I've got a source or two[local beauty operators]for those blades and several online marketers of blades bookmarked. Plus I've got a dozen or more of the old straight razors around. Some had blades with bad nicks I've rehoned and could use, but that would be overkill as they are not really long enough to split leather for anything larger than cigar holders, medium size knives, maybe it would be useful after all to make one that size. Got a bone folder,creaser,burnisher, string beveler getting close to fitting the handle slabs on this evening. Cut from the same piece of bone and horn as the lacing fid. I think I'm on two a theme with these things. Thanks again for the pic and additional information. Mike
-
Hey Jim! I REALLY like that splitter! in picture 4. I've been trying for a while to cobble one together using disposable utility blades by making the blade adjustable. Without much success. But if I'm looking at and reading you right, the block in front of the cutting edge of the blade moves up and down with that screw in the center? The bolt at the rear acts as the pivot for the adjustable block? Oh man did I ever have it all ass backwards! Back to the barn for 40 lashes! And try again.
-
Thanks Romey! Nice knives! I browsed your site this morning. Very informative. I make a blade now and then as a hobby. Randy Jantz of Jantz Supply and knifemaking.com is an old aquaintance and practically a neighbor. I spend way too much money in his store in Davis, Ok. just down the road a few miles.
-
Bacon Wrapped Green Chilies stuffed with Chicken. Marinate chicken breast in your favorite marinade, I usually use lemon juice, overnite or at least 4 hours. Cut into strips. How big or long depends on the size of the Chilies, or large jalapeños. Slice open the peppers and scrape out seeds. Insert chicken. At this point you can also add a slice of cheese, when I add cheese it is Monterrey Jack. Wrap with thick, the thicker the better, bacon. Don't spare the bacon, it will keep the pepper from burning while they cook. Coat liberally with cracked pepper or at least salad grind pepper. Grill or oven cook for 15-20 minutes. Do Not, I repeat do not, eat these while drinking a fine Mexican beer[is there any other kind]. Doing so will cause you to eat all of them yourself, drinking too much beer and taking a siesta in the lawn chair beside the grill and you won't get anything done until Sunday Night Football.
-
Hey Jim! I've got the Garlands with the rolled heads, had them for years. never cared much for them and haven't used them in ages. Never could develop a good feel with them. I have to raise my shoulder too high to get a square blow on my tools. Then one day I was at the Tandy LF store in Oklahoma City and they had some of the Al Stolhmans rawhide mauls on the bench where they had been doing some work, a 32 oz and a 24. I stopped and took a look and the manager asked if I'd like to try them out. Man what a difference. With all that heft on a short handle I can get comfortable and just rat-a-tat-tat along and get smooth lines with a beveler, get nice, sharp, consistent depth and even burnished impressions with the basket weave. I didn't get the AS maul that day as I was really pushing my budget, but got a couple of Barry King mauls with HDPE heads from HideCrafters a little later. I love those tools, simply great tools, but I keep remembering the feel of the rawhide head as it struck the tool. Less shock as it struck, quieter. And after all the decades of abuse my wrists have taken as a welder/mechanic using high impact and torque tools they really like the lower angle I can get using mauls versus mallets. Hopefully I'll have a working motor on my old lathe this week and I can finish turning the heads and handles down, and give you better update. BTW I saw your antler burnisher/creaser with the knotted head earlier this evening. That is one nice looking tool. I've taken to cutting my own lace lately and have Bruce Grant's Encyclopedia of Rawhide and Leather Braiding and really want to give that knotwork a try.
-
Got several on the work table in various stages of completion. An awl I'm sawing [with a jewelers saw]out of an old mower blade. It has a full tang and will have bone or horn slab handles pinned on with homemade mosaic pins. A maul with a stacked disk rawhide head and a stacked disk leather handle. I'll post pictures to the forum when I can.
-
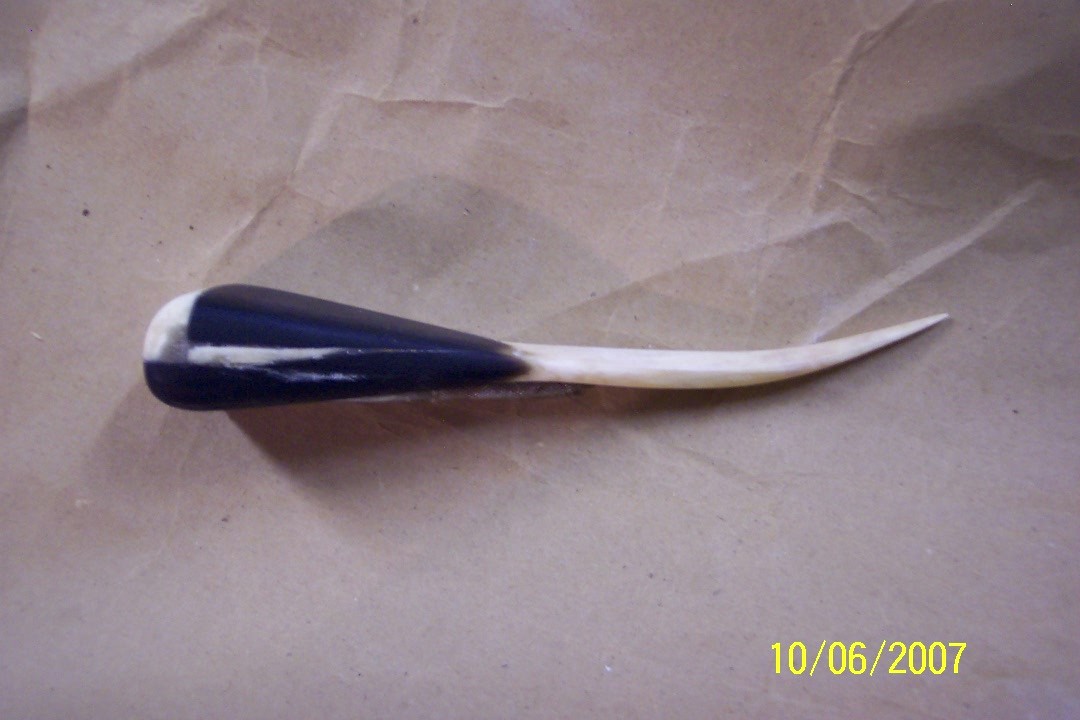
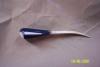
Luis, The tool has several uses. First if you are passing the string/thong through the same slit/hole more than once you uses the fid to enlarge the slit/hole enough to pass the string/thong through. Second you use it to hook under a string to tighten a loose braid or pulling from the other side to loosen one that is pulled too tight. It is useful also when you make a mistake and have to pull several out by hooking it under the lace and pulling back out holes.
-
Thanks craftsman827! I'm really proud of it. It works great too.
-
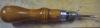
My old lacing fid kept falling apart, didn't fit my hand, too short and prone to roll off the bench etc. While cutting up some bone for guitar bridges, nuts and saddles I had one long slender tapered piece left when the lights came on. Now, I said to myself, I can make a "Real Fid". So I picked up some left over pieces of horn and more lights came on. I put the glue pot on the burner and got busy with the hack saw and sanding blocks. I really like the way it has turned out so far[i'm prone to keep working on stuff forever when I make it for myself]. The bone appears to just be growing out the horn handle slabs. No "hardware" was used just bone, horn and hide glue. Only tools used to make it were a hacksaw, sand paper and homemade sanding blocks and sticks, a vice and spring clamps. Oh and some imagination. Required about a total of six hours labor on my part not counting the time for the glue to set. What I really like is how it all ties together in the greater scheme of things. Hide, bone and horn.
-
I've done business with Zack White Leather Company. Never had any problems that weren't easily taken care of[once a rawhide bend was left not shipped with the other items even though it was on the packing list as shipped. A phone call to the toll free number got it taken care at no additional cost on my part. The woman who took the call was most both kind and professional]. Whenever I need something the Zack White catalog is usually where I look first.
-
Read through this thread and there are some interesting suggestions. Number one is using fired casings. Don't want to work on any live rounds. There are couple of types of bullet pullers out there the cheapest being a kinetic bullet puller but your still left with the issue of live primers and they can put an eye out or put some serious burns on it. Heres a good one for you. When primers are manufactured they put a drop of lacquer on the priming compound to protect it from moisture and extend the shelf life so I'd be kind of iffy about using that WD40 trick.Too expensive, too dangerous. I've been a competitive shooter for decades so I've got a world of experience working with this stuff. If you use rifle casings, GI ammo manufactured for multi use in small arms and light machine guns have a thick base. NRA Service Rifle Match competitors will have those. All 30-06 and 308 brass is supposed to meet the same specs but I've weighed enough of to know that the GI brass is heavier in the anvil area with those with the designation of LC [Lake City] are heavier still. They will usually have some that are past their reloadable life and will give you some. Or if you know someone in the National Guard they might turn you on to some. They usually have to turn in all spent rounds but they usually can find a few loose ones. The base of those are just thick enough you can drill a hole and using a tap thread it for your concho or Chicago screw, Then just file off the top of the screw even with the shell case base. Oh and when you go to saw off the cases, your little Dremel Tool with cut off wheels will work but they are fragile and fly apart and you can only cut one or two cases with each one so use a hacksaw with the absolute MOST teeth per inch you can get. At least 32, more if you can find them. If you have a jewelers saw a size 12 or 14 will do an excellent job. The blades ore fragile so don't but any pressure on them, let the saw do the work.
-
I know I'm replying to an old post but in case anyone is surfing through I'll add my two cents. I've seen John play lots of guitars and use even more straps but your probably talking about his black Gibson J45 acoustic. Jeff Mosby used several different pads and materials depending on the model strap. He favored just using Barge cement to glue on a piece of shearling then trimming it close to the edge and beveling the edges of the wool. I usually sew mine on in addition to glue but you really have to keep your thread and needles waxed to pass through the wool without pulling a hunk of it through with the thread. I've even laced the edges after the shearling was on but again you have to keep the lace waxed heavily. Trimming the wool back a bit and beveling the edge of the shearling so it won't stick out in an unsightly manner helps also. Both Jeff and me make straps that have a shell the shoulder pad is attached to completely enclosing the strap so Jeffs' method of just gluing the shearling on afterward is less labor intensive and in the case of hand saddle stitching less layers of leather to have to pierce with the awl and needles. I just love the way several rows of heavy, waxed, saddle stitching looks in a contrasting color with the leather. As far as the lengths and widths of the pieces go lets take a serious look at this issue. If you are making a strap for yourself and your favorite guitar use the measurement from whatever strap your currently using or get one of those cheap nylon ones and adjust it for yourself while playing standing and sitting and take those two measurements, punch holes in those locations and eliminate to need for buckles. Buckles and rivets and such certainly add to the bling factor but they scratch and ding your guitar in a million terrible ways. Most guitar players only need two adjustments so why should I risk putting dents in the finish and wood of a guitar that cost upwards of one to six months of labor on my part with a piece of bling. Just punch two holes in either the tail, or in the case of an acoustic/electric with a pass through jack/endpin, head of the strap. More on this later.
-
distressed belt buckles
Mike Phelps replied to Micah's topic in Purses, Wallets, Belts and Miscellaneous Pocket Items
There is a finish that gives a brown rust appearance like the old muzzle loading firearms had called Plum Brown made by Birchwood Casey. Jantz Supply www.knifemaking.com sells that and several others listed to give a black finish. Give them a visit. Good folks to do business with and just down the road from me. -
I get the cheap saddle skirting from time to time from TLF and it will have areas, typically along the spine and butt, that are extremely hard. I've got some that I use for sandal soles. TLF even says can be used for sole and armour. You can feel these hard areas when you are at the store. Lately I've had very good results casing with saddle soap followed by, when the leather has reached the right temper, burnishing with a hardwood 1"X4"X12" stick that I rounded the end and carved a handle on, really makes the grain of the leather stand out, then do the tooling. Burnishing this way you can repeat it several times and eliminate any desire to use antiquing stains or gels. Typical casing time on the 4-6oz leather I use for wallets and such is the time it takes to drink a soup mug of real good coffee. Then I burnish and do the stitch lines, cut and burnish the border lines. A good tool I've found for doing those are those Maple Popsicle sticks you can get in the craft section of your mega retailer. Down at the end where the stick starts getting round sand a nice taper with course then fine sandpaper. I get a deep rich tobacco brown color to all my creasing and stamping that I use on that weight leather. Casing with saddle soap makes things a little slippery but my results have been so good that I put up with it. Just set my stamps the way WC told me, get it where I want it, light tap with the maul to set it followed by a good lick. I'll post some pictures when time permits me to post some usable images. My digital photographic skills ain't so good.