


Dan28
-
Posts
295 -
Joined
-
Last visited
Content Type
Profiles
Forums
Events
Blogs
Gallery
Store
Everything posted by Dan28
-
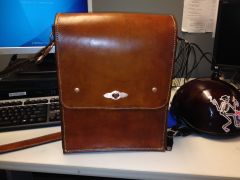
From the album: Dan's Leather stuff
A messenger bag I'm working on. It is almost done, just going to add an accent piece to the flap and a handle to the back. Was my 7th or 8th leather project. -
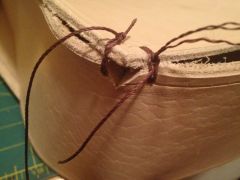
I think I noticed I could stitch quite a bit faster If I could pull the thread through in one motion without having to regrab it. So I think my max length will be my "wingspan" from now on for the most part. Anyway, I wanted to stitch on my lunch break at work today, so I brought the strap, thread, awl, needles with me to work. Made myself a makeshift stitching pony and got into a pretty good rythem with it. Probably have about an hour left till this strap is done. (Think I may redo the first eight inches or so. I was watching Nigel Armitage's videos while trying learn exactly how to get a good consistent stitch, and think it took me about that long before I was getting the hang of it)
-
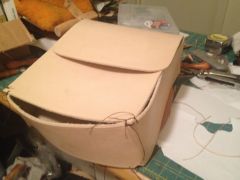
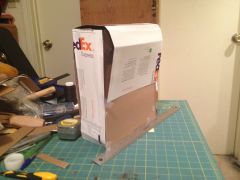
From the album: Dan's Leather stuff
Wanted to work on stitching a strap during my lunch hour at work. Found some items around the office to create a make shift stitching pony. Just an empty paper box with a couple paper clips and a hunk of railroad steel that was laying around to weight the box down. Worked pretty good and I got two plus feet stitched up after making it. On a side note, I think that piece of railroad track, would make a good anvil. -
Been stitching on the strap for hours and just a little over half way done. I did start breaking the thread up into about 8 foot section. Used the effect described above when I finished a threads run.
-
Do you try to measure out enough thread to do one run and deal with pulling it all through each hole at first, or just expect to have to do small sections with multiple backstiches? I started one last night with a very long amount of thread between my needles, but think I'm going to do shorter runs and a few backstitches so I can control it more easily. The stitch on this item is just ornamental, so no need for it to hold anything structurally.
-
Guess I did get lucky, as the order showed up USPS today.
-
Thanks. I kind of was waiting for those stitching chisels to progress with a project, but think I'll look into some alternatives rather than waiting another three to four weeks. I guess I could use the stitching wheels and diamond awls I have. When I placed the order I was not paying attention to shipping times. I would have paid for the expedited shipping if I knew it would take that long.
-
I wonder if there is just one accidental zero on that. Even at $270 it would be kind of expensive, but it does look well made out of good oak.
-
I did a search trying to find out what carrier these guys deliver with in the US. Yesterday was exactly 3 weeks since my order supposedly shipped. Order was for a few stitching chisels, a stylus/modeling spoon, a wing divider/groover, and a small jar of their Gum Trag replacement, so should just be one box. I didn't get tracking info with my order, (think there is a charge for that). I'm just curious should I be looking for it to come US Mail, Fed Ex, UPS etc.
-
 Sounds a lot like my experience the past couple days with a bag I'm doing. Up until this all my dye jobs have been relatively small. I was using Feibings saddle tan oil dye and just kept jetting bad streaks. It was drying way to quickly. Eventually I got it to a point I could live with it and went to put Resolene on it and that just made it worse. My Saddle Tan dye was also coming out slightly red too. I eventually couldn't stand the streaks and went to town on it with Fiebings Deglazer, denatured alcohol, and acetone. Took a lot of "junk" off, soaked the pieces, let them dry a bit, but not bone dry and then put another couple coats of dye on. They pieces came out with an antiqued look. It wasn't what I was going for originally, but I kind of like it, though there is still a slight red tinge, maybe from some mink oil I had applied. Of course when I dyed the straps, they came out without issue and saddle tan. I mixed some Saddle tan dye with a little bit of mahogany dye to add a second coat to the straps to get them to match the rest and it got it close. It was a learning process.
 -
From the album: Dan's Leather stuff
Mocking up my messenger bag before I move forward. -
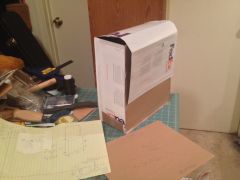
From the album: Dan's Leather stuff
Mocking up my in progress messenger bag. -
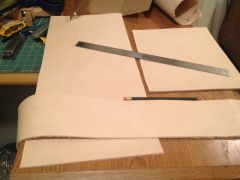
From the album: Dan's Leather stuff
I assembled my initial pattern, but found I thought it was too big for what I want to use it for. Disassembled and resized. -
Pattern for a messenger bag I'm working on, after trimming size down
Dan28 posted a gallery image in Gallery- Our Leatherwork
From the album: Dan's Leather stuff
Initial size too large for what I wanted, so I cut it down and then wanted to see how it looked. -
From the album: Dan's Leather stuff
My initial cuts for a messenger bag I'm making. -
Thanks. I was a Seabee in the Navy years ago, so I do have a background in building stuff. Posting these to know if I'm on the right track. On the magazine pouch, I cobbled together a quick form using some scrap cedar at my dad's wood shop, kind of spur of the moment as its a two and a half hour drive and I was leaving that day. I just kind of wanted to get something since I was there and had his shop available to me. If I had planned it out, I probably would have made the form a double As it is I had to form each pouch separately and then connect them to a single backing piece. You can see that they are two separate pieces of leather in the middle between the stitching. I took the "pointy" end of my burnishing tool and kind of grooved them together to try and make it less noticeable. I almost ran a strip of pig skin down the middle, too, but decided against it. The left pouch stitching is rough. I used a stitching wheel (not sure of name) to mark my stitch points, then the tip of a diamond awl and my arbor press to punch them. It started off ok, but then I guess I lost consistency. and got off track. I guess I should have just hand punched them with the awl handle. Its just with my arbor press method it is like going though butter. I've now started a messenger bag. I am taking it super slow though (for me anyway). I kind of assembled my paper templates with tape to see how it looked and decided to trim down the dimensions. Finally got it to the point I wanted and made my initial cuts in my good leather last night. I do think I may have an issue or rather just an obstacle. I made the corners square and the design has a single piece of leather as the gusset that goes down each side and along the bottom. . I found that having it square will make it harder to attach the gusset but I think I have solved this by cutting small triangles out of the edge of the bends so that I can stitch the sides and bottom to the front and back. Anyway I'm at a stand still on that project till some tools I ordered arrive.
-
Thanks for the responses. I gave her some pieces of scrap and good 9oz leather and designs I want to try today. They were unfinished, so I will see how it turns out. I'm going on vacation so I won't know for a week or so how it turns out. I'm actually looking at one of the "cheap" Chinese 40W laser engravers on Amazon now. Wondering if it would be worth it to mess with it myself.
-
First off, I am new to leather crafting. I do have a pretty good resource I can use, as a co-worker has a rather high end laser engraving machine that she mostly used to make etchings into wood frames. https://www.etsy.com/shop/LaserCraftEngraving?page=1 She can and will engrave leather for me. I'm just curious if anybody knows whether to do it to the veg tan leather before or after the dying process?
-
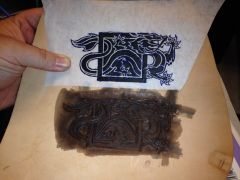
From the album: Dan's Leather stuff
This was my first shot at tooling a design. I took tracing paper and taped it to a regular sheet of paper and printed out the design. I placed the design on my scrap piece of leather with a flat metal ruler on top and clamped it all down lightly. This allowed me to flip the tracing paper up and down without it moving. I think just used a ballpoint pen to trace the design and between the pressure and ink it transferred it to the leather. Did my hand at carving, but couldn't really bevel it the way I want since I don't have any beveling tools small enough for the intricate parts. I wanted to bevel down all the white line portions from the print out. The image was a chapter icon from a book series I started reading in the early 90's, The Wheel of Time. -
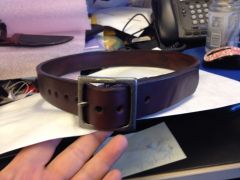 Thanks. I think it is a little tight on that particular buckle, that was just one I had on hand. I probably should have skived down the bend a bit more for that buckle. The one I use is a similar buckle but a bit wider so its easier to slide the belt through. Its attached with Chicago screws, so my dad (who got this particular belt) can change it out with one of his own buckles if he wants.
 -
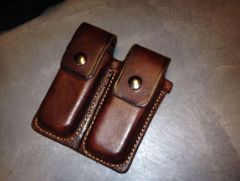
Here is the magazine pouch.
-
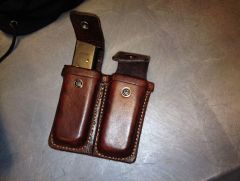
From the album: Dan's Leather stuff
My first attempt at wet forming a shapped piece of leather. I formed each pouch separately on the same form. The backing and flaps are from one piece of leather. I lined it with pig skin. This was my fifth project. -
From the album: Dan's Leather stuff
My first attempt at wet forming a shapped piece of leather. I formed each pouch separately on the same form. The backing and flaps are from one piece of leather. I lined it with pig skin. This was my fifth project. -
Thanks. I kind of picked the "loop" position arbitrarily. If I had seen some of the ones here before hand, I may have moved it up. The stitching is where my impatience kicked in. I started out with a diamond awl doing the flat work where the bottom of the barrel is. I switched to a cheap set of pricking tools I have to do most of the rest. I think afterwords after seeing it that they are probably too many stitches per inch for this project and the mix of the two does detract. I have some pricking tools on order from Goods Japan that are around six stitches per inch, but think I got a week or so wait till they arrive. I also was going to try my hand at tooling a border on it and changed my mind after a bit. I had marked a grove around the edge as a guide. The stamps I had made, about 6 or 7 were along the fold and I was able to remove them by wetting the leather. I couldn't get the guide grove out though. I've since finished a magazine holder that I wet formed to go with it, that has some of the same issues you pointed out. Or I should say close to finished, as I think I need to burnish the edges some more on it. I thought they were pretty good yesterday, but today they seem to have gotten a little rougher.
-
Wanting a certain style holster for my 1911 is what drove me to finally try leather working. I've thought about trying it for years, but the holster idea was what finally drove me to go buy some tools and leather and give it a try. Made two belts and a knife sheath then went to work on the holster. Hadn't found this site before I made it, or I may have done better. Looking at some of the stuff people have done on here let's me know I'm very much a beginner. I already see many ways of improving. The first employing more patience. Anyway here is my holster.