Daggrim
-
Posts
243 -
Joined
-
Last visited
Content Type
Profiles
Forums
Events
Blogs
Gallery
Store
Everything posted by Daggrim
-
Nice shoes. I agree, turning them must've been hard. What weight is the leather? Also, what did the vinegaroon do? I've skimmed the posts on it, but didn't read closely. I'll go back for more details, so no need to repeat all that info...just curious. Didn't the fashion extremists of the day tie their shoe toe up to their shins because the shoes were so long? Dag
-
Yup...Cost of Goods Sold. Now that's the wackiest way of figuring out what I'd call the Cost of Materials. I've studied it until I'm crosseyed, and I get a grasp on it, only to have it vaporize during the night. I beg my wife to explain it to me. Again. Now she just rolls her eyes, and tells me it doesn't matter. So we spend a few bucks to have the tax person make her magic. Guess i'm just a primitive, because , as Arthur C. Clarke once said, "A technology advanced far enough is indistinguishable from magic". Life'd be no fun if you "got" it. I said that. Dag
-
Terry, I got started by googling "Marc Carlson footwear" and looking at his dark ages patterns. After that it was typical prototyping , paper and cardboard cutouts; thin leather pattern; glueing, cutting, stapling. And lots of persistence. I made probably a half dozen pair before I felt I had it figured out. Anyway, PM me and we can talk. Glad to help out. Dag
-
Mmax, I have the same setup with my LLC. Just one thing...I got a state tax # from WI, and sold there at some faires. Well, everafter, they send me , quarterly, an estimated mount of sales tax I owe! They fabricate this out of thin air. I now dutifully send them a sales tax report for zero dollars every quarter, and they're happy. They will not change their method, so i just adapted. So, if you get a letter from some state declaring that they want their gigathousands of dollars, don't panic. All it may take is a current sales tax form. Daggrim
-
Such good craftsmanship, and art, and history, all in one piece. It'd be an awesome addition to any garb. Are the runes inside the dragon? Dag
-
Calanneh, I machine stitched the upper to the sole with nylon thread, and hand stitched the visible sewing with artificial waxed sinew. Dag
-
Viking era bags and pouches, pattern help?
Daggrim replied to Raven's topic in Historical Reenactment
A great resource for patterns and authenticity research is http://armourarchive.org Daggrim -
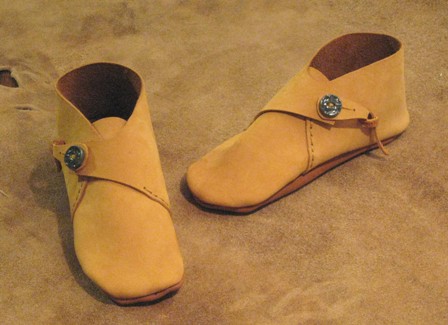
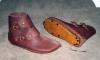
Oops, goofed. Here's the shoe with the ceramic button.
-
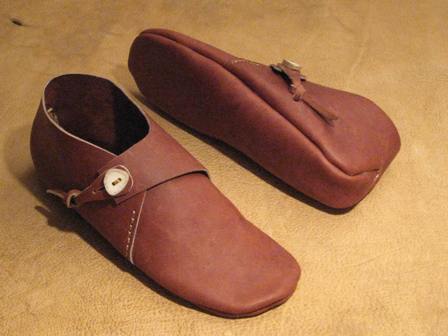
I'll try posting pictures of my most recent turnshoes. For those who aren't familiar with the term, turnshoes are basically pre-Renaissance European moccasins. They're sewn inside out, then turned the right way, which protects the seams. One pic shows soft shoes with blue ceramic buttons Another pic shows a heavier shoe with an extended heel. Final pictures show a Viking boot made with an extra heavy outsole, which is glued and riveted on. The rivets also act as hobnails for ice. Daggrim


-
TZ...wow, cool idea about the stitching awl. I have two of them, gotten as gifts, which I've never found a use for. Now I'm going to keep one with my 29k. Bree...also a very neat idea. Qiuck and easy, no muss, no fuss. You all have given me a big boost. Many thanks. I've come a long ways since my first posts about that sewing machine. I'd especially like to thank Bree for telling me to keep on trying, as the machine was almost indestructible. I had some negative input from a local repairman who said I had the wrong machine, and that it was basically just an expensive anchor. Hah! Sheer unglamourous dogged persistence has often won the prize. I may not be high speed, but when the sh*t storm's over, I'm still here. Dag
-
Bree, so you add the lubricant into the parafin tray?
-
Jeeze, Kevin, you're right. Thicker layers raise the thread tension disc. So, that's going to make it drop the stitches? Any workaround, or is that my thickness limit? And TZ, how much do you moisten the leather? Like with a small sponge or spray bottle? And a stitching awl has the triangular tip? Thanks everybody for all the help! I'll post some pics of my turnshoes. These are a special order Jorvik Viking boot for a customer in Norway. He wanted an extra outsole put on, so I glued them on, and then put small Chicago screws in for added strength, and for traction on ice. Doug
-
I think I'm many months behind the curve on the new glue formulations. I just used the last of my old Barge cement, and opened a new can. Five minutes after it's put on the leather, it no longer has the "contact cement" action of yesteryear. It's just dry and not sticky. I had to recoat and stick together real fast. Bummer. Is there any other cement out there that still has that contact action? Doug
-
Alright...thanks for the replies. I actually already tried all the things you guys mentioned, except using some oil on the leather. How do I do that? I should've mentioned one obvious thing. The leather is glued together with Barge cement, so this might be causing some drag. In case I can't solve the problem, would it be possible to just hand sew that small section, using the holes my machine so conveniently made? And the second solution is to not buy that kind of leather again, once I've used it up. (That may not be a victory, but it's a good workaround) Doug
-
Hey folks. I posted here a few months ago about some problems with a 29k58, and received lots of encouragement. Well, I've been persistent, and it's finally paying off. Today I sewed up three pairs of turnshoes with virtually no problem. hooray (I rejoice humbly, because whenever I get cocky, something always goes horribly wrong). Anyway, just one problem remains. On my 4th pair of shoes, made a with different leather, whenever I got to the part where 3 layers of 6 0z. leather overlap for about an inch, the machine would drop all the stitches. I decreased the foot tension as I crossed that area, which worked okay on the 5 oz. leather shoes, but not with this. Any other adjustments I'm missing? I went back over the spots a couple of times, and finally got enough thread jammed in there to hold, but it really sucks. Thanks, Doug
-
Nice finished look. Lotsa different skills demonstrated on one piece. You need to make ten more? So, do you sell at shows? Question about that beautiful stitching. Is that done by punching a hole with an awl, then shoving a needle thru? I tried it once, but punched ALL my holes first. Dumb. Anyway, it sounds brutal to punch all those holes, and gettin things lined up thru two layers. Any suggestions? I do some stitching on my turnshoes, but I must confess that I just punch the holes first with a punch, so there's a nice hole there which is easy to use. 'course it doesn't look as nice as the right way to do it. Doug
-
I like it, too. Clever. I had to laugh, because it seems to have a little humor in the concept. Daggrim
-
Mine has a treadle, but until I get more adept, I find myself using the handwheel often to get more control for odd curves.
-
Gloomis, that blue machine looks like a Singer 98k52 patcher. How's that workin' for ya? I have one that I struggle with, but it works. Daggrim
-
So, is there anything to clean a brass drinking cup that isn't toxic? I've used brasso, then washed it with soap and water, but that takes away some of the shine. Besides, brass makes everything taste funny. Is there any way around the taste, or the tarnishing inside after just a day of use? Inquiring Vikings want to know. Sometimes I just stand around looking cool, holding my very large brass chalice, but it's empty. Daggrim
-
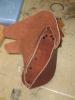
A very good look. I sometimes carry a spear when vending at Renaissance Faires, and I made a sheath, too, but just a quickie...nowhere as nice as yours. All those sharp pointy things need to be sheathed at RF's, or the faire security force has a fit. I've tried using an awl, and I thought it was an awlful chore. (sorry) I drill or punch holes if I'm sewing. But I often opt for practicality when doing production, and less on the artistry. Daggrim
-
From Minnesota, land of the Vikings...UFDA! And that's sayin' a lot. The entwined beasts are so smoothly done. It just shouts professionalism. Daggrim
-
Welcome MMA, I agree with what you said about knowing a few things well, but knowing little else about a vast field of knowledge and experience. Much of the stuff on here, and the skill demonstrated by the craftspeople is just mind boggling. Daggrim
-
Wow, that detail work on the complex way the straps all intertwine, and how the lacing is so well integrated is amazing. Looks like you spent many hours just figuring out how to integrate all that overlapping into a coherent design. What'd you use to get that satiny finish? Daggrim
-
I've had lots of experience with Cuir Bouilli, since every helmet I make is treated to harden the leather. I just use the hot water, and the leather is 10 to 13 oz saddle skirting. The procedure is very time and temperature critical. I aim for a water temp of 175 to 180 degrees, and the immersion time varies from 2 to 3 minutes. A difference of just 5 degrees can cut your time in half, or double it, so you need to watch closely. I pull it out for inspection every 30 seconds or so. As you treat more pieces, the water turns dark red, and you can't see the leather. I presoak the peices in room temp water, because if they go in dry, the thermal shock will just shrivel them. Do not allow the peices to touch the pot, it'll make hot spots, and shrivel it there. I use a folding round vegetable steamer in the pot to isolate the leather. Water at 170 will have some hardening effect, but you'll need to leave it in there for maybe 4 minutes, and it'll never get really, really hard. It'll dry more like heavy cardboard than armour. If you start with stiff leather, it hardens very well, and if you start with floppy leather, it'll also never get really hard. When the leather starts to turn dark...get it out asap, because that's the point when it starts to shrivel. Leather brought to that point gets super hard. The flesh side dries like sandpaper, and the edges have just begun to curl. I've hardened 8 oz leather, but it's tricky. You can't fudge on the temp...hit it with the full monty...175 degrees, but watch it like a hawk. Itll start to shrink earlier than heavier leather, and so you might need to do some tugging to reshape it. You have about 30 seconds to get the leather into a mold after you pull it. It's gonna be rubbery, so be careful or you can distort it with careless handling. It'll start to set up in about 15 minutes, and then you can moderately shape it for about an hour. I've taken pieces that never got hard enough, and resoaked them, them dried them in the oven at 200 degrees. They kinda flatten out and sag, but you can reshape them. I leave them in for 30 or 40 minutes. They scorch where they touch the pan, or the screen. So, there it is...way more than you asked for. I read lotsa stuff on the internet when learning this technique, and I took the parts that made the most sense to me. I'm also a little lazy, so I always try to K.I.S.S. a job as much as possible. I hate the Fuss Factor, and try to cut it out of all my processes. And lastly, the temps are what I see on my candy thermometer, so there might be variations with your thermometer. Hope this summary can help someone. Daggrim