TwinOaks
-
Posts
4,513 -
Joined
-
Last visited
Content Type
Profiles
Forums
Events
Blogs
Gallery
Store
Everything posted by TwinOaks
-
Cem, it's not too bad. They say "Count backward from....", and then you wake up. And good luck.
-
Pancake Holster - Feedback Please
TwinOaks replied to Steven Kelley's topic in Gun Holsters, Rifle Slings and Knife Sheathes
The trick to the sweat shield is to anticipate the 'movement' of the leather as it's stretched around the weapon. You've got to think in terms of curves.....you know, some of that math that you swore you'd never have a real world use for. Or you can do what I do, and guess enough times that you get good at guessing where to put the shield!! -
While Herman Oak and WC are pretty much 'premium' leathers, I have always got exactly what I ordered through Springfield. You can set up an account with them in minutes over the phone, and if you need something, you just give them a call. The only time I was disappointed with a piece of leather, it was my fault. I ordered a double shoulder of "bargain" leather without knowing what to expect. While the grain side WAS damaged more than I expected, the back had been cleaned up so I had some pretty good leather for rough out work. Even though I was ordering 'bargain' leather, they went through the trouble of making sure that at least one side of it was usable. On my last order, there was a delay of 1 day because they were out of something.....well, the next day, the item still wasn't in, so they offered to upgrade. I've never gotten "bad" leather from them and I'm ordering the low price range items. I have no doubt that if I ordered premium leather from them I'd see the same great service. The only time I didn't have my order within two days was the last order- my business partner didn't finalize the order when he said he would. Also, I have needed to make a last minute change to the order and a simple phone call took care of it, no problems. Springfield also offers something kinda rare in the industry- They will cut leather to your specifications. Give them a call and talk to the wonderful ladies that take the orders.
-
And we even have TEA for some of our members! Welcome aboard, sir, you have found the best site on the internet.
-
Pancake Holster - Feedback Please
TwinOaks replied to Steven Kelley's topic in Gun Holsters, Rifle Slings and Knife Sheathes
Looks pretty good for a first holster. From what I can see, you've pretty well spotted your own areas of improvement. Other 'little details': It's kinda hard to see from the angle of the pictures, but pay attention to where the sweat shield is in relation to the slide. If you have a good frame safety, there will be little problem with the holster deactivating it- still, it's something to pay attention to. Also, where the sweat shield meets the body of the holster, I've found it best to trim it a little (before stitching) to ensure that there's nothing there that could contact the mag release. Just a little cut out of the leather, blended with the lines. On the front of the holster- again, it might just be the angle of the photo- be sure that you can get a full firing grip on Ol' Loudmouth there, while it's still in the holster. It looks like the leather under the trigger guard may be carried a little higher than it should be. On your belt slots- They look a little wider than you might need (unless you're wearing a double layer belt) and that could cause some instability by allowing the holster to move on the belt. The easiest way to do the slots if you don't have a large bag punch (slot maker) is to use a standard punch at each end of the slot, then connect the holes with a chisel of the correct width. For your boning of the leather, instead of relying solely on modeling tools, styluses, etc., try rolling over the majority of the frame/slide with a rolling pin. That should help compress the leather enough for you to 'get the lines'. For the finish on the holster, you do need to pay attention to the edges. Even if you don't have an edger, you can lightly sand the edges to remove the corners. From there, dress the edges per Bob Park's (aka Hidepounder) tutorial. It can be found in the "How do I do that" section. You may not have all the tools, but you can substitute with what you have. In place of a rotary burnishing tool, some scrap denim from an old pair of jeans works very well. (It just takes a bit more time and a lot of elbow grease) -
Learning to keep a constant angle on the blade while carving more or less drove me to using an angled blade. I found I could keep a more consistent pressure if I kept the knife vertical. So...I went with the angled blade instead of angling the knife. I think it also makes it easier for beginners to learn to twist around a curve as well as see the pattern line.
-
Like most metals, copper will corrode. If it's a ferrous metal, that corrosion is called rust. Copper will turn green, and start flaking.........depending on the conditions it is exposed to. A good quality saddle oil is what you're looking for. You'll have to oil -AS NEEDED- over the long haul. There isn't a magical 'condition it once and it lasts for ever" conditioner. A little tighter is better than a little loose, but either is okay, as long as you don't get too far away from the size of the rivet....i.e., you shouldn't use a half inch hole for an eighth inch rivet. It should be tight enough to hold the leather together, but not so tight that it badly deforms the leather. It depends on the cement. Some cement will pull loose fairly easily, others have been used in place of stitching and have done well. Glue won't be as secure as glue and rivets. Use thread to sew things, straps to tow something. There isn't a 'thread' strong enough to tow with, but a good heavy thread made of nylon or poly is very strong and will last a very long time. For a good durable leather for a tool belt/bag, you might consider using something like Oil Tanned, or perhaps Latigo leather. Bridle leather is also very nice.
-
First Belt And I Have A ?
TwinOaks replied to Shooter McGavin's topic in Gun Holsters, Rifle Slings and Knife Sheathes
Yes, seal the belt. While the horse hide is not colored, it will still soak up sweat, etc. when being worn. Ditto Frank on the outside of the belt. -
S&w 44Mag Holster
TwinOaks replied to MADMAX22's topic in Gun Holsters, Rifle Slings and Knife Sheathes
One reason to use horsehide is that it's a bit stronger than the cowhide so you can use a thinner piece for things like IWBs and still maintain the same strength of the holster.....or so I've read. I see something I'm curious about and you might want to check on- That is the cylinder placement in relation to the belt. As it looks from the photo, the belt will be riding directly over the cylinder, which would place significant pressure on the wearer's waist. Think of it as strapping a large round lump of steel under your belt in comfort terms. If that IS the way it's designed (as an IWB) you may want to 'raise' the attachment points so the belt can ride above the cylinder, helping to lock the pistol in the holster. If it's where the customer want's it, be sure to remind him that he may need to wear a pants size larger to accommodate the thickness of the revolver. If it's somebody local, you might even have him come over and wear it around for a little while to see how it feels in it's current position. Also, as a personal design element, I try to carry the leather up the cylinder to the blast shield and cover the gap between it an the cylinder- it helps to keep any trash/debris from finding it's way in there. As it's drying, a little 'tweaking' with the fingers to flair the leather eliminates reholstering concerns, and once it's heat set, the leather will pretty much maintain that little flair. It's not a lot, but just enough to keep the edge of the leather from snagging when the gun is on the way in. Good choice to leave some room for the front sight, there's nothing like drawing the gun and trying to sight through a leather 'fuzzy'. -
It'd be great if you ever wanted to 'unzip' some leather you've sewn together......instead of stitching in an actual zipper.....
-
Food Vacuum Bag Wet Molding
TwinOaks replied to Clay B's topic in Gun Holsters, Rifle Slings and Knife Sheathes
Yep, I vacuum mold often. There's not a problem with two layers of 8oz veg tan. Like whinewhine said, place something in the bag to keep the ribbing off the leather ( or not if you don't mind some "texture"). I've gotten the best results using slightly wetter than 'properly cased', but just barely......like spray it with a few spritzes of water on cased leather then in the bag it goes. I've also found that it's really easy to bone the leather while it's in the bag, as the bag prevents the creases from getting colored by friction. A third hand really helps so that one hand can hold the vacuum sealer shut and the other two can dispose of wrinkles before the full vacuum is reached. Hint: Start with an over sized bag and you can get several moldings from one bag......which makes me think the ziploc with the port might be a better idea since you don't end up cutting the bag too short. Using a roll of the bags is nice if you have long or large items to mold. -
You're asking the wrong question. Don't worry about the minimal cost of a machine because that becomes your focus. Find a machine that will do MORE than what you think you'll need, then start shopping the prices on those. I think it was Art (from this forum) that said: "Save your money and get a good machine. Hand sewing everything until you get one will help you save faster." Look for a unison feed machine that will sew at least a quarter inch thicker than your expected maximum. There's LOTS to choose from, but if you go through one of the suppliers here on LW.net, you'll get a machine that is set up TO SEW LEATHER. As you've read, there's a lot that goes into that. If you haven't read that yet, find the thread by Wizcrafts on picking a sewing machine and read it....two or three times. If that wasn't the answer you were looking for, then how about this: Expect to drop somewhere around two thousand dollars for a new or refurbished machine that will do what you ask.
-
While you're learning this craft, only worry about having a few tools and learning to use them to the best of your ability and the fullness of their potential. If you want to see a really impressive tool set, check out PeterMain.com and look at the pic of his shop. I've got about 25 stamps, and many of them I've only used once or twice. Don't buy a bunch of tools at the start of this hobby, get creative with what you have first. Then, when the tool has trouble keeping up with the artist, spend the money on a GOOD set of tools. I don't mean for this to be Craftool bashing, but I've found that some of the newer Craftools (Tandy) aren't uniform in construction or finish.....the result is that you get some tools expecting to do something, and you CAN'T because the tool won't make impressions correctly. My comment is based on my experience with Craftool geometrics, that aren't cut square, "matching" sides are off center, etc.
-
New Holster - Owb For 1911 Govt.
TwinOaks replied to chaosready's topic in Gun Holsters, Rifle Slings and Knife Sheathes
Nice looking holster, but I think you meant "copyright" not "trademark". There's a difference in copyrighting the name and trademarking a holster design.....which would be hard to do unless it was innovative and not common. -
Ah, so you're having a relapse in your addiction......Welcome to Leatherworker.net! Or I guess maybe I should write it this way: We've several members from the land of Foster's, I'm sure you'll find them on here.
-
I use 'mostly' Hidepounder's method...... Glue, sand, edge, (I sprayed the edges at the same time I did the rest of the belt) and slick with Gum Trag and a burnishing stick I made (yeah, I'm still working on getting a rotary one!), then burnish with a piece of denim, lightly coated with yellow saddle soap (which REALLY convinces me I need a powered burnisher) until it gleams. Then apply a topcoat to seal it. At times when I want that dyed edge, I roll it on with a q-tip then reburnish with the denim. Repeat if needed to get the edge right.
-
I agree with everything posted above about Hidepounder's edges and tutorial. Frankly, the edges in those pics above aren't all that impressive. They are dark, but they were never evened out (sanding is a common way to do it). To get that level of darkening, you just need a little moisture, pressure, and friction. Here's a pic of a belt and sheath I did using Bob Park's (aka Hidepounder) method, except I didn't dye the edge after slicking:
-
My First Two Holsters
TwinOaks replied to EngineCo1's topic in Gun Holsters, Rifle Slings and Knife Sheathes
On the first holster, you mask off what you don't want colored then carefully apply via brush. For the second holster, that's not black dye, it's highlighter or antique. Apply a resist, let dry. Apply highlighter/antique, wipe off excess. Seal and finish. For using the backgrounding tool, I've had good results getting a 'random' pattern by overlapping the impressions and twisting the stamp on every stroke. That way you don't have an obvious repeating pattern. There's also a tool called a pebbler which you might look into. -
A suggestion I made to Shorts: To get consistent pressure on the stamping, is there a way to mount a click style torque wrench in place of the handle? That way you could set it to a specific 'pressure', pull to make the impression and it clicks when you have the right (consistent) pressure for even stamping.
-
@shooter: Go to your name @ top of page, click arrow for drop down menu, click on 'My Galler', select 'new album', upload pics
-
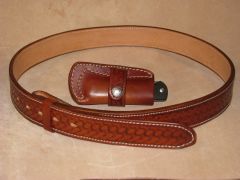
From the album: D.M.DeLoach Custom Leather
-
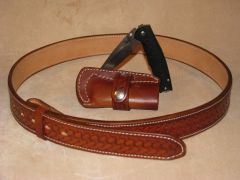
From the album: D.M.DeLoach Custom Leather
-
Welcome to Leatherworker.net! You have found the best site on the internet and we're glad you're here. While you're cruising around the site, look up the profile of "Jbird" (aka Josh), and see if he's close enough to get in touch with.