


Wyowally
-
Posts
125 -
Joined
-
Last visited
Content Type
Profiles
Forums
Events
Blogs
Gallery
Store
Everything posted by Wyowally
-
I am making rifle buttstock risers and covers for hunting rifles. I want to add an offside cartridge holder and have some examples and ideas. Out of all the ways to hold the actual cartridges, I have found this to be quite appealing. I can make and stitch the holder itself the way I want - I am looking for advice on creating the front panel as it shows in this picture - a case being produced in South Africa. To get even spacing, snugness and consistency looks to be a challenge. it appears each needs to be fitted for sure to the particular cartridge involved. Even the example has slightly crooked seams. I struggle with how wide to make the piece that forms the individual cartridge compartments. Thinking of taking a piece that is way overwidth the starting with the middle cartridge, form and stitch, then go left, right, left, right in order to do five. Wide open to suggestions!! Mine will have a flap coming over the top with some kind of closure, so falling out shouldn't be a problem.

-

Singer 17-23 hook to needle clearance
Wyowally replied to Wyowally's topic in Leather Sewing Machines
Yes, you're correct. This came to me set up this way but not working. No history, just the evidence of previous use. The foot pressure was cranked all the way down and froze up - I think we know why. I won't go into all the evidence details, just wish the machine could talk. After a lot of work, I have it stitching belt leather and 1/4" scrap with a #21 leather needle and #138 thread - hand powered. I can tell that's all it will do unless connected to a robust power source. I think the effort to turn the balance wheel is a good measure of system efficiency and resistance. Previous user had actually dinged up the shuttle race trying to get the hook out the wrong way. Dings fixed. The row of stitches at the bottom, ignore the rest.
-
Singer 17-23 hook to needle clearance
Wyowally replied to Wyowally's topic in Leather Sewing Machines
Wiz, thanks for the replies. I already had the manual (published 1919!) and have watched his video. He apparently made a shim in order to move the hook and race closer to the needle - the opposite of my issue with the hook kissing the needle scarf. Pretty creative on his part, and perhaps indicative that no real provision was made for adjusting hook-to-needle. I discovered that it was only the #25 needle it was touching. My #21's (Organ leather point) don't touch. Still wondering what the last operator was using it for, or how he was even able to use it. The little curved arm inserted above the upper tension was missing. The check spring was bent to a new shape. He was using - pre-wound bobbin spools with some strange thread. There was a bag tucked into the base with more of the same spools - I found I had to pull considerable thread off in order to fit in the bobbin case. Such are the adventures when taking on an older neglected machine last run by somebody who had (or chose) to just make do. I appreciate your comments, will let you know how this turns out. -
Singer 17-23 hook to needle clearance
Wyowally replied to Wyowally's topic in Leather Sewing Machines
The issue is the #24, #25 needle that needs to be used. Heavy thread. Those needles are fat enough the hook tip just ticks the scarf. There is an adjustment screw at the right end of the shuttle shaft, on the outside of the machine base. I think it is just for removing play, and doesn't provide for movement of the shaft at all. -
Wanting to know the right way to adjust this, can't find any internet help so far..... The hook is barely striking the needle right now, but it is.
-
I think they just fell out of the needle clamp area when I removed both screws. I think someone (Bubba?) was trying to adjust the needle back-and-forth or left-right without knowing the right way. Made me smile! Thanks for the confirmation!
-
I'm pretty sure Bubba worked on this several times. Check out that lower tensioner! That's where the black washer came from between a hardware store nut and a larger rusty nut for a spacer - no spring. He just used the discs as a wheel to feed the upper tension.
.jpg.b482df5cb3a7aef2a0d01fcd28b60adc.jpg)
-
I acquired an Adler 30-1 in rough shape. Got the needle head rebuilt almost. In the picture: little trapezoid pieces just below the bobbin - where do they go? Two pairs of tensioner discs - slightly different, which is which? Black fiber rubbery washer, where to? Tried to find videos and parts books that would illustrate tensioner, needlebar, etc., not much help out there. This has been worked on by several over the years, found one part with "Simanco" markings even. All advice appreciated!
.thumb.jpg.94c4096b0cea8317fd3f14f98cd024da.jpg)
-
Congrats on your initiative to get 'er done, Jd! Yep that's the sort of thing I do out here in nowhereland. And yep, Wizbit sounds great to me Wiz. Jd, I've found it useful, when I remember, to mark screw and gear positions in relation to shafts and other gears. When I remember being the key phrase.
-
As Wiz suggested, I find broken needles and needle bar movement go hand-in-hand. I even think some manufacturers made the needle bar setscrew a little on the wimpy side on purpose. Sort of like a shear pin protecting a heavy mechanical mechanism does. If the screw can't hang on when enough force hits the needle to break it, all the better. Re-setting timing is so basic that anyone involved in their own maintenance need to pick it up. IMHO like Wiz says. BTW, I discovered only a couple days ago the wisdom of another Wiz tidbit. I'd been fooling around with the total presser feet lift, trying to adjust so they'd both lift the same and raise pretty high. I was successful to the point of having the bottom of the needle bar strike one of the feet when they were manually raised all the way. Didn't realize it until I powered up - it moved my needle bar quite handlily!
-
If it has a servo it doesn't have a clutch. "Jam issue" needs more explanation. Jamming usually means thread jamming. That can be for a number of reasons, most of them only requiring adjustment. I would confirm the mid-70's date if possible. Value depends on real condition and your wants. If it were me I'd throw $300 at him.
-
Thanks again, DonInReno! It is working really well. I replaced the driver's seat cover I made from Cordura a few years back. Machine and knee lifter all worked great on that. Now on to a couple other projects.
-
Consew 277 R3 - Not picking up bobbin thread
Wyowally replied to Escobar's topic in Leather Sewing Machines
It has helped me several times to grab a good little LED light, tilt the head back with bobbin cover open, and actually watch what it does with needle, thread, material, timing, etc. If the hook point doesn't have the right size little loop of upper thread to go into, you're needing to adjust something. -
My problems are solved, I did start another thread. I learned a lot here. The check spring range of motion and tension allow for some leeway, but can be fine tuned. For me anyway, if the check spring does not cycle smoothly without jerks and hopping up and down, then there is something wrong underneath causing those. Whatever it is creates a false increase in lower tension as well. There are variations in hooks and bobbin cases, for sure they are not all the same and must be compensated for. The last thing I learned before - this forum and the people here are the best!
-
It is working perfectly now! I followed the advice on the check spring thread and totally re-timed as advised, particularly in Uwe's excellent Consew 225 video. Timing is advanced the slightest amount over spec. I removed all four grubscrews that hold the hook driven and drive gears on, They were all flat-tipped, so I carefully ground a convex point on two of them, to go into the slots on the shafts. The screw that holds the needle bar setting had the slot buggered out so much that it was difficult to tighten. I ground a screwdriver to fit well enough and got it tight. The bar wasn't loose, but it had been getting pushed up a slight amount over time and just enough to mess things up. Particularly if the raised presser feet were so high that the needle bar would strike them when turning the handwheel! The stitches are the best I've gotten on 2-3 layers of upholstery vinyl. The checkspring isn't jerky anymore - timing had to be spot on, and the case opener had to let the thrread flow by easily when it came off the hook. Tension adjusting works consistently, either top or bottom - when I make a change now I see the results I expected. I had to tighten up the lower tension because of the previous wonky check spring action, snagging or whatever had made me loosen it up to compensate while I was having problems. I'm a little disappointed now I don't get to sew test seams on scraps anymore. Joking aside, this site and forum are the best and I appreciate all the help offered!!
-
Not finding the set screw, might have to put a point on mine....
-
I've posted a number of questions looking for training and advice as I have worked with this machine since April. The big guns here, and others, have kindly responded numerous times. I am grateful!! This 1956 year machine was in good shape mechanically as far as wear goes, but it has seen a lot of use, and from the slight buggering of the slots on most of the adjustment screws, several visits to shops or techs with ill- fitting screwdrivers have happened. I did get it sewing satisfactorily, yet was bothered by one issue - the upper thread check spring action was jerky, and actually appeared to have one semi-snag in the stitch cycle right when the upper thread was getting pulled past the gib plate. About then I posted a number of times on a thread focused on check spring action. Last night, I started from scratch with the hook removed and began the installation and timing process once more. I noted a couple things - my needle bar has no timing marks, and the slot on the needle bar screw was wallered out from many screwdrivers. Also, even though the two screws on the hook gear were different externally, one sort of rounded and the other flat on top, both were flat inside. I believe one should be pointed to stay in the groove on the hook shaft. I carefully went through the process. Last step was adjusting the case opener to allow the thread loop to pass as soon as it was pulled up to the opener finger. It stitched beautifully, smoother and quieter than ever, great top and bottom tension, check spring behaving like it should! Then, after about 18 inches of seam in two layer vinyl, it all went south. Something has moved or come slightly loose. First indicator was the top thread skipping a couple stitches. I ran out of time to investigate, but am confident I can pin it down. Those things I mentioned earlier are all suspect. Think I'll engrave my own timing marks on the needle bar, and pull the needle bar screw and work it over or replace it. I don't think it has decent bite. I want a pointed screw on the hook shaft gear also. The hook saddle clamps down fine. Need to make sure the big gear on the main shaft has proper screws and stays put as well. I have a new needle clamp and screw to install anyway. So knowing how it can do now, I'm hopeful I will get it back to that. To be continued.......
-
Apologies for kinda hijacking this thread. Think I'll start a new one.....
-
Constabulary, thanks for the effort and the idea. If I understood Witz and Uwe correctly, advancing the timing just a little might accomplish similar to a shorter rail. My hook looks identical to your right hand sample. Tip of the rail is involved here somehow, I believe.Wondering if bottom thread wants a gap between that tip and the squared end of the gib plate.
-
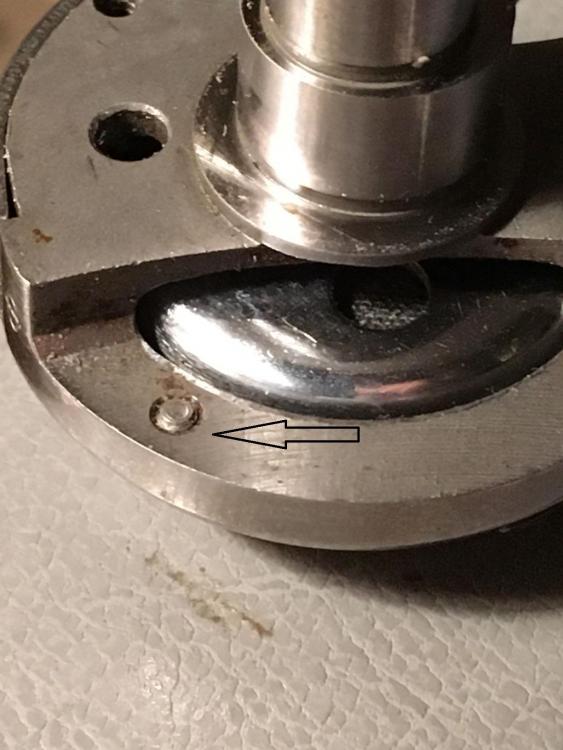
I'm continuing this thread because I'm trying to cure check spring bounce. Thinking I've narrowed it down to problemIs with the hook. In the bottom side pic, is the thread supposed to get under here where it could catch on that gib screw tip? The thread is hanging up on the corner of the gib plate (red arrow, other picture). Yellow line representing hung up thread. That opening at the corner is not quite as exposed as it is in the picture with it timed the way it is. Something seems to be holding the loop back so the thread goes to that corner, instead of moving freely. How/when do you decide the hook shaft bushing is worn? It can be adjusted up and down. Don't know if that's a factor in my problem or not. Thanks.

-
I think this might have some sort of aftermarket Brand X hook. It has no markings from Simanco or anyone else. I'm trying to figure out where the entire upper thread is at each stage after the hook catches the loop at the needle.
-
I can lower them. Think I was going for maximum lift, which I don't need. Thinking the 3/32" is priority over manual lift height.
-
Wiz and Uwe, I'll try those ideas. Might be able to get a picture today. Thanks again. Still wonder if that 3/32" rise from bdc should make the needle bar bump into the presser feet when they are raised. Mine does that, so I can't manually turn the wheel with the feet up!
-
Uwe, thanks again. Mine is snagging a little right at 2:25 in your video, like it is catching on the gib plate or something related.
-
Thanks Wiz! I'll try what you suggest about timing. With mine although I think I've done it all correctly, the needle bar/needle clamp will bump against the the presser feet when lifted manually. When I think I've got the needle 3/32" above bottom it does this. One other oddball thing - with the hook I've got, just about the time I get the checkspring jerk, the opening in the bobbin case hits the gap in the shuttle/hook and there's a little jump there, too. Don't know it they/re related. I'll keep playing and studying Uwe's videos.
.jpg.005011e27db051a8f2aafbe7753205fb.jpg)

