Wyowally
-
Posts
125 -
Joined
-
Last visited
Content Type
Profiles
Forums
Events
Blogs
Gallery
Store
Everything posted by Wyowally
-
They do have a little foot that comes down the back of the presser foot and helps pull material somewhat, so that makes them a little more capable vs. the plastic shell price leaders being sold today. Still, they are what the others on here have told you. There is a "vintage Pfaff sewing machines" FB group that is pretty active. It is discussed there. They have manuals in their Files section too.
-

Safety Clutch settings, Adler and others
Wyowally replied to Wyowally's topic in Leather Sewing Machines
I am smiling because it seems that there are no real adjustment instructions. If it kicks out when you don't want it to when sewing nothing out of the ordinary - then tighten it up a little. If it still kicks out, tighten it some more. If it doesn't kick out when you break a needle or get one of those multiple thread tangles around the bobbin/hook - loosen it up some and hope it works. At least that's what I have found out so far. YMMV. -
Safety Clutch settings, Adler and others
Wyowally replied to Wyowally's topic in Leather Sewing Machines
I never asked for specifics on the actual adjustment in that thread. I do have it cleaned, aligned, and lubed and it does disengage with what I think is adequate force after that and backing the adjustment screw way off. Just find it sort of amusing that the manufacturers who will specify something like "0.35mm clearance" have provided an adjustment without actual adjusting instructions. For this machine I will set it so it trips when a #25 needle hits 1/2" of hard veg tan when trying to force the needle through with the hand wheel. I'll report in this thread on that experiment. -
I got the Adler 167-gk373 working pretty well after all the feedback from you folks. Thanks! I think the safety clutch was the culprit - not releasing easily or as designed. I have searched here and elsewhere on what the trip settings should be - as in if there is a need to adjust, how to do that. Is there an actual torque number, or is it more a ballpark range sort of thing? Maybe back it way off to the soft side, then if it trips too easily when just sewing on tough material with big needle and thread - tighten it up a little? Or put a block of wood under the needlebar (without needle), then adjust to trip when turning with the handwheel with what seems like too much force? I hope that explains my question. The machine mentioned did have the clutch locked up, so the needlebar moved in the clamp, the screw tips got hardened and polished to where the clamp wouldn't hold well when doing normal sewing. Fixed that. Thanks again.
-
Interesting data and manual if indeed that's the OP's machine. IF it is, the manual says that thread tension will be released when the thread trimmer does it's thing. The cable is related to that trimmer, and is part #36 in the listing, calling it a "thread tension release wire". IF it is the machine, the wire doesn't come into use until the trimmer is used then. Now if I could just learn to sew.
-
Singer 111w155 thickness of leather it can sew
Wyowally replied to Davidmadd's topic in Leather Sewing Machines
What Wiz says for sure. I was dealing with a similar issue on a different model not long ago. Just for giggles I hand threaded a #23 leather needle with 138 bonded nylon. Then I put the needle butt down on my bench and pushed a couple pieces of 4 oz. veg tan down on the needle point. It took a LOT of force! After it went through I pulled it back a little and put another thread through the loop. Then started pulling the needle back up while holding the leather down. Again, it took an amazing amount of force to pull the needle, loop, and "bobbin" thread back up and into the leather. There is a huge amount of friction - I think the forces involved are much more than at least I was aware. What it all means to me that if the needle is not large enough for the thread, then the thread will suffer. 92 bonded nylon with the same needle was a much better match. -
45 mm. It takes a different belt of course. I measured carefully and guessed belt size with the counter guy at my auto parts store. Made a lucky guess. Pulley from AMZ.
-
Don, thanks! I also thought the socket head screws seemed out of place. I might pull one and check the thread pitch and type just for curiosity. I try to get all the original adjustment info I can, but still rely heavily on you, Uwe, Constabulary and others. I had my upholstery buddy come over and test run this one with various materials, speeds, forward/reverse shifts and all. He gave it his seal of approval. It is fun to watch a pro!
-
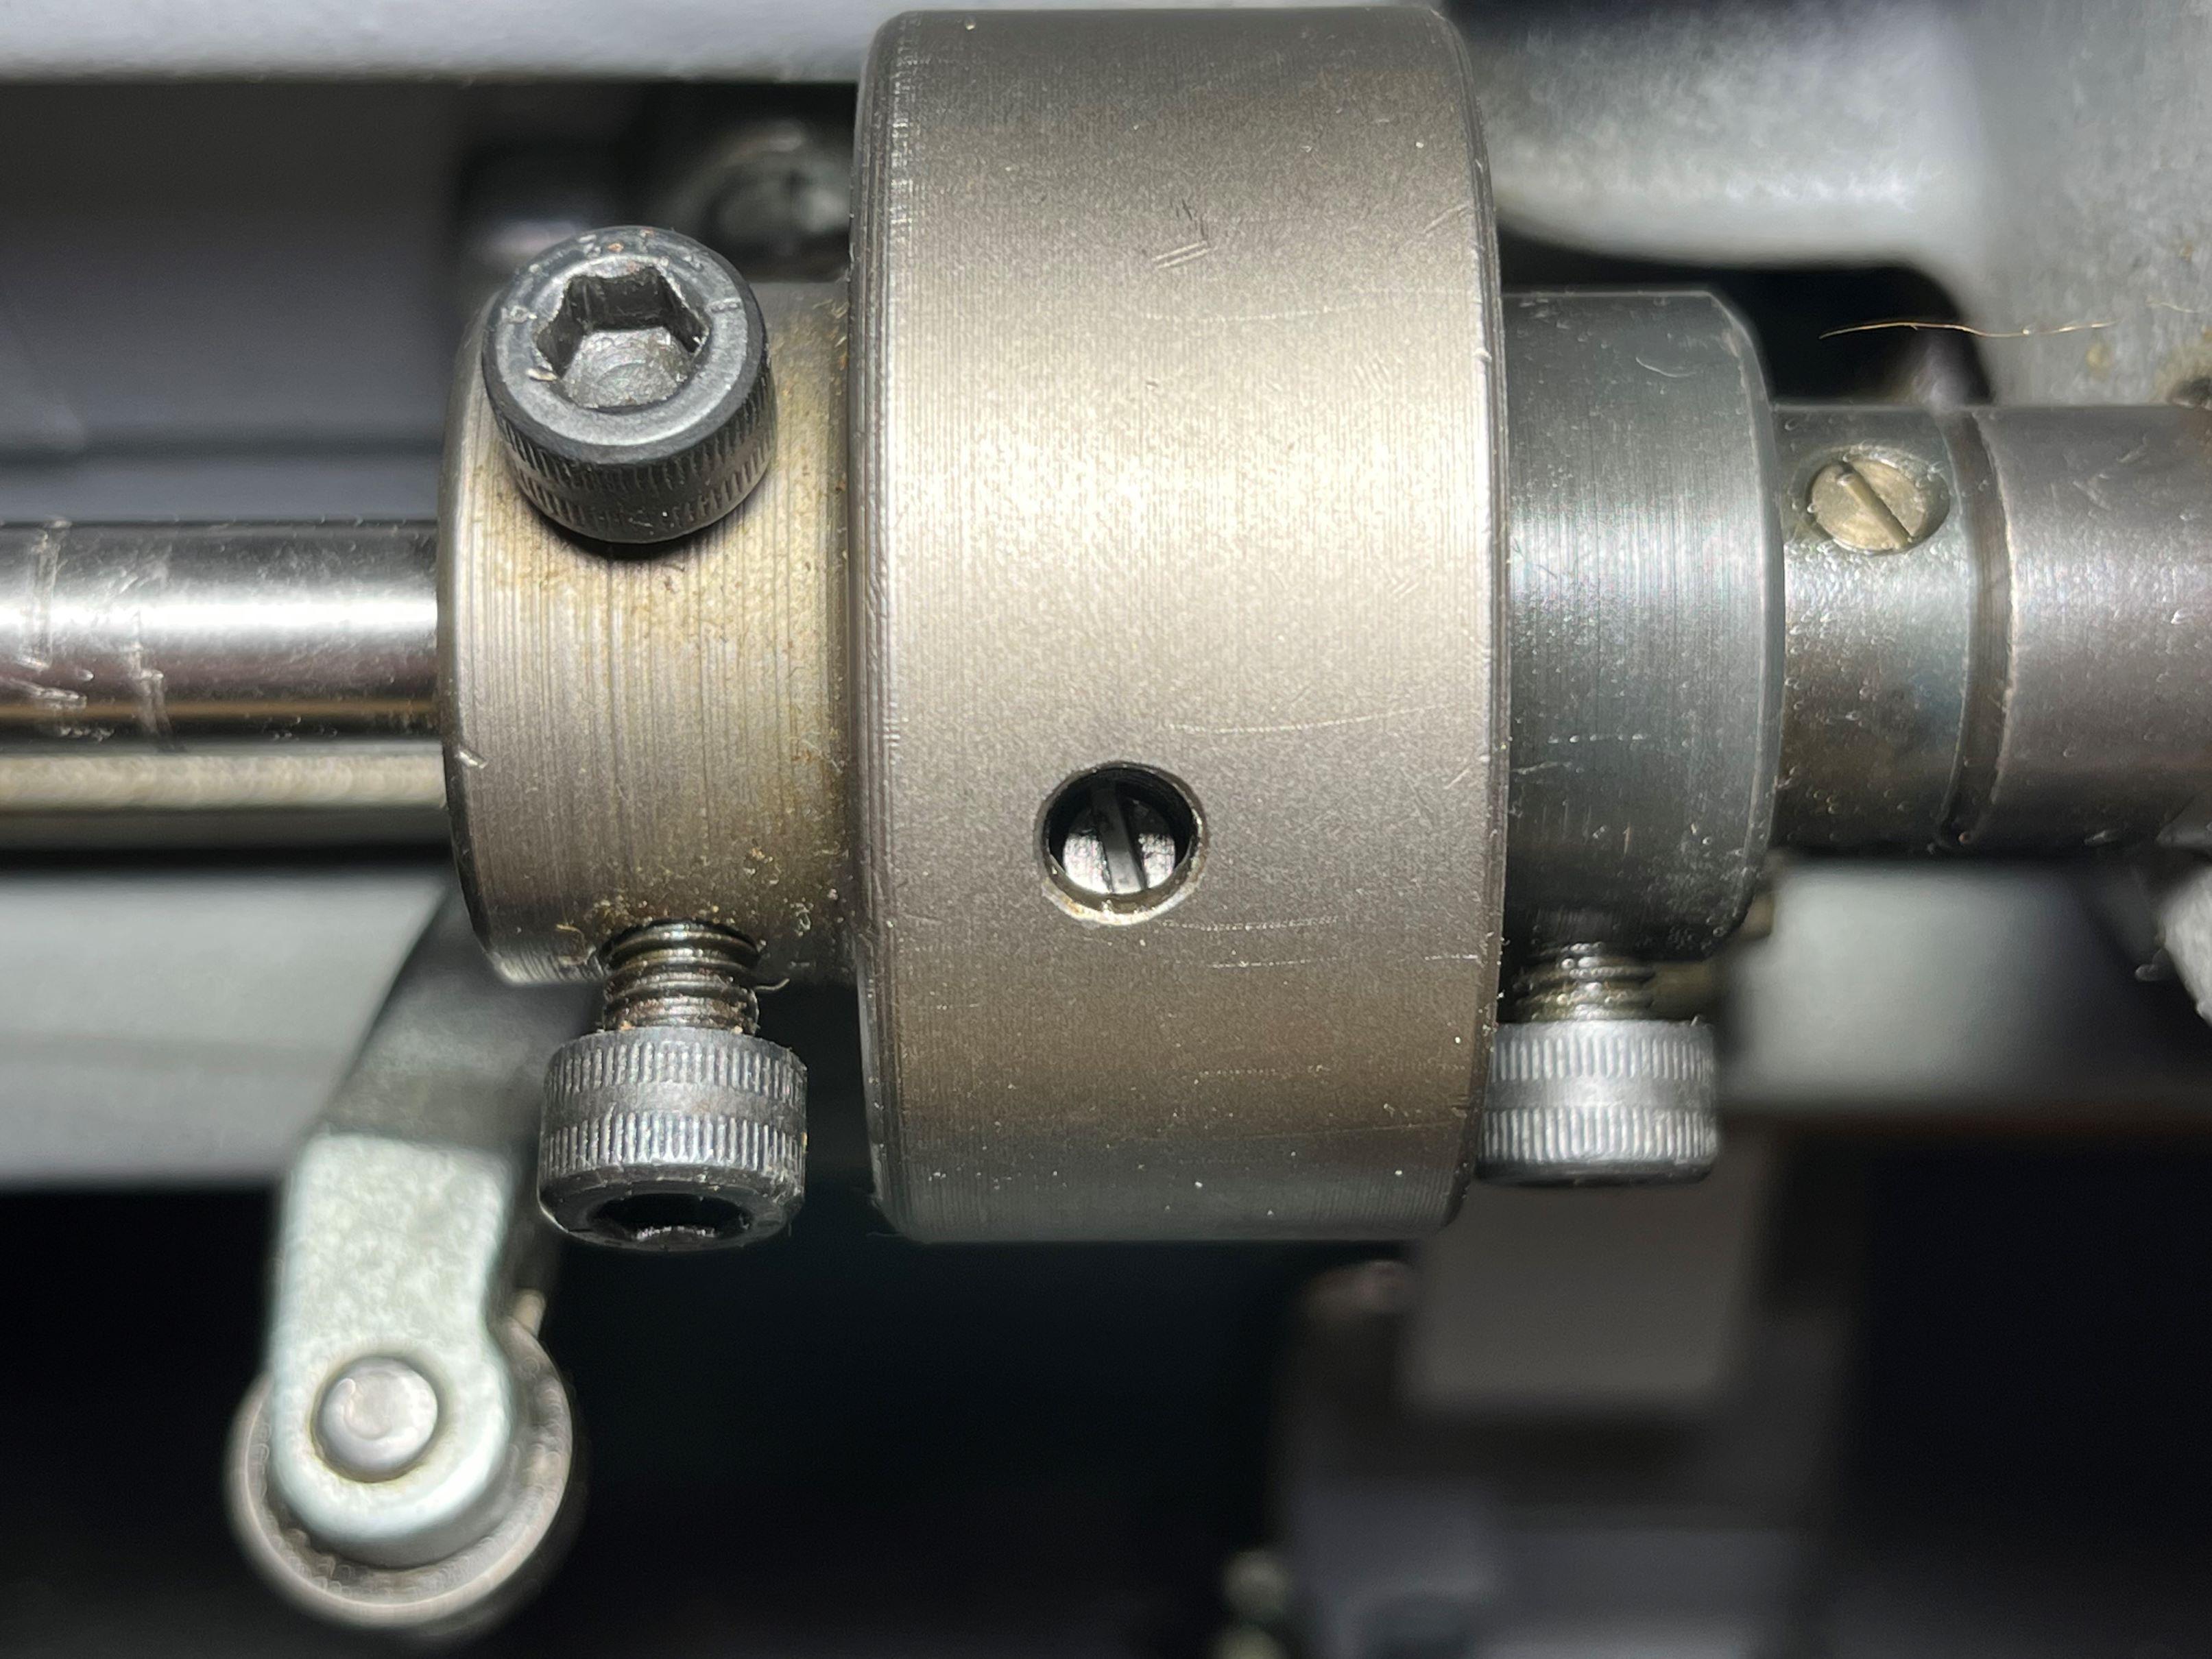
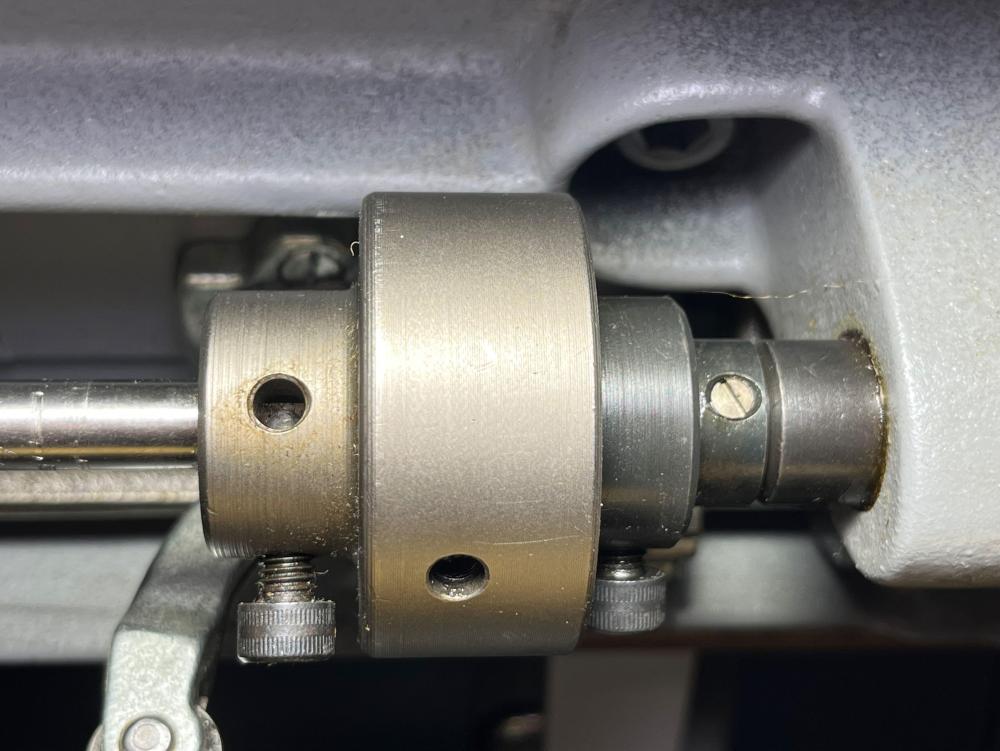
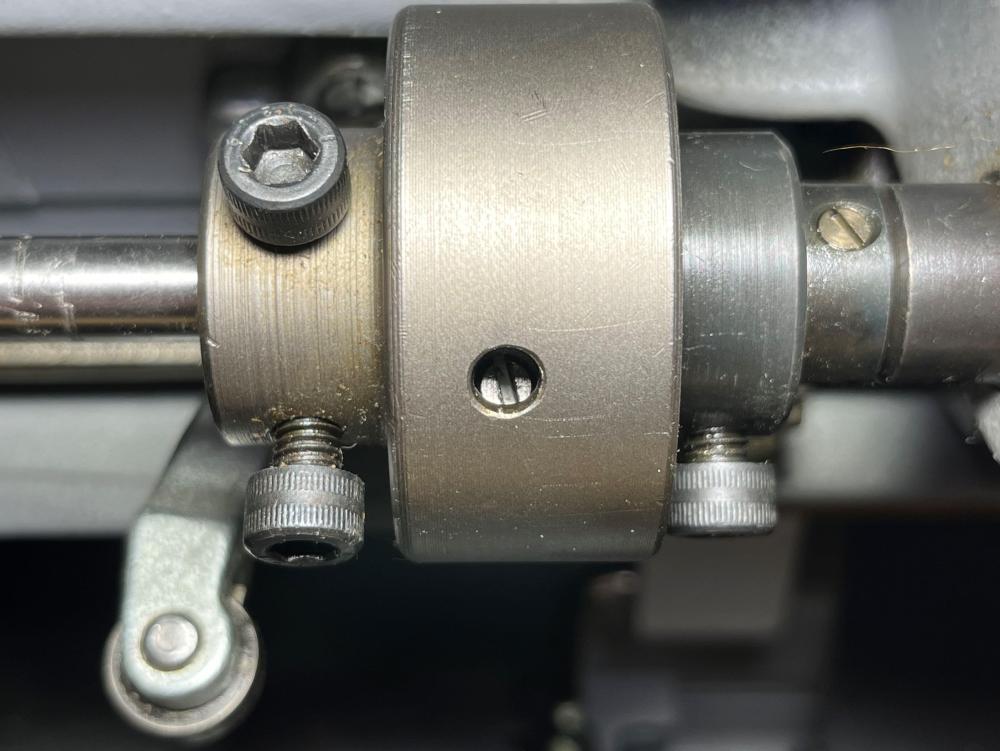
I studied this clutch in depth today. What I found: Both shafts have a flat that one of the pair of set screws is designed to engage. I found no marks or information that told me which screw of the pair to engage the flat with. The four screws are identical. Looking at the clutch and rotating, I put the screw in the upper hole when the other one is exposed below it, on both sides. What I found for adjustment is a screw visible through one of the holes in the outer collar when it is disengaged!! I was able to adjust. Although there is huge potential for changing the timing by selecting the wrong screw to engage the flat, either side, I got lucky and my installation didn't change timing. The timing must be checked for sure though, because it will change if the screws that engage the flats are changed around. It is working well, and I am pleased with the disengagement torque. The picture shows the adjustment screw visible through the outer collar - the hole is normally filled by the engagement ball, so if you start looking for any adjustment location while the clutch is engaged (like I did) you wont find anything. I never found a book or manual reference showing exactly this.
-
Quade and Glenn, thanks for your input. I have it working very well right now - but still puzzled. Quade, I think your suspicions about the clutch components slipping on the shafts and cutouts may be correct and I'll check that today. Not sure about flats or cutouts and want to know. I think in order for things to get out of time and needlebar height change there had to be some force involved that setscrews couldn't hold back. I started at the belt pulley and made sure screws and setscrews were tight. Before, I had re-engaged the clutch, but it had taken more force than I thought it should. I loosened but didn't back off all four setscrews in the two clutch components and oiled the balls and mating surfaces thoroughly. Then just snugged the screws and forced disengaging and engaging and spun the two around a number of times. Tightened the screws and did the same. It works much better . Don't know if there is a torque spec, but it seems reasonable now. Went on towards the hook, making sure screws were tight and lateral movement was proper. Popped the gearbox cover knowing timing was way off. Discovered too much backlash movement in the hook gear. Timed it for hook needle alignment with needlebar 1.75mm rise, then made sure shaft to hook gear backlash was minimized without binding. Re-set the needlebar height to specs. I wonder if the tips of those screws don't get smoothed and hardened after several cycles of jamming, needle breakage, etc. I'll check that. Made sure the case opener had proper clearance when moved to the right. It was a little too fine, not quite the gap it should show for heavier thread. Sewed perfectly after all this. I still want to know more about what can happen if the clutch doesn't turn loose when it should - but I'm pretty sure I may not ever. For now the previous owners, Bubba and his pipe wrench, thread jams and broken needles are all likely suspects in causing the timing changes I discovered. If I make any discoveries after checking the shafts for cutouts I will let you know!
-
I have not seen the adjustment in illustrations on this one. It consists of two mated pieces held onto each shaft by two large allen head setscrews each. There are two spring loaded balls engaged when running. Uwe Grosse' video "Adler 67 Safety Clutch and Hook Timing" shows one at 37 seconds in just like this one. His has 4 slotted head screws, mine are allen. No obvious adjustment possibilities.
-
Starting to think the safety clutch is too tight and not turning loose when it should. If that's the case, I wonder what slips or moves, like needlebar settings, hook drive gears, etc. ?
-
Trying to help out a friend. Machine acquired from original (now deceased owner) and appears in great shape, very clean. New owners not trained well, mostly homeowner experience but pretty handy. It came with the original clutch motor and they did a perfect job installing a servo. Couldn't handle the clutch speed, although they did get it to sew a few practice seams, then jammed it up and couldn't get it to work again. They called me. The safety clutch was engaged, but the shaft going from clutch to hook is chewed up like someone struggled with getting it re-engaged and used a pipe wrench on it. First clue. Timing check - when the needle rise was 1.75mm the hook point was an inch past the needle. Something moved it way off. Not sure my friends wanted to tell me what all they had done. Timed by opening the gear box and following timing directions, making sure gears meshed properly. The grease in the box was hardly used. Thought I tightened all the screws adequately. Had to move the needle bar to line up the scarf and eye with the hook point, again after 1.75 mm rise. Needle to hook distance was good. It wanted to stitch, but constant looping on the back. The case opener was not set properly and the upper thread didn't have smooth flow coming around the hook, thus putting a couple extra tugs on the needle thread - adjusted that. Tensions adjusted well, stitches looked good. Feeling triumphant, went to backstitch using the reverse lever and under power. Bang!!! Immediately broke a needle on first motion. The safety clutch kicked out, needle bar moved, reset the clutch and found the timing way off, as bad as before. All this work was in the friends' shop. We agreed to take it to my shop where I can work and focus. I love visiting with them and we BS too much, and I try too hard to educate them while I'm working! Have not and will not work on it until I have it at my place. A few thoughts: I've watched all the Uwe Grosse videos and have read most of the threads on here I can chase down, but still feel like I need A to Z timing advice in sequence. The needle breaking when trying to reverse, when all seemed well really bothers me. This was just on two layers of denim. My upholstery friend with a nearly identical Chandler hits reverse for backstitching while in motion all the time. Just don't know what happened, I did not check the needle guard yet or earlier in the process. Could the needle have hit that - like when going forward it is too snug to the needle, so when reversing it the needle strikes? Maybe. We are using new 134 needles. I wish I knew the story on the pipe wrench marks on the main shaft, but won't ever know. Previous owner was making horse blankets and pads. The needle bar seems to get out of adjustment too easily, even with the screws pretty tight. Thinking about roughening up the tips of those screws for a little better grip. Really wondering what is loose and allowing timing to change - is the safety clutch supposed to do it's job before anything else gets damaged? Is it adjustable? There are a number of large allen-headed screws on the clutch pieces left and right - but this is where the manuals I have and web videos fall short. I'm certain that I got the gearbox set screws tightened properly when I did adjust the timing before. Even so, when the timing changed is that what slipped. Right now, if I go to correct the timing that is where I would do it again. I got the clutch re-engaged with hand power only. Are there alignment marks and can it be engaged 180 degrees out of whack? Is there a wrong way to re-engage? What have I left out or not paid attention to? Thanks everyone. I'm a little desperate here. Friends think I'm an expert, but that may be changing........
-
Poly vs. Nylon ? Same size, different adjustments
Wyowally replied to Wyowally's topic in Leather Sewing Machines
Well folks - thanks! I think I knew the answers but wanted to get the experts to give us the real lowdown on thread of the same size variations they've experienced. Is trolling for positive purposes and the benefit of others an acceptable thing? -
Tensions: if you can free hand pull thread from the loaded bobbin smoothly and pretty easy - and through the top tensioner smoothly but with more resistance than the bobbin thread, then things are close. Loops that big and consistently make me think the the top thread is snagging after the hook pulls it around and turns it loose, just when the needle is trying to pull up, but before it gets to the bobbin thread. You posted good pictures, BTW. Suggest looking at the hook and thread action after the hook pulls the top thread around.
-
Ha, Glenn, not anymore. It would do several stitches then tangle and lock threads. Carefully resetting needle depth and orientation, check spring travel and tension, upper tension, etc. Smoothed the edges of the hole in the needle plate. Reset the presser foot travel and pressure. One of those must have worked! I use the shotgun approach..... :).
-
Poly vs. Nylon ? Same size, different adjustments
Wyowally posted a topic in Leather Sewing Machines
Normally if you use 138 nylon or are set up for 138 polyester and use quality thread and want to switch, do adjustments just need to be tweaked a little? Is a needle change ever necessary? I think I have found differences in the same brand of polyester thread, same size, different color that made me change bobbin tension. Just hoping that setup doesn't have to start from scratch when switching nylon vs. polyester. -
Thanks Constabulary. I know you've resurrected this model yourself. I should have mentioned I have this manual and the illustrated parts book. I was hoping my words would be descriptive enough, but can do pictures today. I have worked on many older machines, industrial and others. Hoping Glenn will see this. He's helped me out with other problems.
-
I've got one that sews air pretty good. This one has the single roller foot. Problems when threaded. I have searched all of our forums. Question and comments: It is timed pretty well, using proper needles and 138 bonded. Without the specific manual, how can timing be adjusted? I have needle eye to hook point at about 1/16" There is a lot of wear or clearance on/under the main needlebar screw. The big-headed one with a curved slot. It is stuck. I'm assuming this is the left-handed one like on many machines, and it is stuck with age. Is there any hope for it? I'm not used to seeing that much movement, linkage to shaft. I have the hook to needle clearance looking good, but the right side of the needle is right up tight to the hole in the needle plate. Looks wrong to me. Is there a left-right needle adjustment I don't know about? What is the adjustment for presser foot travel with the roller? How much clearance should I have with the roller raised? Is there an adjuster's manual or set of instructions that I have not found? Is there an adjustment for feed dog travel? This is making holes about 3mm apart on max. When threaded up and sewing 5oz. veg tan, turning the wheel by hand, there is always extra resistance right when the needle eye is ready to pull back up into the leather. I'm blaming the clearance right side to the needle plate. There is no resistance without thread and just poking holes. There is a lot of movement on the shaft and linkage for the needle bar clamp. Is the linkage supposed to just ride on the clamp screw shaft and move laterally if it needs to? It does make stitches for a couple inches, but then upper thread gets tangled, twisted or something underneath. Perhaps that's enough questions for now! I know that's a lot, hoping those that know will chime in. I'll be patient..........thanks.
-
Singer 111W155 Big loops underneath at slower speeds HELP
Wyowally replied to cynthiab's topic in Leather Sewing Machines
Are you using a thread stand that routes the thread up above the cone? Trying to picture the difficulty unwinding. A picture of your machine might help identify it. Amann Serabond poly #92 thread makes my machine happy. Wondering if you've made progress at all on the looping. -
Singer 111W155 Big loops underneath at slower speeds HELP
Wyowally replied to cynthiab's topic in Leather Sewing Machines
The case opener might be just ticking that bobbin thread when going slow, pulling extra on the top. My early morning before coffee guess. -
Rifle stock cover and scope caps
Wyowally replied to Ddat's topic in Gun Holsters, Rifle Slings and Knife Sheathes
Nice work. I'm gonna try to duplicate the scope covers. I did make a riser with cartridge holder similar to yours. I used the Wyoming-legal Pro Dye, it worked great. The whole thing was made from scraps. The cartridge holder has them pointed forward. The flap hides the shine. I really admire the use of different dyes to match the camo laminate!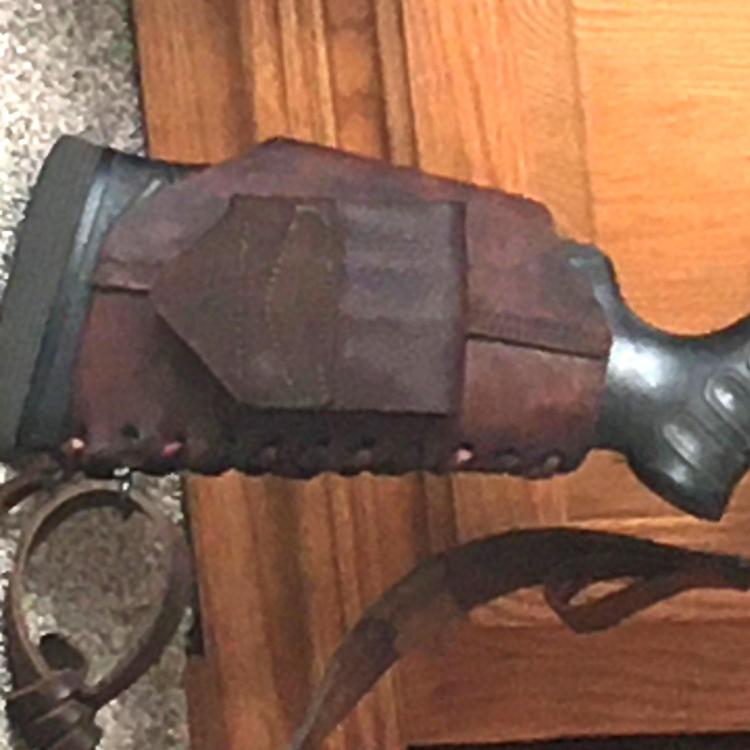
-
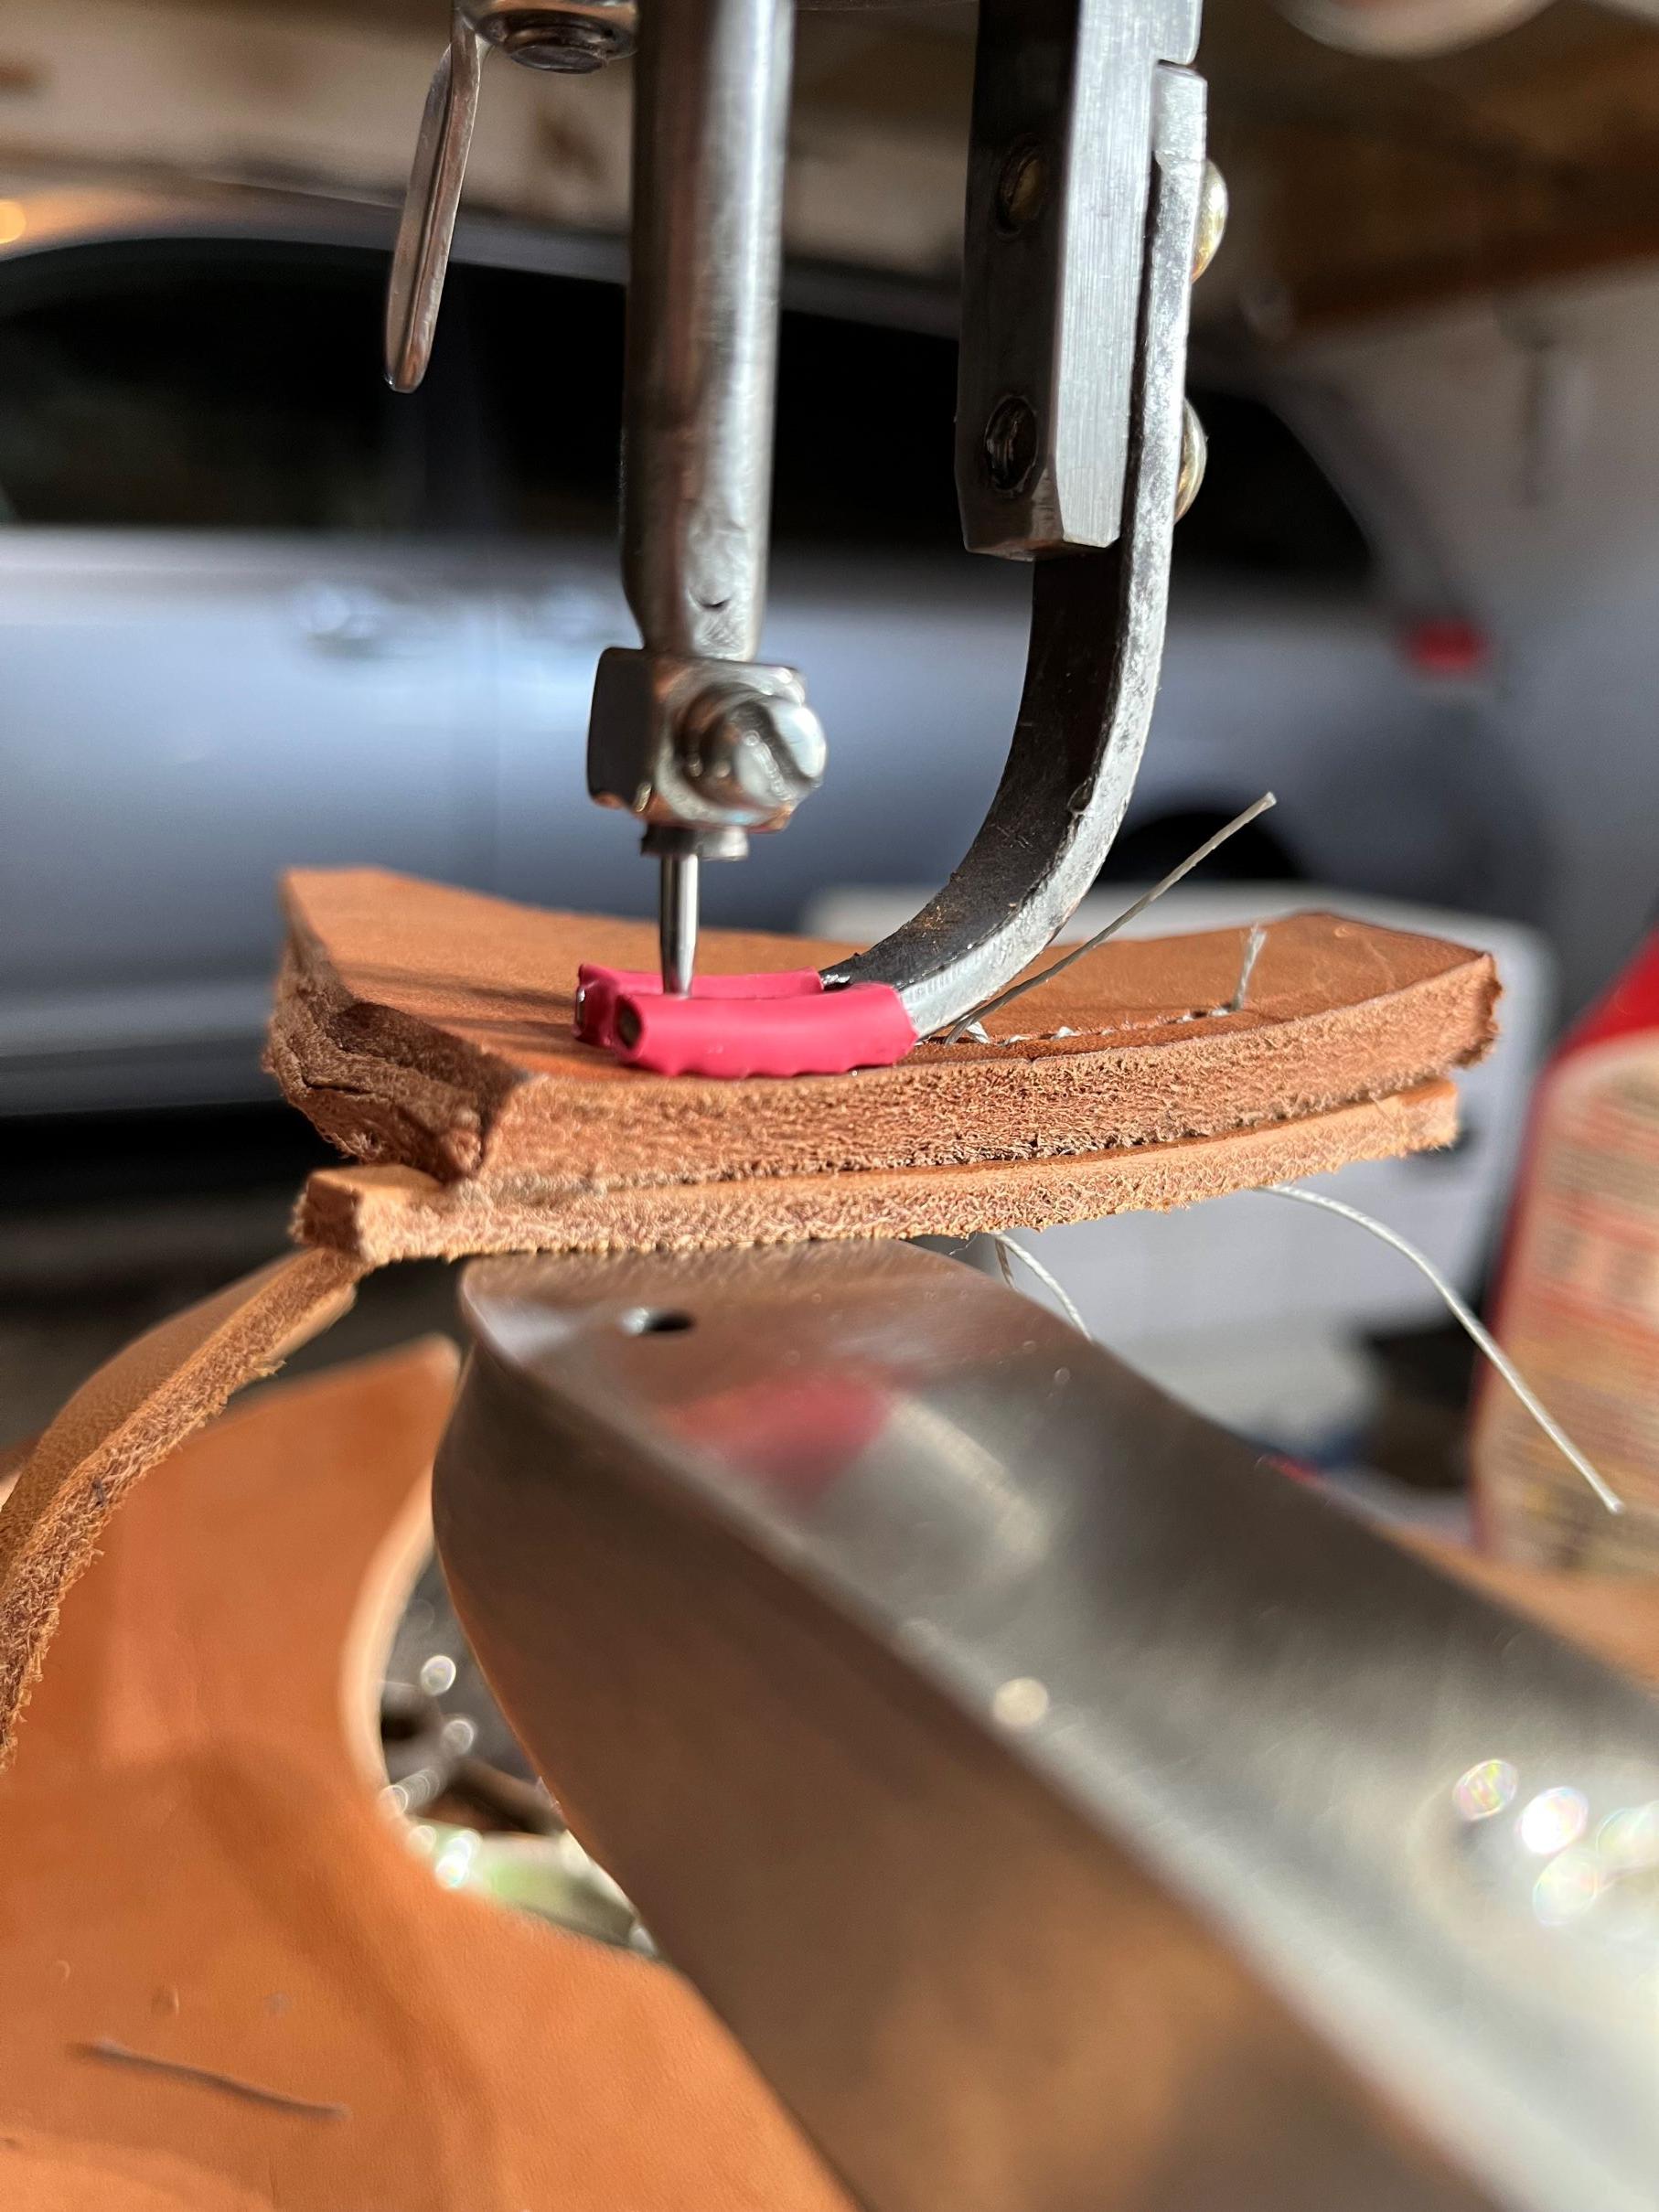
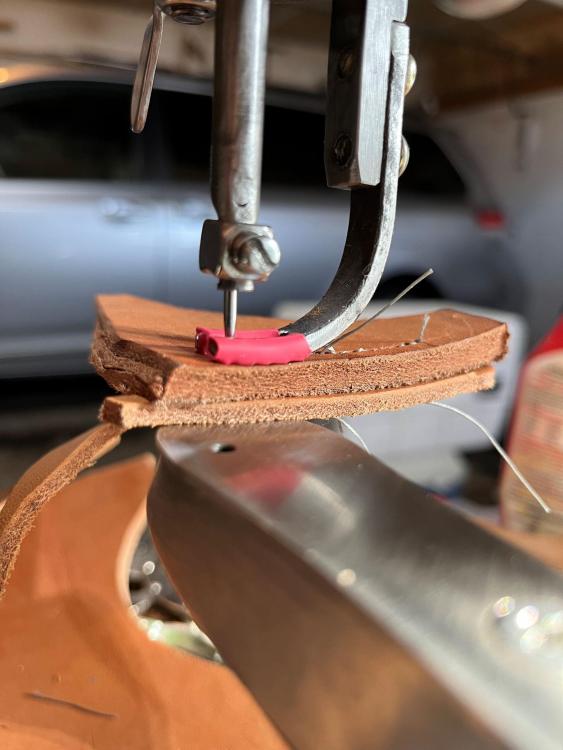
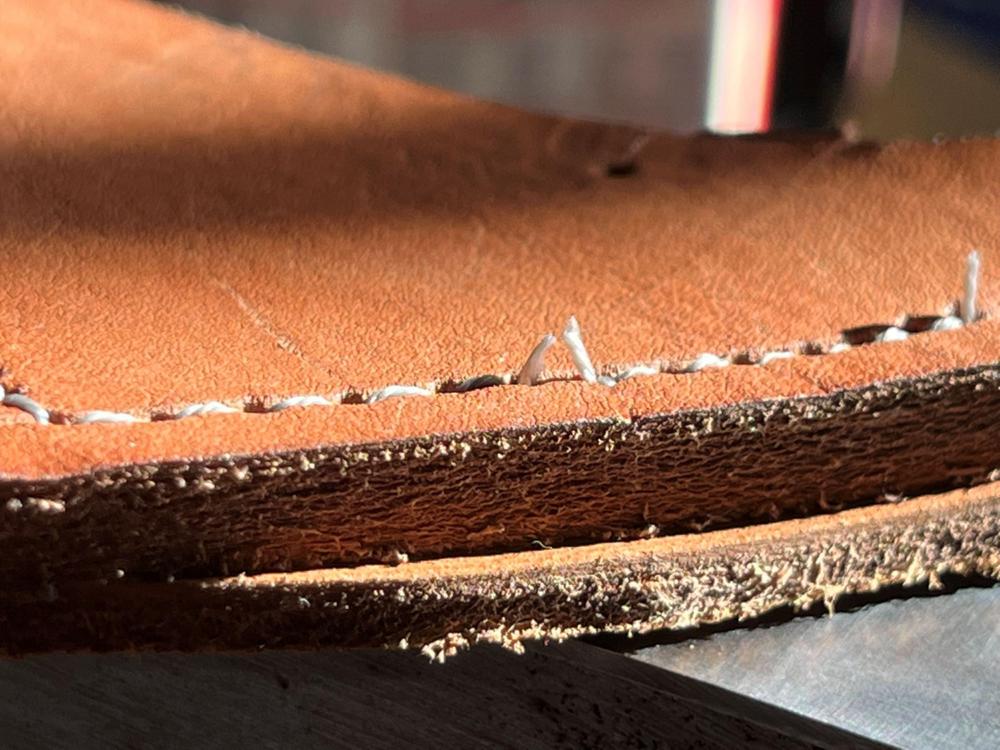
Here is about how thick I can sew veg tan without modding. Changed stitch length for the pic, it does go longer.
-
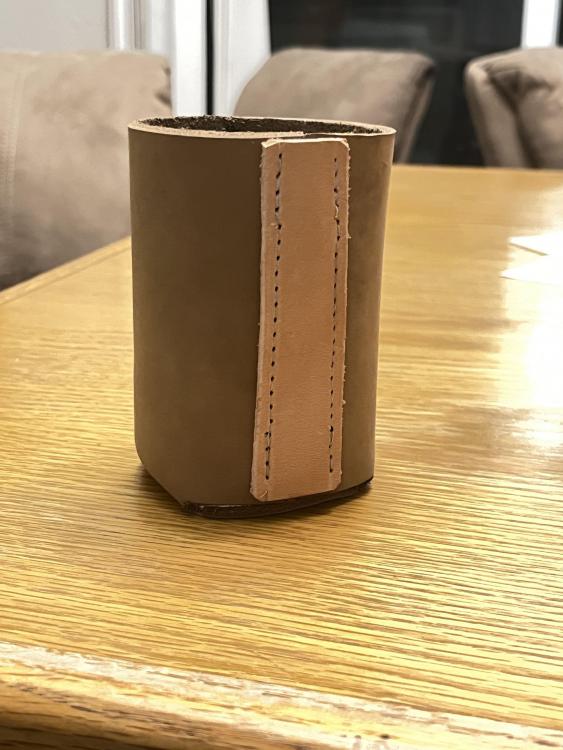
I also have one, the "10 bearing" model. Tinkerers delight is an appropriate term. I am not a highly skilled leatherworker. If I had devoted the tinkering time it took to get the machine working to my satisfaction to learning leatherwork instead I would been expert. As it is, I AM expert on these machines now. Not a very marketable skill. kgg and I can relate on this I believe. For those interested or with the machine, the ORGAN brand DPX35D leather point needles work very well. Chuck123wapati - fellow Wyo person - if I can advise you somehow on the machine let me know! Pic is a coozie I made with it just playing with scraps. Not ready for prime time.
-
There are FB groups dealing with industrial machines. One in particular focuses on mechanics. Search FB.