-
Posts
1,216 -
Joined
-
Last visited
Content Type
Profiles
Forums
Events
Blogs
Gallery
Store
Everything posted by David
-
Thanks for the kind words Alex. I like doing seats for Jeff. He likes to give me free reign let me do my thing. Dave Theobald
-
-
Fiebings Antiquing Paste works well to accentuate lines in your carvings. Thanks for taking a look. Dave Theobald
-
Thanks guys, I thought it came out looking pretty good. My first "color" seat Dave Theobald
-
-
Jeff shot a couple pics of his 66 shovel at his home. This is a really sweet looking ride. Dave Theobald
-
First of all, you need to prevent this from happening again. I'm not sure of your leather weight, but it looks thin. I use 7/8 oz. Second way to prevent this is to leave more leather on the back. Instead of the huge opening in the back, Cut two circles for the spring studs and a long slit for the mounting hardware. Ok, how to fix it. I would wet it, push the leather back down and dry it quickly. I'd us a hair dryer or something similar. Do not use an oven. When it looks pretty dry, put it aside for at least a day without touching the leather. Best of luck, Dave Theobald
-
From the album: David's Gallery
© © leatherworker.net
-
From the album: David's Gallery
© © leatherworker.net
-
Your braiding looks pretty good. Will it sell? You'll have to tell us how it went. Dave
-
Welcome to the forum. I'm sure you'll meet many fine people and see a lot of inspiring work. David Theobald
-
Thanks guys, The comments are appreciated Dave
-
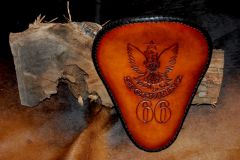
Jeff threw me a curve on this one. He's doing a simple all black bike and wanted a simple seat in a weathered tan. Just a logo of his and his number 66! One of the striking features will be no springs under the seat! The seat will rest on a couple rubber bumpers....All in a effort to get that LOW look. Here is the result David Theobald
-

New Seat Almost Done , A Few Questions Though
David replied to billymac814's topic in Motorcycles and Biker Gear
I cut the padding flush with the edge of the pan and then put about a 1/4" bevel on the padding just so the leather wraps around the edge a bit better. No trim on the edge of my pans. Hope that helps.... post some pics.... let's see what you've made. Dave -

New Seat Almost Done , A Few Questions Though
David replied to billymac814's topic in Motorcycles and Biker Gear
-

New Seat Almost Done , A Few Questions Though
David replied to billymac814's topic in Motorcycles and Biker Gear
I do it a little differently from MadMax. When the seat is assembled like yours is. I apply neatsfoot oil and let it sit over night. Then I dye the seat usually with an airbrush. I use spirit dye, just because I've never used the oil based stuff. When it is dry, i wet the seat with water and apply the antique paste. final finish is leather balm with atom wax. I don't know why you would want to add sno seal too. I'd use one or the other. If you don't want the seat dark, used some color other than the dark brown antique paste. It will add color to the entire seat. When I lace, I don't use a needle... that's just how I do it. Hope this helps Dave -
Very nice work Tim. Although I don't envy you doing that back cover. Can you still see after doing that? Dave Theobald
-
Troy, Wait until you see it on the bike! I'll post as soon as I get the pics from Jeff. Dave Theobald
-
Thanks for the comments, I should have a pic of it soon. Jeff was holding up a photo shoot of the bike until I delivered the seat so it shouldn't take long. Dave
-
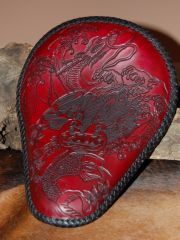
Here is the seat in final color. The flash made it look a bit more red that it appears in person. But, here are a few pics so you can see it. Dave Theobald
-

8 Tips To Get More Traffic From Your Directory Listing
David commented on CitizenKate's blog entry in CitizenKate's Blog
Hi Kate, I tried the logo box. The photo was one of Jeff Cochran's, so you know the quality. I must say I'm disappointed with the resolution of the logo Dave -
Hello everyone, Today I'm posting the fourth in a series of Signature Seats for Jeff Cochran. This seat will go on a 1966 Harley. The '66 is important to Jeff. It is not only the year of the engine and frame of this bike, it is also the year he was born. It is hard to believe that in all the shovelheads that Jeff has built (probably hundreds) this is the first '66 he has done. He tells me that he's keeping this one..... But I've heard that before! For Jeff keeping it, may mean all summer or until next week! Or it may just mean that he's not going to offer it for sale....he'll just wait until someone makes an offer that he can't refuse! The bike is black with a dark cherry inset on the tank and rear fender.... the seat will probably end up a dark oxblood color. Not the best for showing off the tooling, but it should go well with the bike. Please excuse any problems with the photos. I'm still trying to adjust to the new photo software on this computer. Dave Theobald
-
I haven't had any problem with the centers rising. When you build seats the way I do, the critical factor is getting a pattern that really fits. I have nothing against using glue or thick foam padding and then wet forming. For me it is a matter of my hands. They just won't do the wet molding any more. Dave
-
Thank you all for taking a look at the seat. And of course for the kind words. Encouragement means a lot. Dave
-
Hello Everyone and thanks for taking a look at this posting. Here's the final seat. Ready to ship. David Theobald

.jpg.d60258221c476480a6e073a8805645bb.jpg)


