

Crystal
-
Content Count
1,054 -
Joined
-
Last visited
Posts posted by Crystal
-
-
I think one of the problems women face (and I generalise horribly here) is that bags tend to be designed and made by men... To be honest, it wouldn't do male leatherworkers any harm to listen (no, really listen) to what women actually want before they make any more purses!I'd personally like a copy of that Tandy Pattern too, because it looks like a good foundation for some creativity - but what could be really useful are some kind of 'female focused' guidelines on bag design. What works and what doesn't.
I accept that this would be extremely subjective but that never stopped a good survey!
Ray
I think that there will probably be as many different needs/wants for a bag as there are women who use them. I have been mulling this for quite some time -I need a new bag and am refusing to buy another one when I can make my own.
I bought a Coach bag at a "purse party" last September. I am sure that it was either a knock off or a line reject. There were a few construction flaws in the bag, missing a matching decorative piece, etc. It has fallen apart in less than a year. Zipper pull tab- gone. 2 construction rivets - gone. Inside fabric pockets - torn at seams (I stapled them back together). Bag straps- fraying at the edges. Strap keepers- coming apart where they were glued. All kinds of little things going bad, and I am not a bag abuser. If I had paid retail for a "genuine" bag (I don't know for sure that this one is genuine) I would be very dissapointed with them as a brand altogether.
I have never met my "perfect bag" anywhere. I like a larger "tote" style, but cannot tolerate the "pit purses" that seem to be everywhere. (Those bags that have handles too long to carry in your hand and too short for over the shoulder without having them tucked clear into your arm pit. Forget having enough room for over the shoulder with a winter coat on.) I want over the shoulder straps, with enough room for winterwear, but not so long that it becomes a knee banger. I want those straps to be adjustable.
It needs compartments and pockets. Outside and inside. Outside pockets for cell phone, pens, notes, shopping lists, sunglasses, keys.... Inside compartments to segregate all the little this and that's that I think I need. Everything from wallet to perfume. For me- this has to be a 3 compartment setup. There needs to be enough room inside for a bottle of water (I want a bottle holder in there) and everything else from a book to a file folder for documents.
I don't care for zippers, especially zippers for the main closure on the bag itself. I want magnetic closures. Easy access - quick access. A zippered compartment on the inside, would do.
I don't want it to weigh a ton - because I will pack enough stuff with me to give it some weight. So I will probably go with a leather outside and fabric inside. A detached fabric inside, so it can be turned inside out for cleaning.
I want it to look like a million dollars, feel like a dream, and wear like Samsonite luggage.
Now - if you were to ask my best friend what she wants in a bag, we're gonna get an entirely different list. She likes small.... very small - with zippers and built-ins for cash and cards and checkbook - no seperate wallet for her. She always puts her coins in a zippered pocket, she clips her cell phone and keys to her belt. She has a different purse for all occasions and changes out on a regualr basis. I don't like to fuss this much. I dump my change into the bottom of my bag and when it gets too heavy, I know it is time to dump out all those nickles and pennies.
So - the quest to build the perfect bag is on. Don't think I will get it right frist time around, but I will get there someday.
Crystal
-
Hi Casey - I did a quick search and found these. They are textile references, but may help a little. If I find anything else, I'll let you know.
Plate # 14 on this one: http://chestofbooks.com/crafts/needlework/...ted-Part-3.html
http://chestofbooks.com/crafts/needlework/...ted-Part-2.html
I often think of Spanish style in ceramic tiles. Like here: http://www.arttile.com/
or here: http://www.powells.com/biblio?isbn=9780486417998
Crystal
-
Wow, Tom. Hope you get bored more often and post more items like this! Beautiful bag!
Crystal
-
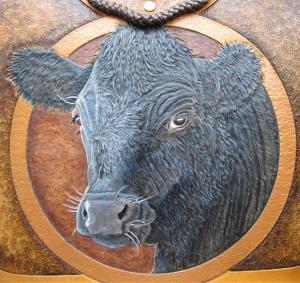
Wow, Tina! Lots of work on that one. Braiding, lacing and sewing. Not to mention all that carving.
 The frogs are adorable! (I am also a frog fan.) And I really like the way you incorporated the braiding and beads into the flap tie with the concho. And the pop of green for the liner is great. Excellent all around!
Crystal
-
Just saw this, that belt is awesome!Love the colors. Makes you say 'gimme!'

Thanks, Shorts! If it looks half as good as your belt at the end of a year with 1 percent of the wear, I'll be a happy camper.
Crystal
-
Hi Crystal,I liked your rig so much I just had to give you my 2 cts worth... It's such a pleasure to see nice clean, simple styling! That's my 2 cts worth!

Kevin
Thank you, Kevin. Toss in your 2 cents anytime! (Good or bad.)
Crystal
-
Looks fantastic Crystal!!! I really like that two tone.Art
Thanks alot, Art!
Crystal
-
HOW CAN I HAVE MISSED THIS ONE!! DROP DEAD GORGEOUS MY FRIEND!!I often get so caught up in all this business with tooling and all that and seeing a sweetie like this every once in a while is just a great reminder of the core in what we do, this is truely a fine piece of excellent leatherwork!!
Thank you Crystal, you made my day!!
Tom
Thank you, Tom! You just brightened up my day and motivated me to go back to the bench!!
Crystal
-
@Crystalvery fine work looks great.....and the color looks good to
@Casey
what kind of belts are on your webpage??
Its not for motorcycle riding I think!
Greetings
Johann
Thanks alot, Johann!
Crystal
-
Looks great C. The 2 tone is a hit wit me.Thanks, Kid!
Crystal
-
I have used .22 shorts for bullet loops on the miniature gun rigs. They look fine but are just a tad big for scale. I have also used some hand made bullet dummys that were better scale for my miniature Bholin gun rigs.As for the guns, I have used the cheaper miniature replica guns that work very well and don't jump up the price much. The hammer and trigger work and the cylinder will spin but they will not fire.
I have also used Uberti miniature guns which run from $500.00 and up. Obvisouly not everyone will pay this for a miniature gun rig. These guns are made by gunsmiths in Italy and are exact replicas of the real thing, right down to the serial numbers.
The older models had a hollow barrel and some say they would fire a bullet. I don't know this to be a fact, I have never seen it done and I don't know if any ammo would fit in the cylinder.
The newer models have a solid barrel in the center so they won't be able to fire anything.
Hope this answers your questions.
Thanks for the information, Casey! It is very interesting to learn what collectors want, and the miniature guns are very interesting. I did a quick look online and found this site: http://miniaturefirearms.net/index.html I can't believe it, Miniature Gatling guns! Miniature rifles! I had no idea such things existed. I need to get out more...
Thanks for the info! It lead to some interesting places!
Crystal
-
Very nice, David! I really like how you shaded that font! Of course, the carving, dyeing and lacing is always high on my drool meter.... dang - gotta get the mop out now.
Crystal
-
Very pretty, Pinkchaps! Glad to see you got the pictures uploaded, hopefully we will get to see more of your work.
Nicely done.
Crystal
-
Thanks for the welcome, everyone. I am very honored to have been asked to join such an outstanding team - everyone from the moderators to the ambassadors do such an amazing job here, I just hope to be able to contribute in some way.
Leatherworker.net is an amazing place filled with skilled, talented, generous, members and I am very happy to be here and hope to be able to give back a little to a place that has given so much to me.
Crystal
-
Thank you, Casey! I did the slots. I might try sewing next time instead. The slots worked well and seemed to line up pretty good. More accident than planning, I think.Crystal
Well it looks real good, accident or not.
The reason I asked is because I hand sew between all of my loops on my miniature bullet loops to get them nice and tight. I might try the slot method to see if it will come out as nice as yours on a miniature.
Casey - I just have to ask... are your miniature guns and ammo real? Was trying to think of what size casing you would need for a miniature belt then got to thinking about the guns that go with the belts....

Crystal
-
Hi Tom! Wow, don't know how I missed this. Nice write up. Thanks for taking the time to do this. This technique could definitely come in handy for some projects.
Thanks!
Crystal
-
Nice work Crystal, looks good to me!Thanks, Bob. I saw that you got your new machine... I get into another one of these I may beg to come down for you to sew it for me...ahhh..,errrr... give me a demonstration.

Crystal
Crystal,Very nice and professional!
I do have one question about the bullet loops. Since you did an excellent job of getting them nice and tight it is hard to tell if you sewed between the loops or just run the bullet loops through slots. I'm guessing through slots.
Either way it's very nice.
Thank you, Casey! I did the slots. I might try sewing next time instead. The slots worked well and seemed to line up pretty good. More accident than planning, I think.
Crystal
-
Beautiful, Ed! I like the little curlie-q coming off the tip of that flower petal. Little touches like that really show how much thought goes into your pieces. Count me as one of your many fans!
Crystal
-
Great job Crystal....looks really nice! The two tone spices it up.Bob
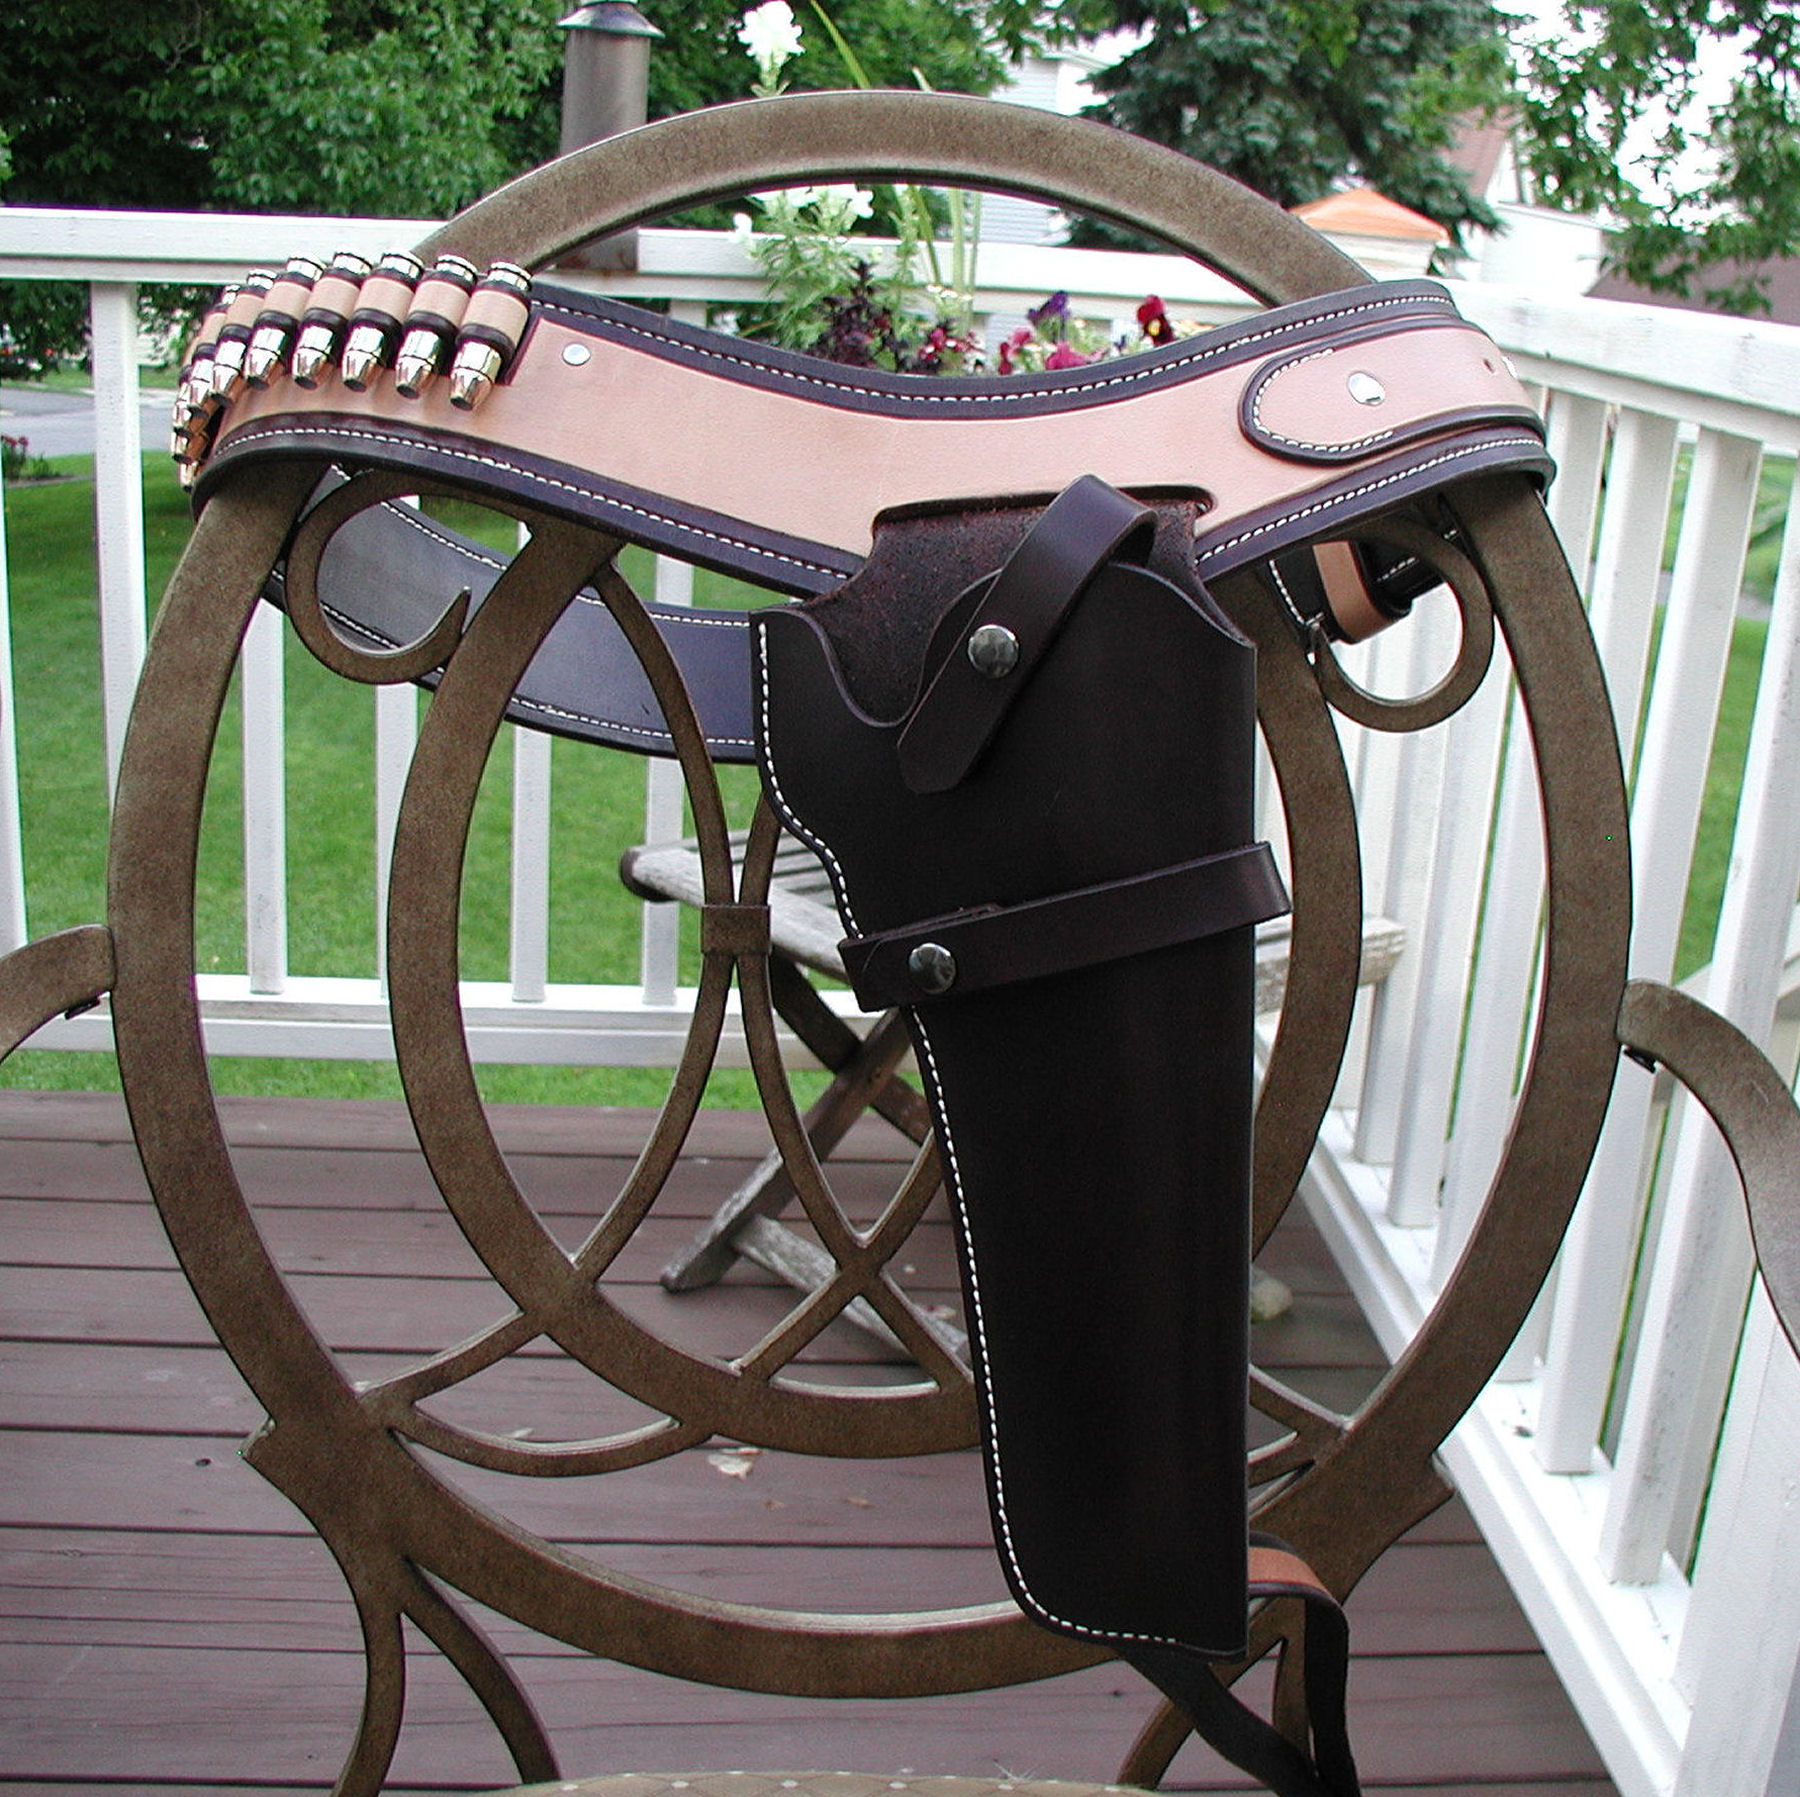
Thank you, Bob! I am happy that the two-tone is looking good to everyone. I liked it, hubby didn't (he's a minimalist) -so I wasn't sure how it was going to look to others.
Crystal
-
Really nice piece, I love the colours.Only two things, since you asked for a critique

1. Stitch around the slot where the holster comes through the drop-loop. This is a high-stress area and will probably come apart eventually if just glued.
2. The main belt keeper, the large one, can be skived down and inserted and stitched between the two layers of the main belt so it isn't visible on the front. I prefer this personally, but it's a matter of taste.
Really nice job though.
Badger
Thank you, Badger!
Stitching around the holster slot is something I will do. I was having a problem with the holster flap fit the way I had originally made it. I finally fixed that problem so everything would fit thru the original slot - but until that point I was leaving some wiggle room to make the slot wider.
I will use your suggestion for the back keeper next time. I didn't like the bulk either with that, and just couldn't think of another way to go with it.
Thanks again!
Crystal
-
CrystalThe late nights and sore hands payed off. We talked a lot on the live chat about this project and I knew you would finish it. You did a Great job on it, the two tone looks really nice and the whole thing turned out. I'm really glad that you posed it for all to see.
Keep up the great work.
Mark
Thanks, Mark. I appreciate you keeping me motivated!
Crystal
Crystal, That sure is a very nice gun belt. I have been wanting to do one but havent got up the nerve yet. I do like the two tone colors. All in all I think you did a great job, just hope my first one will be that good.Keep up the good work
Kenneth
Thank you, Kenneth. For me the hardest part is just getting started, so go ahead and give it a try! Be sure to post it when you get it done!
Crystal
Great job, I as well really like that two tone color scheme you did. Excellent work.Thanks, MadMax! I wanted to do something decorative, but was a little intimidated to try to carve something that large. So I ended up playing with the dye.
Crystal
-
excellent job,love the two tone color,would like to have seen the holster two tone also
Thanks! The holster was made first for a .44 Ruger, the guy didn't want this style he wanted a molded one. Hubby was the go between in the order... I am wondering if he messed it up just to get a holster for himself? lol I thought about re-doing the holster to match, and probably will someday.
Crystal
That looks great, Crystal. Very clean, very professional.Thanks alot, Tim!
CrystalI am proud of you awsome work you are a real talent.
Can you go in to how you got the two tone look are the seprate pieces or just dyed that way.
Great work hers a glass of Milk
Josh
PS thanks for sharing I love it
Thanks, Josh. The two-tone is just dyeing. I came in about 1/2" from the edge and lightly scribed the line. Then I ran a creaser on that line to give it a little more definition, and just used a small paint brush to paint it on.
Thanks for the glass of milk!

Crystal
-
Hi All!
First let me give a big "Thank You" to everyone that I have pestered with guestions on this project! I couldn't have done it without all of your help.

Lots of boo-boo's, oops's, and one really big
 that I managed to hide. Still need to get better with my edges and my sewing. Ahh, that sewing, somehow I get it okay on the front side and messy on the back side. I will get it figured out sometime.
As always, I am open to any critiques, "shoulda done's", or "ought-to-do's".


Thanks for looking!
Crystal
-
Beautiful, Tina! I keep looking and finding new things to ooh and awww over.
I have the same trouble with my stitching - if I ever figure out how to cure what ill's my sewing, you'll be the first I will share that info with!
Crystal


Skulls and more skulls...
in Books, Journals and Photo Albums
Posted · Report reply
Love it, Tina! The snake skin is a really cool touch. Although - I probably wouldn't touch it. Give me a spider over a snake anyday - I am pretty sure I can take down a spider in a fair fight, don't think I could with a rattlesnake.
Another beautiful project! I never get tired of seeing your work.
Crystal