
KittenThrasher
-
Posts
56 -
Joined
-
Last visited
Content Type
Profiles
Forums
Events
Blogs
Gallery
Store
Everything posted by KittenThrasher
-
In the UK they are called 'click knives' and 'click presses' and there are several companies that make the blades at reasonable cost, I guess the same is true of the US? Another thought is getting the components Laser cut, for thin light stuff like watch straps this should be a really good solution, also for the same few hundred dollars that you might spend on a click press (you could also make one if you get some steel offcuts from a fabricator) you could buy a cheap chinese laser cutter that would cut all your watch straps and any thing else you fancy. Laser cutting is a very interesting way to go in leatherwork. good luck.
-
Very nice work, I particularly like the nice clean contrasty stitching; slightly jealous of that. I'd also like to see some of your home made tools as well if you'd be willing, Well done, great work.
-

antiquing Resolene on top of Tan Kote?
KittenThrasher replied to maritimemoose's topic in How Do I Do That?
If I remember correctly Tan kote is labeled as a thinner for antique gel, so should bond properly with it on the material, I've noticed that if you leave the antique for some days the resolene doesn't strip it so much. I also like to use resolene as a top coat on a lot of my stuff and have spent quite a bit of time so far trying to find the best way to put it on an antique finish - leaving it a couple of days is the best I've come up with so far. Currently I spray the 50/50 resolene on with an airbrush or spray gun, that helps a lot. Good luck and do post your results, I've got a couple more things to do with the same process over the next couple of weeks, I'll post some pictures. -
What's Your Handle? (Origins of your maker marks)
KittenThrasher replied to Mjolnir's topic in Leatherwork Conversation
Kitten_Thrasher is one of a couple of my online handles, it was created years ago during a party on a beach, it has no meaning and kittens are usually safe with me unless i'm thinking of making some nice soft gloves, small ones. The avatar was created by my daughter, she did 'surgery' on Barbie then photoshopped real eyes into the picture, she was 9 years old at the time, her mother was less impressed than I was. 'been using it ever since, the original is quite disturbing, lots of blood spatter, gore and a razor blade. Nice. -
leather quality Quality grading veg tan leather,
KittenThrasher replied to KittenThrasher's topic in How Do I Do That?
Peak Ale is the good stuff, it is a nice area round here for sure, sadly quite far from Wicket and Craig although wouldn't mind going over there for a visit someday. My main interest in this thread is just to see how people grade or choose leather, if they have any method at all, I generally fiddle with it a bit, shake my head and frown, and go; "Yeah, that'll do I guess," -
No idea what I'm doing, but happy to be here!
KittenThrasher replied to JiffyJones's topic in Member Gallery
Never tried that; I imagine it would work, maybe with some fabric toweling or something that won't dry out much or at all, 'certainly worth a go on some scrap at least, I know someone who 'diferentially' hardens stuff with a hair dryer, she's quite happy with that. -
No idea what I'm doing, but happy to be here!
KittenThrasher replied to JiffyJones's topic in Member Gallery
PS,,,,,, Don't be worried about stitching, it's the most therapeutic and relaxing part of the whole thing, 'couple of beers, good film on netflix a couple of bags to sew and I'm sorted, (I am getting old though.) Get yourself a pile of decent saddle stitching needles, I use John James size 2, 3 and 4 for just about everything. Get or make a stitching pony of some sort - doesn't have to be fancy to start off with, some way to mark the stitch holes - I prefer irons, and a good sharp awl. I like to use braided thread but there's loads out there, just try a few and see what you like. maybe watch a few different youtube videos. Have fun. -
No idea what I'm doing, but happy to be here!
KittenThrasher replied to JiffyJones's topic in Member Gallery
That is really really nice work, do you know that if you put the leather in a warm domestic oven after you've shaped it and while it is still damp it will permanently harden into shape really well? the oven needs to be 'hot but not hot enough to burn your skin' probs about 60 degrees or whatever weird temperature scale you use in the US . Absolutely love your painting, Acrylic works really well on veg tan leather - especially Angelus Acrylic Leather paint (any decent quality stuff is good though.) Good luck and keep at it. Andy P. -
Hi everyone, I've always bought my leather from the same place pretty much forever (feels like it anyway) and thought it was time to look around a bit and see if I was missing out on anything. I quickly realized that one persons 'A' grade was another persons sack of S****e. I'm curious if or how people assess their leather for quality especially if you're buying online? I got some from Tandy which was very good - exactly what I would describe as 'A' grade, then some from a small supplier which was 'pretty much ok' but nothing to shout about and I got some from an leather online specialist in Italy and the quality was utter crap. I questioned them about it and they said "expensive 'A' grade veg tan calf is better than cheap 'A' grade veg tan calf". obviously to them 'A' grade is an entirely movable feast presumably depending what they have in stock at the time. Obviously won't ever buy from them again,, Anyone got any thoughts? I'll probably buy from Tandy for the moment at least. Cheers,,
-
You wondered if the problem might have been related to using airbrush, I use airbrush and spray for nearly all my work and it never gives a problem, sometimes it doesn't provide the same degree of penetration as a dauber but it's never been a problem, I think I'd be looking at the thought of putting a water based material on top of an oil based one such as Olive oil, as per what Rocky Ausie mentioned. Good luck.
-
Hand stitching my first Bi-Fold wallet
KittenThrasher commented on Firewalker's gallery image in Our Leatherwork Galleries
 Very nice looking job, and great looking stitching. nice work mate.
 -
It's all got a bit out of hand I'm afraid, less than a year on and we're onto the serious stuff now, it's all jolly good fun though.
-
Perhaps it's rebuilt and modified, I guess it's electric? see how old the motor mountings look, not likely an electric motor from a hundred years ago would work on our mains voltage I guess, interesting thing though.
-
Choice of glue for leather and cardboard
KittenThrasher replied to leolun's topic in How Do I Do That?
Good quality PVA is durable and long lasting, 'might be worth going to Youtube and checking out some bookbinding videos, that might give you a better idea. -
I'm not sure that sticker is so old, clear vinyl type stuff with a very modern font, does not look in keeping with the machine at all, I'd say the metal plates are a much better bet. I think that sticker would have at least yellowed if it was more than 'some' years old.
-
Choice of glue for leather and cardboard
KittenThrasher replied to leolun's topic in How Do I Do That?
Depends on what you are going to make, 'bit more information would help, generally I use contact adhesive like Evo-Stik - there are many 'general purpose' types which would do the job, PVA white glue would stick leather to cardboard quite well. PVA is less expensive, contact glue might be stronger. there are many glues that would work well. What are you making? -

-
Very nice all round, I also like the way you store your tooling stamps, think I might just copy that idea.
-
Looks to me like you can see the texture of the cord through the leather covering it, 'must be very thin I'm thinking, that might be worth considering if you're going to experiment with it. As MY63 said, it may be wet moulded round the cord - that would certainly give the nice texture shown.
-
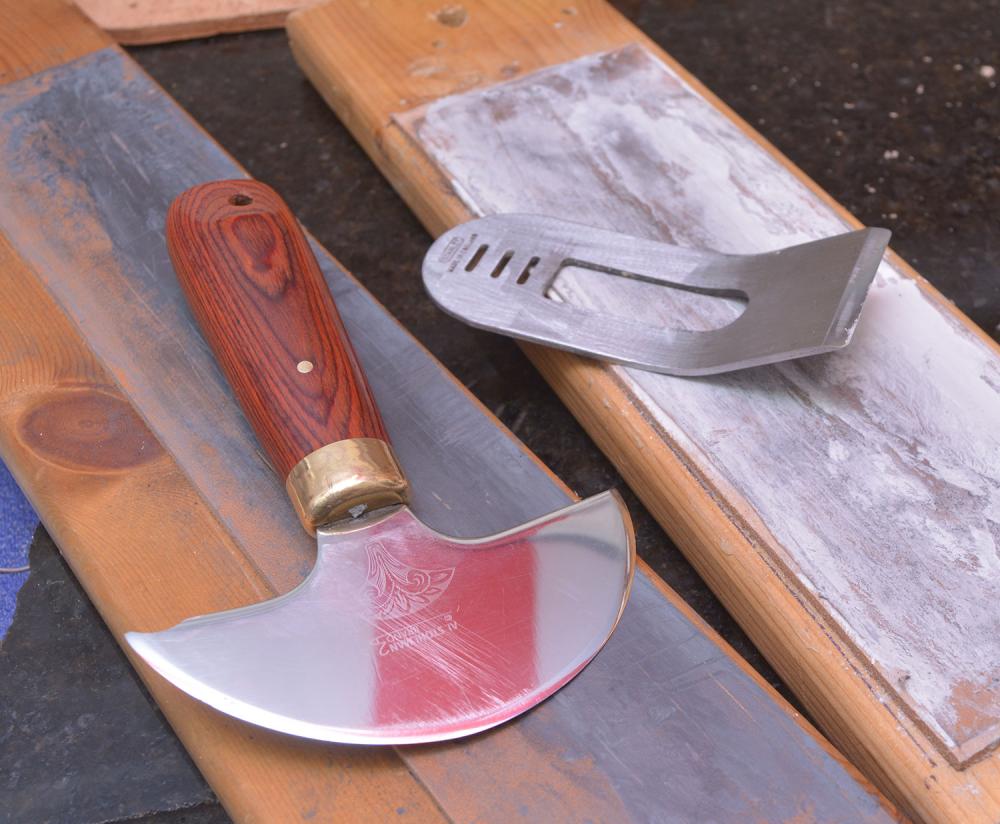
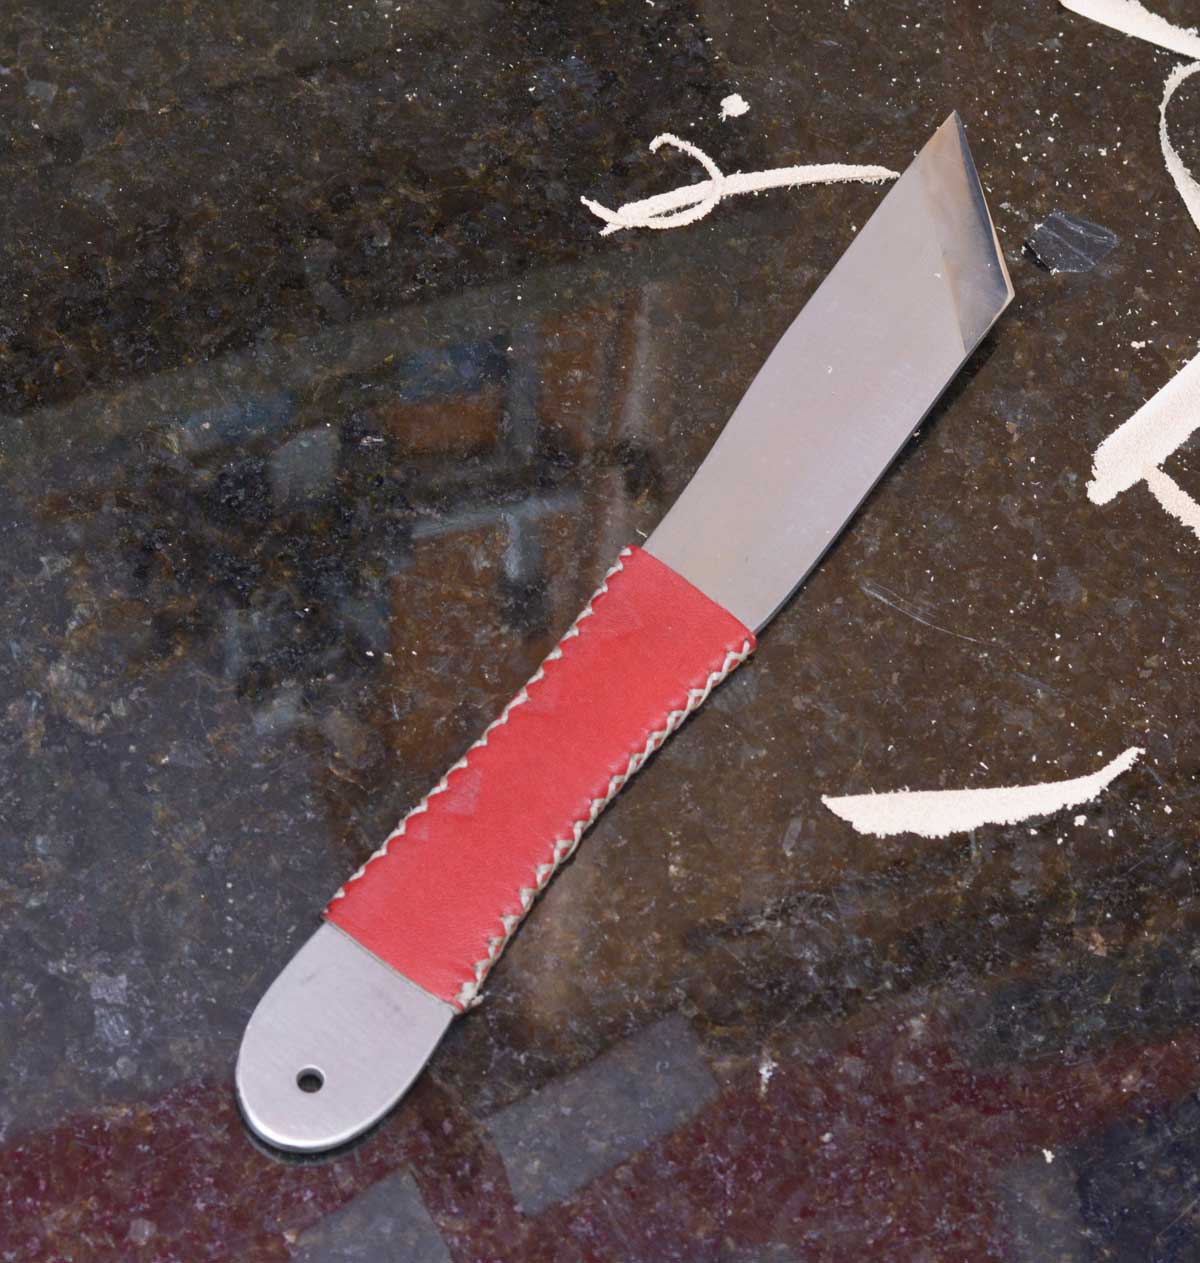
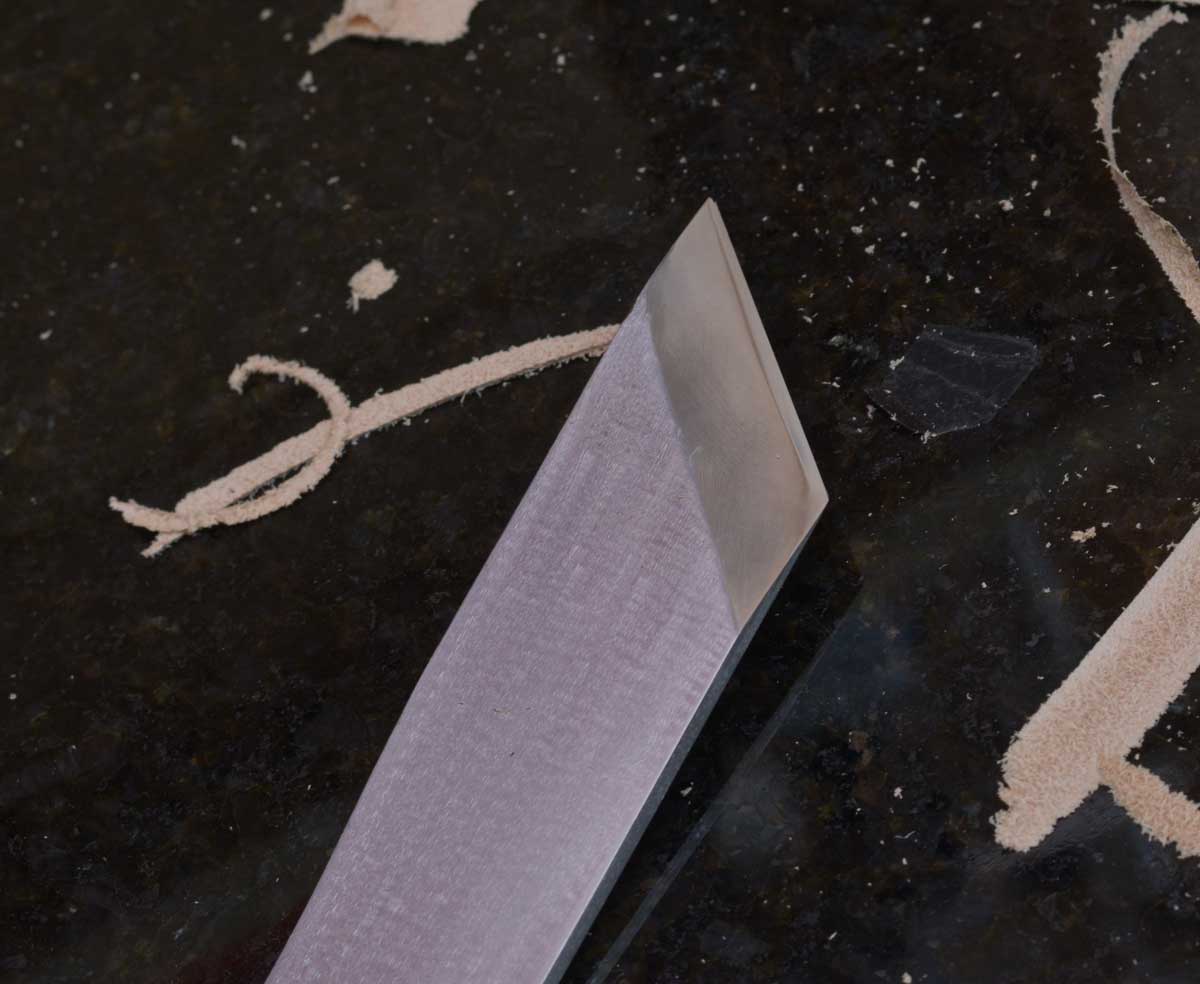
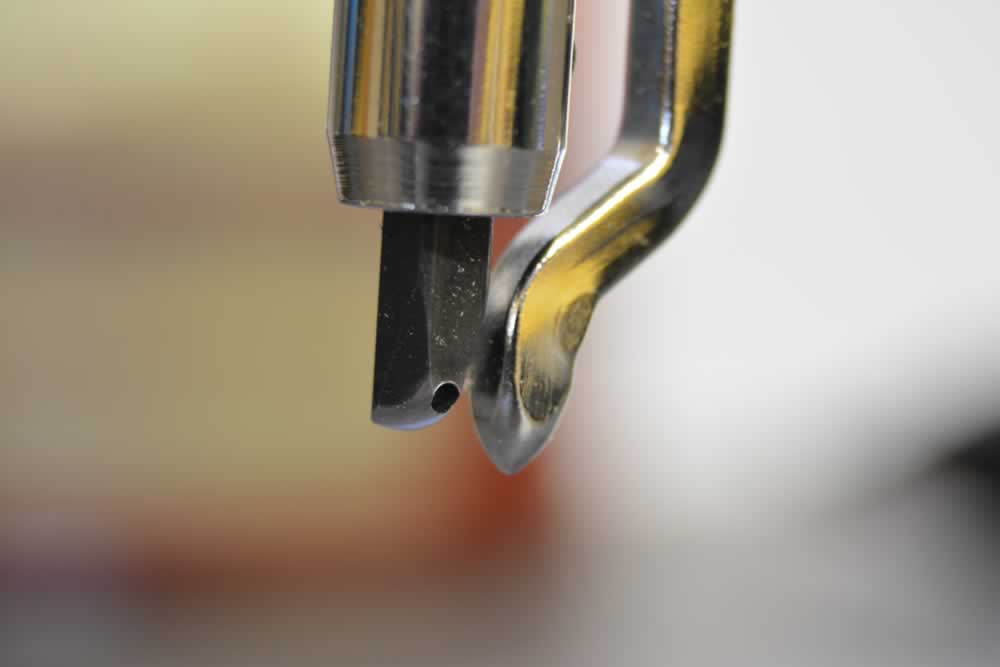
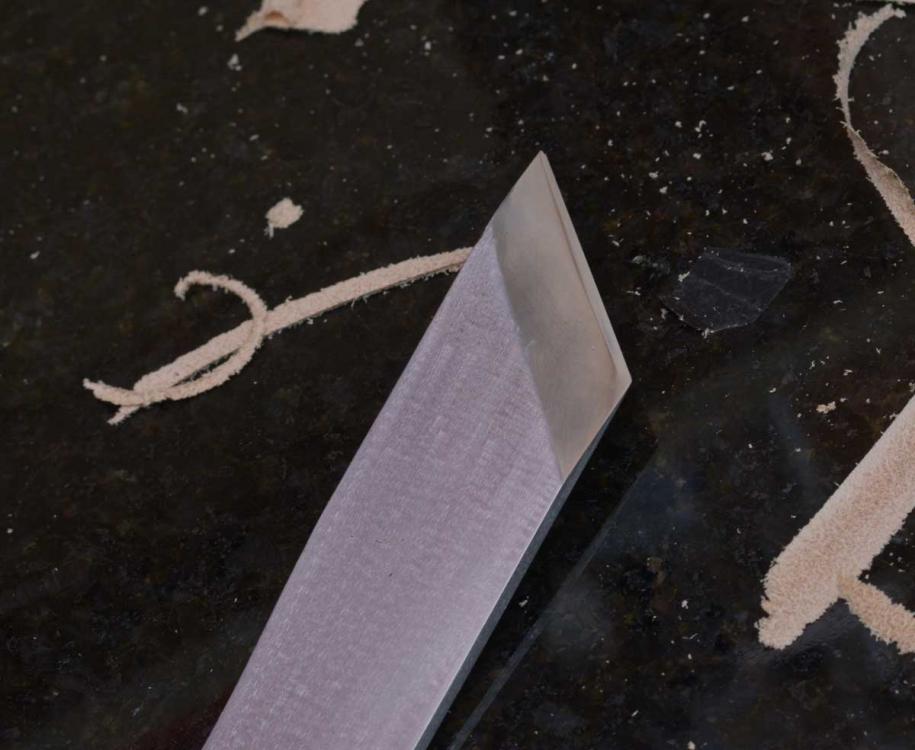
The metal of the saw blade turns out to be just right for making a skiving knife, it holds an edge quite well, is flexible and is developing a good quality polish on the bevel and the back. The one I accidentally (Duh,,,,,) made left handed I've turned into a knife for cutting thicker leather, that works really well as the long handle gives extra leverage for good control going through 4 or 5mm harder VT leather. I've been thinking of making a handle for the plane blade but haven't decided if I want a short stubby one or a longer one, maybe I'll try both! the plane blade takes an excellent edge as you'd imagine.
-
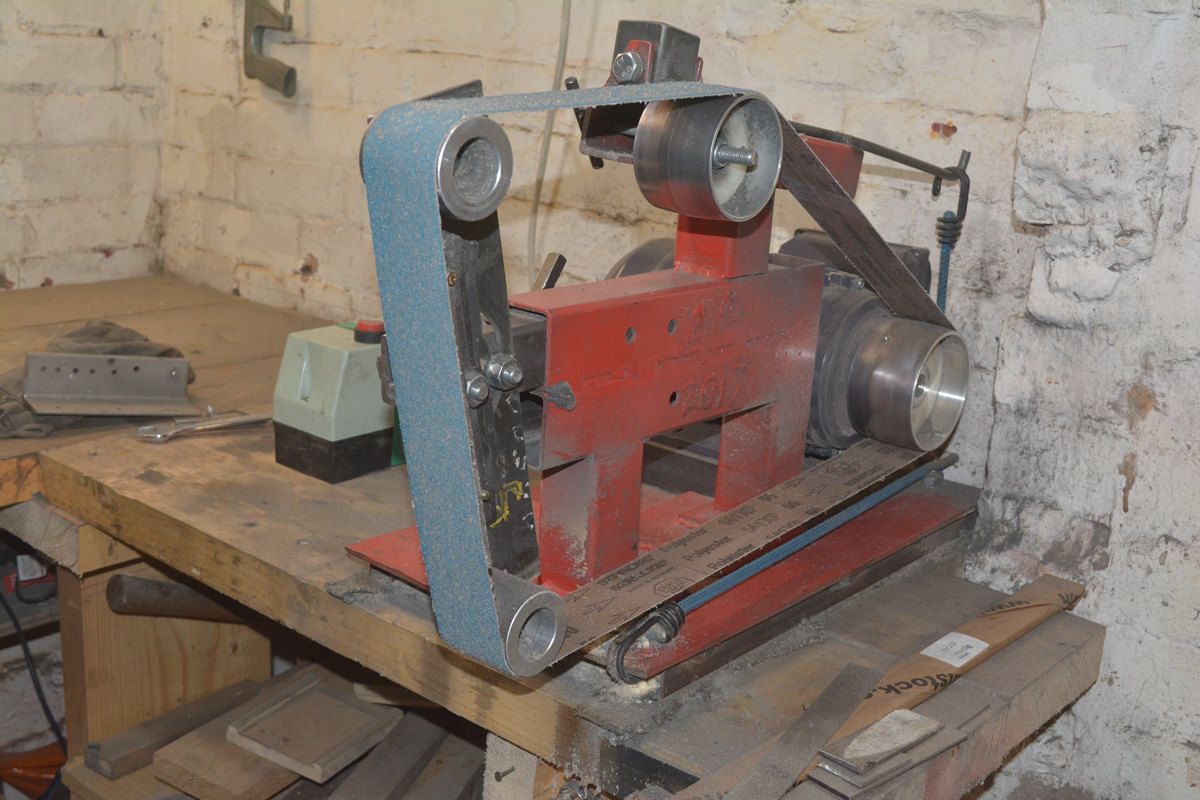
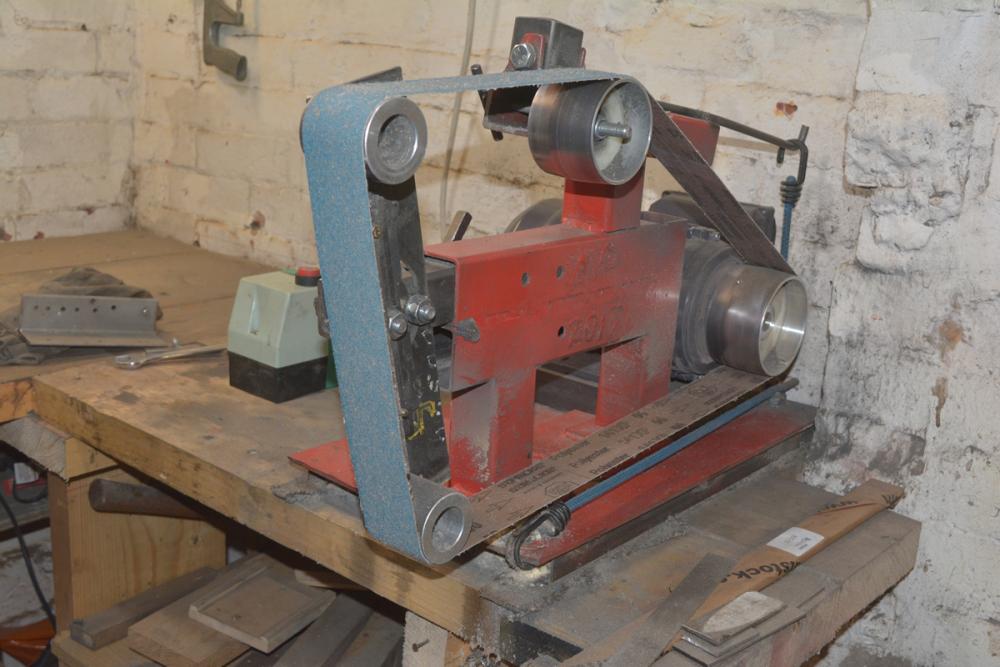
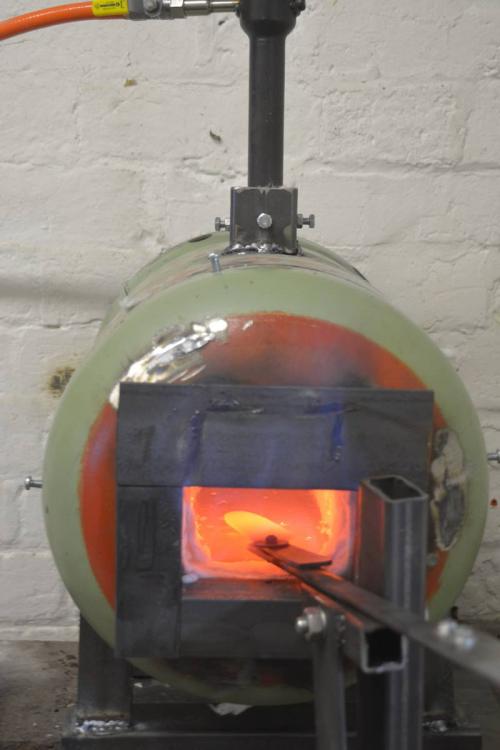
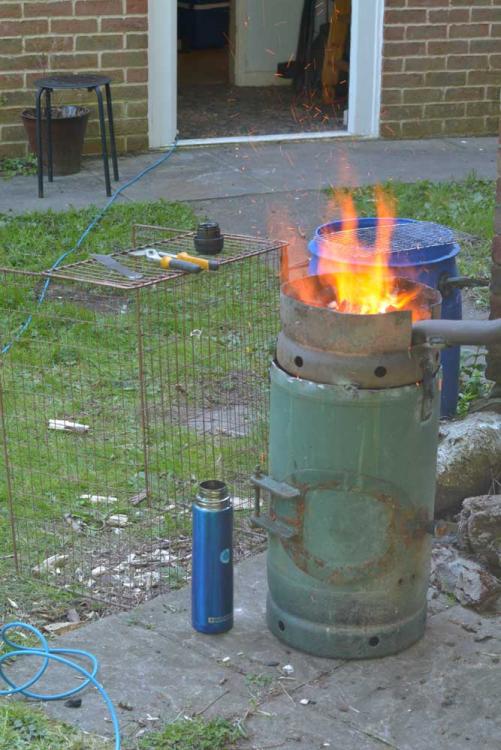
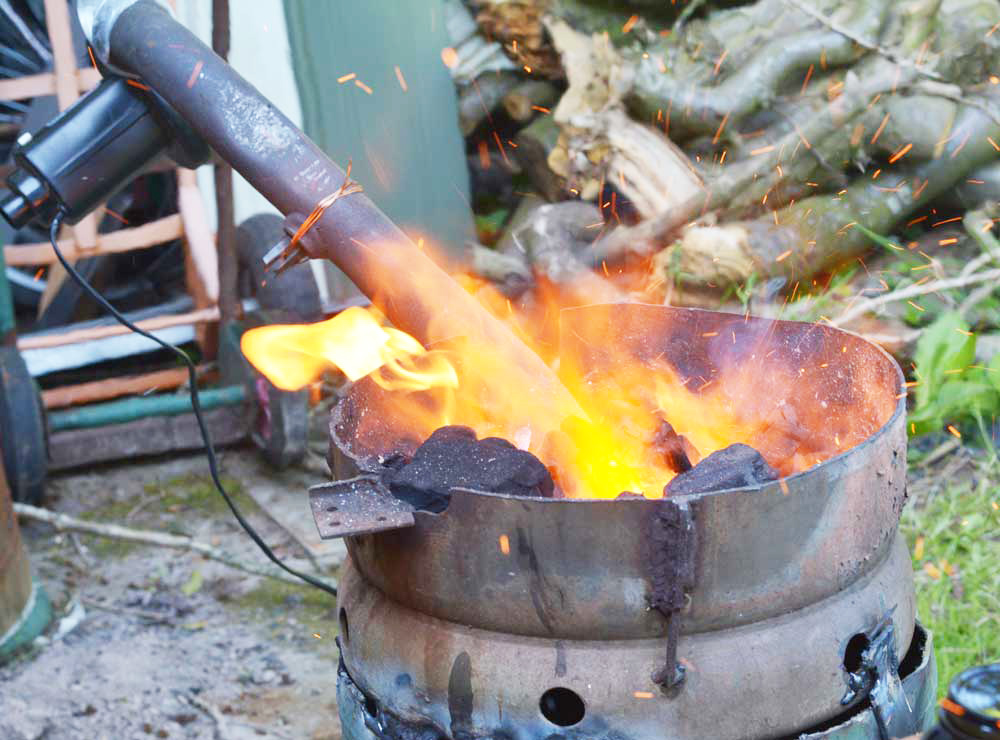
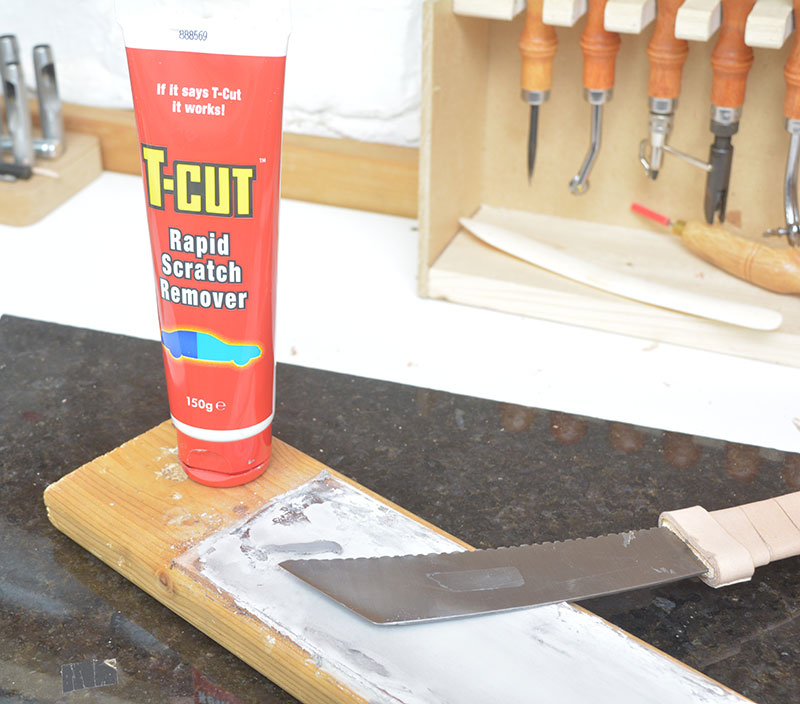
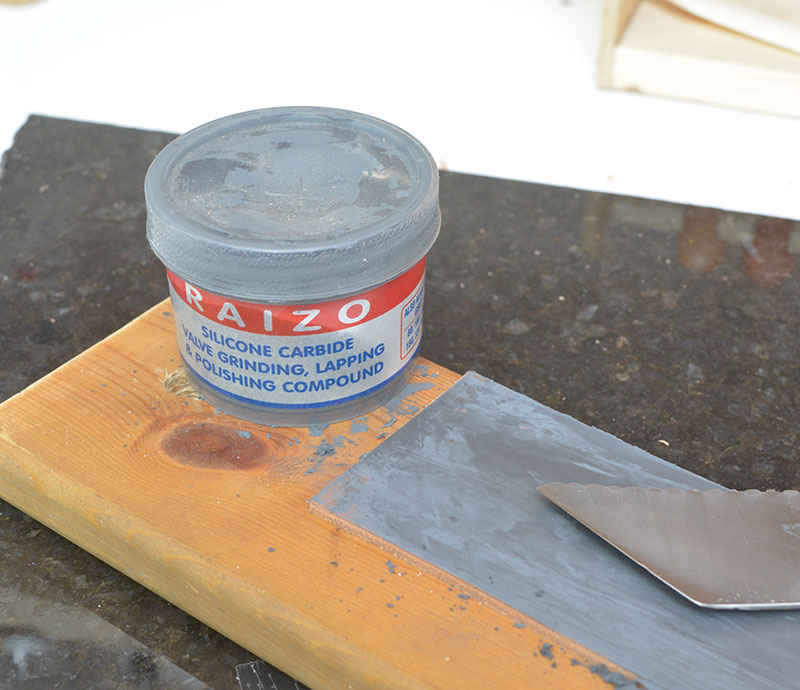
Greetings folks,, I’ve been taking ideas and stuff from this site for ages now and thought it was about time I posted something some of you might find useful. Skiving knives, ‘never been able to buy one that I really liked, doubtless more a comment on my pickiness than anything else. Anyways, I had a crafty idea and decided to try making my own. Recently I retired my camping firewood saw and recalling how well it held an edge I decided to see if it would make a half-decent skiving knife – it was a ‘mid-range’ pruning saw with a reasonable quality Swedish steel blade, ‘decent - but nothing special. ‘Sort of thing you’d pick up at a boot sale for a couple of £/$ or thereabouts, or $30.00 new. The work was not difficult, 1. Using cutting disks on a Dremel I cut the blade to an appropriate length and the blade angle I wanted. 2. I made two tools, one from each bit of blade. (I sharpened the first attempt on the wrong side, so it turned out left handed - and yes, that was embarrassing.) 3. Using a hand file, dress what will be the cutting edge so it is straight, clean and even. 4. Carefully grind a shallow bevel (20 degrees or so, it’s not that critical) on the business end with the finer side of a bench grinder, go slow with this and do not allow the blade to get hot enough to discolour. (it softens the metal). To avoid heat problems I took it down very close to a sharp edge but not quite there, the thinner the metal the more likely it is to heat up too much. Also dip it in a pot of water every few seconds to cool it. 5. Grind off the teeth, or at least most of them - they might still be sharp!! 6. If you don’t have a bench grinder you can use the little grinding stones that come with Dremel tools - it’s a bit slower but does actually produce a less rough finish I think. I never found any other use for them so I had loads. 7. Saw blade metal is hard so you need a bit of patience, if the metal isn’t hard it’s a clue that it probably isn’t up to the job. 8. Work the newly formed bevel and the back of the blade on a 400grit whetstone for some few minutes until you have the start of a sharp edge and most of the scratches from the bench grinder are disappearing. (In all of the following processes, work the back and the front of the blade equally). The back stays completely flat and the front will have a nice shallow bevel. 9. Then spend some minutes working on a 1000grit whetstone, ‘still looking to see scratches fading and the metal starting to shine up a bit. 10. Then 5 minutes on 3000grit whetstone, this isn’t taking much metal off anymore but it is clearing up scratches from the previous stones and improving the finish. 11. Then on to my course grinding-paste strop, this polishes good steel at an astonishing rate. By the time I’ve worked it on that for a few minutes I can see my face in the bevel and on the back edge of the blade, it is important to get both sides of the blade just as nice as each other - they are both equally involved in the cutting process while you are skiving your leather.. 12. Finally onto my fine ‘Tcut’ strop for a while. 13. Test it out, ‘probably won’t be great first time, but working it regularly on the grinding paste strop will fairly rapidly give you one pretty damn fine sharp edge. 14. Thinking about it a bit more, I think you just get better with the tool after a bit of practice more than the edge improving so much, either way is good though. The grinding paste is an automotive product which is available widely, ‘can’t remember off hand if I got this one from Amazon or Ebay - either way it’s literally just a couple of $/£. Tcut is another automotive product widely used to ‘refresh’ car paint by finely abrading the top layer of faded paint off, personally I prefer it to jewellers rouge, I reckon it’s better and cheaper and as it comes in liquid or cream form it’s easier to use and more versatile, it’s also GREAT for refreshing edges on things like edge bevellers and other tools with a recessed sharp edge. (soak a piece of string or leather thong in it then draw it along the recessed cutting edge a few times - in the right direction of course) The other skiver shown is an old woodworkers plane blade, again decent quality steel that holds an edge, this one was much easier to make as apart from giving it a good edge - the only thing I did was stick it in a vice, heat the middles section a bit with a torch, then tap it with a hammer to give a bend so I can hold it. I made it a while ago and it now has a completely evil edge that just gets a regular light kiss on the Tcut and an occasional go on the grinding paste. I also rounded the corners of the cutting edge just a tad as an experiment, I actually find it easier to control as the blade isn’t trying to dig into my granite or the piece of glass I usually skive on. I liked the result so most of my skivers are now the same. So there you go, with basic kit most of us will have already or have some access to it is possible to make extremely usable tools. Generally I buy my tools, as I’d rather be making stuff to sell than crappy second rate tools, however in this case I have managed to produce 3 top quality blades which I now use all the time. The exact grit grade of the stones doesn’t matter, as long as they’re progressively finer, clean your job between each stone as you don’t want to transfer course grit onto a finer stone. Even if you don’t fancy making your own skiver I hope there’s something here which will either help you improve what you do, or give you an idea that you can develop to improve what you do. Have fun and keep your fingers behind the edge! ‘Thrasher,


-
I came to leatherwork from another craft where I was using edge tools, my advice is learn to sharpen your tools properly, ie. learn to make them extremely sharp as a matter of routine, it takes a bit of learning but there's no mystery to it and it will make learning a load of other stuff a lot easier and more pleasurable. It gets to be second nature after a while. automotive valve grinding paste makes a great course strop and Tcut makes a fine strop which is second to none,, Have fun and keep you fingers behind the sharp edge!

-
I do much the same, I use marine varnish and soak the MDF in it rather than paint it on, it takes at least a week to dry but I've had a few molds I made like that for years and used them a lot, they're still going strong.
-
I'm guessing there are many ways round this one,,,, My experience is you will certainly lose definition and quality if you do decorative tooling before you mold the bag, I often do a bit of tooling while the moulded piece is still on the former after moulding, my molds are made of MDF soaked in marine varnish so they are pretty hard and will take a bit of tooling. where the leather is stretched into shape - as in on the curved edges - you'll find it doesn't tool so well, Usually though I do decorative tooling on pieces which I stitch onto bag afterwards.
-
I glue the leather onto a piece of scrap wood to make a strop, thinner leather doesn't 'give' so much as thicker leather when pulling a blade along it, my strops usually last a few months then go in the bin and make a new one. Just in case you're interested,,,, I use two strops, one coated in fine grade automotive valve grinding paste and the other coated in 'TCut' which is an automotive paint restoring or polishing compound - my favourite for all-day-everyday use is the valve grinding paste but when I'm looking for a truly nasty edge for skiving thin soft stuff I give the blade a go on the TCut as well. Both of these products are a lot cheaper (and in my opinion better) than proprietary compounds.