


Leatherimages
-
Content Count
417 -
Joined
-
Last visited
Posts posted by Leatherimages
-
-
I have been looking also, to no avail!
When my children were little there was a brand called TV Booties. I even made a couple of pair for them.
But I didn't save any patterns, and I can't find them in the hope chest, (tho I ought to look again).
I'm working myself up to taking a hand at doing up a run of toddler size patterns.
I just need some measurements for the basic sizes.
But I don't know where to look.
I think this is a neglected area of the footwear trade.
TLF has their baby moc kits, but I can't help more than that.
-
BIGGUN you're right,
I've been reading all of the tutorials and I know you're right. It's just that some of the folks on here are so damn good at it I was a bit intimidated to trying it my self.
I will be doing that though, what have I got to loose? Worse case is I learn something new.
That's the right attitude.
Your first one is going to have many lessons in it, including that it's your first one.
Pattern making of any leather item should be early in the learning process, I believe.
Good luck, and be sure to share.
-
Nick, my apologies for not replying sooner. It's hard for me to bring my full attention to the keyboard, especially when my wife is home. But bless her heart, I'm a boot maker by her grace,
I like your progress. It's good to have those two differnt degrees of curve in your awls.
In time, their specific differences will become manifest, and you'll appreciate them anew,
if you know what I mean, jelly bean.
I think I more or less got a handle on the holdfast, not perfect but that will come with practice.
The only point I'll make here is that you want to be careful to maintain an even 1.5 to 2 mm thichness on the feather edge. Too much thinner than that, in the wrong spot around the perimeter of the insole, can create a knife edge, if sweat should dry and stiffen the insole.
And that's also why the "old dead guys", who wrote the "How to's" in the 19th Cenury, recommended brushing on repeated applications of Tallow, or rendered fat. Get the point?
Now I am moving on towards getting ideas and whatnot for making patterns. I am at the point where I am mostly wondering how to go about taking measurements, and deciding on sizes and everything for my patterns. The boot I have in mind is a fairly simple one, basically just four pieces each for the uppers linings and covers. Vamp and counter cover being one continuous piece that is stitched together behind the heel, and stiffened with a counter, and something like another cover sewn up the heel and spine of the boot to seal the rear of the shaft and counter cover seam. The shaft will be divided into two halves and they'll meet in the front on the instep/high instep where they will be laced/belted together. I plan to have a zipper running up the side on the inside, although I'm not totally sure about this because it would compromise water proofing a little bit, although the quick on/off is something I have enjoyed in all the boots I've purchased in the last few years.
Now you're talking about a system. A system of measuring, pattern making and the tricky part, order of assembly. This is the fundamentals. It will be much easier for me to comment, when I know which or whose's system you're talking about.
Did you get the Pattern Makers book from Nobel Press? It's value is tremendous from this point.
The style you are describing is fundamentaly a Balmoral Style. There are specific drawings, and lines that are necessary for this style to be viable. (Frank discusses the Balmoral in the text mentioned above.) I'm extremely interested in this style myself, and want to try my hand at it sometime. But there's more to it than meets the eye. I don't really know where the challenging parts are but DW, who has made several, himself feels there's still more to figure out about how to control the fit and function in the patterning process. Knowing where the controls are is critical to understanding patterns for footwear also.
Using the tape method of pattern making, will give you a chance to draw the pattern lines for the stlye you're considering.
A zipper could have a tongue to help with water resistance at that point.
Considering that these will be fully hand-sewn, since I don't have a machine (and want to develop a reputation as doing fully hand-stitched work) I am thinking a lot about how the patter should be arrange, how much seam allowance to give, and the construction of the lining.
Until we identify more about your pattern parts, I'll only comment on the insole, before we get any further away from it.
On the insoles you've shown 'til now, you have made your holdfast go all the way around the heel. This is a method that does indeed have it's applications, like in European dress shoes. It's a classic.
But not in work or outdoor boots in my opinion. I've seen many fault at the stitches around the heel. They break from exposure to many different elements. This style has a weakness at a critical spot. The heel of the foot flexes away from the heel of the boot with the greatest force at this point, where these stitches are all that's holding it together. My suggestion would be to plan on turning under; the lining, counter, and heel cover, and tackng it with either brass clinching nails, maybe wood pegs, or lastly iron clinching nails.
I've been giving your suggestion of a stitched-in counter suggestion serious though. I think that the pocket counter would be easier, and I am not expecting a whole lot out of these since they are after all only my first pair of boots made in this style, but I am also thinking I ought to be establishing as many good habits as I can from the get-go.
It's likely the choice will be obvious when pattern making begins. But with a "hung lining", ie. one stitched at the top line and extending all the way to the insole, utilizing a "pocket counter", one just should be conscious to select leather for the greatest wear.
Here are a few photos of my second attempt at a holdfast. I am not sure about the spacing, I was just eye-balling it, and the lack of rulers that are demarcated with standard American inches makes it more difficult. Knowing that an inch is roughly 2.5cm though I checked it out with my cm based rulers and it seems to work out to roughly 3 to the inch, although around the toe and heel the spacing becomes kind of uneven. Even so it ought to work out ok.
Your spacing looks pretty good. DW showed me to do this. Take a narrow gauge nail about 1 1/4" long and bend it. And like cribbage, move it along after you make each hole. It will serve as a point of reference as you try to get the feel for "3 to the inch".
Or use a marker along the ouside of the holdfast until eye begins to know it. From the apex of the curve of your toe, angle the path of the awl away from the center and not in towards it. If you do this about an inch and a half back from the middle, you'll have plenty of room for your awl holes there at the toe.
-
Johanna,
Thank you for your help in getting this up on the board. It was getting a little frusrtrating. You're wonderful.
I realize this ought to be over in the section with footwear and such, but my impulse was to put it here for a bit. Moving it later is fine with me.
I'm pleased that a dozen or so folks have viewed it overnight, this is an area of leather work most people are not exposed to. I hope someone will be interested to learn more.
I am interested to teach this coming year, not just boot repair, which is where I think it ought to begin, but boot making too. It will be several months before I'm in the position to follow through with that plan though.
Casey,
Thank you for your comments. I hope others will let me know what value they see it such presentaions. I think I'd like to do more.
Paul
-
Wow, Good on you. You're very ingenious. I'm sure it's a matter of neccessity, but you seem to have what it takes.
You've done a fantastic job for your first go at the insole, for not having anyone standing over your shoulder. Very good! I'll share a few things on what you've shown.
You'll want to work out as much of the roughness as possible on your curved awl. Useing finer and finer grits of wet/dry sand paper and polishing the blade with jewlers rouge will work out the scratches and burrs, and it will slide through the holdfast much easier.
The beeswax is good, and will burnish your hole in preparation for stitching later.
The edge of the insole is called the feather, and the distance from the feather to the holdfast should be equal to the combined thickness of your vamp and linings. Your hold fast ought to be about 6mm wide. Space your holes about 3 to the inch. This will sometimes mean that at the inside of the curve of the toe, they may need to be closer together than that, and you might need to come through the holdfast at an angle, spacing your entry hole so you don't break through when inseaming. Also you'll want to keep in mind that the welt will be too loose if your spacing is greater than 3 to the inch at the feather edge.
You're doing great. I'm glad you spent sometime on the Colloquy. I'm a boot maker and not as versed in all the shoe making points as Masters such as Marcel can share. If you ever have a chance to take one of his workshops, you will be miles ahead of me.
The countryside there in China is indeed very beautiful. Earth is a great place, isn't it?
Keep up the good work.
-
I'm going to go ahead and post the pictures on here, so I don't have to send them out indivdually.
The Clicker is mounted on the table which is also for sale,
and the dies a hanging on the back wall. This is all there is.
These are mostly dies of flame configurations. All sizes.
Hello Friends,
I still have this clicker to sell.
You might even call me a little less firm.
But it would be for pick up in Prescott only, as I'm still recovering from this hip deal.
Interested? please call Paul at 928 442-1213 or 928 308-5865.
-
Great job! I'd say you had tremendous help.
Will you show us when you get the skate part attached?
Just a tip, if you don't care to do a skant skive on the edges of your trim pieces,
you could just run a flame past the edges with a Bic lighter to remove the fuzz.
I hope you'll show us more in the future.
-
Do you have any other photos of inseaming you could share?
I don't really. That will be something I'll be adding to my library of pictures in the pairs ahead. But there are great tutorials on the Crispin Colloquy.
I think I have a good idea what you're talking about the whole lasting process, and in fact this morning I put together a fitters model to test part of my pattern (I haven't got the whole pattern worked out yet, because I don't quite understand the whole process of measuring and whatnot yet, kind of figuring that out as I go right now). I also used the toe box that I made the other day with this fitters model just to see how it feels. I think my last may actually be a bit too long, but will see when the fitter is done.
You really need to get your patterns worked out to know anything about your fit. The subject of fit is so complex, I don't know how it would go, trying to do it by these kinds of posts.
DW says, "Learning to make boots is a matter of muscel memory, learning to fit is a life long study".
You really need to get involved with the Cordwainers thru the Crispin Colloquy and tap that world wide resourse. I could direct you some to help you learn your way around the site.
I am assuming that when you say "pocket construction" regarding the boots I intend to make that you are meaning the vamp and counter are in fact one piece stitched together along the back of the heel. This is what I'm currently intending, since it seems to be the easiest design to work with at the moment. Also i have a pair of Belleville Gore-Tex combat boots that have this construction, and I like their look and feel a lot.
I have taken step-by-step photos of what I am currently trying out on my last, which I will post up probably tonight or tomorrow. Based on these pictures you may be able to have an idea of the direction I am intending to take with these boots.
One question I have right off of my head is that when mentioning a 'stitched in' lining do you mean that each piece of the outter (shaft, vamp, counter pieces) each have their own piece of lining stitched directly to them, and the "pocket" lining refers to larger sheets of lining that would cover all the seams from the inside? If this is in fact your meaning I am currently planning to do a "stitched" lining.
No, I'm referring to a pocket counter, as opposed to a stitched-in counter.
In a pocket counter construction, the counter, or heel stiffener, is between two layers, like in a pocket.
It may be between the quarters and a counter cover, with the quarters extending all the way down to the heel seat, serving as a "liner",
then the counter in the "pocket", and then a cover stitched to the outside, looking much as your Russell illustration shows.
Or there may be a lining for the quaters, with the counter between these layers.
In a stitched-in counter, the pattern for the quarters would be drafted with a void drawn in where the counter would be stitched in. Then the counter cover would be applied over that.
The advantage of the stitched-in counter, where it may be possible to do this on any given style, is that the counter leather, which is usually something like 10-12 ounce veg, will be much longer lasting than any lining leather. I've seen many a hole in liners in the heel area from wear, but practically never in a stitch-in counter, such as cowboy boots have.
Of course I'm interested to see your work, it will be very helpful for commenting.
As for linings, different constructions and different sewing machines will sometimes dictate how you'll go about doing your linings. But one thing to remember as a handmaker, you always want to think out ahead 15-30 years, for in the event that the boot comes back for repair. How possible it might be, may depend on how you chose to construct it.
Paul
-
I've reattached the pictures as you have done, and they should show at the bottom of this post.
These are all pull ons, and I acknowledge you are making a lace up. Sorry, I just don't have any pictures of lace ups in process.
I like challenges too, believe me, but encourageing smaller steps will take you further. I respect your efforts
It sounds like you have it right about lasting draft sequence,
You also have it right about the fitters model, and it will serve as a pattern test also.
In the Paratrooper boot you are showing, the quarters would have the tongue and counter attached,
(for a fitter you wo uld not need to do a counter cover, unless you were insisting on a "pocket" counter.)
Then the vamp and lining would be installed, then lasted and allowed to dry. The tacks at the toe would be released and the vamp pulled back to install the toe boxes. Then the vamp would be pulled over and cemented to the insole. That would be your pattern/fitters modelwith extra credit for the toe box practice.
I understand what you're saying about your environmental conditions leading your choices about inseam construction. Wow. So yeah, a hand stitched inseam with holdfast would indeed be best for you at this time.
We can do that in it's turn. But I've attached a picture just to feed your imaginings. This is for a box toe, one that is squared across the front by a turn up on the insole. it's not really what you're likely to do, but it's the picture I have of the sculpted insole at this stage.
Paul


-
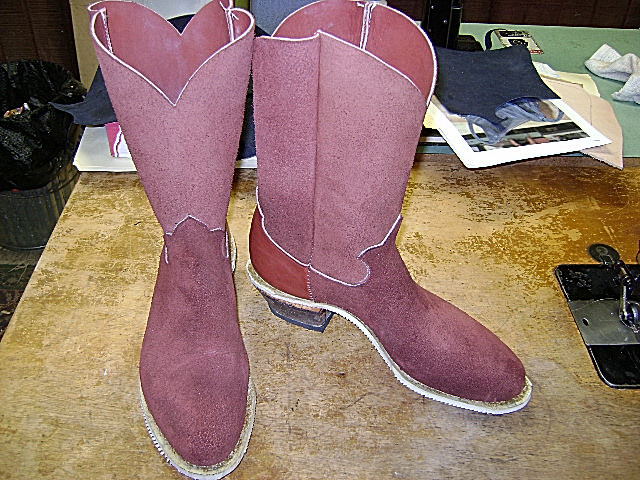
WOW!
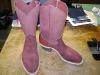
 that is a thing of true beauty... you definitely should have won 'something' for that effort, both pairs are truly great. congrats, you might not be able to put it in a frame on the wall, but atleast you've won the popularity, praise, and respect of your peers here... take care... i'm still trying to decide which i like better... the black is more my taste, but the red is stunning...
eric
Thank you very much Eric.
I was pleased just to show up "out of the box" with the Red ones.
-
Hi everyone!
I am looking for a good source for a mechanical hook and eye closure called Galoshes hooks. I am not sure if that is what they are regularly referred to as or if that's just what people call them. I do seem to remember them being on my old galoshes though (when I was like 8)
Anyway, If any of you have even a push in the right direction for me I would greatly appreciate it!!!
Thanks!
You might try Ohio Travel Bag http://www.ohiotravelbag.com/
But I don't know it I've ever seen them offered by anyone I've done buisness with in 40yrs.
But then I've always been in the West.
Good Luck,
-
Nick,
It's Nick, isn't it?
My suggestion is to get done gettin' ready, and get started.
I assume you're still on the Russell Hunting boot style, is that correct? My opinion is that it really is an overly ambitious style with which to start.
Did you get your pattern makers book yet?.
When you do, here's a good first step; after you've made your pattern, make up a fitters model. You'll get lasting practice in 'real time' as it were. Up to now, what you're getting has been good for up to now.
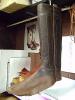
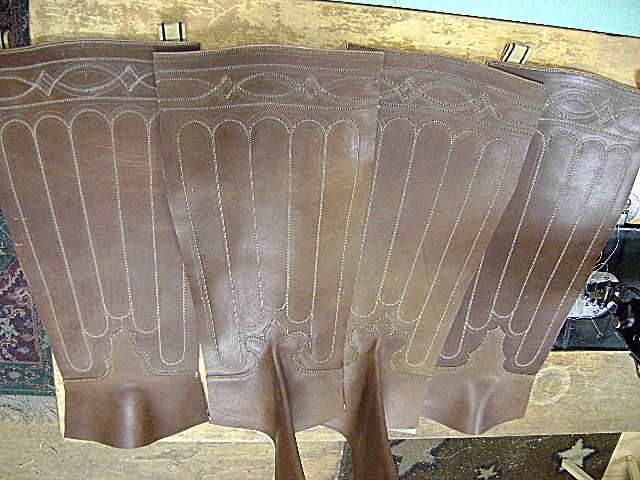
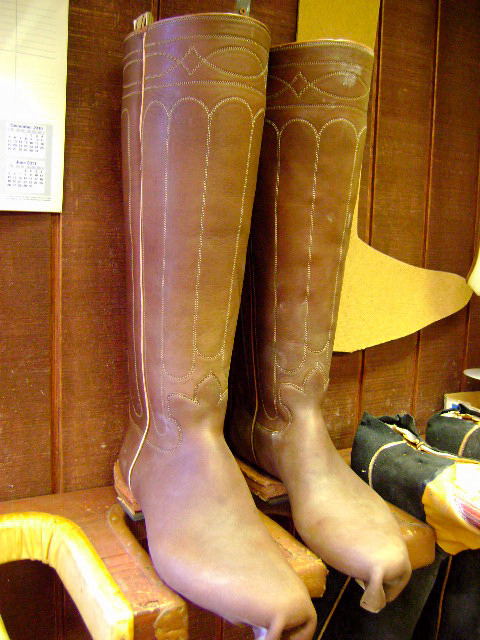
I've attached a picture of a fitters model of the western boots I make. (It's the assembled rough outs)

They are made up of remnant leather, assembled so as to give me the negative space for the last to fill. I usually make them to test the fit before I begin making the boots, but also sometimes as a pattern test.
If you wanted to practice toe boxes, you could properly install remant leather liners (I guess that would be good practice too), and pull it over your last.
Do you need to know the sequence of your "drafts"?
That may need to be another lesson.
I'd strongly recommend DW Frommer's book ofnthe Western Packers for instruction in assembly fundaments. He works with the Geometric Method of pattern making, as opposed to choices elsewhere.
http://www.bootmaker.com/dwswb.htm
For the fitters for your Hunting Boot design, you'd have your quarters and vamp stitched together, and then pull that over your last with insole attached..
(You could wait to make your smaller pattern pieces later, unless you want to practice that now too, of course.
Moving forward in small steps is not a bad idea by any means. Just don't get discouraged. This is a very long process that only gets some quicker. Remember there's more to it than meets the eye.)
You need to make your tries with the work that has proceeded the step you're practicing, if you know what I mean.
FYI, I often use skirting leather scraps for the counters in my fitters. I don't know if the style you'll be making will want 'stitched in' counters, or "pocket" counters, probably the latter. DW's method, which I use, has 'stitched in'.
I guess we can talk about that as we get there.
I've looked thru most all the pictures on my computer, and I don't see any for lasting as instructional images.
The best I can do is the next three attached.
They are;
1. tops and vamps are ready to be side seamed,

2.treed prior to being lasted, and

3.lasted.
 ...
...everything but the actual lasting..
I would be pleased to help with building a holdfast on your insole for inseaming when you're ready, (and I have many pictures of that)
but my suggestion is to let your fitter be cement constructed..
Veldtshoen (sp?) or Norwegian Welt, is a whole 'nuther kettle of fish. And one for an advanced class.
Do you know of Sharon Raymongs book Simple Shoes? Check this out also:
http://www.amazon.co...s/dp/1579903789
Have you spent any time on this web site yet? No boot/shoe making study should be without it.
You'll find all this and more discussed in spades, but patience, it takes awhile to find it.
I'll stop here and give you a chance to reply...
-
These really are beautifully crafted boots.A lot could be learned from you, thanks for sharing.
Thank you friend.
I'd really like to be able to just type a couple of paragraphs and answer all your questions. I really wish it were that easy.
I've got lots of photos, and a key board, but it's just the thing about sitting still long enough to compose a "how I".
I'd like to see that you were doing things according to the tutorial posted on this site, which I understand you've downloaded. It would give a premise for instruction, if you know what I mean.
It's hard for me to get on board with you because of your choice of how to begin.
I'll keep checking back and see what happens. Patience is a very very important skill in boot/shoe making/learning.
-
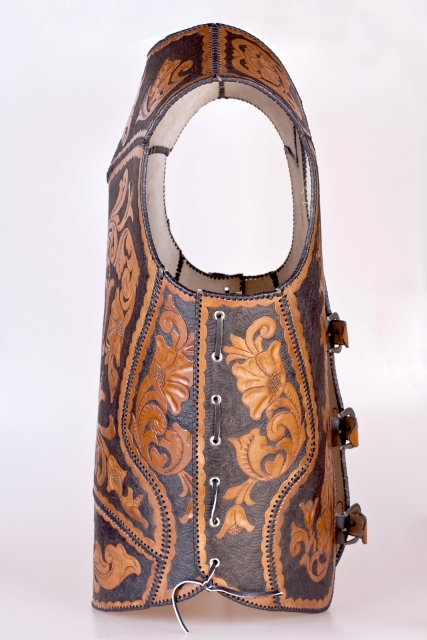
This is my third motorcycle vest)
Don't beat me hard)
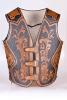

This looks remarkable! As to not beating you too hard, it looks like it wouldn't hurt anyway, if you were wearing this vest, that's for sure.
I wonder if it rides up when the wearer is seated? Actually it doesn't look like you were going for comfort.
I discovered a great leather treatment several years ago for veg tan leather that is toolable yet soft, and much more flexible than what we are accustomed to tooling.
It is a Milled Veg Tan from Wickett and Craig. This same vest would be completely different if it were made of 3-4 ounce Milled Tooling Leather.
The first side I ordereded was almost "drapy" the way it arrived. I've used it very successfully as boot top leather, and many other projects where I did not want the boardiness of regular tooling leather.
Ask for Glenn, but be patient. They don't run it thru the tumblers until they have a vat-fut.
-
I recently made some test attempts at lasting using some junk leather left over from past projects, and was fairly successful in getting them to shape properly, and whatnot.
I had problems with the firmness of the leather though.
The leather in question is roughly 6-7oz or so, full grain, and I am having trouble getting it to harden properly.
I had read articles on hardening leather before, and have successfully hardened leather in the past using near-boiling water.
I wet lasted the leather, stretching it over the last after dampening it with cool water, and then once the leather was in place I poured boiling water over it evenly and slowly to try to get it to harden. The shape held fine, but when pressure was applied to it after taking it off the last it immediately collapsed, and needed me to push it back out into shape.
How can I successfully harden the leather to make a hard toed boot?
I also tried tooling it with a hammer while on the last to compress the fibers and try to make it harder that way, but with little luck.
Any help would be appreciated.
There really are alot of unknowns in what you've got going on here. I don't know where you're starting from, or whose method you're working with. But I'll offer what I can.
First it sounds like you may be using veg tan, if you're 'trying to tool it with a hammer on the last'. Actually, veg will make for a very stiff foot once you've got it lasted.
It would not be a very comfortable boot, and not really for first timers or unguided. Chrome would be better. Your 6-7 ounce is very heavy, and you don't say anything about lining leather.
I don't know it this will address your issues, but try this next time.
Use 3-4 ounce vamp chrome tanned vamp leather, and 3-4 ounce vamp lining leather. Before lasting, soaking it in warm water for an hour or so. This is mostly to soften the veg tanned counter, which you don't say anything about.
So after lasting, and allowing the boot to dry on the last for several days (depending on the humidity in your area), take the vamp loose at the toe only, leaving the lining still in place. Now install your toe box. The toe box is what makes a hard toe, and is it's own lesson with several choices. Briefly, use 6.5 ounce veg, skived at the edge. Once it's cased, installed and allowed to sit for anouther day or two, shape and harden with celluloid cement. Once that's hardened under several coats, pull the toe of your vamp back over it all. Now you'd be ready to inseam, and pull the last.
This probably raises more questions than answers, but there you go.
As my first teacher used to always say, 'there's more to it than meets the eye'.
-
Eric,
You haven't attached a picture of them.
-
I love mine. And I paid $400!
For wallet edges I'd reccommend a thread size 46 or 69 with needle size 12 or 14 respectively.
Use a round point needle to avoid cutting the thred when you cross over on any given stitch pattern.
It's best to sew with your right hand constanly on the flywheel. A loose leather belt will slip and give you a little slower stitch.
And remember, "Practice doesn't make perfect, it makes permantent. Only perfect practice makes perfect.".
Good luck.
-
Here's wishing you strength and stamina.
Make things for people you love.
Besides being good practice for later when you're recovered,
it'll be good for your heart and your soul.
God Bless,
Paul
-
I'd recommend the Jones and Vining Co. They are will to do single orders, tho they suggest three pair for best shipping rates.
They have a catalog of their models for a nominal charge.
Global Footwear Solutions is not in buisness at this time.
-
Cool.
The plug looks machine stitched. Is it?
How'd you line them?
Love the bead work.
-
Stewart,
There is a whole field of leather work that is modled only. I kinda like it actually. Even more depth can be accomplished by raising the leather from the back. They call it reposse', I think.
Ten years ago, about fifty of us did a Leather Art Cruise up the Inside Passage of Alaska. There was this huge landscape scene that was done without a swivel knife, modling tools only. It looked like about 6-7 ounce side of leather. Really quite amazing.
If you like, do it. There's very little right and wrong, and even that don't matter.
Go for it dude!
-
Wow Friend,
You've chosen a very ambitious style to start with. I won't be discouraging, but there's more to this than meets the eye.
Frank Jones of Noble Footwear has a pattern cutting book that I'd use if I were to attempt this design.
http://www.noblefootwear.com/Books%20For%20Sale/book1.htm
Good Luck.
-
Mark,
Thank you for the reply. I don't know that I've ever seen them done with a lace up the front.
I'm not a rider, horse or motorcycle (any longer) but I've seen more than a few pair of chaps and made many different styles also.
But none that lace up the front.
Do you maybe have a picture, or sketch, so I can see how the crotch begins the close.?
Thanks again,
Paul
-
I've had a customer ask about a pair of step in chaps with a lace up front..
I don't quiet see how practical that would be. It would be "bulgy" when seated.
Does anyone have any input?


Advice On Lasting Boots
in Shoes, Boots, Sandals and Moccassins
Posted · Report reply
Nick,
Whew! I'm afraid I'm starting to feel overwhelmed by the length of our posts. We've got to do shorter ones, I'm startin' to get lost.
Pattern Cutting-Step by Step Patterns for Footwear, edited by Frank Jones, (I mentioned in your other thread about Sheep Hunters boots)
Also I highly recommend Tim Skrym's book Bespoke Shoemaking, both are available here:
http://www.shoemakingbook.com/
(We're all together in this , you know)
You've demonsrated a skill at thinking things through, I'm really very impressed. But if you want to be successful in this effort, I believe you must follow the path of those who have gone before.
I'll be of little help if you want to create a whole new way.
(I don't know how much more help I can be, as it it is. But I am willing to help if you're will to get these text books.)
I would not have a thing to say about your own ideas about stitching the inseam like you're thinking. I can only imagine problems.
Many many shoes and boots, have been being made by hand by many many different people for many many years.
What works is what works. Learn the fundamental ways to do it, and then, after totally understanding how, then you can begin to "play in the field of possibilities".
We'll keep it going. This is being good for me too.