


Leatherimages
-
Content Count
417 -
Joined
-
Last visited
Everything posted by Leatherimages
-
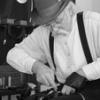
Hand Made Boots Inspired By Merrell
Leatherimages replied to BorisVanJr's topic in Shoes, Boots, Sandals and Moccassins
Surly you would needed a post machine to do the heel area, or even around the eyelet section, as that would never lay flat for stitching on a table machine such as you've shown? I would also think a roller would be the only way to get such a nice stitch, instead of using that walking foot. Are you sure you don't have on of those? -
Hand Made Boots Inspired By Merrell
Leatherimages replied to BorisVanJr's topic in Shoes, Boots, Sandals and Moccassins
Well for the first pair ever made, you sure do show mastery of some very difficult techniques! And you must have access to some pretty specific machinery too. Very admirable. Paul -
Hand Made Boots Inspired By Merrell
Leatherimages replied to BorisVanJr's topic in Shoes, Boots, Sandals and Moccassins
I'm curious about why there is a LOWA label on the tongue? -
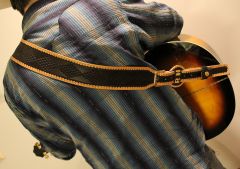 I like the sliding keeper with initials.
 -
Bespoke Shoemakers: The Best Sewing Machine To Use?
Leatherimages replied to khopper117's topic in How Do I Do That?
Art's suggestions are good to start. It's a process. Also, you might want to loose the "cobbler" reference. It's a derisive term to makers. Use cordwainer. HCC.org for research. Some tools to start - http://www.unitedglobalsupply.com/shoemaking/shoe-machine-supplies.html -
How To Measure Someone For A Custom Name Belt
Leatherimages replied to chancey77's topic in How Do I Do That?
Experience has told me, one needs to add an additional 1/2" (3cm) or so, for the thickness of the belt. That is if the measure has been obtained from a thin tape such as the one shown. It's also worth considering the type of buckle and how it will be worn for the front center: If a heel bar buckle. the bar will line up on the "gig line", the overlap of pants. If a center bar buckle, the center will be on the fold of the belt around the bar. If a trophy style buckle, the center for measure would be between the bar and prong. There's more to this than meets the eye, but if you have it all in front of you, it can be figured out with observation. Paul -
Concho Triads
Leatherimages replied to Leatherimages's topic in Shoes, Boots, Sandals and Moccassins
Thank you for your comments. -
Free Patterns - Bags Purses And Hats
Leatherimages replied to DebHop's topic in Patterns and Templates
One presumes the sizing is left up to the maker. And therefore, the proportions of all the pieces. Is that how you see it? -
This pair of boots was a design choice for a lady who is on the short and stout side. I suggested that the triad design, with it's side panels extending all the way to the sole/heel edge, would lengthen her legs, and the neutral color would direct attention to the Ostrich. The side conchos and mountain images are tooled and colored on milled veg tan. Thanks for looking.
-
Key Fob with cabochon stone mount
Leatherimages commented on JustKate's gallery image in Our Leatherwork Galleries
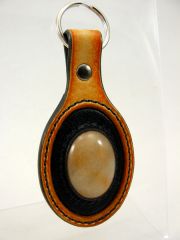 A great example in soo many ways. This should be an on line class.
 -
Key Fob with cabochon stone mount
Leatherimages commented on JustKate's gallery image in Our Leatherwork Galleries
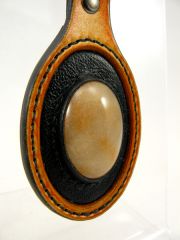 Kate, What a fantastic album you've out up.
 -
Thank you all for the comments.
-
I was asked to show these, which was my entry to the Art of the Cowboy Makers show this past June. Please excuse the repeat if it is.
-
Midsole Leather Weight Inquiry
Leatherimages replied to PaxAddict's topic in Shoes, Boots, Sandals and Moccassins
Michael, Bespoke is not a style, it is an adjetive for the item for which you made the patterns for a particular person. It's as if to say, "that pair is spoken for". Channeling an insole is how some would make a holdfast. There's a few choics of technique for inseaming, which it sounds like you're doing in this part of the conversation. Show us a drawing so we can help. There's really "nothing new under the sun". Paul -
Midsole Leather Weight Inquiry
Leatherimages replied to PaxAddict's topic in Shoes, Boots, Sandals and Moccassins
Michael, 11 ounce is good, and the buffalo may serve if you can channel it cleanly, but I think it'd be too fiberous. The kind of grain surface is relavant also. You might want to scratch any top finsih off so it will give a little friction and won't crack. But to me it sounds as if a heavy skirting would serve. As an insole, you could channel and stitch it, and it would give you the softness you indicated you were after. What can pass for insoles in some applications would be hard and disappointing for a first pair. Unless you maybe show a picture or drawing of what you are after though, You'll be on your own in a field of the lost. I always tell people that boot/shoe making isn't brain surgery, but a Brain Surgeon could do it. With Regards, Paul -
Midsole Leather Weight Inquiry
Leatherimages replied to PaxAddict's topic in Shoes, Boots, Sandals and Moccassins
For me, I don't have just one weight. It depends on what I'm making. Art's range works for me, but more to the point is who I'm making for and what I'm making. What are you making? -
Making Orange Watch Strap
Leatherimages replied to hunio's topic in Purses, Wallets, Belts and Miscellaneous Pocket Items
More clean work. My apologies for my comment. It probably doesn't translate in Korean. I was just attempting a little humor. You do very nice work. -
Help With Sewing Purse On Cobra 4
Leatherimages replied to anester05's topic in Leather Sewing Machines
I don't know why a stirrup plate wouldn't work. It's all a matter of how you hold your mouth anyway. -
Making Orange Watch Strap
Leatherimages replied to hunio's topic in Purses, Wallets, Belts and Miscellaneous Pocket Items
Very clean work. Did you know there is no word that rhymes with Orange? -
I think you are doing great just to be aware of the difference! I might add a little more and not worry about being short, but I like your thinking and your process. No real bigee, it's not like it's metal, after all. My own process is that liners are 4 times shorter than the thickness of the leather in question, when it it is enclosed like your holster here. My teacher calls it he orange peel effect. The math is my own. The circumfrance of an unpeeled orange will be approximately 4 X's the thickness of the peel greater than the orange itself. With this premise a bi-fold wallet liner will be 2 X's the thickness shorter that the wallet back. Corrections and disagreements welcome. Paul
-
It's funny to think about it, but my Black and Tan boots have been picked up from the Pro Rodeo Hall of Fame and are on their way back home to me. I've missed them!
-

Why don't you post the pictures again. I for one cannot see them to many times and will always remember the inspiration. Still think they should have had hops leaves! LOL
-
-
First, it looks like you've done the sample shown with a binding attachment, it's so tight. That part looks great! If you are using an attachment, you should know there are ones with a trimmer also. I've love one of those myself. So while I don't have a binder or do much of it, even the French method, it is much the same as I do when trimming the boot top liner after stitching the top and liner together. I leave a 3/8" margin beyond my piping and trim it afterward. For trimming, I mostly use a #2 common edger, which I've modified to be easier underneath on the item surface. Common edgers are the ones that have like two long toes with the trimming blade being in the crotch. What I did was shorten and blunt the "right toe", That toe slides along under the liner as I cut it away. I keep an upward pull on the material so I don't hang up as I cut along the edge. I think you'd want a healthy 1/8" (maybe like 4mm) margin to trim away, to have a fingerhold on the cutoff. When I come to a corner I have to keep my attention on where the blade is and not out at the end of the toes making the turn. Find the sweet spot and keep your attention there while you cut close alongside of the stitch line. This weekend I trimmed the liners on several pair of boots, and gave my #2 French Edger a try, as Bro. Muckart suggests. It went of ok, but I'd want to practice more before I took ownership of the tool for that. In either case, a sharp tool is key. Common edgers can be sharpened on the edge of your strop board to good effect. I have 1200 wet/dry sandpaper on one side, and rouge soaked horse butt on the other. After working along the corner edge on both left and right edges of the sandpaper side, I turn the strop over and repeat on the rouge side. Then, (and this is important) I run a lace with rouge on it over the top of the blade edge (just once) to remove any burr that developes. I do the same on my small french edgers. A burr will mess you up everytime. I hope this helps. A keen eye and steady hand will be signs of mastery. Go for it, Paul
-
Pouch for smartphone front view
Leatherimages commented on Tverd's gallery image in Our Leatherwork Galleries
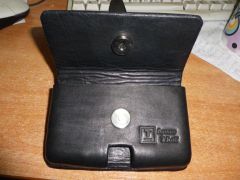 Now here some nice looking minimalism!
 -
Traveler's Small Bag
Leatherimages replied to hunio's topic in Purses, Wallets, Belts and Miscellaneous Pocket Items
I like the minimalism. It's clean. Nice looking welt on the bottom.