Leatherimages
-
Posts
417 -
Joined
-
Last visited
Content Type
Profiles
Forums
Events
Blogs
Gallery
Store
Everything posted by Leatherimages
-
Second Wallet
Leatherimages replied to Chavez's topic in Purses, Wallets, Belts and Miscellaneous Pocket Items
Really nice job Amigo. -
How Would One Do This? (Money Clip/wallet)
Leatherimages replied to dpixel8's topic in How Do I Do That?
You could ask the folks at Gorilla Leather. They might give you their blessing to copy it. Don't know if you don't ask. -
Lasts Works
Leatherimages replied to joao grilo's topic in Gun Holsters, Rifle Slings and Knife Sheathes
Pretty nice looking work, friend. I like your incised edge line on the ax cover. And your stitching looks great on everything. I do think a "softer" looking edge would aid the overall appearance. Keep up the good work. Bueno, Paul -
I like to think of myself as the last guy to say a thing can't be done. But it comes down to how it's going to look. Making a boot that doesn't sag is taken care of way at the beginning to the design and construction process, so anything done now is going to be half a**. The shoe repair trade has "heel liners" for boots that might stiffen it some, but unless you do something to the front, it's still going to sag. And in either case, it's going to be problomatic, because it needs to be stitched blind, even if done on a long arm patcher. And if your stitch line so much as 1/4" away from the edge, the liner can turn at the edge from going in and out of it. That can be irritateing. If you wanted to stitch a firmer leather to the ouside, verticaly in the middle of the boots where the sagging is, it might help. But again, it's gonna look bad no matter what. My suggestion is to have a pair handmade with this as a paricular request. Or just put me down as someone who says it can't be done...
-
Beveling Edges On Chromexcel/softer Leathers?
Leatherimages replied to jk215's topic in How Do I Do That?
I use Ron's Tools french edgers on chrome tanned boot leathers for a "skant" skive. A size #2 really works well for one layer being stiched atop another. -
More Bob beard mystique? Add it to the list of stories all over the world.
-
Repairng Crack In Boots
Leatherimages replied to tabitha az's topic in Shoes, Boots, Sandals and Moccassins
Any hobby shop should have what you need. You want a flexible acrylic. Robb Barr liked Ceramcoat from Joann's Fabrics. That's what I use. it's a matt finish but will shine up with the follow up. I should mention that I've used 1200 wet/dry sandpaper to feather the edge of the color. Good luck, Paul -
Repairng Crack In Boots
Leatherimages replied to tabitha az's topic in Shoes, Boots, Sandals and Moccassins
Well Tabitha, there might be. From a picture there's no way to tell how far down the road these are. I'd Shampoo and tree these, and let them dry real well for a day or two. Then a light oil, I like Obenauf's Leather Oil for oldies like this. Dries with no residue. Give that another day or so to dry. I have it in my shop up the hill here in Prescott. Then I would begin with several light coats of a flexible black acrylic color. I think that would give you the best chance of it staying on and not cracking off, by doing several light coats. Once it's filled in some, I'd use cream polish, and then begin a long process of wax build up, useing a spit shine technique. Use shoe trees that pull all the wrinkles out to work it. Good Luck, Paul -
Special Order Avengers W/ Bling
Leatherimages replied to George B's topic in Gun Holsters, Rifle Slings and Knife Sheathes
I like these! I've made "bezels" for cabs in my leather with a deep crease line and an angle to my swivel knife. You might try it. I'm not so sure if the face of a holster would be firmly flat enough for that tho. But I'm curious about your belt slot. Is it all gong on at the back? Thanks for the share, Paul -
An overstitch wheel might be a compromise for you at this stage of your skills. As the name implies, it is a wheel shaped tool which is intended to clean up a stitch line after stitching, but which will also make impressions of stitchies by itself. They are available with stitch lengths of 5, 6, and 7 stitches per inch (spi). I also like Chief's suggetion of a crease line, with dyed and well finished edges. Always strive to do nice edges. Have fun, and begin the learning curve for hand stitching too. It's a skill to be proud of. Paul
-
Iphone4 Cover
Leatherimages replied to Boothill Bob's topic in Purses, Wallets, Belts and Miscellaneous Pocket Items
Nice work, especially the edges! -
Thank you Elliot. What was so disappointing about CF?
-
I've lost the info I had for Marcellus Olivas (Is that right?), and need to shop for wallet interiors. I have images of bi-fold wallets from Chaylor Finnelli, but want to compare pockets and slots to the others available. Could someone share contact info for them please. Thank you, Paul
-
J, I think I would be interested. I might want to send you my own choice ofleather. Would you be up for that? I'd like to see what you have, but I understand the proprietory feelings you're having. PM me please, and provide an address, and I'll send some leather to you to click out what you have. I may be having a quantity idea with your offer. Thank you , paul
-
2 New Wallets
Leatherimages replied to Schpacko's topic in Purses, Wallets, Belts and Miscellaneous Pocket Items
These are really clean friend, and good photography too. I'm really diggin' the stiched central card pocket. I also like your cutout liner piece. That eliminates the problem of a too-close stitch, being the beginning a "postage stamp" tear later. Very cool and original pattern! May I use it? Paul -
Belt Leather Questions
Leatherimages replied to Matt Alsaker's topic in Purses, Wallets, Belts and Miscellaneous Pocket Items
Well someone did a nice job on it whatever it is. And 15 years is pretty darned good! But my guess would be waxed veg retan. Horween has a leather called Beaumont, Maveric Leather is carrying it. -
So change your relationship to hand stitching. Make it something you're proud of instead. Otherwise you will not stay with leather work. All you need is some technique. Good luck. Paul
-
 These are all very very nice work!
 -
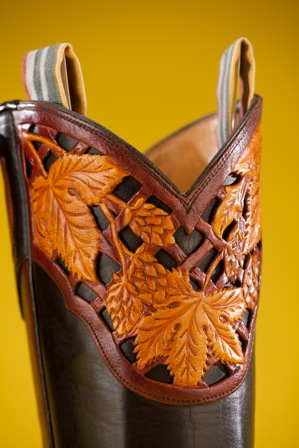
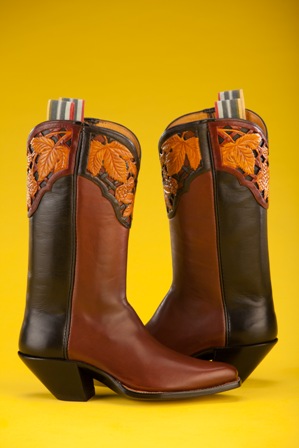
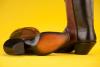
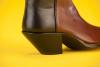
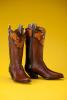
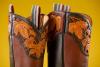
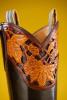
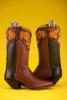
French calf full cuts with milled veg filigreed collars on 2 1/4" heels, Belgian leather soles.
-
There is no is. Be yourself. Grow and be that person then. DBA as you wish. There is no is.
-
A fellow came into my shop the other day with his old Boy Scout bow. The lamination has loosened at the grip, and he's just going to hang it, but he'd like me to wrap it. So I'm interested in what design for wraps are traditional? where to look, and so forth. Any ideas are appreciated
-
Call Garlin Neuman. They're advertisers here.
-
Good job so far. Will you be finishing them yourself? You can get rid of the fuzz before you sew the pieces next time with a flame passed quickly across the back edge. But of course a sharp knife is critical to seeing advancement. Keep up the good work.
-
Look into block dyeing. Just takes practice.