-
Posts
417 -
Joined
-
Last visited
Content Type
Profiles
Forums
Events
Blogs
Gallery
Everything posted by Leatherimages
-

Death Of Jan F. Schoonover
Leatherimages replied to ClayB's topic in Announcements and Administrivia
Clay, I'm sure that was a shock to you and others close to Jan. My sincere condolences to you and others who knew him. Let his example of excellence be a guide. Peace -

Resizing A Pair Of Pinched Roses
Leatherimages replied to Leatherimages's topic in Shoes, Boots, Sandals and Moccassins
Thanks alot for your comments guys. This is the third time I've done such an extensive job, and I am fully aware that I am risking failure each time. What I haven't tried yet is making a boot bigger, more than just stretching. It seems like there ought to be a way, but again, it would be a risk. I have a pair of size 10.5 Peanut Brittle Sea Turtle to try something on someday. My brother picked them up in a trade for me. I wear a 12, so I'll have to give it a go sometime. Thanks again for your encouragement. -
I recently completed a job for a customer who bought a pair of highly collectible Lisa Sorrell boots off of Ebay. She wears an 8 and thought she could get away with the 9 that was offered. It turned out the boots were a mens 9, which made them even bigger than she thought. She had seen a job I'd posted of my process of a similar adjustment and contacted me. The link below has the whole set up and a PDF of how I did what I did. Please check it out and ask questions. http://noazleatherwo...-pinched-roses/
-
My guess, w/o looking at personally, is that the stitches you see on the gusset are ornamental (read false). It could be the front and back are stiched together, but I even doubt that. The gusset is probably just covering over where the f & b are glued together. But w/o seeing it it's just sour grapes.
-
Now here's an ambitious project! I've never done a boxing glove but I've been punched by a few. Boot making requires gathering extra material at the toe. So maybe this will be some help: Start at the middle, you might want to lay an edge of cement to hold the gathers. I'd suggest using a needle nose pliers and press it to the cement. Move to the right of the middle about 1/2", and twist clockwise and press to the cement. Go to the left side of the middle and repeat by moving over about 1/2", and twist counter clockwise. You might want to secure the sides before you begin in the middle. Try to minimize the amount left to be "drafted" in the center of it all. If you need to twist the same as above, clockwise for the right side and counter clockwise for the left side. Good Luck
-
You will recall we all drooled over Bob Park's Ostrich/Tooled,Briefcase on display at the Trappings of the American West Show in Prescott Az in November '11. (I was proud to share a display case with him.) Well, he was just acknowledged by the curators of this show. Congratulations Bob! Bootstrap1.doc
-
For my choice of black cherry, I also choose Feibings Cherry Stain. I use Bee Natural's Saddle Oil on it first, though. After the stain has dried, I use the liquid Antige stain, I've also used the paste. But buffing 'til it shines gives me the finish I like. Then just follow with a top coat, and neutral wax.
-

A Second Life For Shoes
Leatherimages replied to Phil2011's topic in Shoes, Boots, Sandals and Moccassins
Phil, Very nice job! You must have preshaped them somewhat? Great profile to the sides to your sole section. Do these have a countour cushion insole also? My observation is that both the yellowing and cracking are a result of oxidation, and that white just shows it up better. This is an up grade! Keep up the good work!, Paul -
Great discussion guys. Thank you. I understand this for job scheduleing, and it is a problem even after 40 years in; shoe repair (it'll be ready on Tuesday), boot making (I'll be working on it next October), and general leatherwork (It'll be a week or two, I'll call when it's done.) But howabout, are there suggetions for programs for Project Managment that show where you are in the time line of a job? Paul
-

How To Change The Color Of Colored Leather?
Leatherimages replied to Muse's topic in How Do I Do That?
Well if it's an effort, then I'd say it's probably not worth it. There've been times when I opened a bottle and thought it was just acetone anyway! Joann's Fabrics has the Ceramcoat Acrylics that our friend, the late Robb Barr, suggested one time. Comes in many many colors. Again, I'll repeat go thin and build up. The reason is a thicker coat seems more likely to peel. I'm sure not a chemist, and I just suppose this from years of seeing color peel or crack off of leather, but I think the diluted liquid molecules bond better, whether with the "tooth" or the leather fibers. Good Luck with your lesson. Post a picture, Paul -

How To Change The Color Of Colored Leather?
Leatherimages replied to Muse's topic in How Do I Do That?
That is a real pink, isn't it. I can see why you'd be interested to know about changing it. If indeed it is leather, it's probably an acrylic color coat. You can break the surface with Acetone, if you can't find Leather Dye Preparer. Check a local shoe repair shop. Several light coats, with any flexible acrylic color will work now, whether it be a leather spray (one is called Nulife Color Spray at a s/r shop). You can actually paint it on if you wish. I'd follow with a fixitive spray from an art supply store, or a claer acrylic coat. And then keep it waxed with neutral wax polish. Otherwise don't use shoe polish to color your leather items, it will rub off color. Hope that helps. -
Well it just so happens there is a boot maker, holster maker and candle stick maker on this site. Actually I have thought about just such a holster designed into a boot. And all of your concerns are obvious and valid. But it could be done. There are pattern issues regarding the top panels, not just for big calves, but getting into the boot. If the piece was holstered, room would have to be allowed for the foot to go by. But it could be done. I'm in Arizona, so if you feel you want to travel... Paul
-

Casing Only Part Of The Leather, Or Entire Piece
Leatherimages replied to cbeatti2's topic in Leatherwork Conversation
Clark, It is possible to spray just the section you are going to tool, and mist it over the rest of the surface. The stain appears where the water stops on the interenal fibers of the leather. If you use a casing solution, you can spray or sponge front and back of your tooling area, wait a moment and then tool. If you prefer a sponge, just wipe a lite coat of your solution over the area next to where you'll be tooling. Try it out to see for yourself. -
Ed, I've found that those hard scales and tiles will cut much easier if they are wetted with warm water.
-

More Bracelets
Leatherimages replied to Scary Leatherworks's topic in Purses, Wallets, Belts and Miscellaneous Pocket Items
Are you missing your chance to practice your edges? -
Where are you in AZ? My shop is in Prescott. Call and come for a visit. Paul 928 442-1213
-

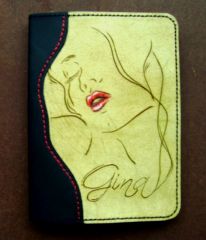
South African ID book cover. :)
Leatherimages commented on Anet du Toit's gallery image in Our Leatherwork Galleries
-
My guess would be 69 maybe 92. Not familiar with polyethylene thread. Try several and see what you like for yourself. Different needle points and thread tension can come into play here, too. Paul
-

How To Mark Stitch Holes On The Deerskin?
Leatherimages replied to Suicide's topic in How Do I Do That?
A silver ink pen is helpful here. Fisher Pens has them in their economy line. Use your over stitch whele and follow up with the silver pen. It can be erased from the leather. Make sure with a test first tho. -
The leather working handbook from,.. ------------------------------------------------------- her name escapes me, but I think it's English ------------------------------------------------------- ...anyway, she describes an intetesting method I've not used yet. Instead of a piped welt as describe above, she cuts a narrow strip. I guess it would want to be at least 2 or 3 times the thickness of your seam. But one edge of this strip is sewn first to one panel, right sides together, then the other edge to the other panel, also right sides together. The second seam might be much harder by machine, than hand, because of the clearances needed for foot or roller. But you end with the look of a softer welted seam. I'm intrigued by this technique, but haven't tried it yet. A little test corner would reveal practicality. Anybody ever used it?
-

Which Glue If Using A Sewing Machine?
Leatherimages replied to Andrew Chee's topic in Leather Sewing Machines
Have you used this tape on a patcher? -
I don't Clay. Hey, I appreciate the "Go to Forum" link on the front page. Thank you!
-
Another option is to cut a veg strip of about 6 oz. X 5/8" wide the length of your seam plus an inch. Sew it with long basteing stitches to the grain side of your first piece along one side, and join the body pieces grain sides together along the edges. Make register marks on the panels and gusetts to aid in alignment. Set your row of stitches about 3/16" to 1/4" from the edge, with stitches no longer than the thickness of your combined layers. After your preferred stitching method, trim to within 1/8" of your stitch, and turn right side out. Using a #2 Common Edger, trim the excess and burnish. Or at least, thay's the way I do it for boot side seams.


