sandmanred
-
Posts
106 -
Joined
-
Last visited
Content Type
Profiles
Forums
Events
Blogs
Gallery
Store
Everything posted by sandmanred
-
One last thing worth mentioning to help feathering the clutch is either reduce the throw on the foot pedal or increase the throw on the clutch lever or a little of both. This will increase the distance the pedal needs to tip to engage the clutch.
-
Grease the cork clutch plate and will help control a bit. I like to put bigger pulley on the handwheel and smaller on the motor. If you have lathe or know some one that does what I do is make an oversized pulley that pilots on the pulley that's on the handwheel. I go for 5-6 inches diameter. That way if the original handwheel helps balance the machine it keeps that intact. I fasten the over pulley by drilling and tapping a few holes into the handwheel.
-
Just because there may be an older one here doesn't mean you shouldn't post your oldest :-)
-
So I got of pair ones that look like this. The pair got had poorly set rivets so maybe weren't top quality. They are okay but I think I'll try some of the more $$ ones.
-
I know I won't have the oldest machine in service but I'd sure like to know who does. Post your oldest so we can all see what's out there? My oldest is a 132K6. The serial number was assigned in December 1947 in a group of 1000. I'm curious how it got to the US. Wondering if it wasn't part of an effort to rebuild the UK economy after WWII?
-
I save the little bobbins that get pulled before a long run and save them for the smaller runs. If I'm on a top stitch run and run out of bobbin thread I'll pull out enough stitches to tie off on the back side and restart by dropping the needle into the last stitch before dropping the presser foot, tying off that one as well.
-
What is a good quality thread snip and where do you like to get them?
-
This chart cross references many of the needle systems and includes key dimensions. http://ismacs.net/needle_and_shank/needle-cross-reference-chart-round-shank.html Many machines can adapt to different needle lengths by adjusting the needle bar height. I don't know the limits of your machines or the differences between them. There's a half a chance you can adjust them to run the same needle. See what other folks with more experience can chime in with.
-
What machine do you have? That's a factor in choosing thread and needle as well.
-
Wizcrafts and DoInReno, thanks for your insights on this topic, I really appreciate you taking the to read and respond.
-
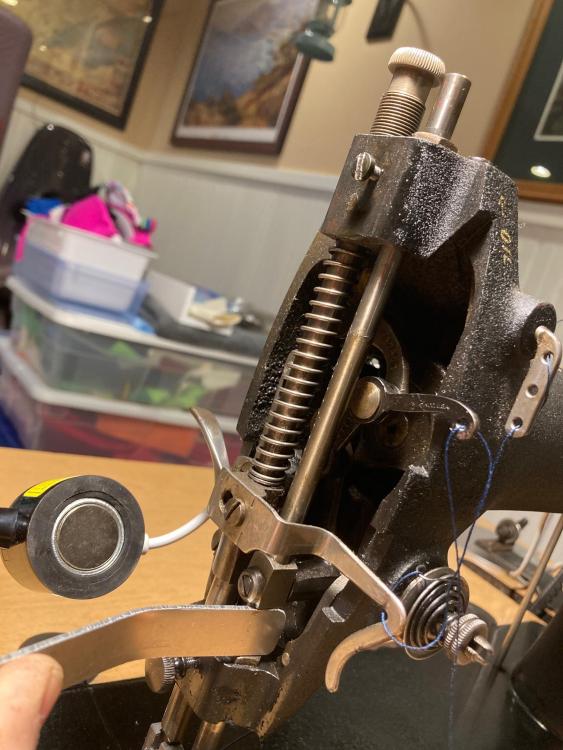
Also received and installed a new hook today. The old one is on the left, new one on the right. Not sure if the shape difference is due to wear or bad copying but I think the longer point will open the loop easier? I also find I have to shorten the part on the blunt end of the hook to get enough clearance for the needle thread to pass between the hook and the hook driver, is it normal to have to trim the blunt end a bit when you install a new hook?

-
So I did adjust the needle bar to the put the hook 1/16 inch above the eye. I've had no breakage at start since but it's a little early to declare victory.
-
Did it work?
-
Replacement Table for an Old Industrial
sandmanred replied to ArtV's topic in Leather Sewing Machines
Did you want to build one or find something suitable to put the right top on? -
Great! That's the condition and all the edges have a small radius and are polished too. I adjusted the needle bar to get to the hook timing to the spec in the guide. It's too early to tell for sure if it's helped but I just got done adding the belt loops. I use a short stitch and have to go through a lot of layers and often have trouble with a few loose stitches but breezed through all them without a hitch.
-
Thanks Wizcrafts and DonInReno, Yes, I have learned the hard way that holding the threads back at the start is necessary, I usually just pinch them to the table with my thumb. If I don't I occasionally get 4-6 stitches with loose loops on the bottom side and occasionally a tangled mess. I thought maybe my current issue is due to starting the stitch with the take up arm too low ( I think it's best to start and stop with it at the top of stroke?) but I debunked that theory as the sole cause of the breakage with a few trials this morning. I'm maybe a little low with my needle height based on the manual attached above so I'll give that a tweak. What is the proper shape for the tip of the hook? Should it feel sharp or rather be slightly rounded? FWIW I have had some success running 207 thread on this machine on vinyl, the worst part is you can only get about 15 feet of thread on the bobbin.
-
Your omega looks a lot like a Singer 16 I had for a while. Your thread up looks right to my memory. Enjoy!
-
Here's a bit more of what's going on. My 31-5 will occasionally (one start in twenty?) break the top thread on the first stitch. Once under way it sews fine, hammers through most anything and never drops a stitch. I'm running a T135 thread with a #23 needle on approximately 12 oz/yd canvas making a pair of jeans type pants. Same thread top and bottom. Tension is not maxed out but towards the upper end. My hook timing is okay I think but the hook is a little sloppy in the race so I ordered a new one but I'm not sure I'm on the right track. Any other things for me to check out?
-
I've had to reset my needle bar to get the hook timing right. Are there any other adjustments I should look at to maintain good timing of the hook and needle or any other critical motions?
-
I have greased the clutch side but not the brake side. I have a Singer 132K6 with a 3:1 speed reducing set up between the motor and machine. I've not experienced any issues with the clutch slipping under load, one of my belts always slips first. The grease helps but it's still not a servo
-
Replacement Table for an Old Industrial
sandmanred replied to ArtV's topic in Leather Sewing Machines
I agree on the center bar interference on the one you show, that would interfere with the drip pan if you keep the top dimension of a typical table. I have made a couple of tables I used an old solid core door 1 3/4 inches thick for a table top. I've also used two layers of 3/4 plywood glued up and then covered it with laminate. I think a trestle style base would work if you can find but then you'll still have to fashion a foot pedal. The ones I've built are kind of a trestle style, I like that because you are less likely to bang your knees as you swing in and out from the machine. -
singer 111g155 handwheel shaft size
sandmanred replied to chrisash's topic in Leather Sewing Machines
Not sure on that model but every industrial Singer I know it's a little over a half inch, my caliper says 0.545 inch. I made a larger pulley for my 31-15 of aluminum that replaced the hand wheel. It worked great to slow it down but unfortunately it threw it off balance at higher speeds because the hand wheel has a counter weight built in that I ignored when I made my oversized pulley. My solution since has been to turn an over size pulley that bolts on the the hand wheel. The add on pulley leaves the handwheel in place so it doesn't throw off the balance at higher speeds. It requires a large bore in the add on pulley that pilots on a surface where the belt normally rides. Once fitted I drill and tap into a meaty part of the handwheel to fasten the over-sized pulley with a screw or two. The pic below is a 78-1 that I added this pulley but I also have it on my 31-15 and a Consew 28. In the case of the 78-1 I was able to pilot the add on pulley on the right end, the nub that sticks through provided enough of a shoulder to center the add on pulley.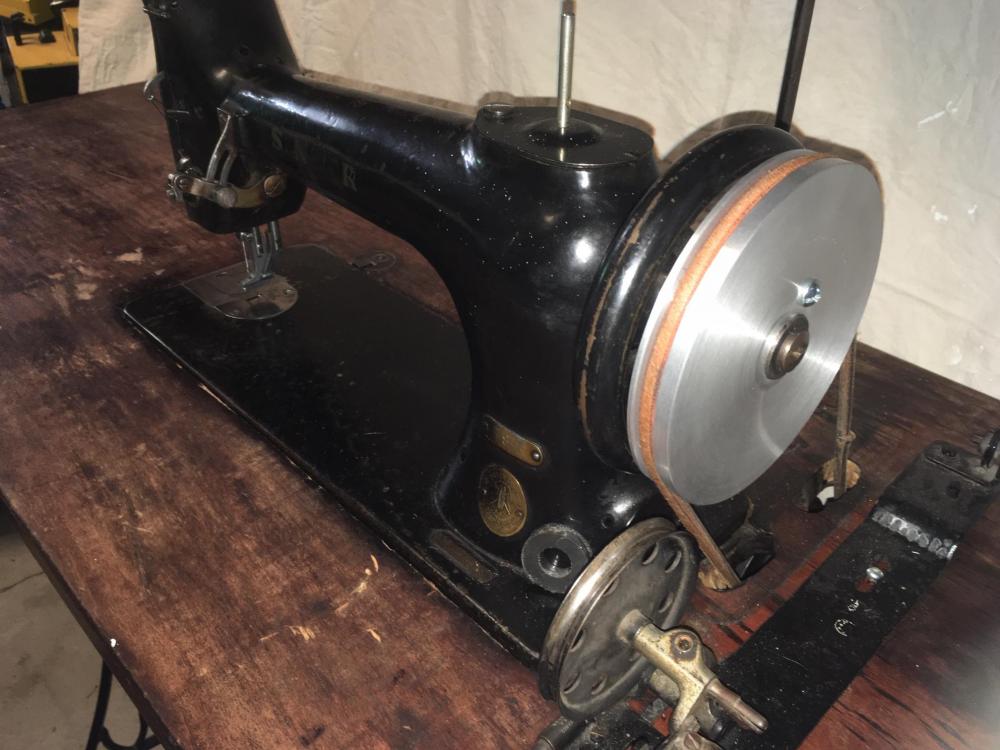
-
Refurbing 211G165 - Noob needs some help
sandmanred replied to BdB's topic in Leather Sewing Machines
I've re-furbished a few Singers and have I find there are many screws that are not readily available through other sources besides exact replacements. The pitch will be a standard pitch but the diameters are often non-standard. In many cases where a head is washed out I TIG weld a blob on top of screw and grind it round again then cut a new slot with a hacksaw. Once the blob is welded on I chuck the threaded end gently it in a drill and re-shape it on a grinder, spinning the screw slowly in the drill. -
New to this 31K20 and to everything else too
sandmanred replied to Tride's topic in Leather Sewing Machines
Great! My needle bar might be a tad low by that 3/32 standard but there's plenty of clearance to the body on top at the top of stroke running the needles I pictured in the post above. -
New to this 31K20 and to everything else too
sandmanred replied to Tride's topic in Leather Sewing Machines
It might have been my 31-15 or another machine but I've had a needle bar scarred up too and resist moving after the set screw is loose. I recall doing something along these lines, put a soft metal spacer between the body where the set screw goes and the casting below, then tapping on the top of the needle bar. I still didn't hit it very hard but once loose I was able to extract it out the top and file the burrs back to smooth. The spacer transfers the tapping force to a beefier part of the body and keeps any forces off the linkage connected to the needle bar but still go gently!