


HandyDave
-
Posts
200 -
Joined
-
Last visited
HandyDave's Achievements
Member (2/4)
-
To sand the edges or not to sand
HandyDave replied to ThisIsMyFirstRodeo's topic in Leatherwork Conversation
Single edges get sanded to smooth up from cutting out with knife. Layered edges get sanded to level everything out for a better finish. With layered pieces I want the edges to look like one piece or as close as possible. As for grits. I keep a 80 grit on my bench top belt sander it helps to even things up on alot of the thick welted projects I do. And I keep a 120 on the disc. Then any beveling that needs doing and a final once over with 220 by hand. I actually like to very lighty damp the edges before the 220. This I what works for me. -
Here in NC we don't get as cold as Colorado but winter gets cold enough to freeze some of my leather stuff if left in my shop during winter. The alcohol based dyes ain't really a problem but alot of the stuff like paints and finishes and oils and glues I have had problems with. I thought about taking one of my cabinets in shop and insulating it with foam board or something. But what I end up doing was buying me a dedicated tote. I got one of those stackable rolling tool boxes but a cheaper one. It holds all my supplies and keeps them somewhat organized. And it makes it easy enough to just bring in the house with me and roll it out to my shop when I'm working and shop is heated up. I was gonna use a old rolling suitcase that I have laying around and make some dividers for it but found a good deal on the webs for the box I got.
-
Get edges sanded nice and smooth. Then I use a bit of water just to lightly dampen the edges getting burnished. And wood burnisher. Then I rub edge with beeswax and hit it lightly with blowdryer to kinda melt the wax just a bit before burnishing again with a separate wooden burnisher cause I don't want wax build up on my primary burnisher. I hate edge paint. That's not burnishing or finishing a edge that's just covering it up. I've tryed tokenol and a couple other "finishes" but didn't find them to be worth the extra cost over my regular method.
-
Dye woes
HandyDave replied to Yellowhousejake's topic in Gun Holsters, Rifle Slings and Knife Sheathes
Leather is natural material. And even really good leather has differences throughout the hide. Sometimes with lighter colors then pure black your just gonna have uneven areas. You'll save yourself alot of headache if you learn to just let it ride. The variation in finish is just part of it. Even when you buy pre dyed veg tan you can see lighter and darker areas. -
That weldwood contact cement is pretty much all I use. Even a couple odd projects that didn't get sewn after gluing it holds. The trick like alot of other glues is the set time before sticking pieces together. Spread it on both pieces that's going together and let it set for 20 minutes or so till it doesn't even really feel tacky anymore. Then you want be able to pull 2 pieces apart without damage. I buy it by the gallon from lowes or home depot home improvement stores. It's cheaper in store then most places online.
-
If your in Daytona beach area definitely have some "biker" type items. Wallets for men and women. Keychains, can koozies, maybe some small handle bar bags.
-
I use 4/5 oz for my outsides. 8 will make a thick wallet like has been said. Just got to be easy with carving tooling so you don't blow right through. I use 2/3oz veg tan for my inside pockets.
-
Some type of Chicago screw with female post long enough to set through both pieces of leather without screw tightening down and binding. That will allow the piece to swivel. It's how I do my attachments on shoulder holsters and similar so pieces can pivot and move a bit.
-
Easiest way to make a bandolier for across the shoulder is cut straight strap the width you need it. Overlap the ends but at a 90 degree to each other. By doing this it creates a curve. The overlapped ends hang at the bottom.
-
I use regular hdpe cutting boards. I sand them with straight or orbital palm sanders with 220ish grit paper. It doesn't melt and clog but makes a super fine dust that sticks to everything if not using dust collection. Definitely wear a mask. Running plastic through a wood planer machine would be terrible on the blades of machine. I have a couple different boards I use. Some for just cutting and some for just punching. Then after sanding them several times and they are just wore out. I grab a couple more cheap ones from the store when I go to town.
-
Keep in mind you may need to cut strip a little wider then 5 inches depending on thickness of leather. Cause when folded you'll lose just a bit of width.
-
This is a good tip. I also keep my modeling spoon handy for same purpose. Just to smooth out any little bumps. As for the op and his carving journey it's already been said but practice practice practice. You'll find that the beveler will want to naturally ride your cut lines. And with time you'll find that sweet spot between speed and consistency.
-
Total noob w/ bullet loop question…
HandyDave replied to Ravenshurst's topic in Gun Holsters, Rifle Slings and Knife Sheathes
You can also add a thin strip below the ammo loops. And even if loops do loosen up a bit over the years they still want fall out from the bottom. You can also adjust where you put the stop strip to get the rounds to set a little higher in the loops making them easier to fetch. I also like to remove my dummy rounds when loops are allmost dry but not quite. Then they draw up a bit more without the ammo in place. Then work the rounds back in the loops once fully dry for a snug fit that's still usable. Here's a pic of a rig I done using the strip under the ammo loops like a stop. This method works good for straight cartridgeslike the 45acp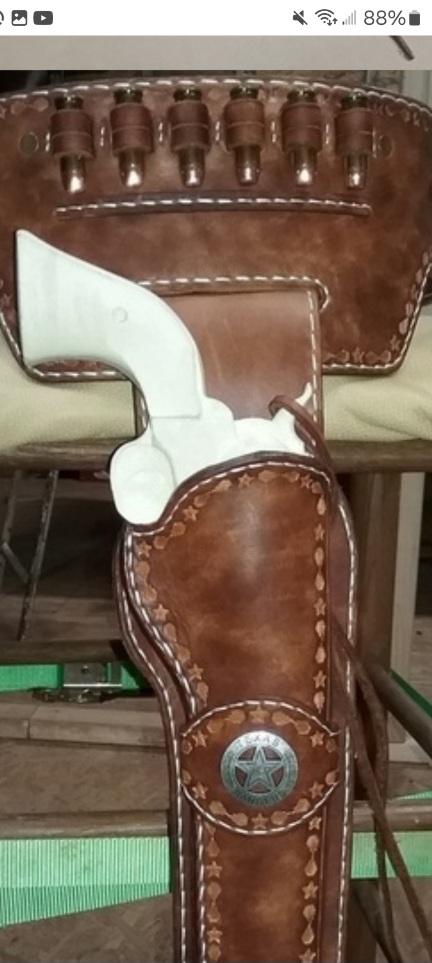
-
Sheath for curved knife?
HandyDave replied to DaleksInc's topic in Gun Holsters, Rifle Slings and Knife Sheathes
Just do a 2 piece sheath with a front and back panel and a welt running all the way around. And it can be whatever shape you need. -
One tip I'll lend for the welt on holsters like this and even knife sheathes. I notice you cut your template for the welt in the shape of the holster. When you have gentle curves like on your holster template you don't need to cut a welt to shape. You can use a straight piece cut to width. Glue it and you can curve the straight piece right along your edge without the extra work of making a special welt.