CFM Frodo Posted January 25, 2023 Author CFM Report Posted January 25, 2023 Huh, I guess 3 times is the charm Top and bottom Quote Singer 66, Chi Chi Patcher, Rex 26-188, singer 29k62 , 2-needles D.C.F.M
CFM chuck123wapati Posted January 25, 2023 CFM Report Posted January 25, 2023 14 minutes ago, Frodo said: Huh, I guess 3 times is the charm Top and bottom that could just be needle thread combo now, my chi chi patcher does that when the thread is to thick for the needle. Oh and i also found that the needle scarf ( flat spot) was to far away from the bobbin hook so the hook would miss the loop. Quote Worked in a prison for 30 years if I aint shiny every time I comment its no big deal, I just don't wave pompoms. “I won’t be wronged, I won’t be insulted, and I won’t be laid a hand on. I don’t do these things to other people, and I require the same from them.” THE DUKE!
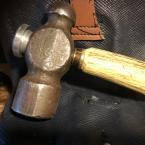
CFM Frodo Posted January 25, 2023 Author CFM Report Posted January 25, 2023 Shat Back to the rats nest again Quote Singer 66, Chi Chi Patcher, Rex 26-188, singer 29k62 , 2-needles D.C.F.M
Moderator Wizcrafts Posted January 25, 2023 Moderator Report Posted January 25, 2023 1 hour ago, Frodo said: Shat Back to the rats nest again I'm not sure you timed it right. SOP on most walking foot machines is to hand-wheel the needle to BDC, then come up 3/32 inch. At that point the tip of the hook should intersect the needle at 1/16 inch above the top of the eye, inside the scarf area. With this timing there is plenty of upward motion to form a good loop. When sewing through leather the needle and thread meets resistance and the loop may not be as robust. The longer timing may help the loop form better. Another setting to dink with is the check spring, aka: thread controller. You can try increasing the throw by lowering the bottom stopper bracket under the spring. Quote Posted IMHO, by Wiz My current crop of sewing machines: Cowboy CB4500, Singer 107w3, Singer 139w109, Singer 168G101, Singer 29k71, Singer 31-15, Singer 111w103, Singer 211G156, Adler 30-7 on power stand, Fortuna power skiver and a Pfaff 4 thread 2 needle serger.
Members Quade Posted January 25, 2023 Members Report Posted January 25, 2023 Quote I'm not sure you timed it right. I was thinking this from the picture too. Particularly the picture that shows the hook and needle. I was thinking it might be better to pull the two screws off so, and the cover plate so you can see the hook more easily. The hook is pretty deep on that pic. I wonder if the OP is timing off the wrong part of the hook? if you read section 8 of the manual, it's pretty much saying what I said. About the needle eye and hook placement. Needle to the bottom, starts going up, the hook should be right in line with the needle, 1.6 mm from the needle eye. Often there are timing marks on the needle bar. Bottom mark is used to set the needle bar length and the top is for where the needle and hook should intersect. This machine, it seems you set the needle bar length to get the timing position correct. Quote
CFM Frodo Posted January 25, 2023 Author CFM Report Posted January 25, 2023 I think I got the timing correct and moved on to tension here us what and where I am at now Top bottom Quote Singer 66, Chi Chi Patcher, Rex 26-188, singer 29k62 , 2-needles D.C.F.M
Members Quade Posted January 26, 2023 Members Report Posted January 26, 2023 What they recommend for tension is use a different color for top and bottom threads so you can see where the knot is. Quote
CFM Frodo Posted January 26, 2023 Author CFM Report Posted January 26, 2023 I am not saying What I did is perfect or right. I followed what I think the wording of the manual says when the needle is at its lowest position the TIP of the needle must be on a level line with the bottom of the hook when that is achieved then the next paragraph becomes true I was asked to show the tension using different thread colors Top black bottom green Quote Singer 66, Chi Chi Patcher, Rex 26-188, singer 29k62 , 2-needles D.C.F.M
CFM Frodo Posted January 26, 2023 Author CFM Report Posted January 26, 2023 Man Ii hate not being able to edit here is the whole wording from the manual when needle bar at its lowest position, needle TIP and internal part of shuttle hook ( inside diameter of hook/ bottom edge) must be on level line. when needle bar is raised and hook point of shuttle comes on the center line of needle a distance between hook and EYE of needle must be 1.6mm. / 1/16” Quote Singer 66, Chi Chi Patcher, Rex 26-188, singer 29k62 , 2-needles D.C.F.M
DonInReno Posted January 26, 2023 Report Posted January 26, 2023 (edited) 6 hours ago, Frodo said: when needle bar is raised and hook point of shuttle comes on the center line of needle a distance between hook and EYE of needle must be 1.6mm. / 1/16” Yep, after the needle starts to rise (about the thickness of a nickel is most commonly recommended for most machines) , the eye should be 1/16” BELOW the tip of the hook as they pass each other. That might be what you said - I’m just double checking. The horizontal gap BETWEEN the needle and hook needs to be as close to zero as you can get without touching. Most manuals give a range for this gap, but as close as possible is ideal - that’s not just my option, but guys managing big sewing shops have said zero is just right. Heck one of those guys said if the needle is deflected a a tiny amount he won’t change it. Its a little hard to tell how sharp that hook is, but it looks a little blunt, which doesn’t help it grab the thread cleanly. It may sew great, but if you still get odd skipped stitches, or the hook seems to be impacting the thread once in a while instead of cleanly hooking around it, then you might look into sharpening it a bit. Its hard to explain, other than recommending looking at a nice sharp hook and duplicating the angle and polish on it. Probably more hooks have been damaged beyond repair than have been saved by well intentioned first timers, but you’re pretty handy and I’d bet it’s something you might try so I’ll briefly hit on it: Keep in mind you aren’t taking material away from the needle side or outer diameter of the hook. Also, don’t reduce the length. Having a good hook right there makes it easy to know where to remove material. It won’t be perfect - we’re just reducing any bluntness. I picked up an old singer with 1/4” of the hook broken off - sharpened what was left until the new hook arrived - it’s sewn threw a pound of thread without a single skipped thread so I’ve never installed the new hook yet. Sandpaper glued on a popsicle stick, or even fingernail emory boards work well - the tip of the hook is thin and it won’t take much. I’ll use 220 grit to get the shape, then 400 followed by 800 to get any scratch marks out. Finally going over the whole hook with 1200 or 1500 grit cleans up any minor surface rust and blends the new tip in so nobody should be able to tell you’ve done anything. Anyway, good job on your progress! You are learning your machines inside and out. edit: I almost forgot to mention, if at all possible keep an original Singer hook - replacement Chinese hooks are dirt cheap, but they are often soft metal and may not be shaped correctly. Edited January 26, 2023 by DonInReno Quote


Recommended Posts
Join the conversation
You can post now and register later. If you have an account, sign in now to post with your account.
Note: Your post will require moderator approval before it will be visible.