Members supercub Posted April 20, 2015 Members Report Posted April 20, 2015 Everybody develops there way. Your method is used by some others use other methods. I myself use a groover then mark my holes with an over stitch wheel then poke each hole with a diamond awl. Its not one way is better then another it's what works for you. I have one of the Costco vacuum sealers. the texture is only on one side of the bag, so when I insert my holster I make sure the front of the holster is against the smooth side. The texture wil imprint on the back side but it is a light diamond texture and on the back of the holster not a big deal. I used to use these as well. If you put a thin piece of cardboard on the back of the holster against the diamond texture pattern of the bag, you won't leave any marks on the leather. I use a different method now for vacuum bagging, but I made many holsters and sheaths with a food saver. They work well, but the bags can be expensive. Quote
Members Red Bear Haraldsson Posted April 20, 2015 Members Report Posted April 20, 2015 Pit, I still cannot figure out how to cut and paste any sites in here, but... http://leatherworker.net/forum/index.php?showtopic=18101 Hidepounder's edge finishing tutorial is great. Quote
Members chiefjason Posted April 20, 2015 Members Report Posted April 20, 2015 First, you will not get vacuum tight without, well, the vacuum. But you don't need it either. Just accept a bit of difference and learn how to bone in the details. I use 8-9 oz leather. I do all my holsters flat back. CR has you headed in the right direction. Search flat back on here and you will get some more info. I posted some a while back. For getting marks out, cut the head off of a smooth round handled tooth brush. Use the smooth rounded handle to burnish out any boo boos. The last thing I do to my front piece before drying is burnish the wings to get out any marks. That tool will let you push the edges in better and get some details. I do all my line details with a bone folder. This is a Sig P229 IIRC. Flat back. All hand formed and boned. Hand stitched. FWIW, it's taken me a couple years to get here but I'm happy with it. Quote
Pit 4 Brains Posted April 20, 2015 Author Report Posted April 20, 2015 Like anything else, looks like I have a lot of trial and error ahead of me. Thanks for all the tips and help. I'll be forming up another this weekend and applying what I have learned with this one. -Pete Quote
Lobo Posted April 23, 2015 Report Posted April 23, 2015 Any weight of veg-tanned cowhide can be wet-formed. The differences will be in the degree of moisture content required and the effort necessary to do the forming work. Most of the holsters coming out of my shop are made of either 6/7 or 7/8, depending primarily on the size and weight of the intended handgun and the specific holster style. Much of my production is lined holsters, for which a lining leather of about 3 oz. weight is used. Some of my designs utilize double-layer construction, two layers of veg-tanned cemented together flesh side to flesh side, for which I use 5/6 oz. (makes an extremely sturdy holster). When wet-forming there are a few guidelines I can offer: 1. Unlined pieces absorb water more readily than lined. Undyed leather absorbs water more easily than dyed. 2. Using hot tap water results in easier forming more quickly. 3. Generally I allow about 1 second of immersion in the water per ounce of leather weight (longer for lined and two-layer pieces) before starting the forming. 4. Your leather will not begin to retain the forming work until the moisture content has dropped considerably. The first forming will be very general, with some stretching and molding to intended shape. 5. After the first forming the holster needs to dry quite a bit. I use an oven maintained at about 120-125F degrees, allowing about 8 to 10 minutes in the oven after the first forming. 6. Second forming will then start to take final shapes and contours, and light boning can be done at this stage. Then the piece goes back into the oven for 8 to 10 minutes. 7. Holster should be ready for final forming and detail boning. Belt loops or slots can be formed to final shape (I use wooden mandrels 1/4" thick by actual belt width forced into the loops to form to correct size and shape). 8. After final forming and boning the holster goes into a drying cabinet maintained at 105-108F degrees. Complete drying can take 3 to 5 hours, but longer times won't hurt anything and I've been known to leave it going overnight. The key to forming is doing the work when the temperature and moisture content of the leather is optimal. When the moisture content is too high the forming will not be retained. If the moisture content is too low the forming, molding, and boning will be incomplete at best. We have to find the "groove" and stay in it. I also recommend against overworking the leather, especially while boning. One pass of the tool can leave a precise impression, but multiple passes are likely to result in sloppy impressions. The 8 to 10 minute oven cycles allow me to do other work such as cutting, assembling, and stitching the next order in line, dressing edges and beveling, etc. Following a cycle as described usually allows me to complete a production batch of 8 to 12 pieces over a few hours, then leaving that batch in the drying cabinet for several hours. Three or four production batches like this are done each week followed by a day of finish work (oiling, burnishing edges, sealant, final finish) and hardware on 30 or 40 pieces at a time. After finishing and hardware I always allow 24 hours minimum for everything to dry completely and finishes to cure before packaging for delivery. Been doing this so long I have trouble imagining doing just one piece at a time anymore. A slow week here is 25 pieces. A busy week will be closer to 50 (holsters, pouches, belts). Back to the grind now. Quote Lobo Gun Leather serious equipment for serious business, since 1972 www.lobogunleather.com
Pit 4 Brains Posted April 24, 2015 Author Report Posted April 24, 2015 Lobo, thanks for that VERY informative post. Before this I had never thought to do two formings. Now all I have to do is fab up some boning tools and get to work on my next holster. Thanks again, -Pete Quote
Members cgleathercraft Posted April 24, 2015 Members Report Posted April 24, 2015 FWIW add another to the vacuum sealer crowd. to save $ on the bags use the rolls and cut them a foot or two longer than you need. that way when you cut it open your only cutting off a couple inches and can reuse the same bag till it's too small to fit everything inside. instead of 2 disposable bags out of 2 feet you can probably get 5+ Quote http://www.cgleathercraft.com Member of the Iron Brigade.
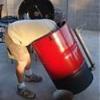
Members Thornton Posted April 25, 2015 Members Report Posted April 25, 2015 I use a garbage bag and a shop vac to form mine. Quote
Pit 4 Brains Posted April 25, 2015 Author Report Posted April 25, 2015 FWIW add another to the vacuum sealer crowd. to save $ on the bags use the rolls and cut them a foot or two longer than you need. that way when you cut it open your only cutting off a couple inches and can reuse the same bag till it's too small to fit everything inside. instead of 2 disposable bags out of 2 feet you can probably get 5+ I just found a couple rolls in the pantry. I asked my wife if we still had the sealer and low and behold it was tucked under the counter in the corner of the cabinets. I thought we sold it in our moving sale. I use a garbage bag and a shop vac to form mine. Hmm. How do you keep the garbage bag from flattening and sealing before a lll the air comes out? I tried to deflate an aircraft lifting bag like that but the low pressure at the nozzle just flattened the bag right there and left the bag somewhat inflated. And that was some heavy duty rubber too. Quote
Members Thornton Posted April 26, 2015 Members Report Posted April 26, 2015 I just found a couple rolls in the pantry. I asked my wife if we still had the sealer and low and behold it was tucked under the counter in the corner of the cabinets. I thought we sold it in our moving sale. Hmm. How do you keep the garbage bag from flattening and sealing before a lll the air comes out? I tried to deflate an aircraft lifting bag like that but the low pressure at the nozzle just flattened the bag right there and left the bag somewhat inflated. And that was some heavy duty rubber too. Sorry. A dish towel lets the air flow while the bag collapses. Lay the towel under whatever you are forming and you shouldn't have any problems. The vacuum storage bags for compressing clothes for storage work also, the one way valve is super handy. Quote


Recommended Posts
Join the conversation
You can post now and register later. If you have an account, sign in now to post with your account.
Note: Your post will require moderator approval before it will be visible.