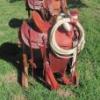
Josh Ashman Report post Posted September 12, 2017 Flat backed GP-100 pancake for a customer. I've been clear to say a number of times on this forum that I believe that 50/50 formed holsters are as good as flat backed ones. I stand by this, so far in my personal use I believe this to be true. I also carry 1911's which are relatively "thin", if I carried a revolver I might want a flat backed holster myself. Anyway, generally I like to get the customer what they want. Or at least as close as I can get it to what they want. 8/9 HO, Fiebings tan dye, which went splotchy (someday I'll learn) and M&G cut 50/50 with water as a top coat. It's for a 3" GP-100 and mine is a 4" so no pictures with the gun in the holster. I molded it then pulled it up the 1" and molded the toe closed. Quote Share this post Link to post Share on other sites
alpha2 Report post Posted September 12, 2017 Nice holster. The only one I've made that I wish was a flat back, was for a 3914 Smith for a student that was pretty petite. I'm afraid that when the 50/50 gets pulled around her waist, it might be too snug on the gun. I did make it just a bit looser than normal for that reason, she hasn't complained. Quote Share this post Link to post Share on other sites
chiefjason Report post Posted September 13, 2017 Welcome to the dark side. lol Just sent one out for a 6" barrel with a strap on it. That one was a bit annoying but I got it done. Quote Share this post Link to post Share on other sites
Bolt Vanderhuge Report post Posted September 13, 2017 (edited) Looks good Josh. Fiebings tans and browns do that to me too. I have had it happen regardless of dying before or after. I dip dye and the color looks perfect until I get it wet for forming or from applying the finish. Some only have a few darkish spots and some will be marbled all over. Edited September 13, 2017 by Bolt Vanderhuge Quote Share this post Link to post Share on other sites
SouthernCross Report post Posted September 13, 2017 That looks really nice. I like the flatter backed holsters, personally. Quote Share this post Link to post Share on other sites
Josh Ashman Report post Posted September 13, 2017 Thanks gents! This was my first flat backed holster for a revolver and the first one I've built since I started sewing with a machine, so I had a few things to figure out. I ended up making a pattern for the back and a rough pattern/best guess for the front. Then I glued the front portion and rough formed the the front around the gun to figure out where it needed to be stitched. I glued that and let it dry then stitched it all up. I should have let it dry a little more as I left presser feet marks that I couldn't quite hammer out. They're not bad, but would be better without them. Anyway, once it was stitched up I put in the slots, burnished the edges, did the finial forming, let it dry then put on the top coat. I was up front with my customer about the issues I had with it (splotchy and presser feet marks that bugged me) and offered it to him at a bit of a discount. He was happy and so am I. I am curious how it'll hold up and asked him to keep me posted. If I hear anything unexpected back I'll pass it along. Bolt, I'm about out of my Fiebings tan, I might not get anymore. I can't seem to figure out why it will sometimes splotch out and other times not. Like you I've tried dying first, drying later. I've also added extra days of drying and sometimes it does and sometimes it doesn't. If I dye after it's stitched and formed it doesn't go splotchy but it dyes the stitching. Anyway, I've read on here that some guys switch to the Angelus and don't look back. Maybe I'll have to give it a try. Chief, I may not be a full convert yet, but we'll see! Thanks again and have a great day! Quote Share this post Link to post Share on other sites
SouthernCross Report post Posted September 13, 2017 How do you dye - dip or spray? Quote Share this post Link to post Share on other sites
Josh Ashman Report post Posted September 13, 2017 Sometimes I dip and sometimes I apply with a scrap of sheepskin. I've also recently started using the little foam "brushes". I used one of those (foam brushes) for this holster. I've never tried to spray it on but I know some folks really like that way. Quote Share this post Link to post Share on other sites
Double Daddy Report post Posted September 14, 2017 I'm with you on the tan dye, Josh...it's a real booger to get right but looks good when it does turn out. Love the flat back design design on that wheel gun rig...looks like it would ride really comfortable! Nice! Quote Share this post Link to post Share on other sites
SouthernCross Report post Posted September 14, 2017 21 hours ago, Josh Ashman said: Sometimes I dip and sometimes I apply with a scrap of sheepskin. I've also recently started using the little foam "brushes". I used one of those (foam brushes) for this holster. I've never tried to spray it on but I know some folks really like that way. I've had much better results with all colors since I started spraying it on. I just use a cheap Paasche airbrush that I picked up years ago. I usually mix the Fiebings about 50/50 with denatured alcohol and spray until I get the color I'm looking for. Quote Share this post Link to post Share on other sites
Josh Ashman Report post Posted September 14, 2017 Thanks Double Daddy! Good info on spraying on your dye Southern Cross! Quote Share this post Link to post Share on other sites
BHPshooter Report post Posted September 19, 2017 Nice work, Josh! I know what you mean about splotches with Fiebing's, but it's not very noticeable on this one, in my opinion. On 9/13/2017 at 2:02 AM, Bolt Vanderhuge said: Looks good Josh. Fiebings tans and browns do that to me too. I have had it happen regardless of dying before or after. I dip dye and the color looks perfect until I get it wet for forming or from applying the finish. Some only have a few darkish spots and some will be marbled all over. I had the same problem. I still have a bottle of Fiebing's Pro Oil Saddle Tan. I absolutely love the color, but getting it to turn out right happened about 10% of the time. On 9/13/2017 at 7:48 AM, Josh Ashman said: Bolt, I'm about out of my Fiebings tan, I might not get anymore. I can't seem to figure out why it will sometimes splotch out and other times not. Like you I've tried dying first, drying later. I've also added extra days of drying and sometimes it does and sometimes it doesn't. If I dye after it's stitched and formed it doesn't go splotchy but it dyes the stitching. Anyway, I've read on here that some guys switch to the Angelus and don't look back. Maybe I'll have to give it a try. I've switched to Angelus for everything but black, at this point, and I've had far fewer headaches. Wes Quote Share this post Link to post Share on other sites
Josh Ashman Report post Posted September 19, 2017 Thanks Wes! Looking more and more like I need to change dye brands! Have a great day! Quote Share this post Link to post Share on other sites
YinTx Report post Posted September 23, 2017 I did this project with Angelus dye, as you can see despite my efforts, still blotchy. I think it is more the leather than the dye...or possibly just me... or me and the leather... but I don't think I'd pin it on the dye at this point... YinTx Quote Share this post Link to post Share on other sites
YinTx Report post Posted September 23, 2017 And your holster looks pretty nice too, forgot to mention while I was commenting on dye! Any issues on retention long term? I had been wondering about how pancakes fare for revolvers... they seem to have less for the holster to "grip" onto than the semi autos... YinTx Quote Share this post Link to post Share on other sites
chiefjason Report post Posted September 23, 2017 1 hour ago, YinTx said: And your holster looks pretty nice too, forgot to mention while I was commenting on dye! Any issues on retention long term? I had been wondering about how pancakes fare for revolvers... they seem to have less for the holster to "grip" onto than the semi autos... YinTx My Taurus 605 that I carry in a botched J frame holster has held up pretty well retention wise. It is tougher to get it right than a semi auto. I got one too tight the other week and had to really work the holster to get it where I wanted it after it was stitched up. If you mold with the revolver on a table you tend to get a looser holster. If you have the grip off the edge of the table it will be a tighter mold because it makes less room. I got one way too tight for a Gp100 and almost had to remake it. But after leaving the mold in a couple days and wetting it around the trigger guard I got it worked out. Quote Share this post Link to post Share on other sites