Members AJ2018 Posted February 12, 2018 Author Members Report Posted February 12, 2018 Browning x-bolt Stainless Stalker 30-06 sprg Pattern Rev 2 .... Pending some more addons.. Browning x-bolt SS stalker 30-06 spr Rev 2.pdf Quote
Members AJ2018 Posted February 12, 2018 Author Members Report Posted February 12, 2018 2 hours ago, Aresioh said: I too am making butt cover, and 1) I'm having trouble with the bullet loops. Im having a hard time pulling the trigger on design 2) scared that the eyelet will scratch the stock. Has anyone ever had seen wear the eyelet scratches the wood? there is a solution to the eyelet problem, what i suggest for you is to put the eyelets on a small rectangular shape of leather and then stitch that rectangular piece with an offset on the actual buttstock cover that way the buttstock cover will secure your eyelet from scratching the stock. its very easy to do but don't make the rectangular piece too big, make it so it can take the eyelet and 1/8" for stitching it to the buttstock cover and then for the final put leather loop and loop both side of the buttstock cover. second which rifle you working on now? are you extending the leather to the trigger side? like as i am doing with my browing x-bolt??? Quote
Members Aresioh Posted February 13, 2018 Members Report Posted February 13, 2018 19 hours ago, AJ2018 said: second which rifle you working on now? are you extending the leather to the trigger side? like as i am doing with my browing x-bolt??? I've never seen them. I'm making one for a .270 and .243. I'm using my winchester sxp 12ga as the template. I'm making one like TinBadge. I was think about the same thing for the eyelets. I was planning on stitching a thin piece under the main part. Quote
Members AJ2018 Posted February 20, 2018 Author Members Report Posted February 20, 2018 (edited) Browning x-bolt Stainless Stalker 30-06 sprg Pattern Rev 3 .... Pending some more addons.. x-bolt Stainless Steel Stalker 30-06 SPRG Rev3.pdf if you like to print this and see how it matches on the actual rifle , use paper size 17" x 11" or whats called Tabloid as paper type if you using PDF printer. this case will cover the x-bolt stock up to the LOP (Length of Pull) which is the distance from the center of the trigger up to the end of the recoil pad. if you like a new version to cover only the buttstock up the the LOC (length of comb) then drop me your feedback that is very easy to do. Edited February 20, 2018 by AJ2018 Quote
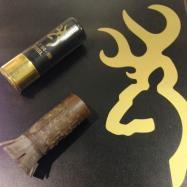
Members AJ2018 Posted April 16, 2018 Author Members Report Posted April 16, 2018 (edited) currently in stage one of cutting the leather, so far everything is perfect, I am going to do a 3D look cartridge loop by stitching cartridge loop over the body of the leather. have a look at the current pictures, just had the leather yesterday. its 6-7 ounce veg-tan leather which is very beautiful I have not stained and tooled the main body yet, i only applied dark brown to the cartridge loop base with tooling. This project is for Browning x-bolt SS Stalker 30-06 sprg rifle. and will do more for other rifles. when the project complete its going to look fabulous i believe as the leather fitted snug on the stock, I am going to cross stitch the top middle center line of the body and and then lace the bottom part. and cross stitch or lace the knob which ever look nicer, I am going to be using Black Bonded Nylon .7mm Leather non waxed thread and for lacing the bottom not decided which thickness of lace I will be using but will keep you updated. the lace maker tool that I ordered off eBay did not arrive yet and not sure if anyone of you have used it before, its the small black plastic piece like a pen shape, it has a blade inside and you attache the leather to the hole and keep pulling to get a long lace, but how is the quality of the lace in this tool? is the thickness consistent ??? The programs i used were: Solidworks 3D/2D Expert features, Photoshop CC 2018, Adobe PDF , and obviously Printer and leather lets see what you guys think so far. cheers. Edited April 16, 2018 by AJ2018 spelling fix Quote
garypl Posted April 16, 2018 Report Posted April 16, 2018 This is an interesting design - can’t wait to see it finished! Gary Quote Cowboy 4500, Consew 206RB-4
Members AJ2018 Posted April 16, 2018 Author Members Report Posted April 16, 2018 55 minutes ago, garypl said: This is an interesting design - can’t wait to see it finished! Gary Thank you Gary, I am still working on it slowly till its done , every stage i do , I will post it on here, I know the majority of people have hard time including the rifle knob section behind the trigger so i took the challenge and did it using solidworks expert modeling features, and Photoshop CC 2018 cheers, A.J Quote
Members Hildebrand Posted April 16, 2018 Members Report Posted April 16, 2018 The lace cutter you describe is OK but it probably will not cut consistent enough laces for the precision you are putting into that project. I have one somewhere that I used to cut lacing to lace together a set of buckskin cloths many moons and pants sizes ago. Quote
Members AJ2018 Posted April 16, 2018 Author Members Report Posted April 16, 2018 (edited) 5 hours ago, Hildebrand said: The lace cutter you describe is OK but it probably will not cut consistent enough laces for the precision you are putting into that project. I have one somewhere that I used to cut lacing to lace together a set of buckskin cloths many moons and pants sizes ago. Thank you so much for your input Hildebrand can you post some pictures to show the precision and the kind of lace that lace maker makes please ? I am interested to see the precision if you can. Edited April 16, 2018 by AJ2018 Quote
Members Hildebrand Posted April 17, 2018 Members Report Posted April 17, 2018 This was about 35 years ago and thankfully no photo evidence exists from that time in my youth. One of the problems with the device is the instructions tell you to start in the middle of a piece of leather and essentially cut a spiral out. This leaves all the lace naturally laying in a circle. Quote


Recommended Posts
Join the conversation
You can post now and register later. If you have an account, sign in now to post with your account.
Note: Your post will require moderator approval before it will be visible.