All Activity
- Past hour
-
Man, you have you a massive amount of work into this. The challenge is that we normally want prices but this is kind a different situation. Let's tag the BossLady in here and see what she thinks, I'm sure it's happened before. @Johanna?
-

What’s the maximum thickness the Singer 29K71 can handle
AlZilla replied to JRodriguez's topic in Leather Sewing Machines
Here's a manual that says the foot rises 3/8" of an inch, so less then that: https://leatherworker.net/forum/applications/core/interface/file/attachment.php?id=149218 -
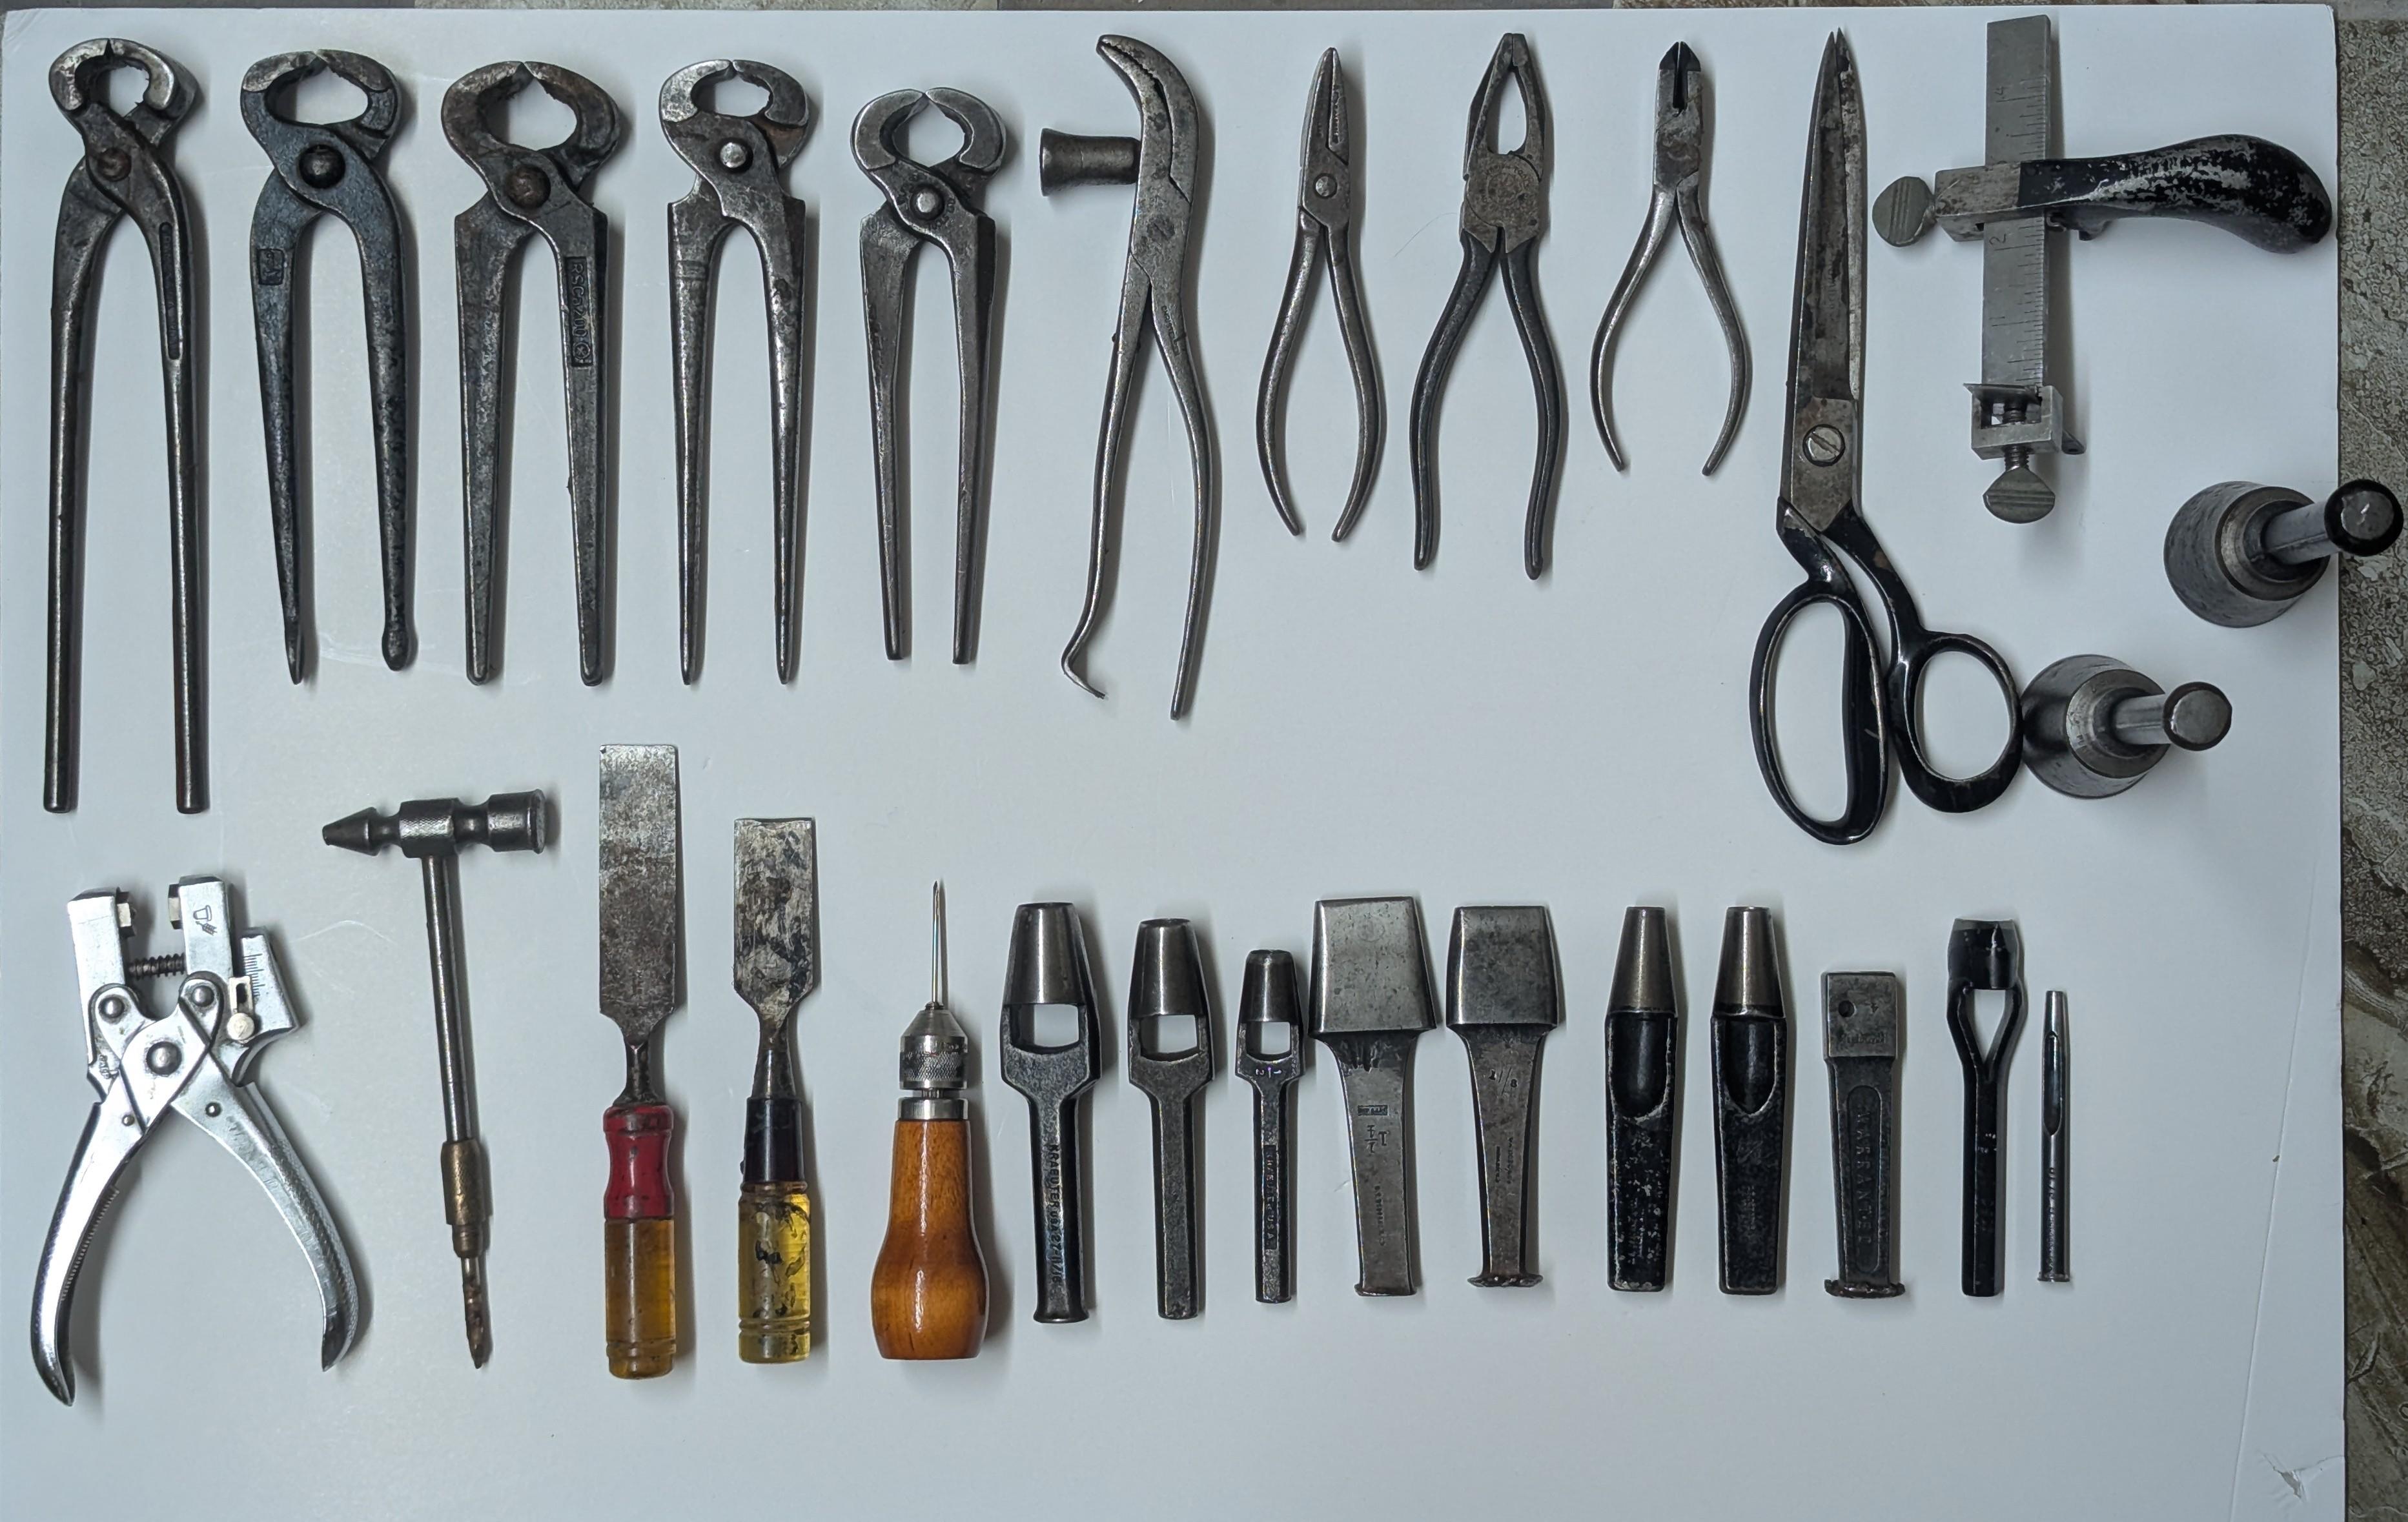
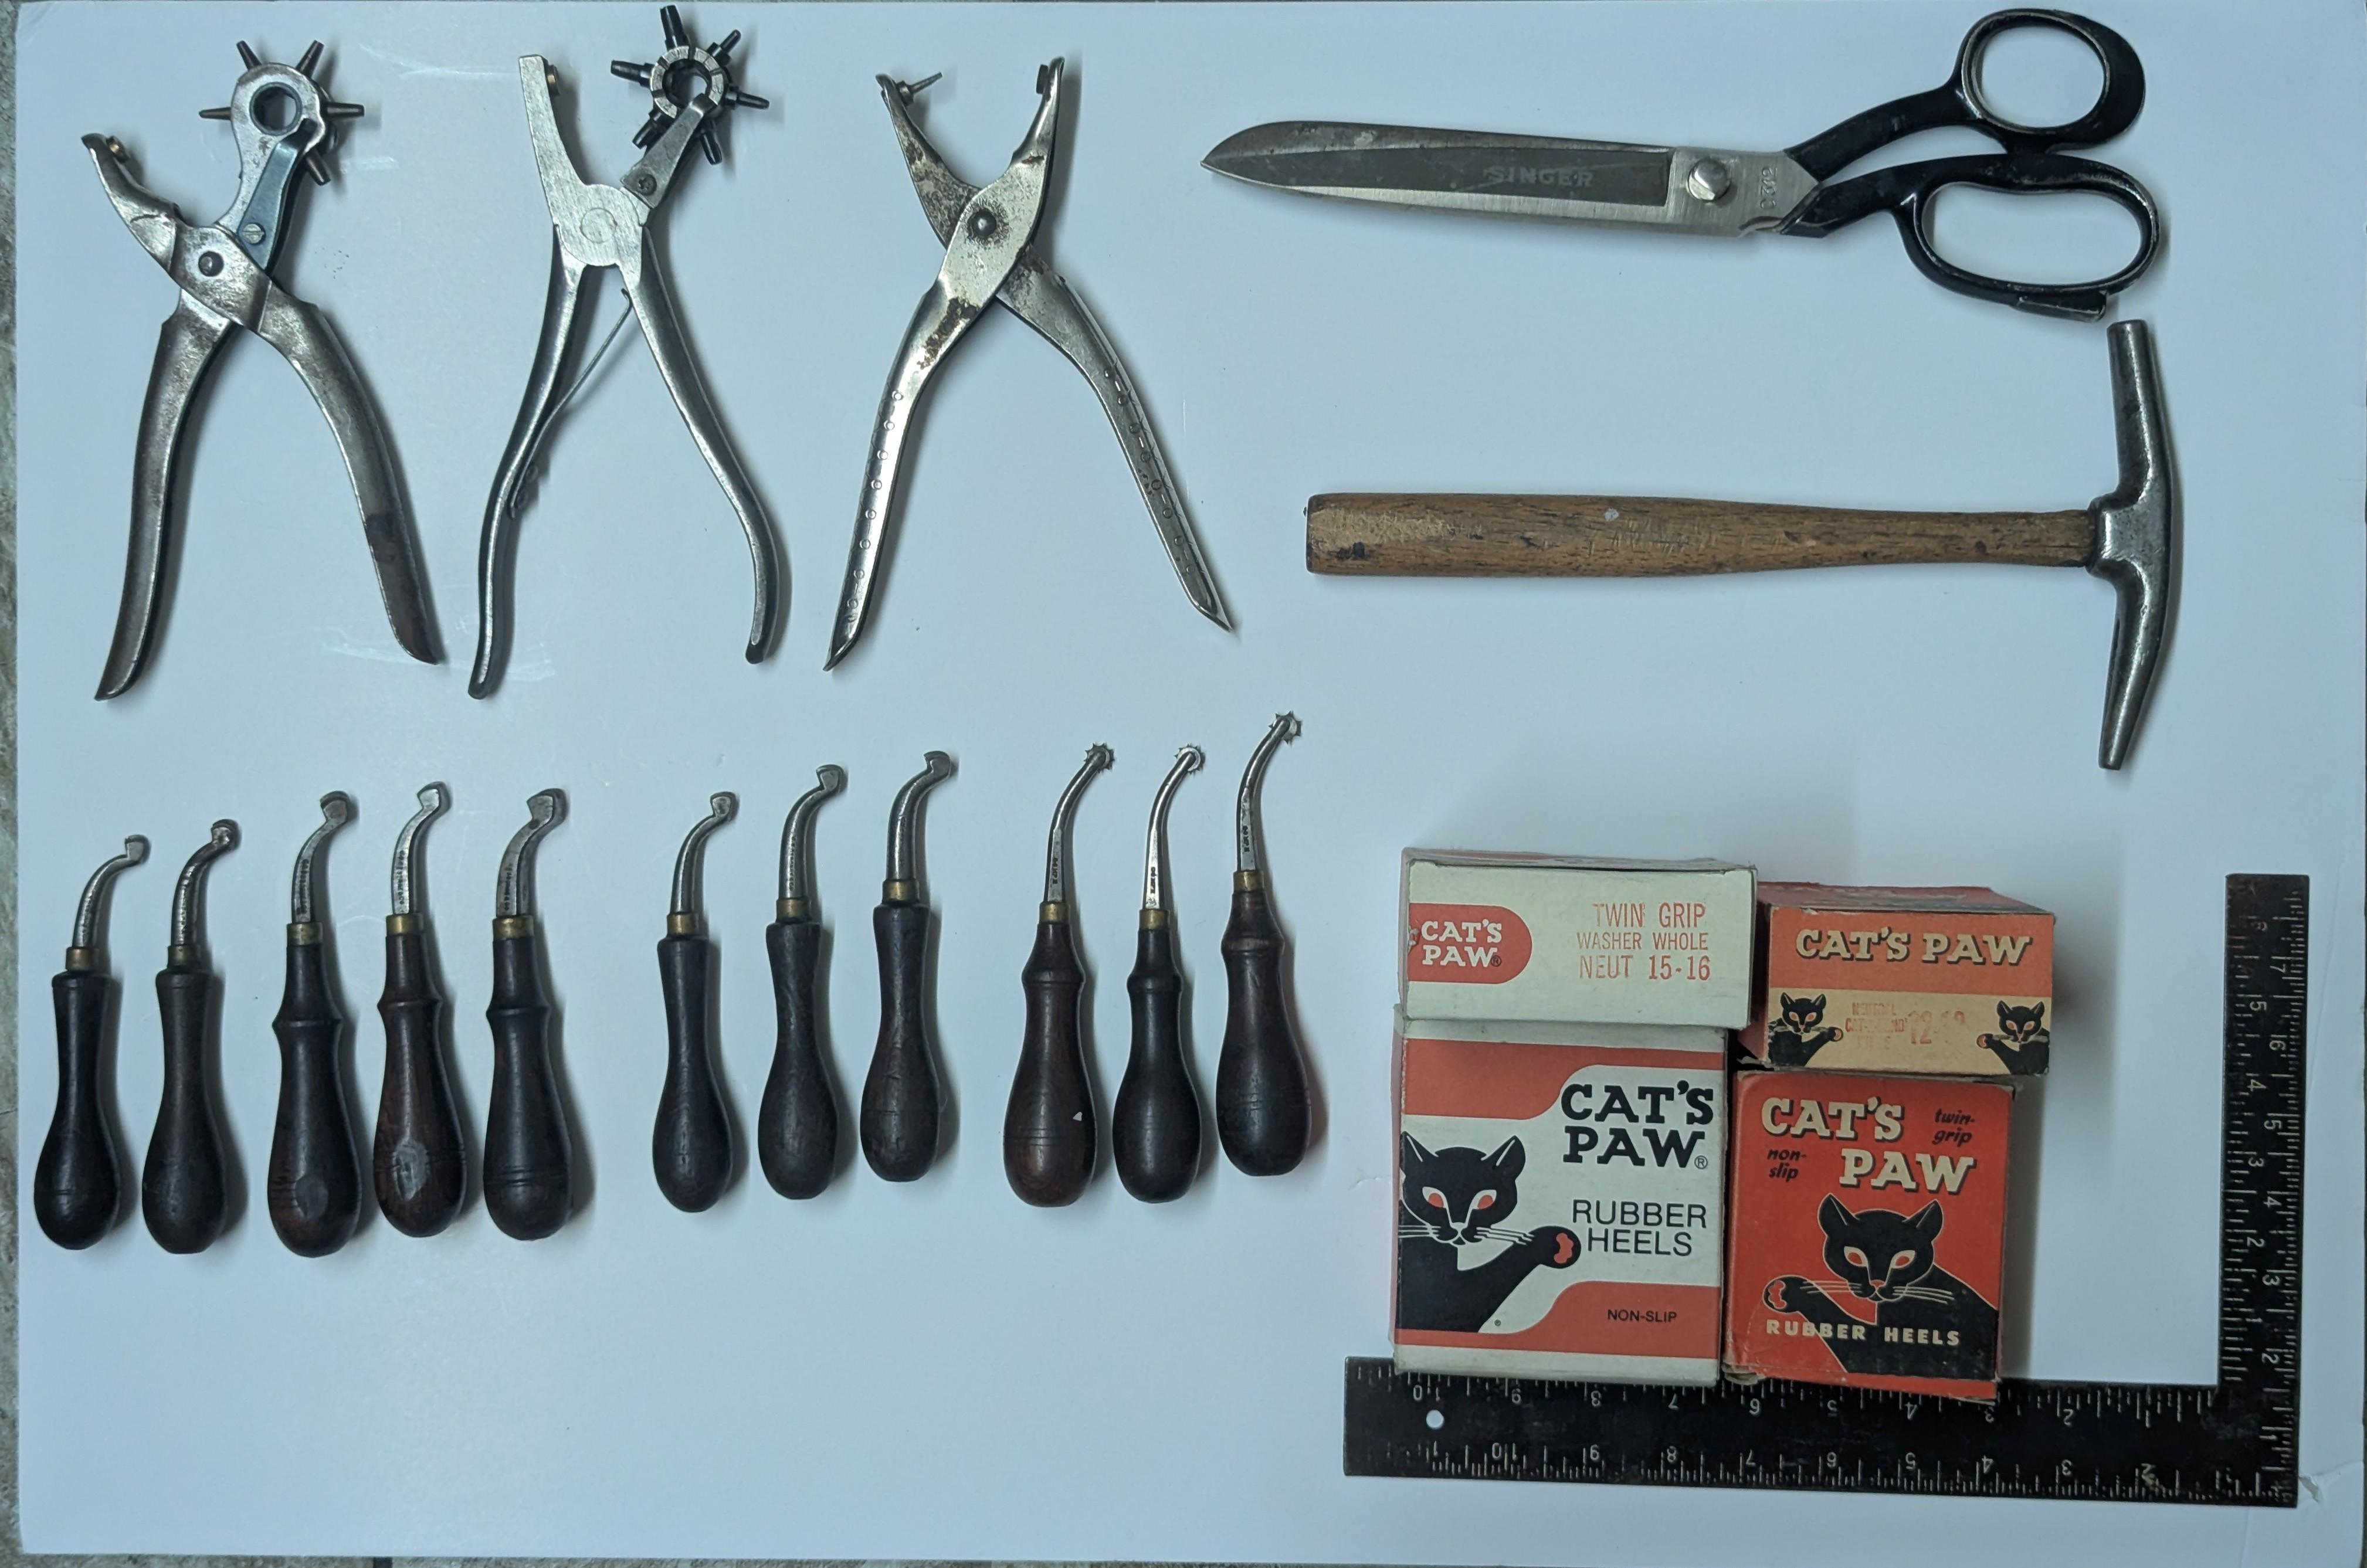
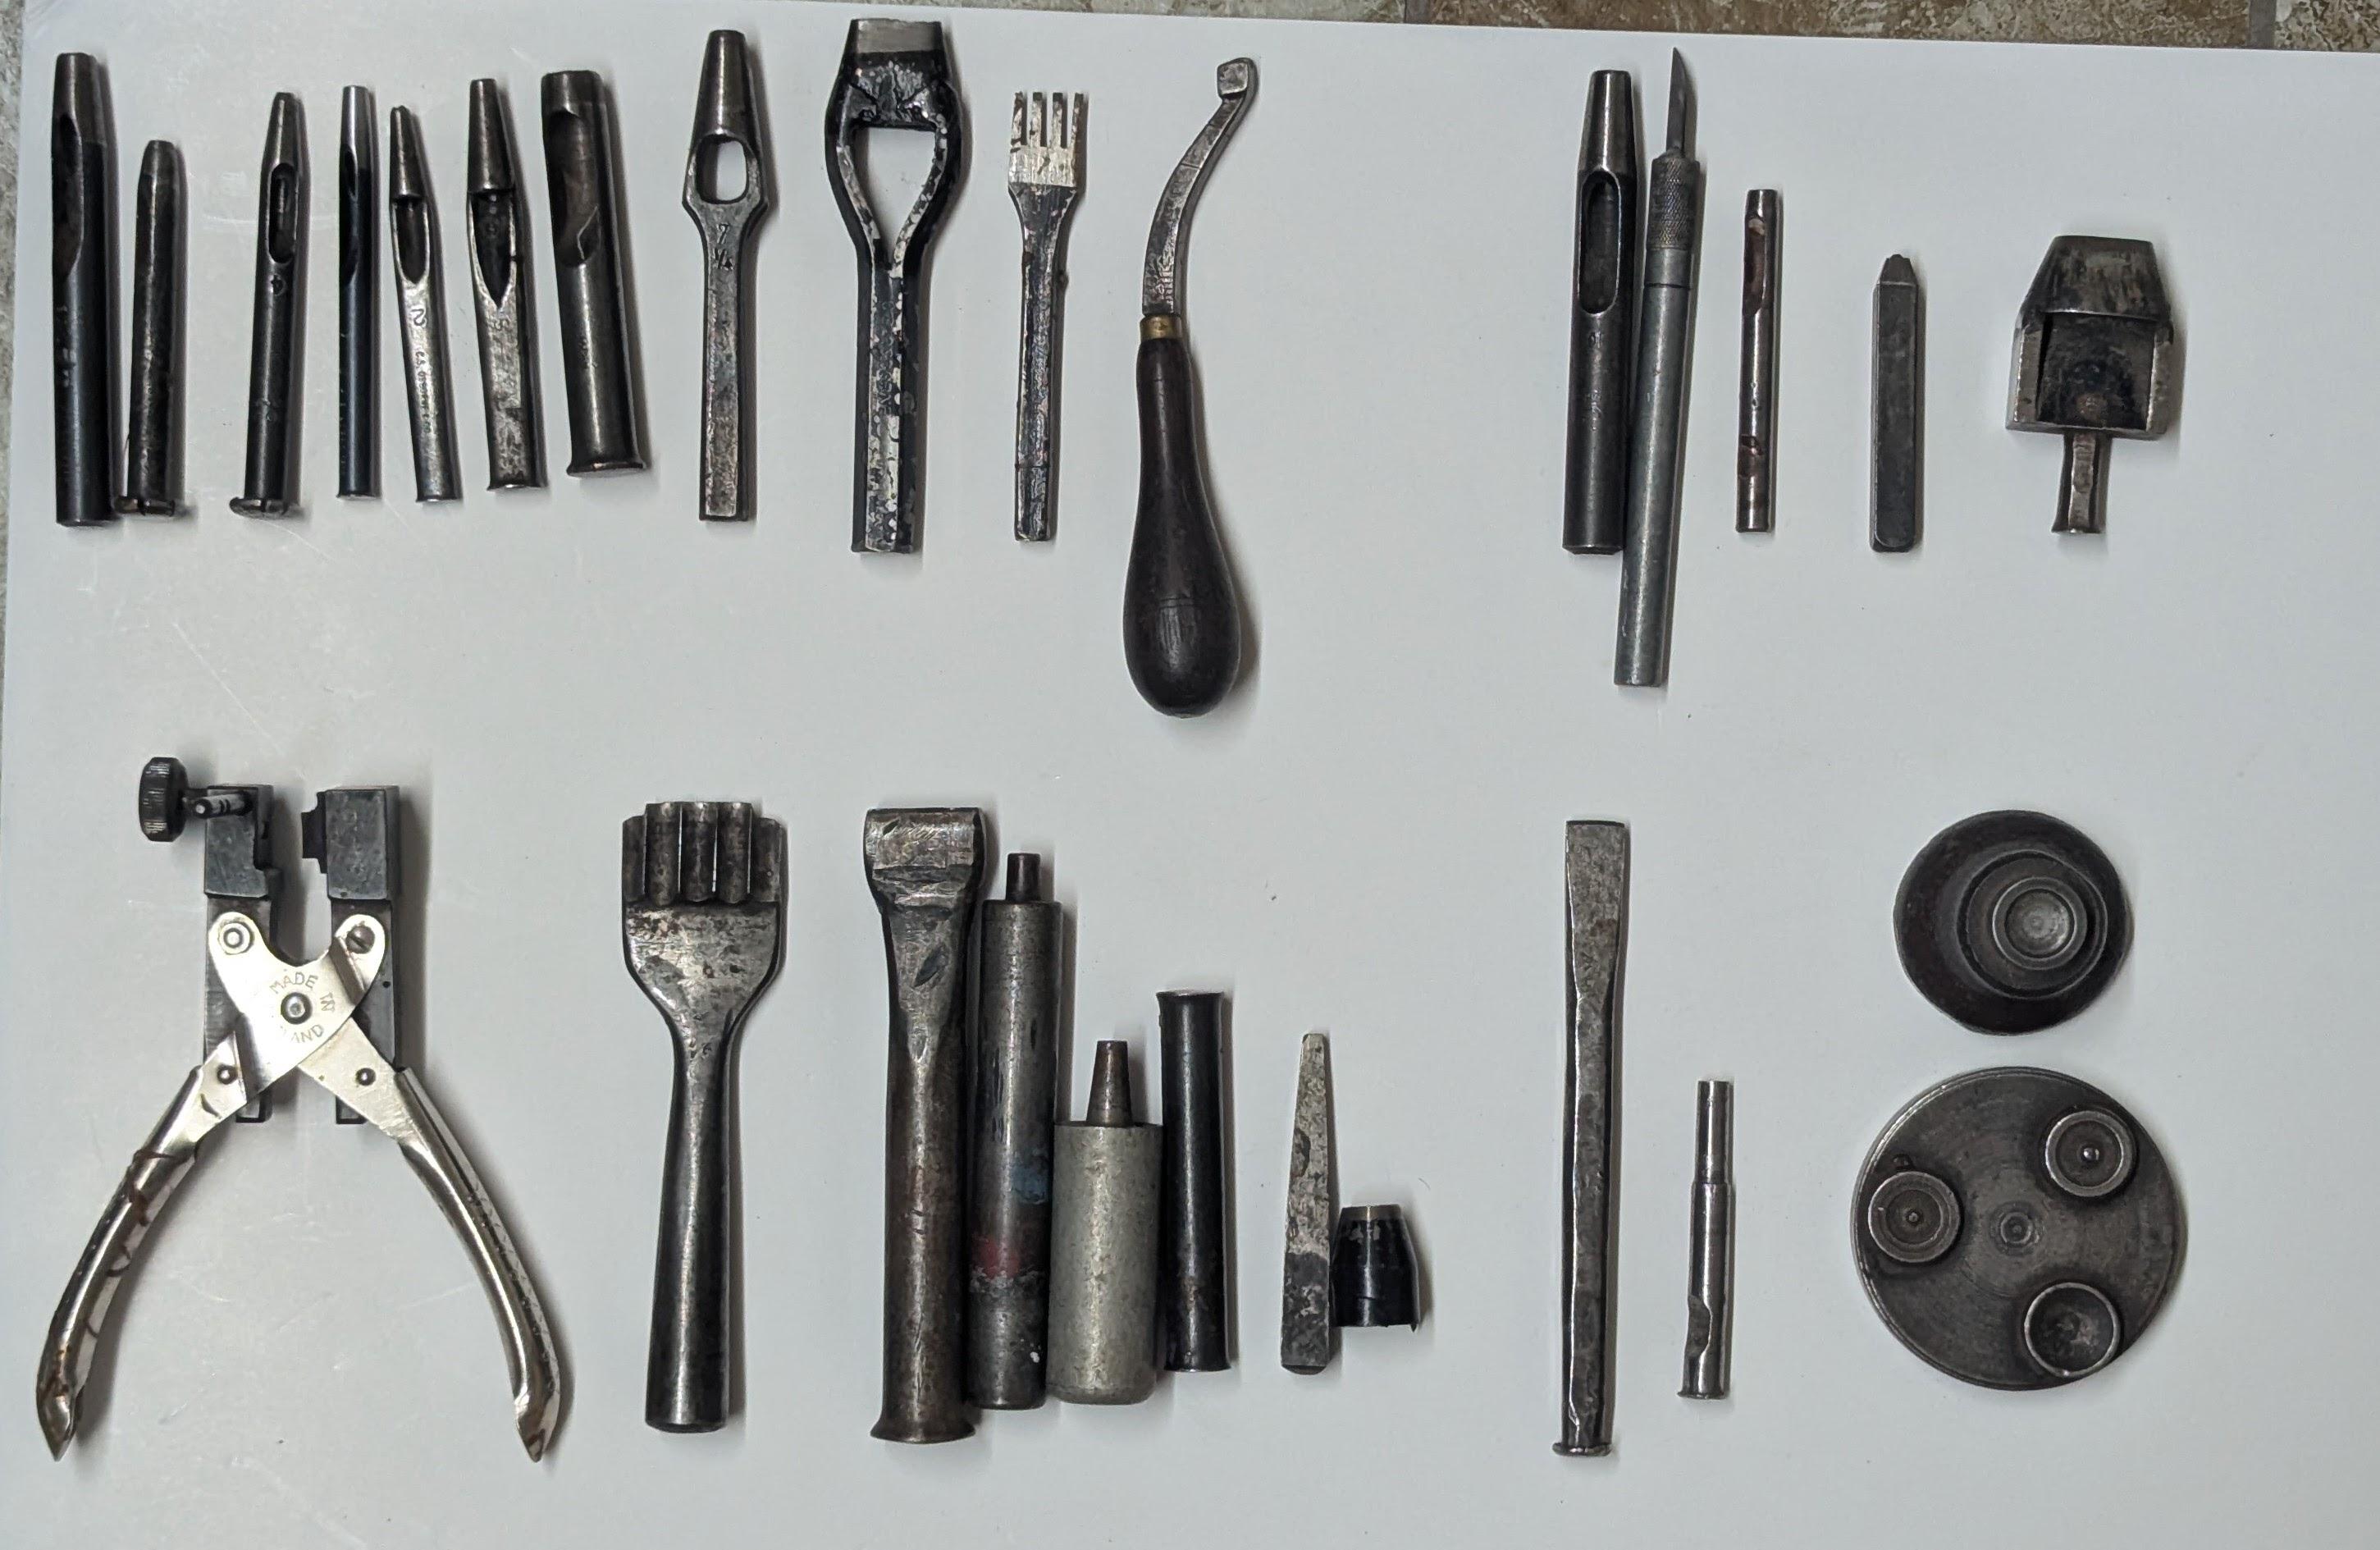
Hey everyone, I'm selling a bunch of vintage and antique leathercraft and cobbler tools that belonged to my dad. I put together a full numbered list of the items, and matched each one with a picture in this Imgur album: https://imgur.com/a/AjGKXD3 Each photo has a number in the description so it's easy to reference. The images are in the same order as the list. My dad bought a cobbler/leather shop in the 90s from a guy who had it since the 50s, and he had bought it from someone who started it in the 30s. So some of these tools are seriously old. One of them dates back about 165 years. A lot of them haven’t even been used in 30+ years. My dad’s close to retiring and I really don’t want to get stuck with all this stuff, so I’m trying to sell it now. I’m not in the trade myself, and I don’t have prices set so feel free to send me an offer for anything you’re interested in, whether it’s just one tool, a small bundle, or even the whole collection. Just keep in mind shipping is extra. It already took a ton of time just to identify and photograph everything, so figuring out prices on top of that was a bit much. If you want more pics or have questions about a specific tool, just ask me. I’ll help however I can. I'm in Montreal, Canada. I can ship almost everything — the only stuff I’d rather not ship are the bigger machines like the Singer 29K60. But if you’re seriously interested, we can see if there’s a way to make it work. I broke the list down into four parts: items in good/new condition with known brand/size items in good condition without brand/size info items in bad condition items I couldn’t identify (some might not even be for leatherwork) Here’s the full list: Mitutoyo 141-133 IMS-12" Inside Micrometer Rod Set, Not Complete Durex industrial 27-piece letter ⅛” letter stamps square (“J” missing) Pincers Cutter tool 10” Lasting Pliers with hammer tool Pincers Cutter tool 8” (3) Pincers Cutter tool 7” Cantle Pliers Pliers Cumbrian Made in England Cutting Nipper Eyelet Leather Punch/Driver Wiss Inlaid No. 20 Scissors Jeweler or Machinist Hammer with screwdriver C.S Osborne Draw Gauge Stitching Awl Wood Chisel Fuller (2) Singer 29K60 Singer 291U3 Landis Shoe Finisher Landis 5 in 1 Antique F.H. Smith MFG CO The Universal Press Punch Eyelet Hole Punch Machine Press (2) Shoemaker's Anvil Bench Vice Auto Soler Heel Wheel C.S OSBORNE #0150 ⅝ Strap End Punch (English Point) Kraeuter #27 11/16 Arch Punch Tool Kraeuter #27 ½ Arch Punch Tool C.S OSBORNE #500 3A Grommet Hole Cutter Kraeuter #27 ⅝ Arch Punch Tool C.S OSBORNE ½ Round Punch Tool C.S OSBORNE #245 3/16 Belt Punch Tool Kraeuter #350 Size 4 Rivet Setters C.S OSBORNE #151 1 ¼ Bag or Oblong Punch Tool Rare W.M DODD C.S OSBORNE #151 1 ⅛ Bag or Oblong Punch Tool Made between 1856 - 1861 C.S OSBORNE #216-3 Plain Grommet Inserting Dies C.S OSBORNE #216-2 Plain Grommet Inserting Dies Split-Head Magnetic Tack Hammer Singer C312 Scissors Set-Square Revolving 6-Hole Leather Punch (2) Maun Industries Spring Punch C.S OSBORNE #21 Size 5 Creaser Large C.S OSBORNE #21 Size 1 Creaser Large C.S OSBORNE #21 Size 3 Creaser Large C.S OSBORNE #21 Size 5 Creaser Small C.S OSBORNE #21 Size 3 Creaser Small C.S OSBORNE Double Line Creaser Size 2 C.S OSBORNE Double Line Creaser Size 3 C.S OSBORNE Double Line Creaser Size 4 Gomph Space Marker Size 8 Gomph Space Marker Size 5 Gomph Space Marker Sizer 7 Cat’s paws Rubber Heel 15-16 Twin Grip Brand New (2) Cat’s paws Rubber Heel 12-13 Twin Grip Brand New (2) The following items have no brand and/or size on them 55. Belt Punch Tool 56. Belt Punch Size 10 Tool 57. Oval Drive Punch 58. Knife 59. Digit “1” Stamp 60. C.S OSBORNE #21 Size ? Creaser Large The following items are in bad condition 61. Arch Punch ¼ 61. C.S OSBORNE #151 ¾ Bag or Oblong Punch Tool 63. C.S OSBORNE #245 5/16 Belt Punch Tool 64. C.S Osborne #147 Size 2 (⅛) Round Punch Tool 65. Priory Size 4 Belt Punch Tool Made in England 66. Belt Punch Tool Made in Japan No Size or Brand 67. C.S OSBORNE #147 3/16 Round Punch Tool 68. Priory Size 5 Belt Punch Tool Made in England 69. C.S OSBORNE #245 3/16 Belt Punch Tool 70. C.S OSBORNE Chisel The following items I don't know what they are. Some may not even be related to leather. See the images on imgur
-

Adler 205-370 - help an old man who screwed up
councilman24 replied to councilman24's topic in Leather Sewing Machines
This is the only machine that has this spring loaded shuttle race. Unless Adler's new one, 969 I think, does. -
Adler 205-370 - help an old man who screwed up
councilman24 replied to councilman24's topic in Leather Sewing Machines
Not that I can find. Found one on setting neesle bar height bit not on turning shuttle timing. I figured it out and it's sewing but don't know what I don't know. -
 Hi everyone, I’m selling a SINGER 29K71 on behalf of a retired cobbler. I’m a shoemaker in Australia and I only have used my 29K71 for leather used in shoemaking, probably maximum 3mm thick. A person wants to buy it but they’re asking about the maximum thickness that this machine can stitch. The information I found on the net says 8mm. I tried to stitch two pieces of veg tan leather together (8mm) total and the leather doesn’t even move. The needle is going into the same position all the time. The machine stitches nicely on a lighter weight leather (2mm) but not with 8mm. Can someone’s share their experiences please?
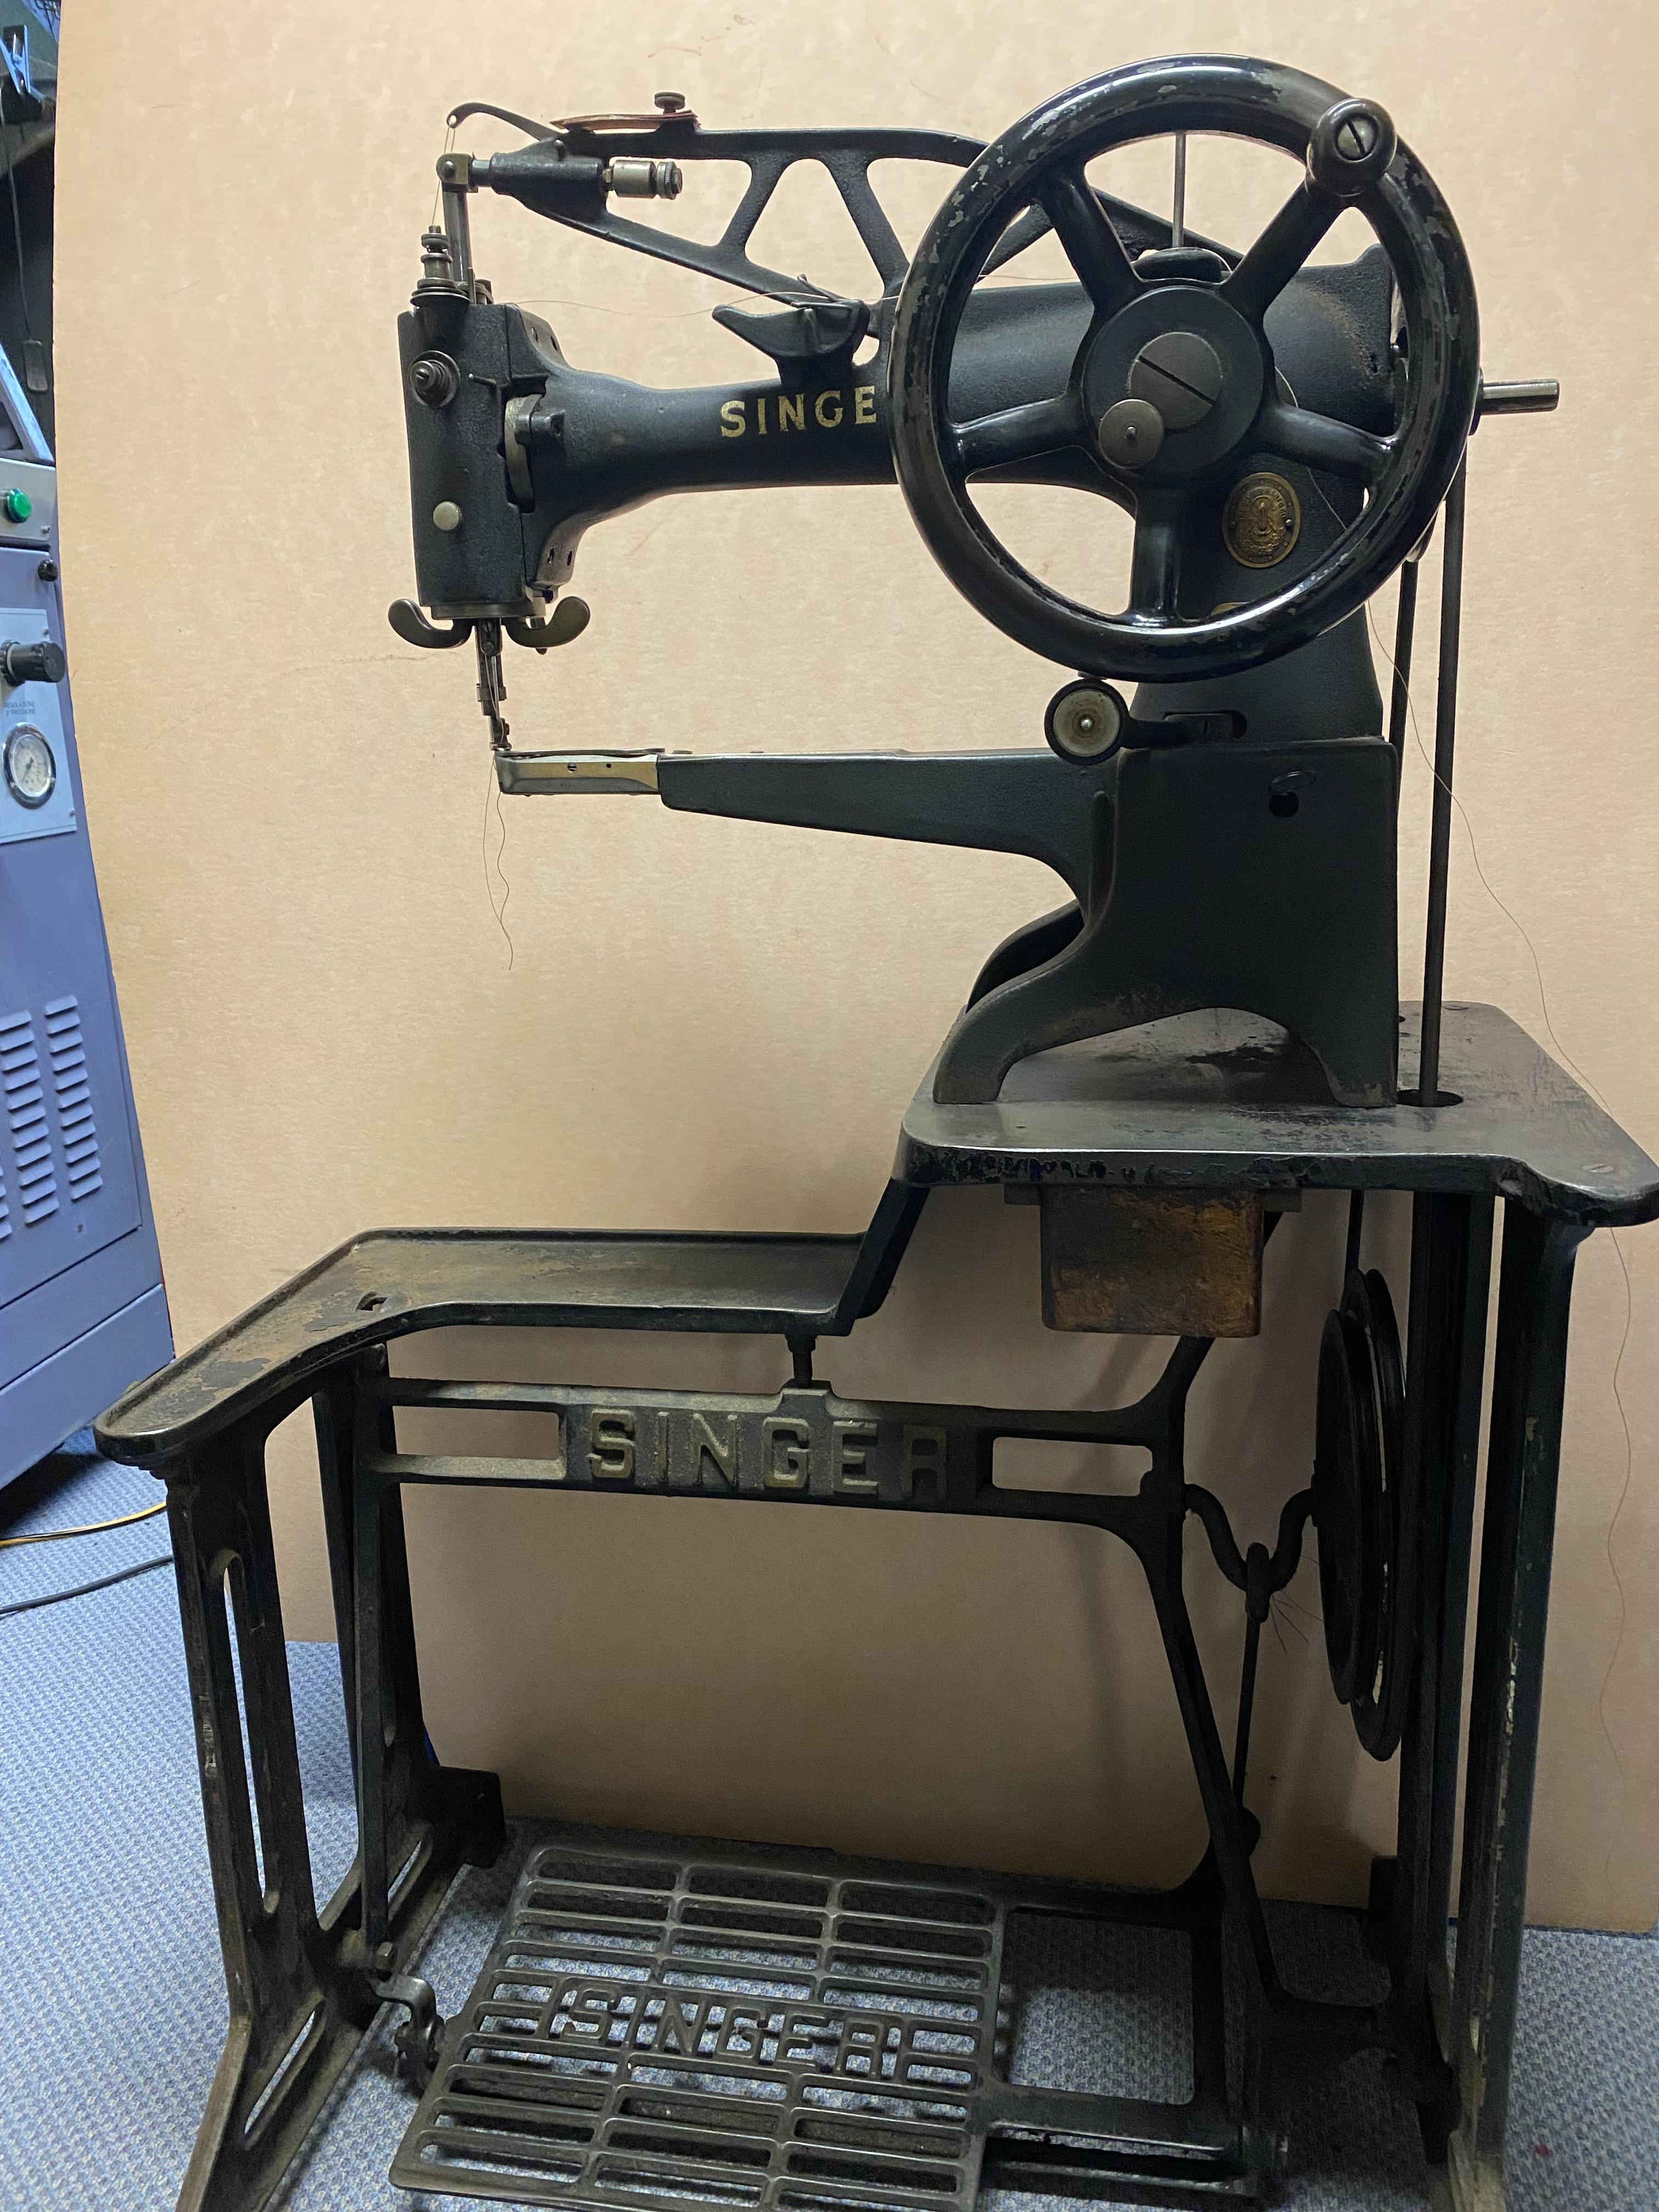
- Today
-

Adler 205-370 - help an old man who screwed up
Goldshot Ron replied to councilman24's topic in Leather Sewing Machines
Weaver has a good video on Youtube for timing your 205. -
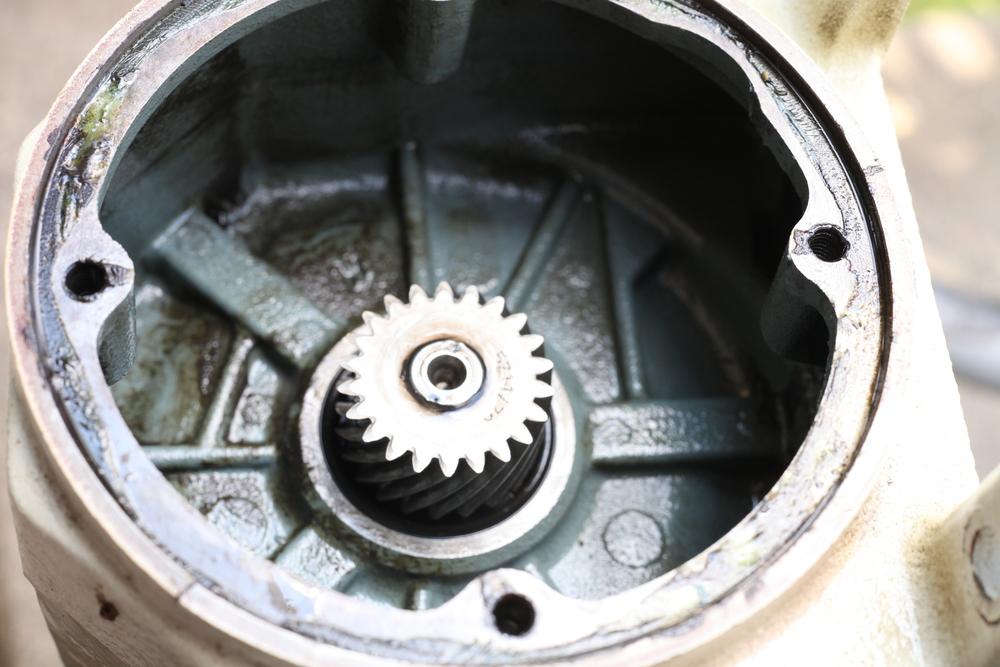
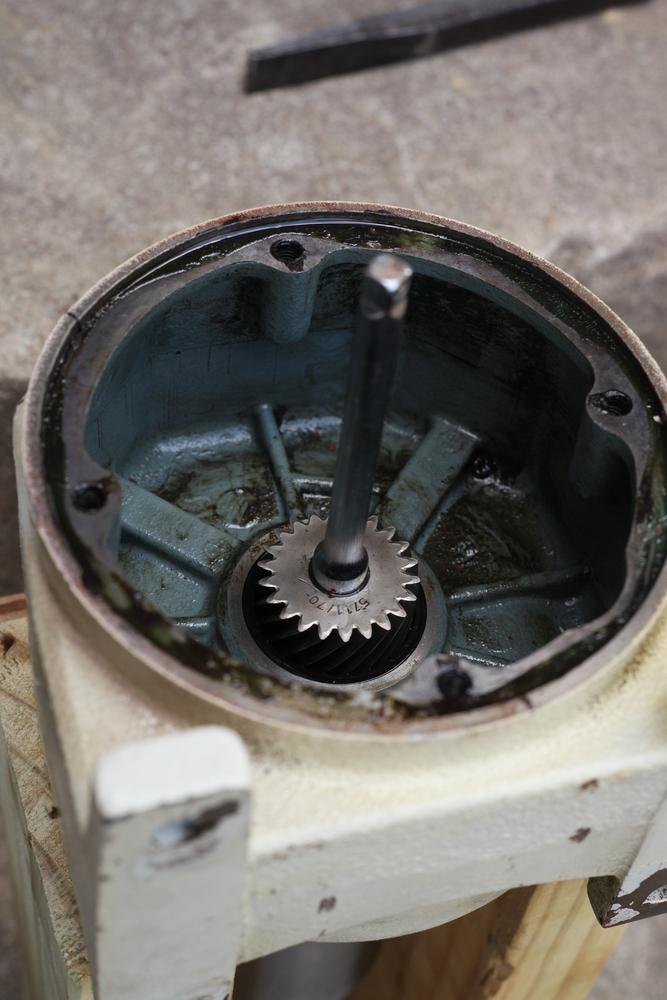
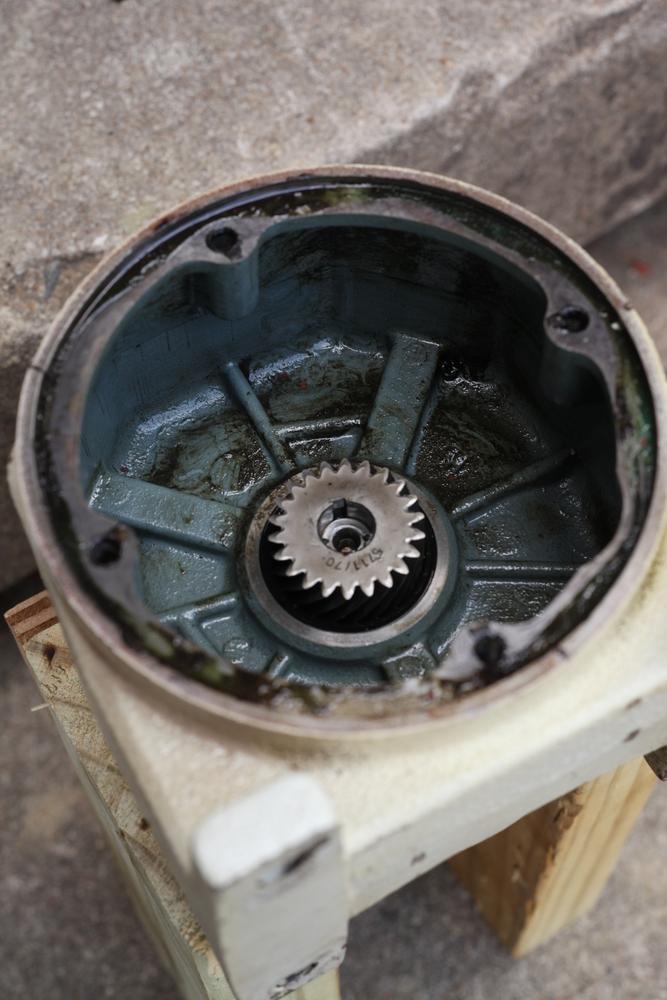
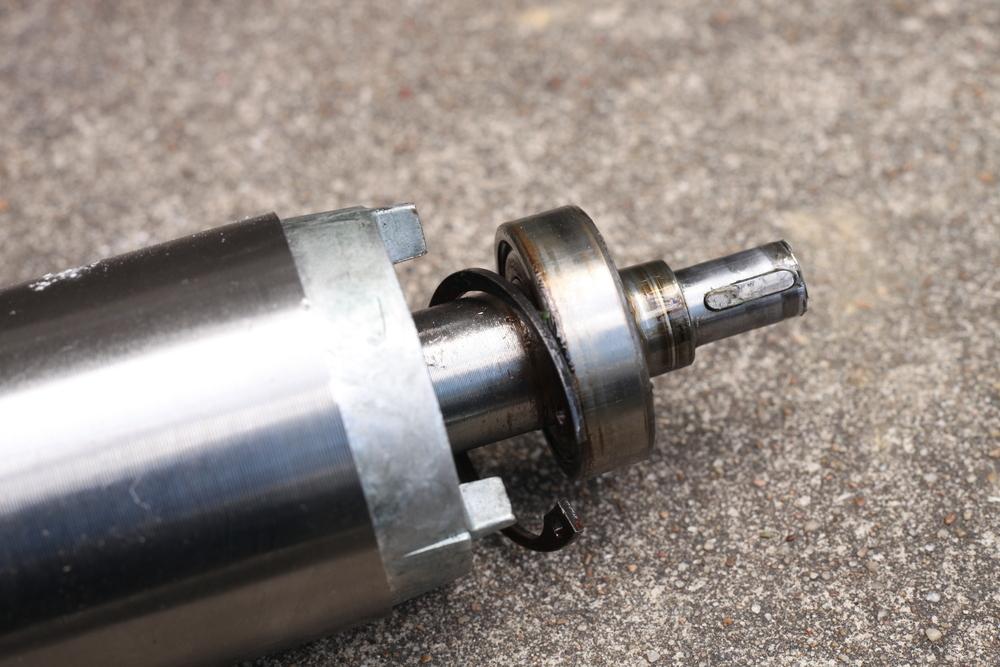
Here's how to replace the bearing on the gearbox end of the motor shaft. There is a big circlip on the motor side of the gearbox. (There will be a photo later) Make sure you remove that before you do any pounding This first image shows the gearbox after you remove the four cap bolts and pull the cap off. This model has two dimples in the shaft to mushroom it out to keep it on. I moved the dimples back inline with the shaft using punch, then used a 1/4 inch drive socket extension and a sledgehammer to drive the shaft out. Here is the bearing that needed replacement the most. Note the large circlip behind it---that's the one you have to remove before you do any pounding. Now that the bearing is out of the gearbox, I used a 3-jaw puller. By the way, notice the paint on this one is white. This is a second gearmotor (same make and model) from the same ebay seller. This time better paint, but still needed a new bearing. I replaced both bearings on the motor shaft, both are size 6203. I did not replace any bearings at the gearbox output shaft. They turn smoothly already, and they get a lot less revolutions than the motor bearings! Good news is, this motor runs quiet with the new bearings. (Can't hear it with the VFD fan running anyway.) I'll be replacing the motor shaft bearings on the other motor soon.
-

Adler 205-370 - help an old man who screwed up
friquant replied to councilman24's topic in Leather Sewing Machines
Nice work! I aspire to own a machine like this someday, so tucking these notes away for future me 😀 -
Getting started, mainly wallets and gunslings (salmon leather inlays)
AlZilla replied to Birchee's topic in Getting Started
You should look at some of this guys posts. He's an experienced leather crafter who has recently done some projects with minimal tools. I don't know that he's created a list but I think a person could extrapolate a list from his projects. Click on his user name to get to his profile page from which you can see his posts. I'm no good at making lists like this. EDIT: here's the post I was looking for. He basically started from scratch: -
Nice!
-
 Hi all, I have been making salmon leather (russia leather style) for a few years now as well as some conditioner and wax all based off birch tar. They have become pretty popular in the area and I have people asking me if I can create some items like wallets and gunslings and use the salmon leather as inlay. There are no leather workers anywhere in this area that I am aware of. All things leather has my interest and so I would like to start learning, I have made a basic list to get started, if I am m issing something or you have any recommendations please do! - Utility knife / Xacto knife - Metal ruler + metal square - Japanese skiving knife - Hole punch - Stitching chisels (high quality) - Awls - Strap cutter - Stitching pony - Self healing cutting mat / board How does that look for starting?
 -
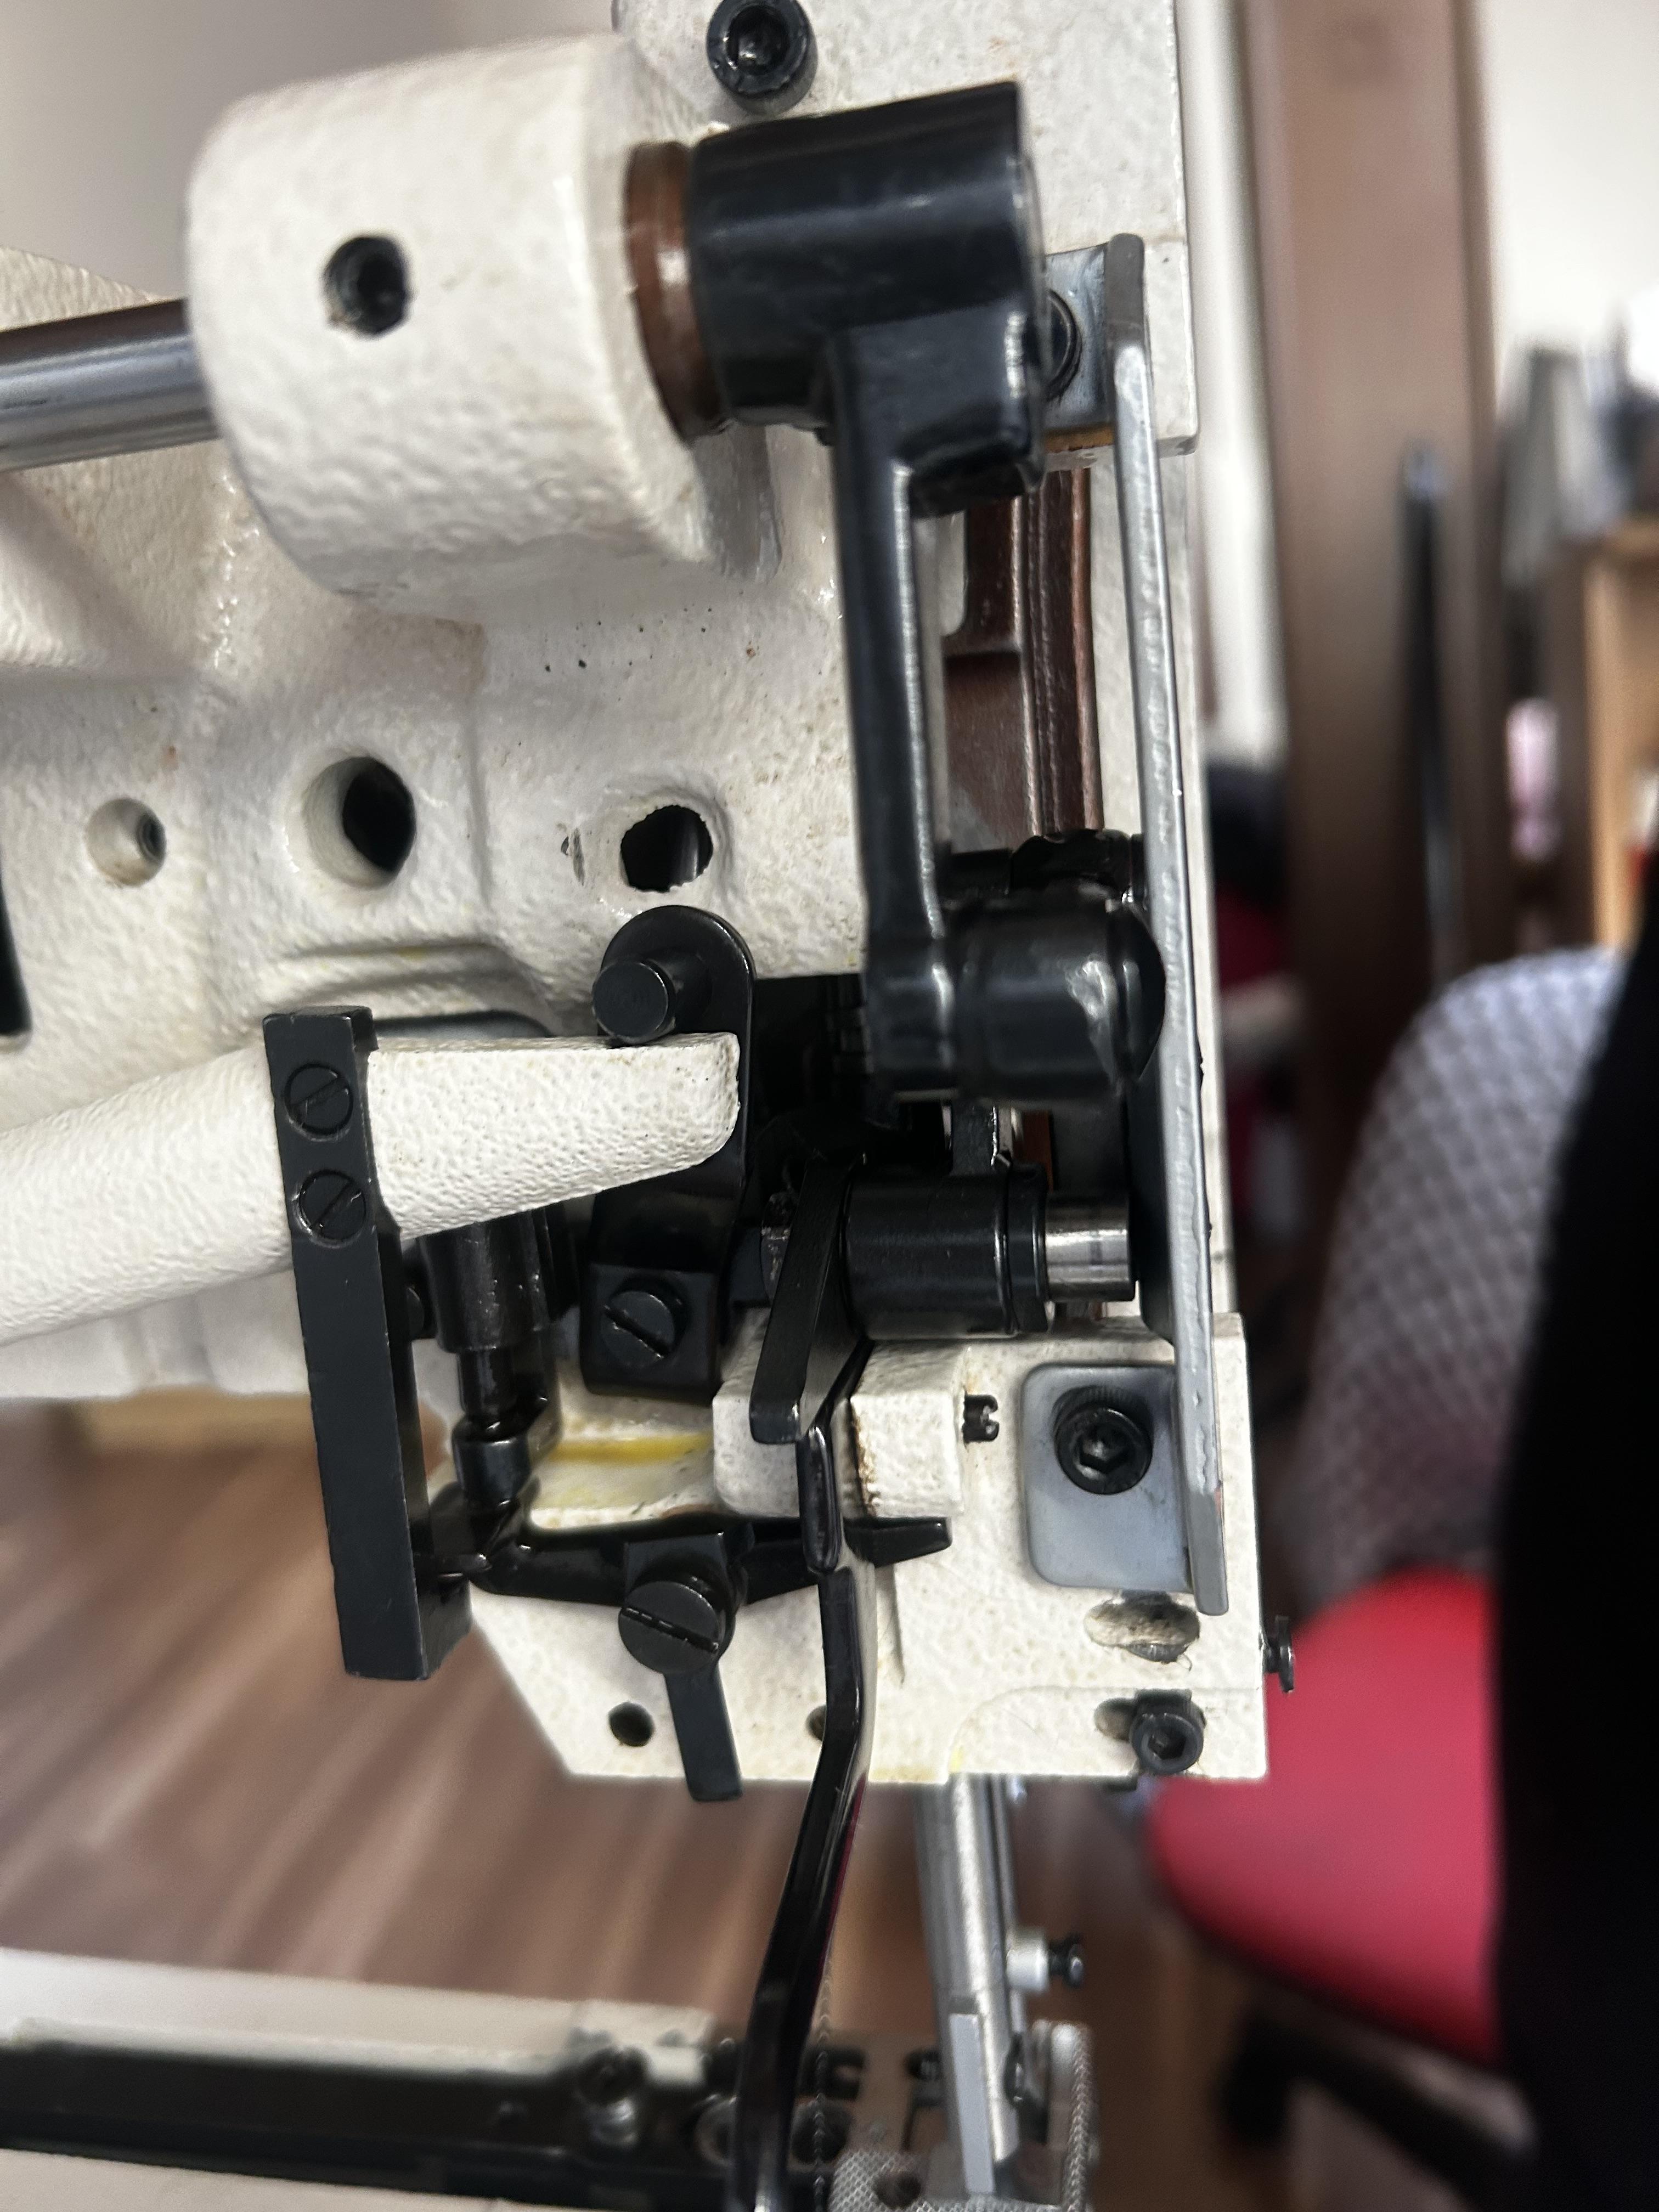
Thank you, I'm currently taking the whole machine apart, cleaning it and putting it back together 😂
-
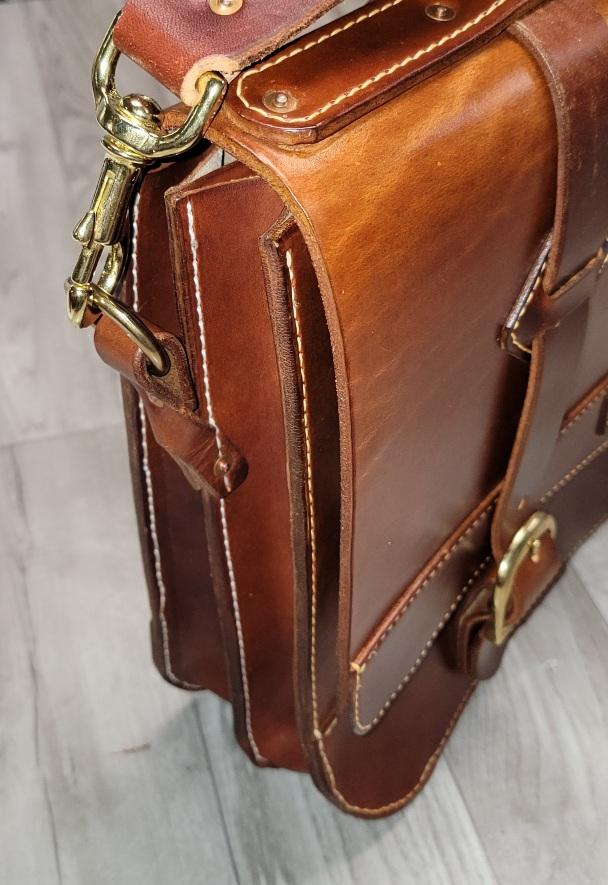
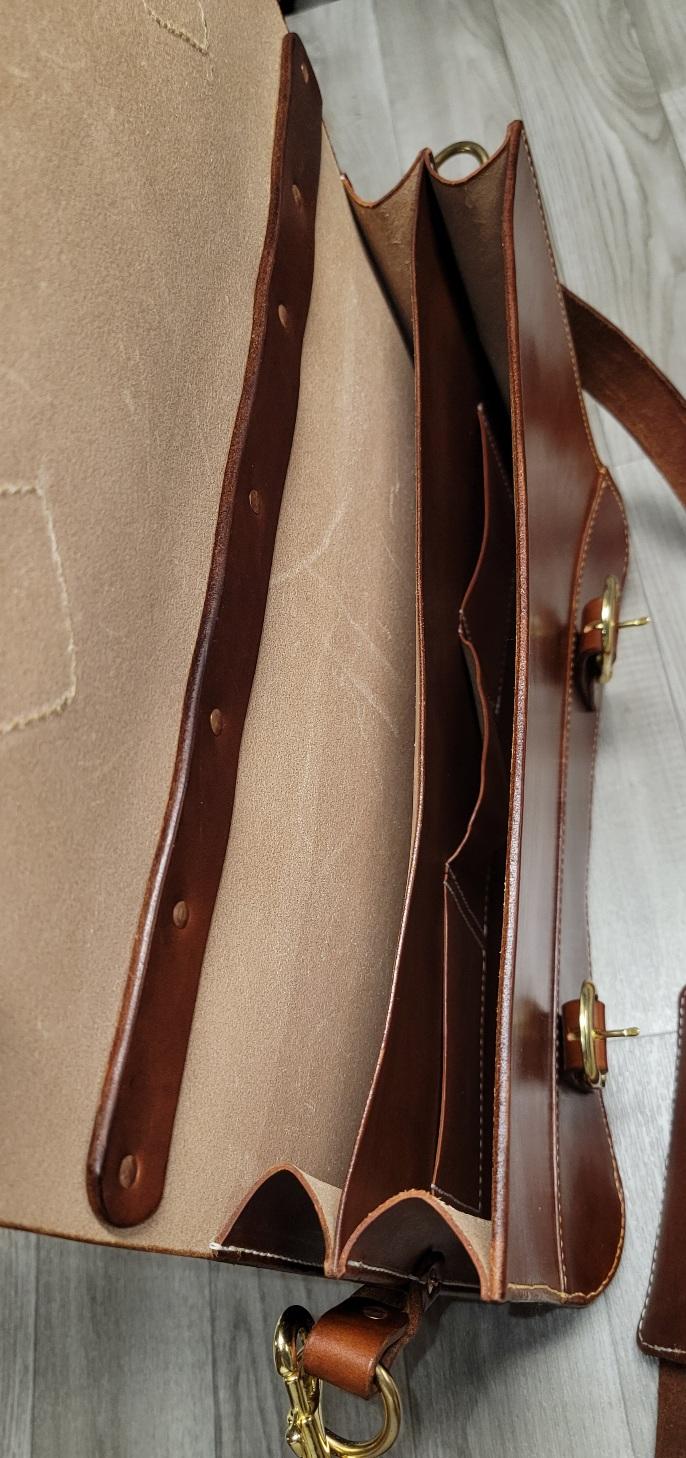
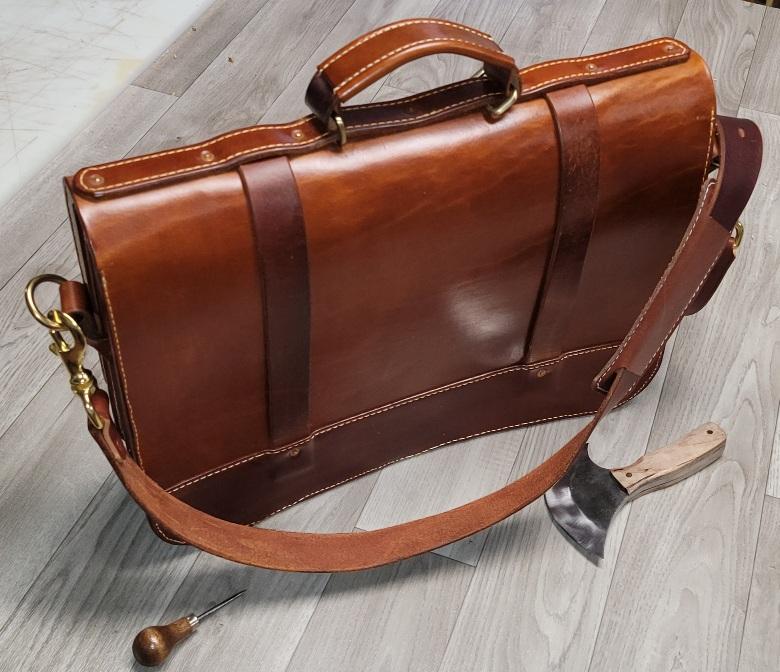
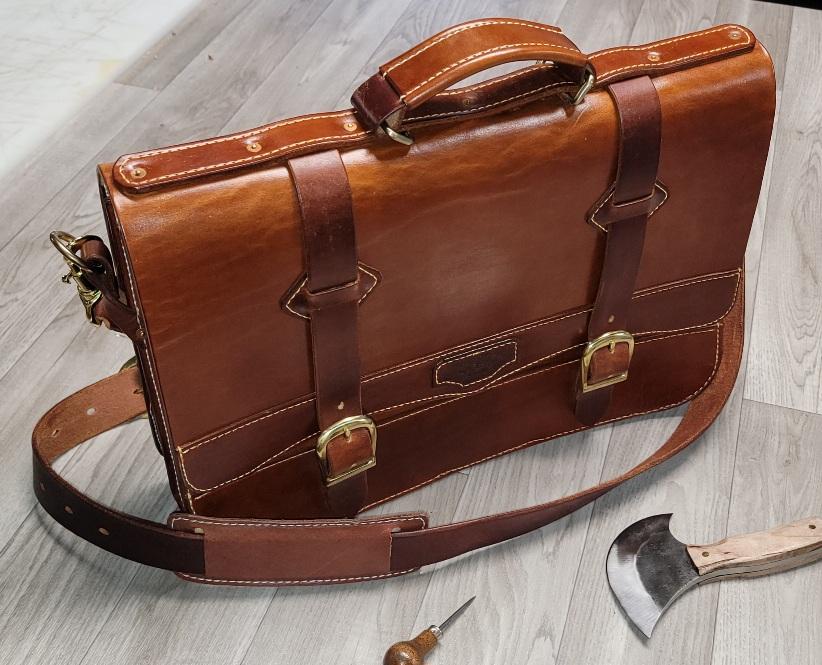
I have a large laptop with a 17" Screen so I decided to make a bag to fit it. The bag 17"X 11.5"X 4" I used 10oz vegtan for the front and back panels as well as the shoulder strap, 5oz for the center divider. I played around a bit with the shoulder strap attachment points and came up with a different design than what I've seen before.
-
Hi Romana, What material are you sewing? Does the machine make good stitches? Presser Foot Pressure On my machines I typically reduce the force of the presser foot because it's uncomfortable to lift the presser foot otherwise. But I'm stitching lightweight materials predominantly. @Wizcrafts is often reminding us that the presser foot must not lift off the table when the thread take up lever tugs on the top thread to complete the stitch. In some cases (stitching on corrugated plastic signs when i do not want to crush the signs) I remove the main pressure spring altogether. But for thinner material I have to put the spring back in or the feet don't contact the cylinder bed well enough. Lubrication In the case of the Pfaff 545, I needed to add a healthy dose of grease to the plates on the back of the machine where the knee lift connects---otherwise it was noisy and hard to move the knee lift. Comfort Grips Also in the case of the Pfaff 545, the hand lever for lifting the presser feet is so tiny and awkward that I wrapped some foam around it and held it in place with duct tape. This made it somewhat more comfortable to lift by hand. (The knee lift was much better after greasing)
-

Maintanence Question on Juki 1508 NH
MarineBozo replied to MarineBozo's topic in Leather Sewing Machines
Thanks for the reply friquant. I originally suspected the plates as well and really oiled it but like you said, I may not be able to really get the oil where it needs to be without taking it apart. I'll check that out this week and report back. -
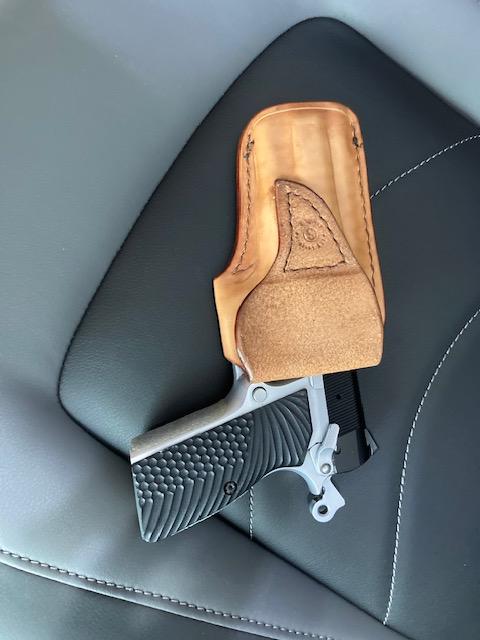
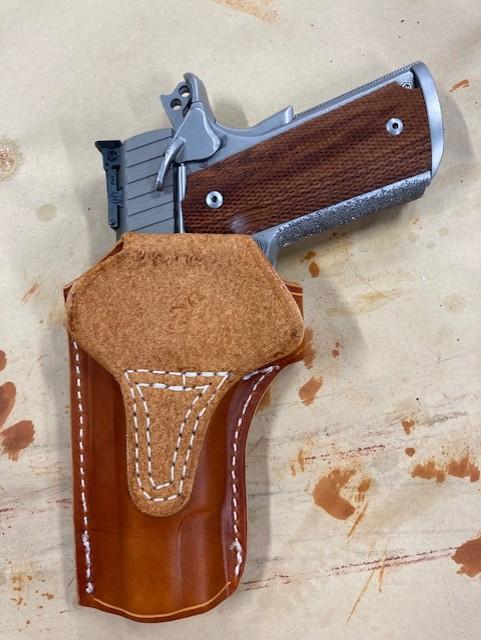
@larry1096 I see your loop design. it looks more maneuverable than mine. Its narrower at the fold so you can move the "ears" out of the way. Ill have to tweak my pattern to reflect that. Looks good
-
Hello, does anyone have instructions on how to adjust the back of the machine? It's a Pfaff 335 clone. It's hard to lift the presser foot.
-
Yup, it looks comfortable but I havent tried it on yet. Shame on me haha. If I wasn't in arizona (where wearing long garments is much frowned upon) I'd consider it for daily carry. I still could, AZ is open carry too. But I dont much care for broadcasting like that. Just me I suppose
-
I've found you can make your life easier (i.e., get some breathing room around the stitching) by being sure to run the rear flap straight down the body of the holster; requires tweaking where it folds, of course, but it's doable. Larry
-
Nice work!! high and tight holster.
-
Thanks, it is interesting and fun to make
-
Birchee joined the community
-
I like the design. It's the next step more coverage from a Yaqui Slide.
-
Yes, the hardest part is stitching near the belt loop. My presser foot is realy wide, I should have swapped it out for mt left toe foot. The loop causes the holster to not lay flat so get some deflection sometimes. Probably my inexperience with my outlaw machine. Definitely going to try again
-
Option D : 3-Phase AC Gearmotor with VFD (Variable Frequency Drive)
friquant posted a blog entry in State of the Servo Motor
Option D : 3-Phase AC Gearmotor with VFD See the parent article: Choosing a Motor The lesser known of motor options is the 3-phase AC Gearmotor with VFD (variable frequency drive). This option gives excellent driveability (does what you ask with no surprises) but requires a fair amount of setup. 1. Interesting Posts about 3-Phase AC Gearmotors with VFD The search bar on the forum does not support three letter words like “awl” or “VFD”. So you will have to use an external search engine to find posts on VFD. Try this search for example: https://www.google.com/search?q=vfd+site%3Aleatherworker.net Here are some forum posts to get you started: GerryR: Description of his VFD setup Tigweldor: How to build a portable VFD GerryR: Adapting a 3-phase clutch motor for use with VFD GerryR: How to get started with VFD TinkerTailor: "The sewing world has not embraced vfd like the machinist world it seems, though in theory it is likely the best way to go for a slow moving leather stitcher." friquant: Introduction to Gearmotors and VFD 2. What is an AC Motor Specifically, we’re talking about AC induction motors. Think table saw, bench grinder, garbage disposal, air conditioner fan. In typical use, an AC motor runs at a constant speed. For example, when you turn on the table saw or bench grinder you hear the motor goes WhOOOOSH for a couple seconds as it gets up to speed. Once at speed, it stays at about that same speed. (A little less under load than with no load). AC induction motors can be single phase or 3-phase. (We want 3-phase for use with a VFD.) The speed the motor turns depends on the frequency of the power source and on how many electromagnetic poles the motor has. As an example, a four-pole AC induction motor typically has a speed around 1400 rpm when fed 60Hz power from the wall. 3. What is a Gearmotor A gearmotor means a motor with a gear reducer added at the end. It looks more or less like a single unit. The gear reduction can be a little bit (like 3:1, which can also be written “3k”) or it can be a lot (like 200:1, which can also be written as “200k”). 2.1 Shopping for an AC Gearmotor Choose a motor size that is suitable. 100W (1/8 horsepower) to 400W (½ horsepower) is probably adequate Make sure your AC gearmotor is 3-phase Make sure your AC gearmotor can run on 220V power. (Some can run on either 220V or 380V) Choose a gear reduction that is suitable. (3:1, 5:1, 10:1 are probably the most suitable) Get one that mounts horizontally (sometimes called a “foot mount”) 4. What is a VFD (Variable Frequency Drive) A VFD (Variable Frequency Drive) is an electrical device that outputs 3-phase power (in the range of 220V) at whatever frequency you choose. (0Hz - 100Hz is typical). 4.1 Why do we want a VFD The speed of an AC induction motor is proportional to the frequency of the power source. The VFD allows us to send whatever frequency we want to the motor, between 0Hz and 100Hz, and the motor speed will change accordingly. 4.2 Shopping for a VFD When shopping for a VFD, make sure you get one that accepts as input power whatever power you have conveniently available. (110V single phase input is a common option.) Note VFDs will usually have a cooling fan that turns on when the VFD is engaged. Mine is louder than I would prefer. I may look for another one with a quieter fan. 4.3 Setting up your VFD When you first get your VFD you can test it out with your motor by using the knob on the front of the VFD to control the frequency. The motor will not move at all when the knob is set to 0Hz, but the hand wheel will still turn freely. Once you move the knob above 0Hz, around 1Hz you will start to see very slow movement in the motor. Turn the knob up high and it will go full speed. For actual use with a sewing machine, you will want an external potentiometer to tell the VFD how fast to go. Buying a TIG pedal is a cost-effective way to get a pedal with two potentiometers and an inline switch so that you can both engage the VFD and drive at whatever speed you want. Here is the TIG pedal I bought. Digging into the user manual for your VFD you will be able to find options for setting the minimum speed, maximum speed, and for limiting the acceleration. 5. Is a 3-Phase AC Gearmotor with VFD Right for Me Choose a 3-Phase AC Gearmotor if: You want the absolute best in terms of driveability. (Does what you want with no surprises) If you want the consistency of the needle always penetrating the fabric, without need to “get a run at it” You want full configurability of how fast your motor goes, and when. (Very slow start available!) You are comfortable wiring electrical equipment You understand basic electronic components such as potentiometers and switches You are comfortable reading technical manuals (The VFD will come with a manual) You are comfortable configuring electronic devices through their menus You want gear reduction without needing extra belts You are willing to buy a pulley separately that fits the gearmotor output shaft and your belt of choice You are willing to mount the motor yourself and come up with your own belt tensioning system