All Activity
- Past hour
-
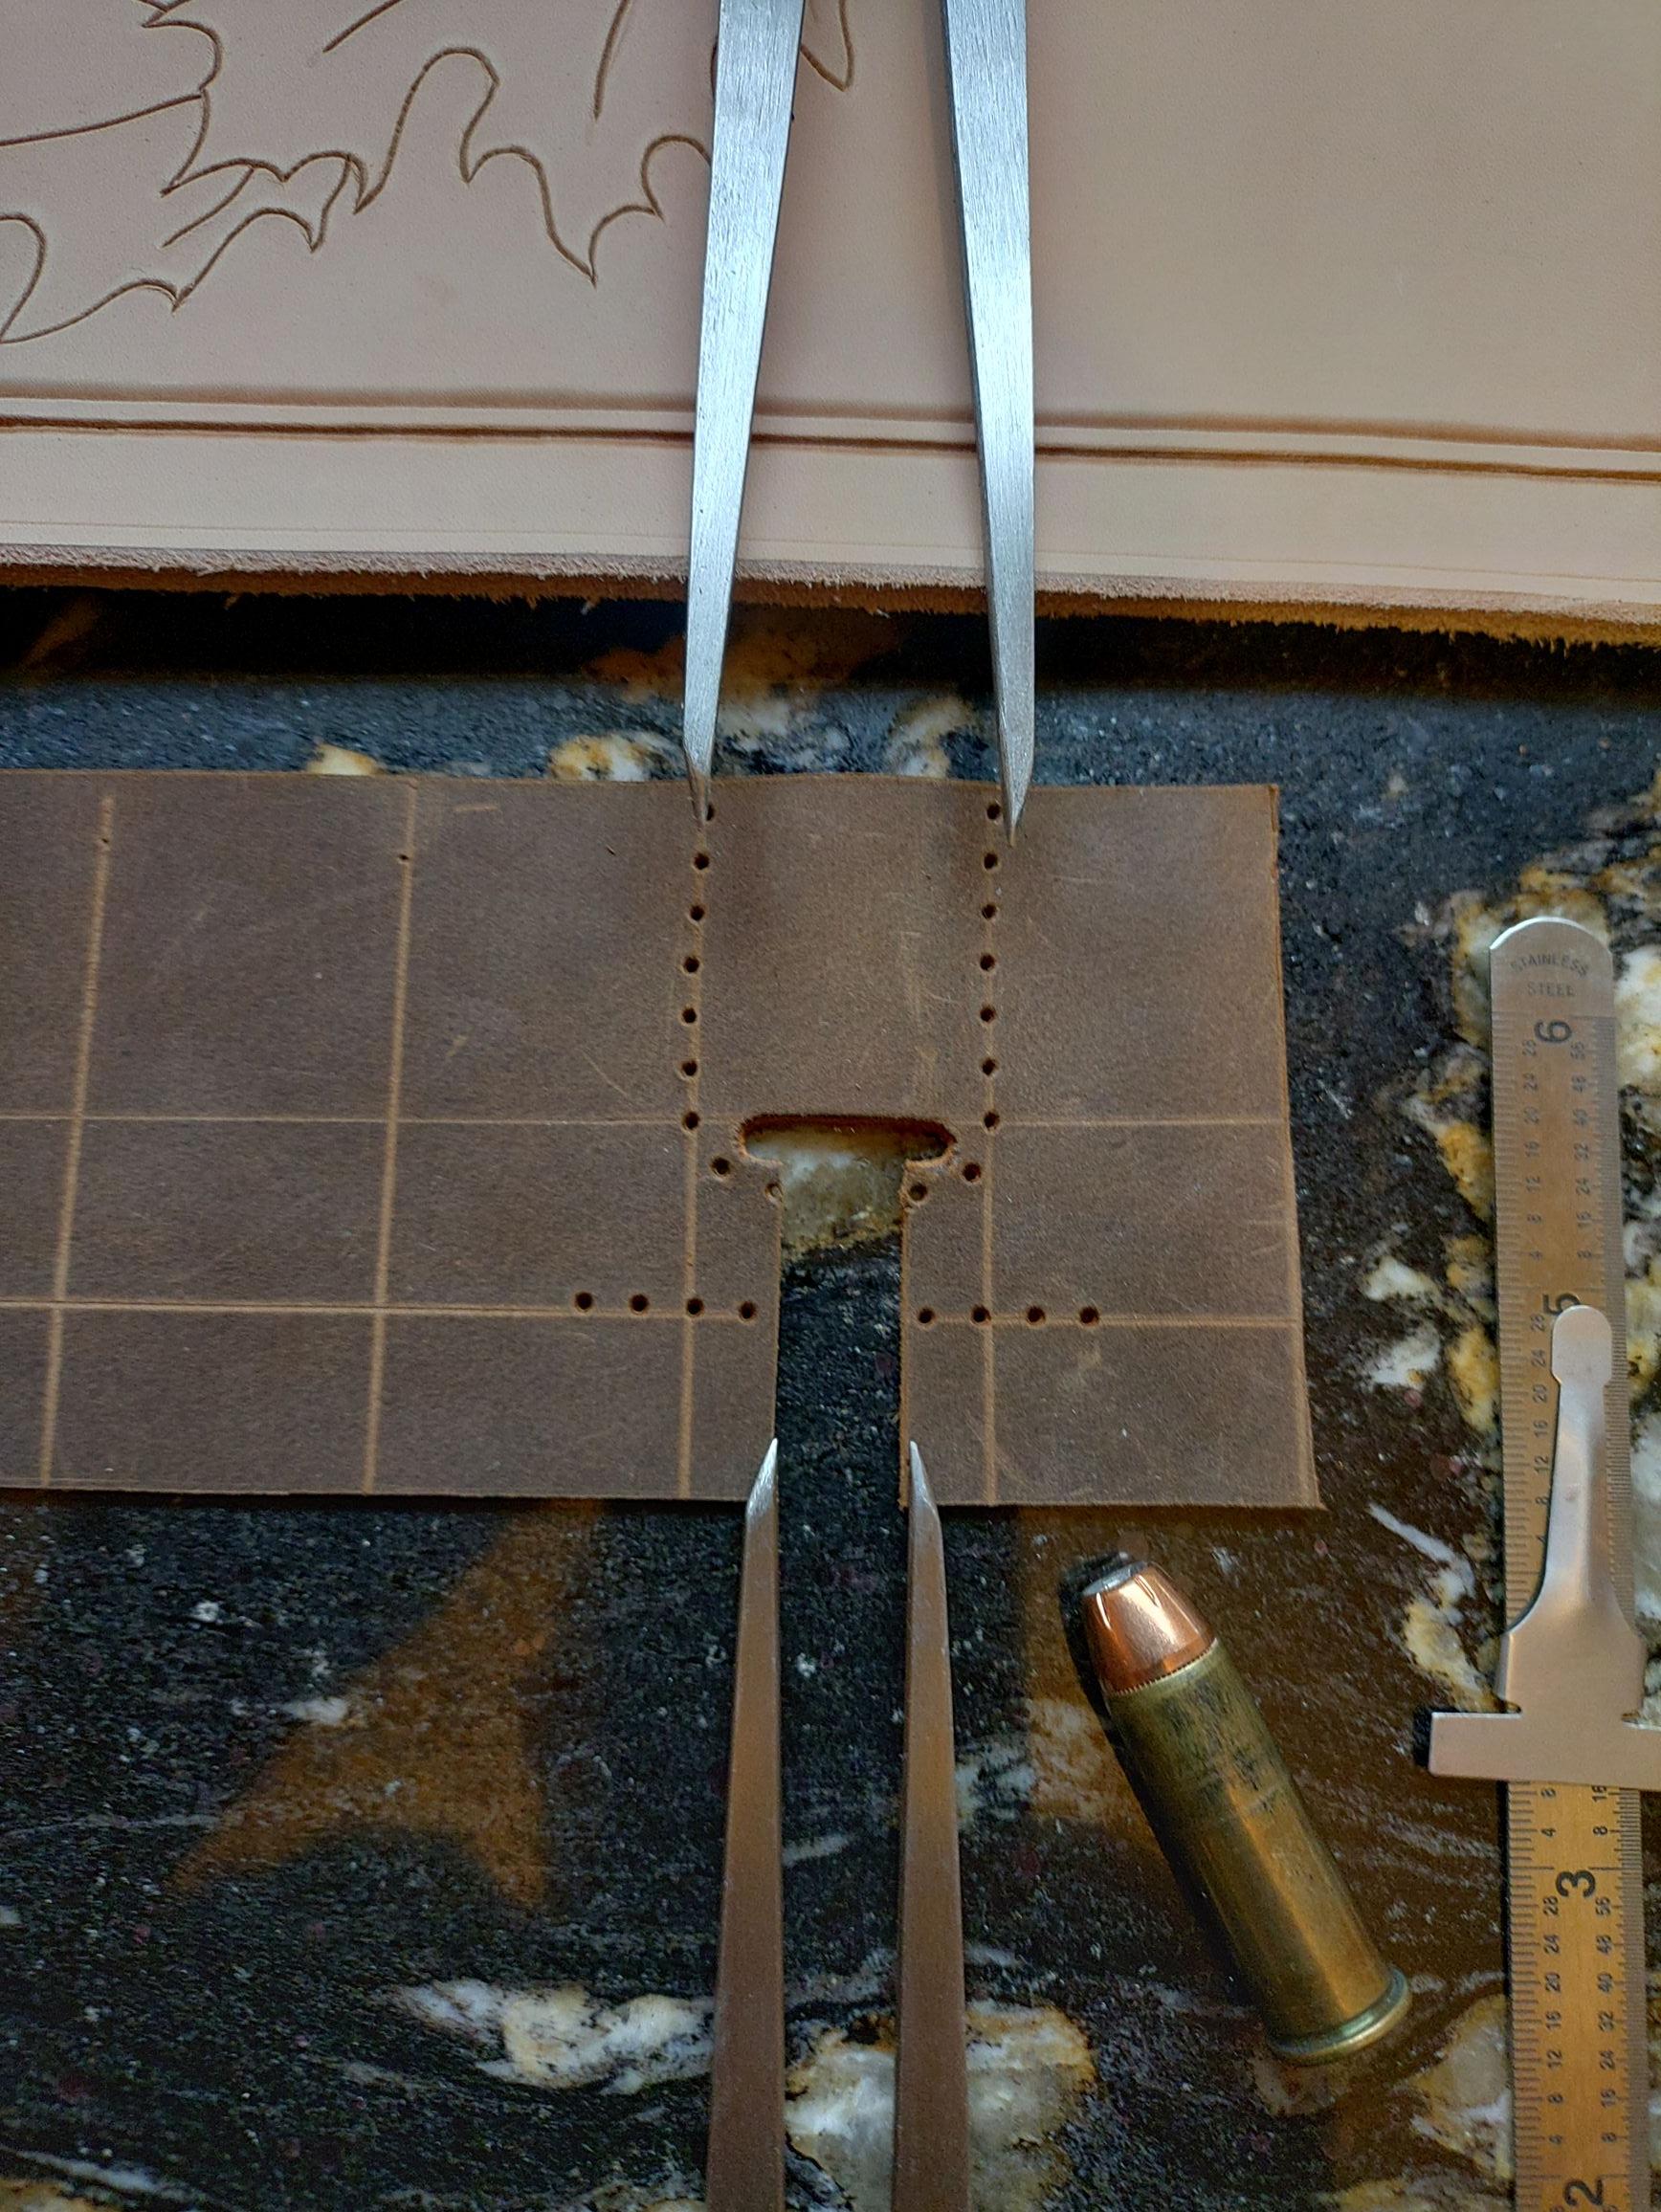
So I was waiting for leather to dry a little and thought I would fiddle with this. The removed material at the bottom needs to be the diameter of the cartridge (in this case .429" -44 mag) The oval punch should be close to that plus the thickness of the leather doubled (.429 + leather doubled) The stitching down the case wall needs to be measured with a couple strait edges holding the leather and bullet down to a flat surface. In my attempt, my punched hole is a little too long. The stitching holes I just eyeballed the radious going under the bullet. Knowing these measurements I think I could build a pattern. Then the stitching on the back piece I think would be like a normal piece except the radioused part under the bullet might need to be punched during assembly? On a bottle neck case, Ill probably have to work that out but I think the oval hole might need to be higher?
-
You might look at Adler 669 Adler 105-25 Cowboy cb246 Jianglong 246 Jianglong 341 Jianglong 1341 Cowboy cb227r cowboy cb341 cowboy cb1341 Techsew 4800 Cobra class 26 Pfaff 335 Typical TW3-P335 Necchi 840-100
- Today
-
Edges are my Achilles heel. Yours ain't perfect but not bad at all. Some folks spend an inordinate amount of time on edges to get them glassy smooth... only to have them fray with a little bit of use. Don't be too hard on yourself because it proclaims the handmade source of the gift. I love the design and the execution is worthy of pride. Lucky son! I grew up playing Scrabble across the table from my mother. It's how she taught us how to improve our vocabulary.
-
Maybe, also maybe files were too large, but somehow missed telling you that. There was a major upgrade here a month or so ago and some things are still cropping up to be changed or clarified. Keeps us all on our toes!
-
By the way, I love that picture of the dog lol, he looks like he's thinking about something, what a beautiful dog.
-
I saw that too. With a round hole punched at the apex of the dart, everything fits together nicely, possibly without wet forming. But wet forming probably wouldn't hurt.
-
Thanks for the information, that's pretty cool.
-
The leg bags are simple. Phone slot, slots for pens and a flashlight, etc. All straight seams. A part cylinder with a flat bed attachment is worth looking into though, in case I end up making these bags more complex. Are there models that compare to the flatbed machines I mentioned that I should look at? Thanks!
-
It just asked me for a link to the images online, not to actually attach anything. Maybe it wouldn't allow them either way because I was still waiting for approval to join?
-
Really nicely done !!!!!
-
Lots of good choices for your projects. The Cobra Class 26 is a popular machine and there are a fair number of lightly used machines available on FB marketplace, Craigslist, etc. I bought one in like new condition several years ago and figure it will hold its value. It is quite handy for medium to lightweight projects.
-
 Hey, I have no experience with shoes - so much said from the start, but I dye my dog collars myself most of the time. One thing I noticed there is that If you don't put a sealer on top, you have rub off as soon as you clean / condition. A conditioner is not a sealer to my knowledge. So you might need to have a look into that. I know that a lot of "shoepeople" use the angelus sealers. I use them as well and have noticed, that these sealers tend to flake a bit in the application process within cracks and creases, but that could also have been because I used up a bottle and those were the last drops. With the angelus ones I can tell you, that a small bottle lasts you a bit of time. My recommendation would be to try the caranauba creme by Fiebrings as it can also be used in the restoration process and as a finish, plus it builds a scratch resistant coate or after you striped your shoes from all your prior-finishing attempts the high-gloss finish by angelus. Was just a quick thought when I read through your problem, as I had a predyed leather strap on my table that bled a lot in the care process, when I was done stitching and seemed to not have a finish/seal on top. I fixed it by removing my care products, applying some neatsfoot oil, waiting for it to soak in and then finished it with the high-gloss. So far the colour is still vibrant and is not bleeding anymore, when being cleaned. Same applies to all my dog collars, that I dyed myself and used the finish as a last step. -Tove
 -
Thank you sir! Thanks so much! Really appreciate that!
-
Thank you, Bruce! I definitely appreciate the suggestions! Yes sir the need was round. I couldn't figure out why that wandering happened. Would the needle shape effect it? Thanks, Bob! I love those closures too! They're a lot like the Loxx brand ones but I like these smaller versions from Rocky Mountain Leather for things like this. Thanks so much!
-
Thank you I will look it up.
-
Thank you very much, this clears thing up, I will do it as soon as I can.
-
You really looking at compound feed machines (needle/feed dog/presser foot) move the material along which the machines you have mentioned are. For flat items, think of wallets/belts, are best done on a flatbed machine like a brand name Juki DNU-1541S or a clone which the Consew RB is and both are able to handle up to 3/8" thick material. For round items like bags, seats a cylinder arm machine is a much better choice like a brand name Juki LS-1341 or a clone and able to handle up to 7/16" thick material. . You can sorta kinda turn a cylinder arm into a flatbed machine by installing a table top attachment but you can not turn a flatbed into a cylinder arm machine. The cost of brand name machines like Juki can be expensive that is why a lot of people go with clone machines like Consew, Cowboy, Cobra to name a few. There are quite a few clones available at various price points, just depends on how deep your pockets are.
-
@Thadrick I moved your post to Gun Holsters, Rifle Slings and Knife Sheathes. It seems to be the best related forum.
-
@eLeM 800 pixels in the longest dimension is quite adequate and recommended. Most devices members use don't display much higher resolution and it is a favor to users on the fringes of the internet that suffer from low download speeds.
-
Tell us about the leg bags. Boat seats are typical "upholstery" which works great on a flatbed walking foot. But when you start talking bags then you have gussets. And if you've ever stitched a stiff gusset on a bag with a flatbed machine you will wish for a cylinder bed or post bed. 😀 What type of images? What is the filesize? Sometimes there are filesize restrictions, so scaling the image down to 1000x1000 pixels gets it under the bar.
-
 Here is a link to my experience with re-dying shoes. It may help, maybe not but it may give you some ideas. kgg
 -
 In my opinion 1000$ for a machine that is so old is way too much. I own old pfaffs and Adlers, but I am using them as hobbiest and with a lot of love for old iron. It's great machine with some limitations (small bobbin), but with limited documentation and limited access to parts which are often very expensive. The worth of the head is max 300$, 500 if you really want this machine. Tables and old motors are practically not worth much.
 -
 Bumm joined the community
 -
 Hello everyone, I’m new here from South Korea, and I’m facing a big problem with redyeing my custom-made dress shoes. I hope someone can help me figure it out. I bought these dark brown (actually closer to medium brown) shoes two years ago, along with other pairs in black and light brown. Compared to the others, this pair of dark brown shoes seems to have some sort of transparent coating or sealant, like Resolene or Saddle-Lac. Still, I was able to polish them Unfortunately, last year the right toe got scratched. I used sandpaper to smooth out the surface, thinking I could restore it by applying Saphir Shoe Cream (Crème Surfine, Color 05: Dark Brown) and later by wax to make them mirror shine. The surface became smooth again, but the shoe cream didn’t cover the scratch or recreate the coating anymore. When I applied Saphir Renovating Cream (Crème Rénovatrice, Color 05: Dark Brown), it just looked like paint sitting on the surface instead of blending into the leather. After polishing a few times, it simply came off. So, I tried acetone to deglaze the shoes and remove the original finish, planning to redye them dark brown. I used Fiebing’s Pro Dye, applying three coats with one-hour intervals by brushing, allowing it to penetrate Afterward, I left the shoes to dry for 24 hours in front of a fan. I buffed them with a white cloth for 10-15minutes and they seemed fine. Then I applied Saphir Renovateur Cream (Conditioner), hoping to polish them well after coniditioning them. The photo below shows the shoes after dyeing. I am indeed quite satisfied because it looks great. But here coms the problem: when I buffed the newly dyed shoes with a dry or damp cloth, they were fine. But whenever I applied any type of cream (Ex: Renovateur, Crème Universelle Leather Balm, colored shoe cream, etc.) or wax (Ex: Saphir Pâte de Luxe) with water, there's huge ruboff: the dye bled heavily and even reverted to the condition before dyeing. That means I couldn’t polish do coating on them by waxat all. I ended up removing the dye completely with acetone again, which took a lot of time. Interestingly, even after deglazing, the leather surface was still very smooth, almost as if dye couldn’t penetrate it properly. I ran a small test by applying just Saphir Shoe Cream and letting it dry. But again, whenever I applied any cream product, the dye bled. This was unseen on any other shoes I have. I've been extremely frustrated and trying to figure out the root cause but without success. Should I simply wait longer (2–3 days) after dyeing? Or should I apply something like oil or water to the shoes before dyeing? Or with this type of leather, does it require any special treatment before dyeing? Or would it be necessary to apply sealer such as leather sheen or Resolene on shoes? I originally wanted to ask the shoe company, but unfortunately, they are no longer in business. I’d really appreciate it if someone could point out what I’m doing wrong or give me some advice. Thanks a lot!
 -
As I was fiddling with paper trying to work out a pattern, I think it will require an oval punch? I'm in the middle of another project right now or I would get right after doing one of these, starting with strait wall cartridge first and then working my way to a bottle neck . My theory would be that the punched hole would be where the bullet and neck could poke through for bottle neck cartridges ? Museums are awesome for ideas. Those Ole timers were brilliant.
-

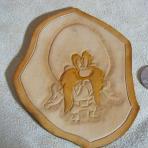
ammo holder
chuck123wapati replied to Thadrick's topic in Gun Holsters, Rifle Slings and Knife Sheathes
looks like a round punch was used and a cut under it to relieve the wrinkling isssue with wet forming these small pockets. Use some scrap leather and quit with the almost-as-good stuff to work this out. just do one pocket first and pin you leather down along the sides, then measure about where you want your punched hole at the base punch it out cut a slit to the end and then wet it and form around the end and pin it down until dry. there will be over lap on the slitt you cut when dry cut straight down through both overlapped tag ends to get that straight clean cut at the bottom. use thin leather! The hole and slot thing is a really good way to solve that wet froming problem, very cool indeed. If you can't figure it out, then later today I might do one and show the pics i have a trap door on the wall and could use a good cartridge belt for it.


.thumb.jpg.6e903dd66163ad5672f00f144058c571.jpg)