

Tove09Tilda
-
Posts
48 -
Joined
-
Last visited
Recent Profile Visitors
574 profile views


Tove09Tilda's Achievements
Member (2/4)
-
 Well done, Jonas! I can imagine how happy your customers must be — finding a truly well-fitting saddle is still a real challenge. I might have a possible explanation for the one-sided wear you mentioned. From a biomechanical point of view, there are usually two likely causes: 1. Hip imbalance An uneven hip can destabilise the leg and cause the rider to push or load the saddle more on one side. If this comes from a leg-length difference, it can sometimes be compensated for with different stirrup lengths. If it originates in the hip itself, correction usually requires a fully bespoke saddle and close cooperation between the saddler and an orthopaedic specialist. The seat must be shaped according to the imbalance that occurs when the rider sits in the saddle. And getting a bespoke saddler to work with your doctor and really taking the time is almost impossible, at least I know of non who would be willing to do that here in Germany if you are not a very successful sports rider. In those cases, I can only encourage investing in a bespoke saddle. Otherwise, the joy of riding is often replaced by recurring hip pain and cramping — in the worst case leading to painful dismounts and difficulty walking afterwards. This is really, really painful and definitely also makes the horse's life harder. But it's worth the 6.000€ to 10.000€ 2. Knee instability From experience, this is often the more difficult issue. A destabilised knee can sometimes be helped by a bespoke saddle, strength training (though in my experience this is rarely a complete solution), or temporarily fixing the leg position in the saddle. Very often, this also involves a confidence issue after injury. As a trainer, I was always wary of mind-related problems, simply because they take so long to resolve. My own knee hasn’t been fully “fixed” for years after surgery. As a result, I have one very stable leg and one that constantly drifts toward the grid. You can clearly see this reflected in the wear pattern on the inside of my boots — even more than seven years after the operation. Since the surgery I was unable to have a nice and stress-free ride and I loved riding dressage, now I can't even ride a straight line as I confuse the horse with that one leg being a total mess and we tried every trick in the book, besides a bespoke saddle. Best, Tove
 -
Hey, I have some advice straight from a saddler’s workshop Apply edge paint in the direction of the cut, using light pressure, so loose fibers are pushed flat before the paint sets. You’re smoothing mechanically, not burnishing. Use a sponge; for very thin edges, an old awl or a small brush works well. Both give you more control. Wipe off excess with a cotton cloth (e.g old t-shirt), again in the same direction, to avoid lifting fibers. Work in thin layers and let each one dry properly. No burnishing beforehand. Sanding isn’t needed if the edge is clean and even, but lightly sanding helps a lot if layers meet or the edge is rough. Some people use an edge filler where two layers meet to level the edge before painting—that can help get a very clean result. I can't tell you more about this, but also want to try it out in the future. Hope this helps Best Tove
-
Looks amazing 🥰 And thank you for the tip with Serafil, I was looking for new thread in larger quantities as I seem to use a lot of white and black. Actually saw that my supplier has them in stock for 13,90€ per roll. Now I am much more confident to buy one or two rolls.
-
Internship and maybe a new start
Tove09Tilda replied to Tove09Tilda's topic in All About Us and Off Topic
Okay, now that my internship is over — one week earlier than planned — I thought I’d give you all an update. I did learn a few things about leather, but by far the biggest lesson was learning what a toxic work environment actually looks like. Not in theory — in real life. I’d heard about it before, but I’d never experienced it firsthand. Now I have, and I can say with 100% certainty: I dodged a bullet. On top of that, the company itself seems to be on rather shaky ground. Reflecting on the experience during the train ride home, I noticed quite a few red flags pointing toward a… let’s call it an uncertain future. That said, here are a few things I learned and can share, as they’re not secrets or company-specific: If you have enough strength, a very sharp cutter knife can be almost as good as a half-moon knife (personally, I’ll still stick to the half-moon). Always apply stain following the growth direction of the fiber — you can check this by rubbing your finger up and down along the edge. Also stain the back of your loops. Piping can easily be done by inserting PVC as a filler, or by skiving the edges and leaving only the center at full thickness. You wouldn’t believe how much of a saddle is made from fat leather. Forget everything you know about maker’s marks — silver pens and fountain pens are widely used instead (though I’ll probably still stick with maker’s marks). Patterns you use frequently should be made from thick cardstock and clearly labeled. For everything else, large craft paper works fine — just weigh it down and trace with a silver pen. Never cut your stitches when you need to undo them. Use a blunt awl and open them one by one. You can trim the edges of rolled pieces with a No. 6 edge tool. Saddle cushions are more often than you’d think backed with thin carpet. Use a round awl when going back into stitches so you don’t cut the thread. Better to have stitch holes slightly too small and use pliers than to make them too large. Always — and I really mean always — expect to use more strength than you initially think. In the end, I was advised to look elsewhere if I truly want to become a saddler — preferably England rather than Germany. And honestly? I can see why. If the German traineeship system doesn’t change significantly in the coming years, I can say this very clearly: I will never, ever let a German-trained saddler work on any of my animals. No training on the animal itself, and an exam consisting of one bridle and hand stitching at the very end? I’m sorry, but that’s a hard no from me. The same goes for saddle fitting, by the way. I’d rather take courses in England whenever possible, combine that with a Saddlefit 4 Life education, and do it myself. This could have been a great experience — but when people look at you strangely for asking “why,” they’re not going to be great teachers. And when most people around you seem unhappy, that tells you everything you need to know. So no new start — but that’s okay. I’ll refocus on business consulting now, especially change management and family business consulting, and pursue that more seriously. I’m currently looking for additional pro bono work, so if you know a small business that could benefit from a short-term external perspective… you know who to recommend 😂 Best, Tove -
Oh, I’m aware of that part — the introduction of horses by the Spanish and also the British, and their later spread is something we cover in Europe, not only in history but even in English classes. We’re taught fairly early on how the Americas were colonised, at least in Germany and Sweden. 😉 My question was more specific: I was wondering whether there were particular horse types or bloodlines preferred by the tribes using these saddles, or if certain mustang families were more commonly used. For example, horses with stronger Spanish-type influence versus those with more later Anglo-American breeding. I’ve read that some feral herds even show traces of European cavalry bloodlines, including breeds like Trakehners, which I find fascinating given their original use as military horses. I’m curious how that might have influenced saddle design and fit.
-
This is very cool — amazing information and a fascinating saddle! When I saw the picture, I almost asked whether it might be a Spanish saddle, but since you’re in the US I assumed that would be a silly question and just quietly followed the thread. It’s fascinating to see that I wasn’t too far off and to learn how this design evolved. Congratulations on owning such a fantastic piece of history! I’d also be really interested to know what kind of horses these saddles were typically used on, build-wise. I’m asking because western saddles were originally built for rather overbuilt horses, while Spanish saddles, as far as I know, were meant for shorter-backed horses with a straighter top-line and more of compact-upright movement.
-
Hey, I’ve dyed a lot of veg tan over the past year, including pieces that had been sitting around and were noticeably stiffer than normal. I’ve had good results applying a very thin layer of neatsfoot oil first, letting the piece dry for at least 24 hours. It does darken the leather slightly, but then I dye afterward without issues, as I mostly used alcohol-based dyes. If you’re concerned that the dyeing process might dry the leather out further, it’s worth checking what kind of dye you’re using. Not all leather dyes are alcohol-based. There are oil-based dyes that can give a very nice finish when paired with the correct sealer — Fiebing’s has several in their range. Water-based dyes and hybrid systems are also options. Depending on how stiff the leather is, I’d personally lean toward an oil-based dye. In that case, I condition afterward and let the piece rest for a few hours up to a day before sealing. Dye often looks much darker before it fully dries, and giving it time makes it easier to control the final depth and vibrancy of the color. Really take the rest times seriously — this allows the dye to develop correctly before conditioning, and gives the conditioner time to absorb before locking it in with the sealer. Hope this helps, and let us know what you end up doing! ☺️ Best, Tove
-
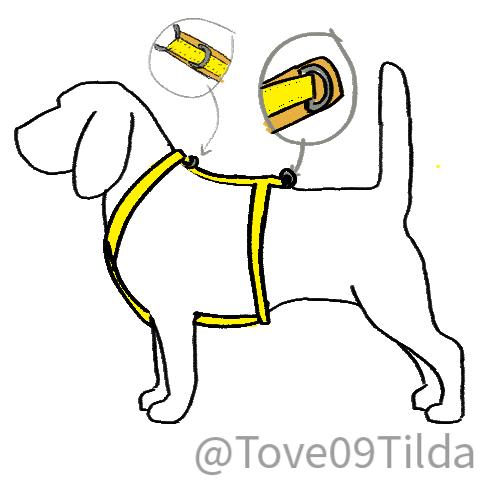
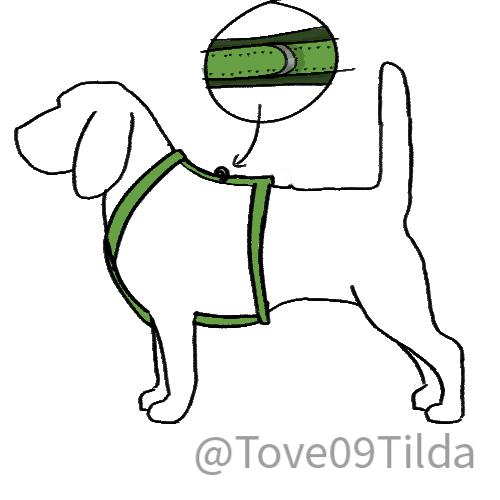
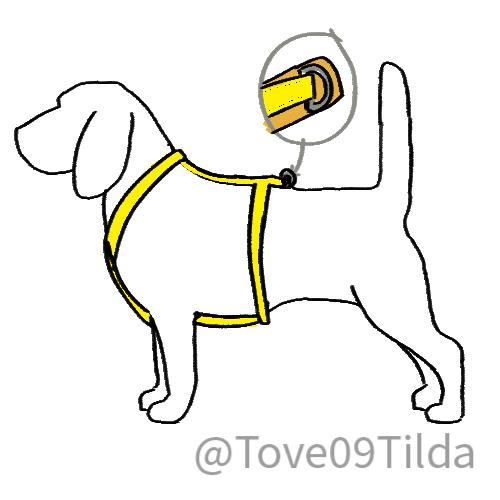
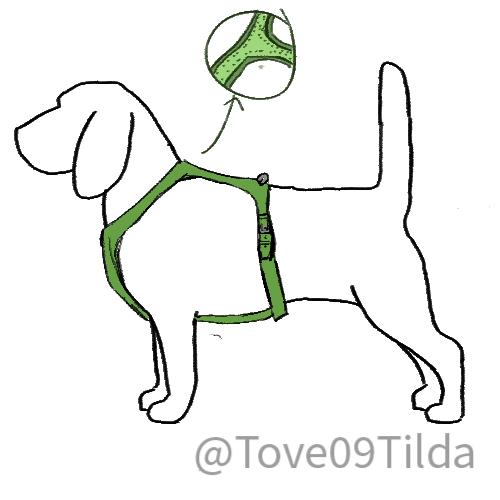
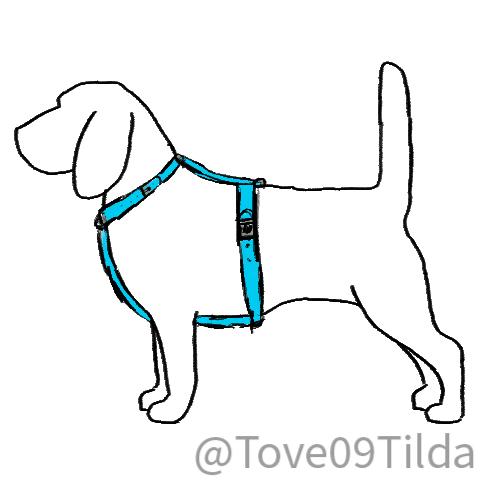
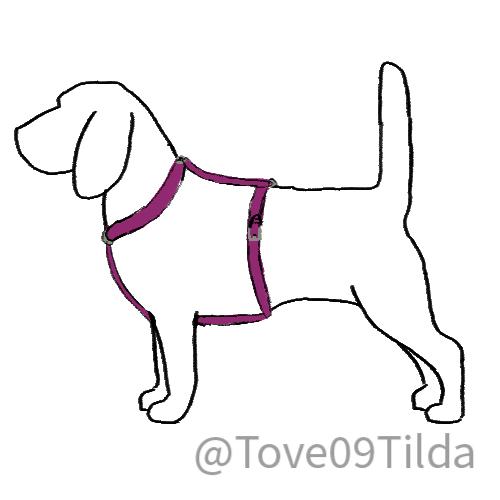
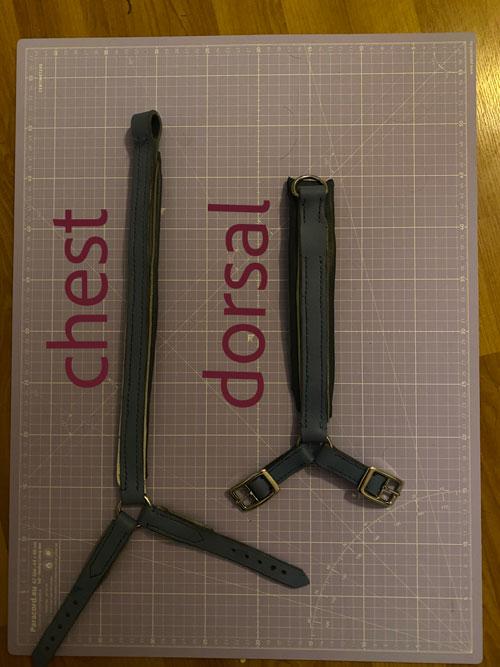
Part 4 – Construction of a Y-Harness In this part, we focus exclusively on the construction of a Y-harness. Other harness styles may be explored in the future, but for now, we deliberately stay with one system to avoid mixing design logic. Before touching leather, we need to look at design options. Construction choices directly affect movement, adjustability, pressure distribution, and long-term comfort, so these decisions must be made first. 4.1 The Chest Piece The chest piece is one of the most critical components of a Y-harness. It determines how the harness settles on the sternum, how much freedom the shoulders have, and how forces are distributed when the dog moves or pulls. There are four viable construction options. Three of them are showcased as sketches. 4.1.1 Slip-In (Over-the-Head) Figure 1 - over-head harness This design is slipped over the dog’s head and has no buckles on the neck. Characteristics: No adjustability after construction Cannot be worn over thick winter coats Requires very precise measurements To avoid excessive rigidity, the two neck straps are sewn into O-rings, allowing slight independent movement on each side. Use when: The dog has stable measurements year-round Minimal hardware is desired The harness is intended for everyday, low-adjustment use Avoid when: The dog is still growing Seasonal coat changes are significant 4.1.2 Buckled Neck (Split Neck Piece) Figure 2 - Split-neck harness This follows the same structural logic as the slip-in design, but the neck is split into four segments, usually with buckles on both sides. Characteristics: High adjustability Can be worn over coats More hardware and additional weight This is the most forgiving option in terms of fit and is especially useful when measurements sit close to design limits. Use when: Adjustability is required The harness must fit across seasons Fine-tuning is needed without rebuilding 4.1.3 Floating Padding Under O-Rings This option is ideal for very sensitive dogs or dogs prone to pressure reactions. Here, the padding for the neck strap chest strap dorsal strap is cut from one continuous piece. ⚠️ Important: The O-rings must float above the padding. They must not be stitched through the padding, or pressure points will be reintroduced. Use when: Skin sensitivity is a concern Even pressure distribution is a priority Controlled movement without hard contact is desired 4.1.4 Triangular Chest Piece (No O-Rings) Figure 3 - Harness with no O-Rings/ Triangular intersection points This design eliminates O-rings entirely. The chest piece is constructed as a fixed triangular unit. Characteristics: Very static Minimal self-adjustment Requires extreme precision Because there is little margin for error, patterning with thick paper or cardstock is strongly recommended before cutting leather. Use when: The dog has very stable conformation Maximum stability is desired Reduced adaptability is acceptable 4.2 D-Ring Positioning D-ring placement determines how forces travel through the harness and how the dog experiences leash pressure. 4.2.1 Back Position (Standard) The D-ring is placed behind the torso strap, centered on the dorsal strap. Figure 4 - Over-head harness with D-Ring in the Back Benefits: Even force distribution Minimal interference with gait Best option for everyday walking This is the default and safest choice for most dogs. 4.2.2 Training Position (Rear-Shifted) An additional D-ring is placed slightly behind the dog’s center of gravity. Figure 5 - Over-head harness with two D-rings Effect: Pulling becomes mechanically uncomfortable The dog is gently discouraged from leaning into the harness ⚠️ Important: This position should only be used temporarily. Limit sessions to a few minutes Always switch back to the back D-ring or a collar afterward With young dogs, allow breaks of 5–10 minutes Prolonged use can alter posture and movement patterns. 4.2.3 Center Position The D-ring is sewn centrally on the harness, closer to the midline. Figure 6 - Overhead harness with a D-Ring in the middle of the dorsal Use when: Balanced leash handling is required Minimal directional pull is expected Trade-off: Reduced freedom for self-centering Can amplify asymmetries if the leash is frequently loaded to one side Okay — now we know what to take into account. I already apologise for my sketching skills, but for the purpose of explaining the construction logic, they are sufficient. 4.3 My Decision for Tova You have seen the measurements, so you already know that she is a bit of a hard case. I decided on a split neck, as my little lady needs to wear coats as soon as temperatures drop. Tuscan Setters are not made for bad German weather. We also do not always have the option to place the harness under the coat, so adjustability was essential. I also chose a single D-ring in the back, as she is not very pully and we do not use a harness for training purposes. I decided to extend the padding so the D-ring does not sit directly on her back. 4.4 Construction Now we leave theory and move into more interesting territory. 4.4.1 The Leather The first step was choosing the leather. It took me half a year to find the ideal hide. The leather is of Italian origin and was sold as dead stock, which allowed me to purchase it at a fair price. It is 4 mm thick, hard temper, with a resin back. This means there is little to no stretch, but it also limits its use: this leather is suitable for dog gear only and must not be used for equestrian equipment. The size is half a double bend butt. For padding, I used 0.8 mm calf nappa. 4.4.2 Thread This may offend some traditional leatherworkers, but I strongly recommend polyester thread. A harness—especially one worn daily—is constantly exposed to the elements. Linen thread requires extensive care after every wet walk, and unless you are willing to do that consistently, it will not serve you well. Get yourself some beeswax and rewax your thread occasionally. It can also be used later to seal stitching or edges. 4.4.3 Edges When working with gear exposed to weather, simply beveling the edges is not enough. I recommend sealing edges before stitching straps to padding, as they become difficult to access afterward. You can burnish with water or beeswax, but I recommend edge paint. I burnished first and then applied clear edge paint to make the edges as waterproof as possible. 4.4.4 Straps You have two options here, and for this project I ended up using both. A strap cutter is strongly recommended. If you do not have one, use a saddler’s compass along a straight edge to mark your strap width and cut by hand. This takes longer and leaves more room for error, but it works. Always cut at least one extra strap. You never know, and it will save you time and frustration. 4.4.5 Fittings This is the point where you gather your hardware. When using O-rings, check that they still allow enough movement once all straps are added. If not, choose one size larger at most. Always read your supplier’s specifications regarding breaking points and maximum load. Also keep in mind: brass is usually the better choice for larger dogs. 4.4.6 The Neck Piece I work best top-down, front-to-back, so I started with the neck piece. I used: ¾-inch straps 6 mm Plastazote 0.8 mm calf leather I selected the best end of the strap, cut an egg point, and punched five holes at ½-inch spacing. From the third hole, I measured the required length, added 2½ inches for the turn, and marked stitching ⅓ inch from the edge until the padding ended. The padding was closed with an egg point. I repeated this process twice and paid close attention to symmetry. Left and right straps must be as identical as possible. For the buckles, I placed them in the middle of the straps, skived the turns, and also skived the overlapping ends at the O-rings. I chose not to pad this section, as the leather layers were already quite thick. Sewing was fiddly due to the short seam length, but once finished, the piece already resembled a collar with two O-rings and buckles on either side. This is the moment for the first fit check. Make sure the neck piece sits correctly before continuing. 4.4.7 Dorsal Strap Next came the dorsal strap, made from a one-inch strap. I skived 2½ inches from the best end after squaring it, added the O-ring, bent the turn, and marked the stitch start with my thumbnail. For measuring the total length, I temporarily pinned the turn with bulldog clips—pure laziness instead of tacking. From the folded O-ring to the previously calculated length, I marked the strap and added another 2 inches for the D-ring. Stitch marking was again done ⅓ inch from the edge. I skipped 1⅓–1½ inches where the torso strap would pass through and marked only up to the D-ring turn. After gluing the padding, I checked the length again. At this stage, adjustments are still easy. If you are unsure, hair ties and bulldog clips are useful before committing to stitch marks. Once everything looked correct, I saddle-stitched the entire piece. 4.4.8 Chest Strap This part was a pain. Construction is similar to the dorsal strap, with the difference that a loop is created for the torso strap to pass through. When checking length on the dog, use a temporary strap or webbing of the same width as the torso strap to ensure nothing is being pulled backward. Watch your dog closely during fitting. My chest strap was too long, and Tova made that very clear by rounding her back. 4.4.9 Torso Strap This strap ties everything together, so precision is crucial. If this fails, the entire construction fails. Always check for symmetry. I started with the buckle side, which required little measuring. I took a one-inch strap of suitable length, squared both ends, and threaded it through the gap left in the dorsal strap. After deducting 2½ inches for buckle turns and punching holes, I measured the distance between the dorsal strap and the buckle hole on both sides until they matched exactly. I marked where the strap met the dorsal strap on both sides—this is essential for padding placement and stitch marking. I glued and stitched one side before inserting it into the gap, then stitched the other side. At this point, the strap is fully locked in place. Do not forget the loops and at least one running loop. Sew these fairly tight, as they will loosen over time. If you cannot block them traditionally, block them with the straps themselves, a ruler and bone folder, or even a boxy highlighter—whatever gives you the right shape. For the final strap, I cut the egg point first, punched five holes at one-inch spacing, and then did a full test fitting before beveling or finishing anything. I threaded the strap through the chest loop, attached it to the buckles, and put the harness on Tova to find the correct position for the third hole on the opposite end. I marked that point, punched one hole, tested again, then completed the remaining holes and egg point. I prefer 2½ inches from the first hole, but adjust as needed. 4.5 Testing, Testing, Testing After a brief moment of thinking “I am a god of leatherwork,” it was time for reality. As soon as I put the harness on, something was wrong. The torso strap was being pulled back into the belly area. The dorsal was correct, so the issue had to be the chest strap—it was a full four inches too long. In picture 2 you can clearly see the discomfort. Even with careful testing, mistakes happen. Luckily, it was too long, not too short. I removed the torso strap, identified where the chest strap should meet it in the correct position, opened the seams at the O-ring, and removed approximately 3½ inches from the harness, including padding and piping. After re-sewing, testing began again. First, I let Tova move freely without a leash—walking, jumping, and running after treats while I observed the harness in motion. When no issues appeared, I added a leash. The pull test was… difficult. Tova decided it was far more enjoyable to walk perfectly and stare at me lovingly. So back to throwing treats. Once nothing shifted and the harness consistently re-centered itself—even when pulled to the left—it was time for a real walk. In motion, the harness moves exactly as intended. I could not ask for a better fit. 4.6 Notes on Construction 4.6.1 Knives This project can be done with a box cutter, but blades must be changed frequently. As soon as they start to drag, replace them. I used a quarter-moon knife and kept a strop with extra-fine jeweller’s rouge next to my workspace, stropping regularly during work. 4.6.2 Stitching I used a short sword awl, but any suitable awl will work. Do not use diamond chisels. We want the holes to swell closed again after stitching, which requires piercing stitch by stitch. My personal recommended stitch density: 7–8 SPI for medium to large dogs 10–12 SPI for smaller dogs Use blunt saddle or harness needles matched to your awl and thread. I used size 3 needles (S + N Systems) and 0.7 mm polyester thread. 4.6.3 Piping Piping is optional. If you do not feel confident adding it, skip it. For those who do: I used 2 mm leather cord as the core Reflective tape was glued around it That is the entire technique. Just make sure you glue the correct side of the tape—I checked this with my phone flashlight before committing. ----- This build is not meant to be replicated line by line. It is meant to be understood. Measurements change, dogs change, materials change — but the construction logic stays the same. If you work slowly, test often, and let the dog’s movement guide your decisions, this type of harness will always show you where it needs adjustment. And once it does, it will settle exactly where it belongs. I’m curious to see what you will make of this guide — and what ideas, variations, or entirely different harnesses might grow from it. Have fun with the process, test your assumptions, and let your dog be your best feedback. Cuddle your dogs, and create something that both of you will truly love
-
Thanks for your feedback! 🙂 Just to clarify, the seam on a rolled collar is intentionally smoothed rather than seamless, and the stitches can sometimes be slightly hidden or recessed. This is a traditional English saddlery technique — skiving down close to the stitching and smoothing the edges ensures comfort, even on the inside seam. With a dog’s fur and proper finishing, it shouldn’t cause any irritation. Skiving takes a lot of patience, as you have to get as close as possible to the stitch line without cutting into it, while maintaining a clear and even edge.
-
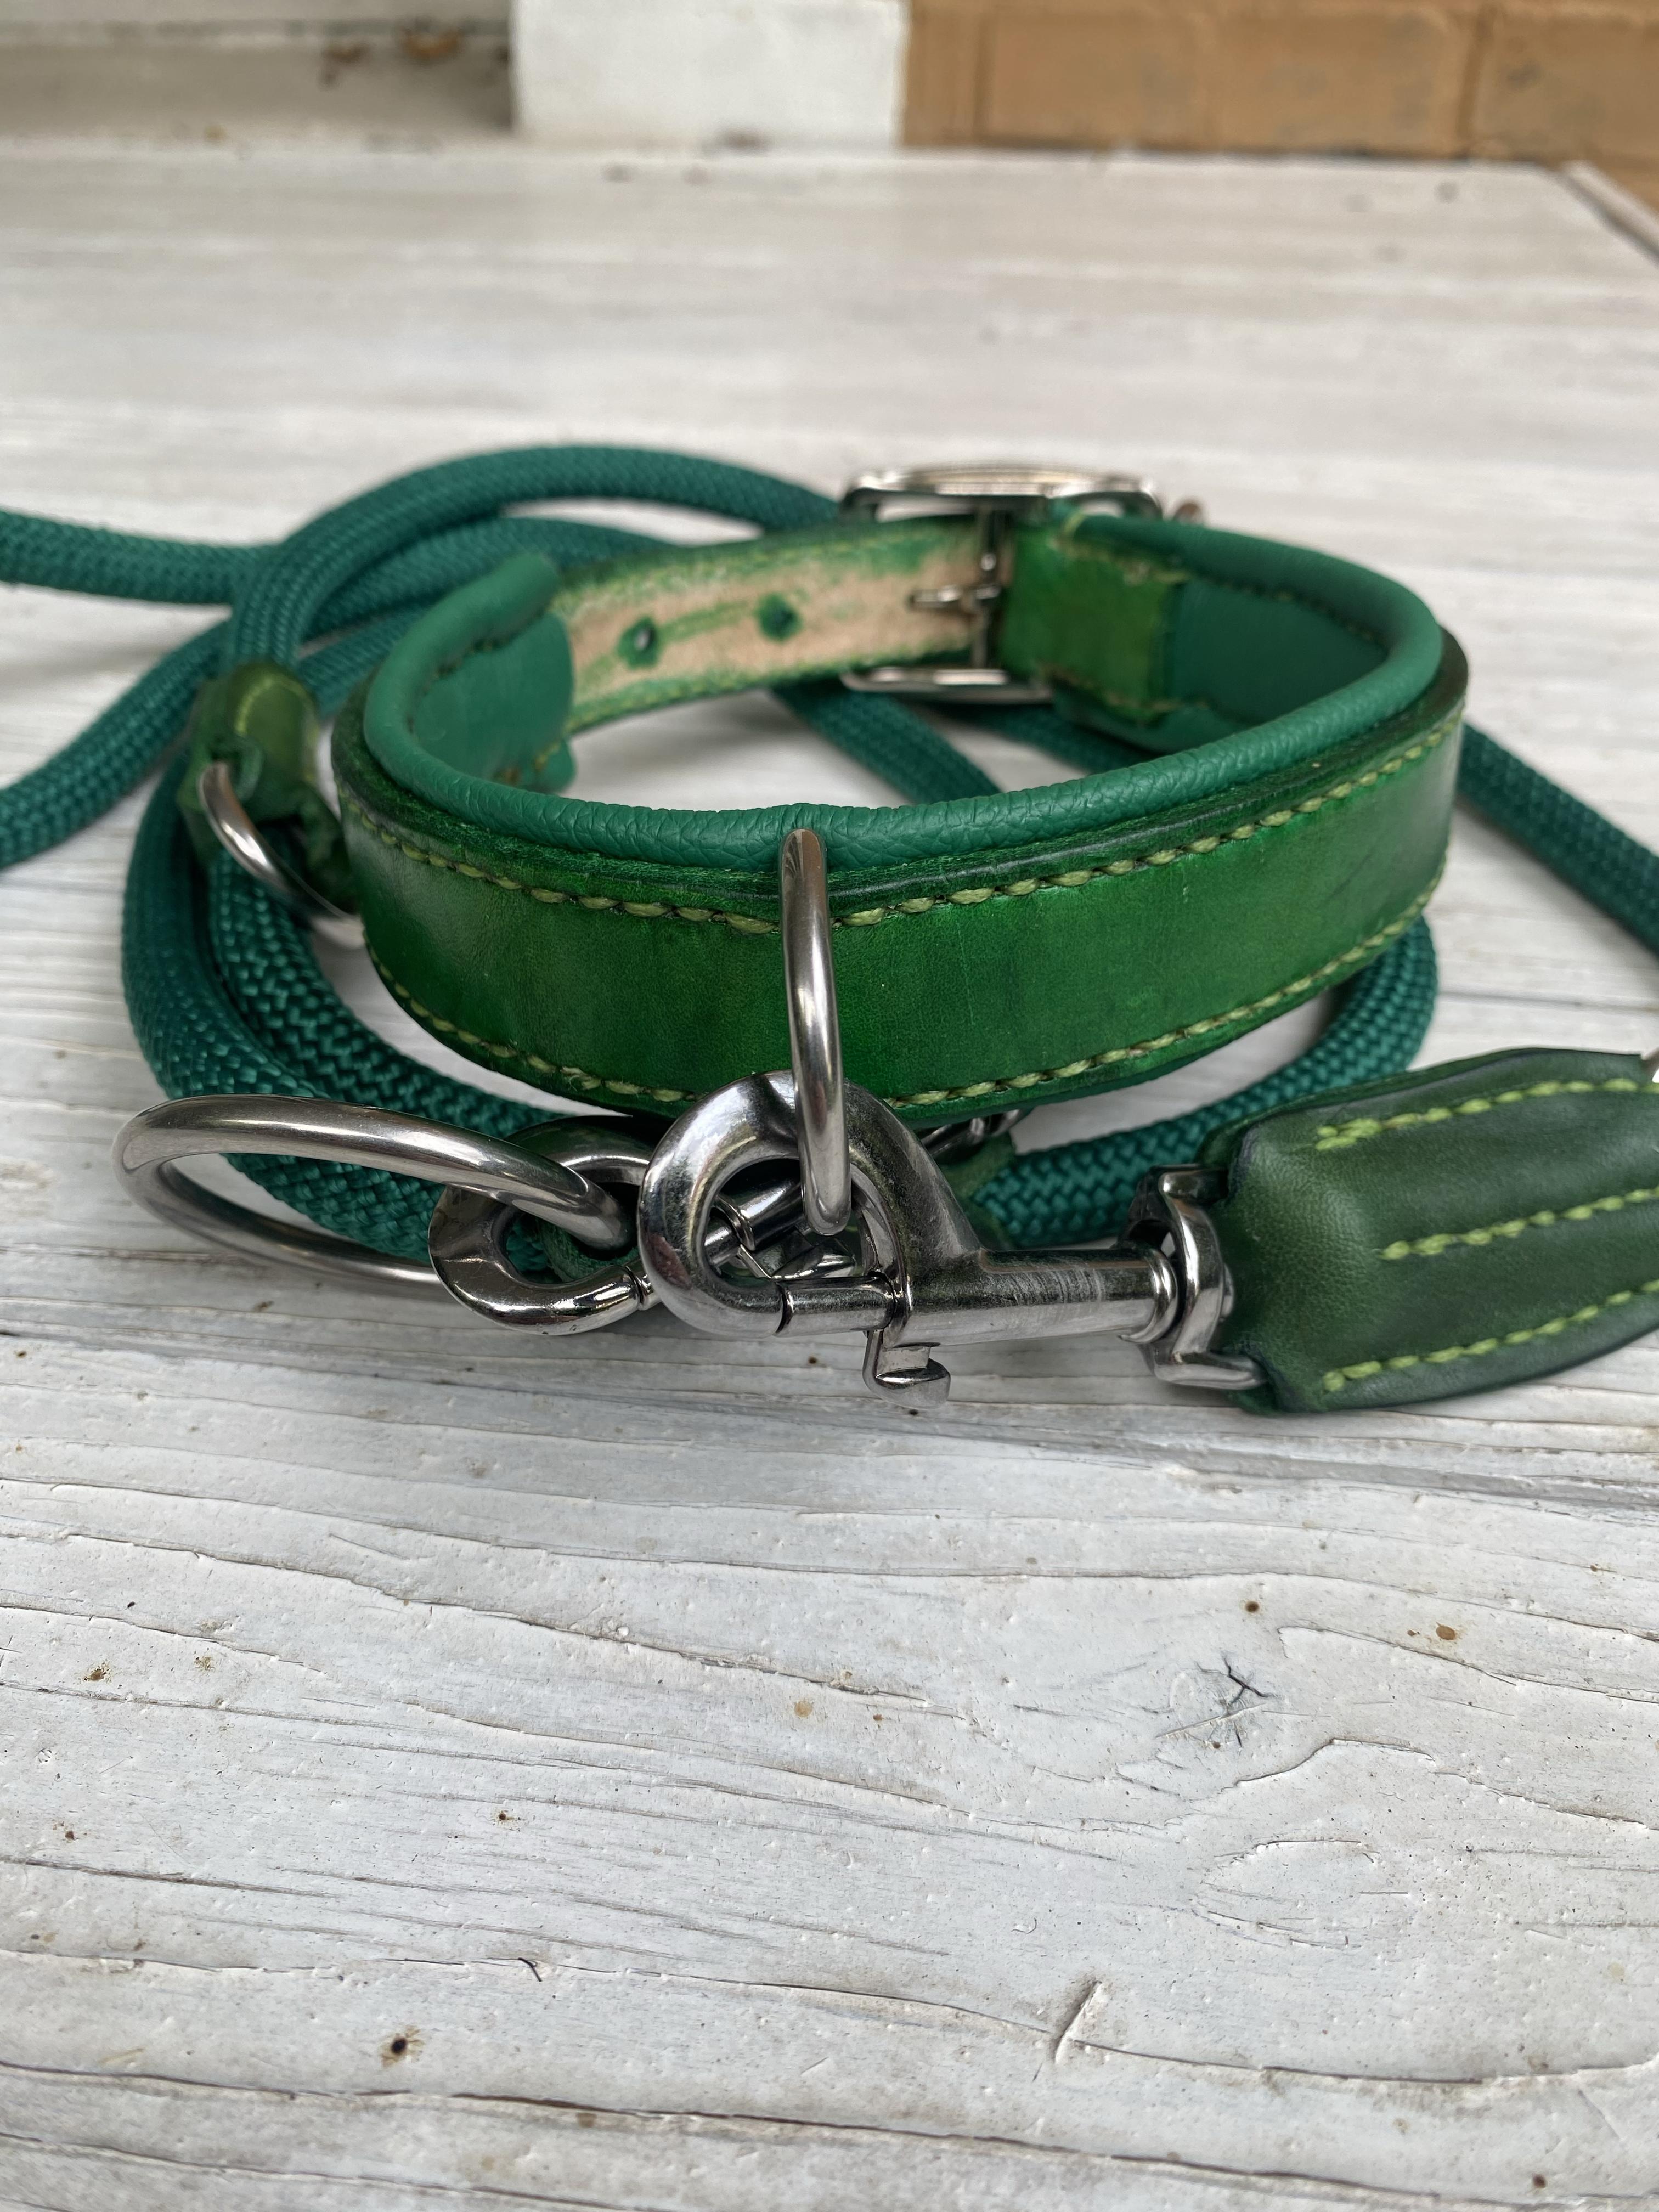
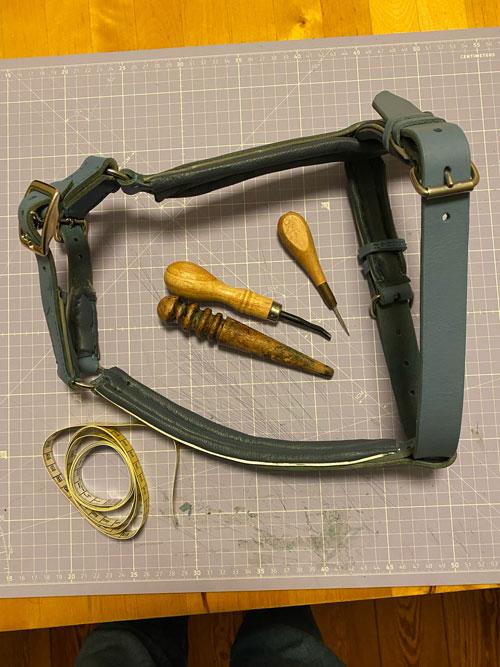
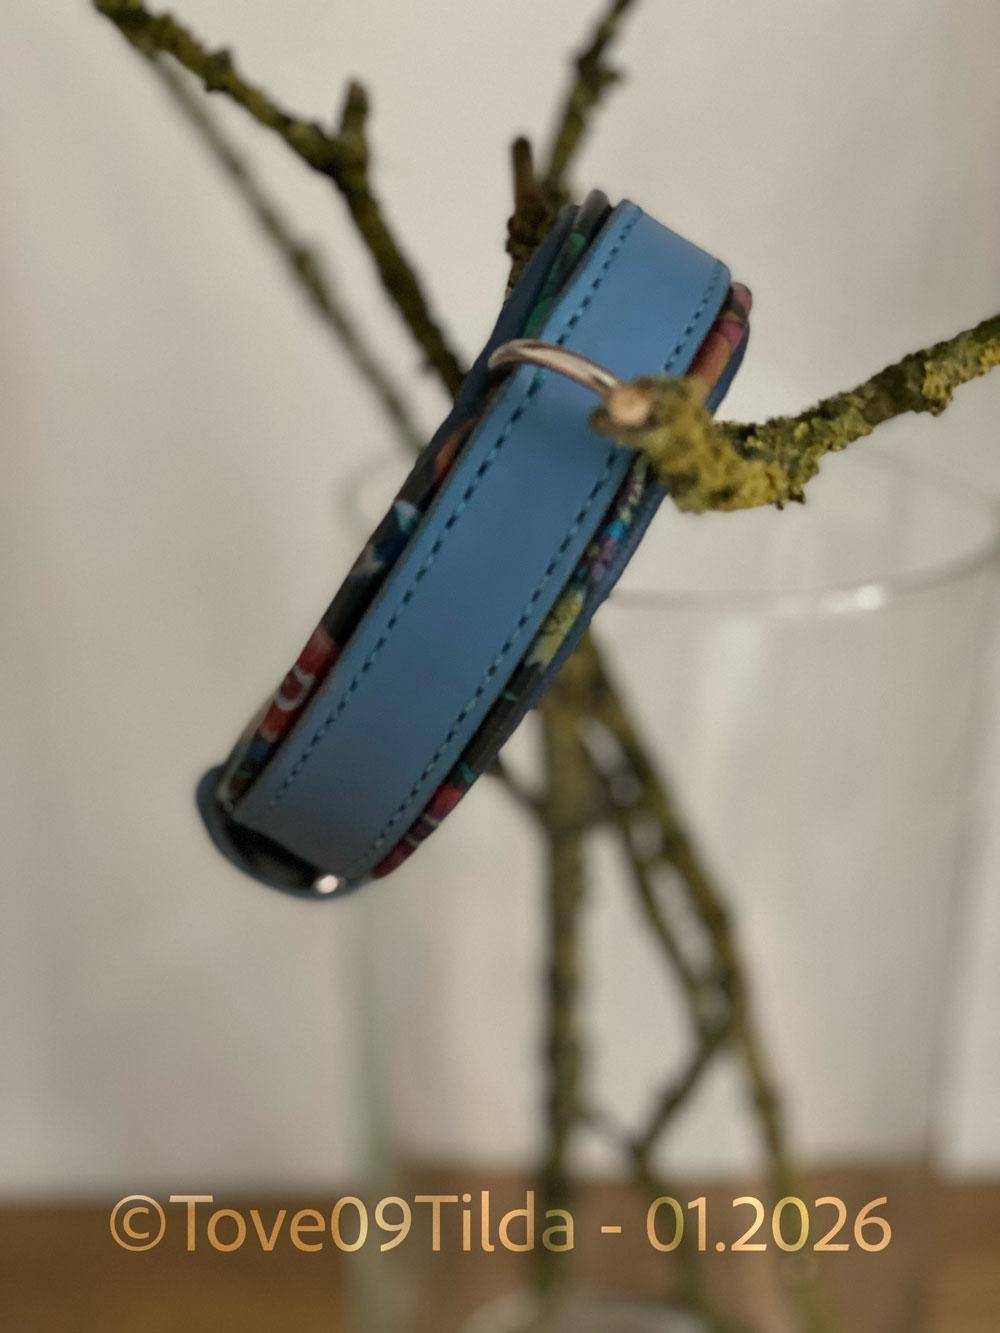
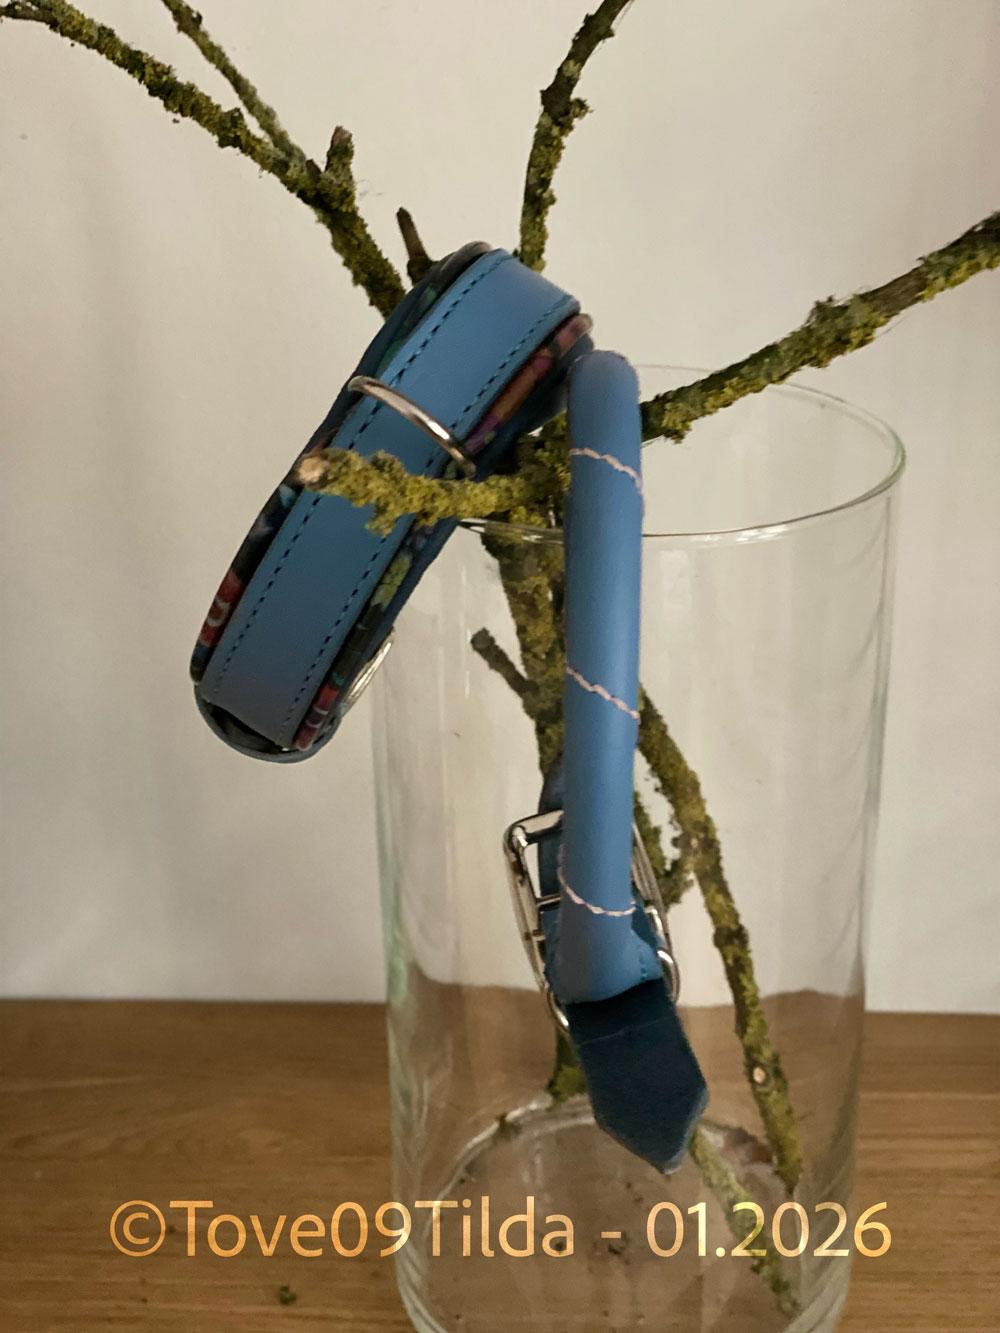
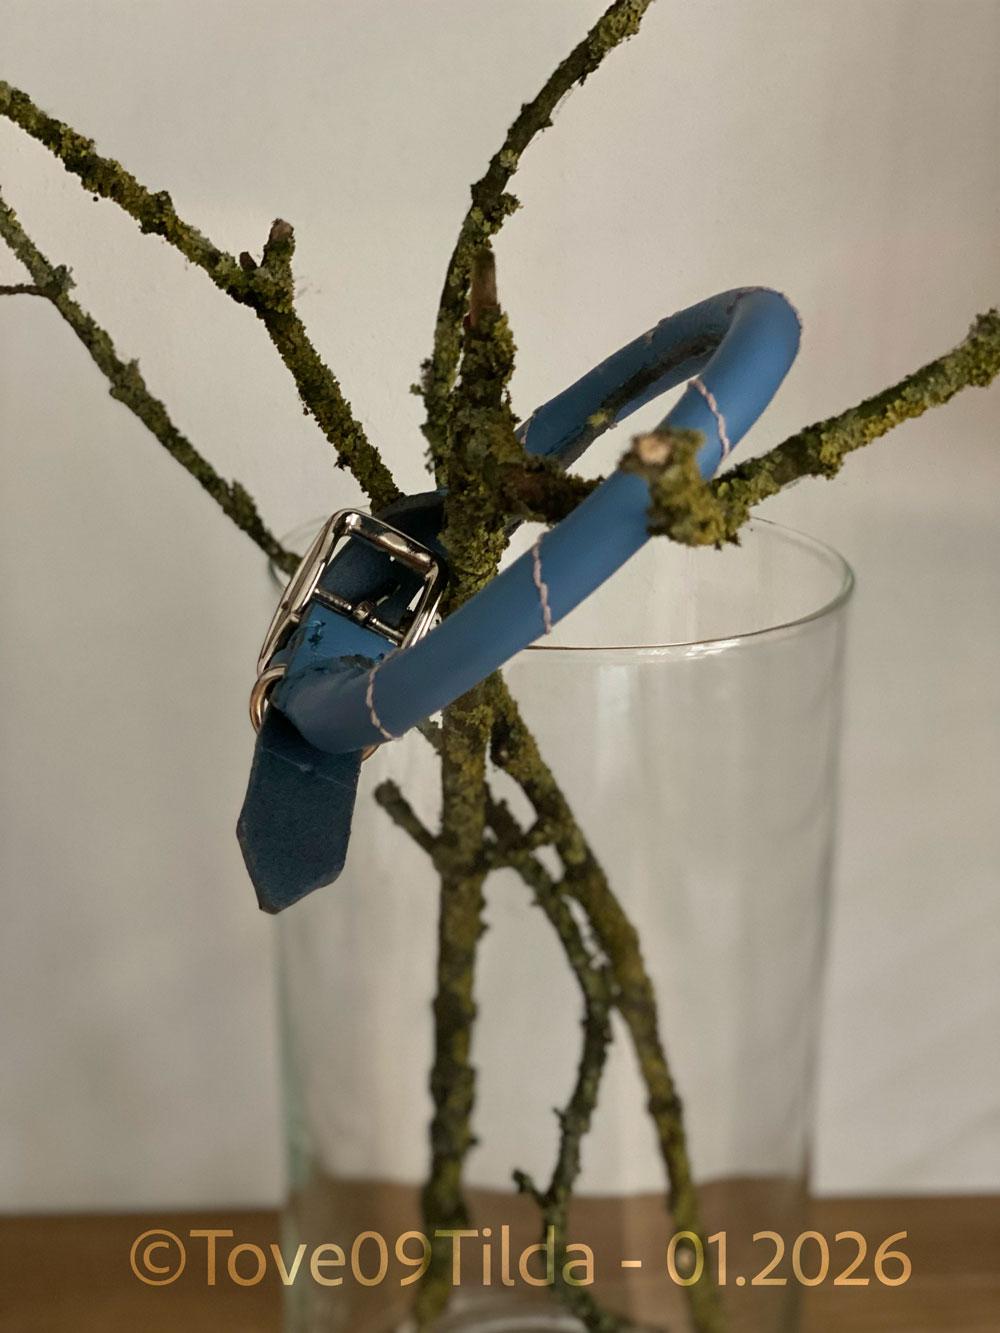
Hey guys, I spent New Year’s Eve on a last practice before my internship at a saddlers workshop. Since I only own dogs and got a new toy (what my friends jokingly call my little leather splitter), I decided to make a flat and a rolled collar. Both were made to measure for my mum’s dog. I’m still waiting on my new creaser, which might arrive tomorrow, so all decorative lines are missing for now. # Italian leather with steel hardware. The blue hide is dead stock and no longer available. I originally bought it for my dog’s new harness, but I had already planned to use some for dog collars. When my mum and I discussed the collar, she mentioned a whole hide of flower-print fashion leather (1.5–2 mm) that I was gifted by my grandparents. Since I was already working on some reflective piping for my dog’s new harness, we decided to use this leather for a colorful twist on the plain blue design. This project really tested my patience — I had to cut a 2-inch strap three times due to mistakes! Just when I was ready to give up, I finally got it right. If you look closely, you can still see my maker’s marks on the back side of the pull. The pink stitches are purely decorative and inspired by the beautiful work of Windsor & Hanly Bridles from England. The stitching ended up being the most fun part of the project! For my first rolled collar, I’m quite happy with how it turned out and learned a lot in the process. My mum already wants another one as soon as I’m back from my internship, and I’m planning one for my dog too. I used 10 mm dog leash rope for the core, as my mum’s dog is fairly large. Both collars measure 46 cm from the third hole. On my bench right now are a half-checkered/martingale collar and a harness, which I hope to finish by Tuesday evening. All in all, these were fun last projects before trying to convince the pros that I’m worth their while. The rolled collar, in particular, was a great stress test.
-
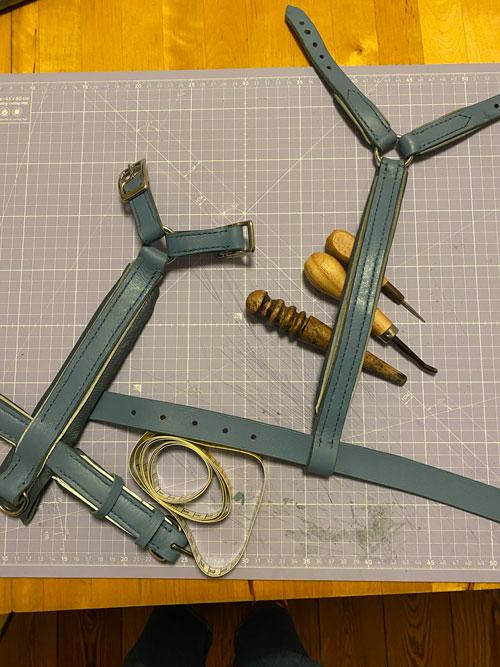
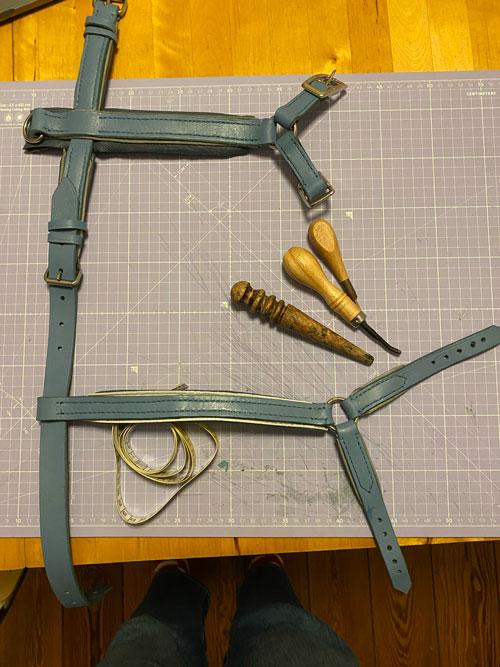
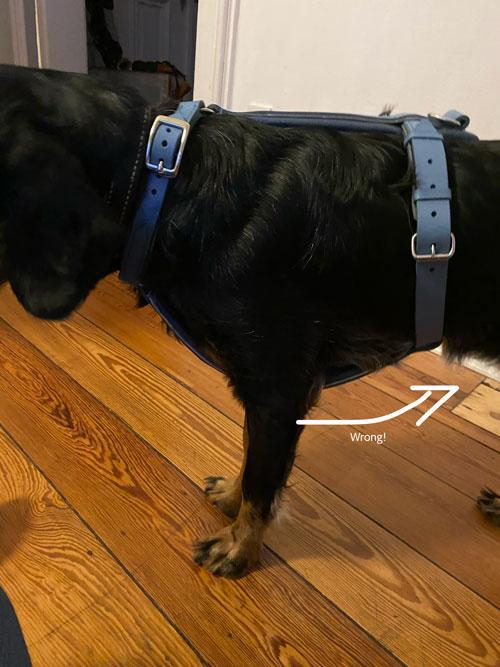
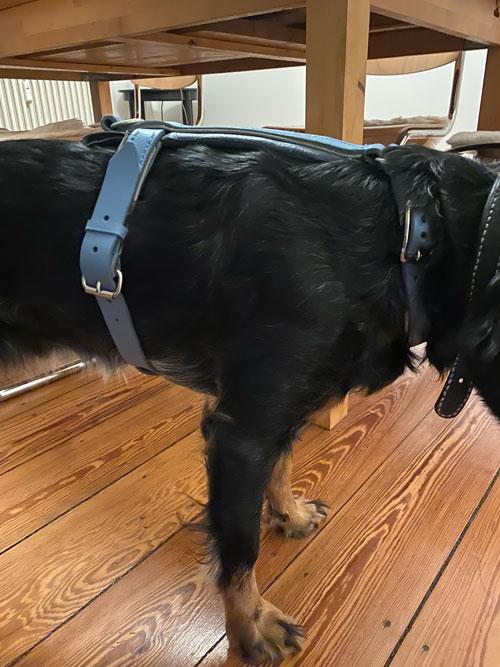
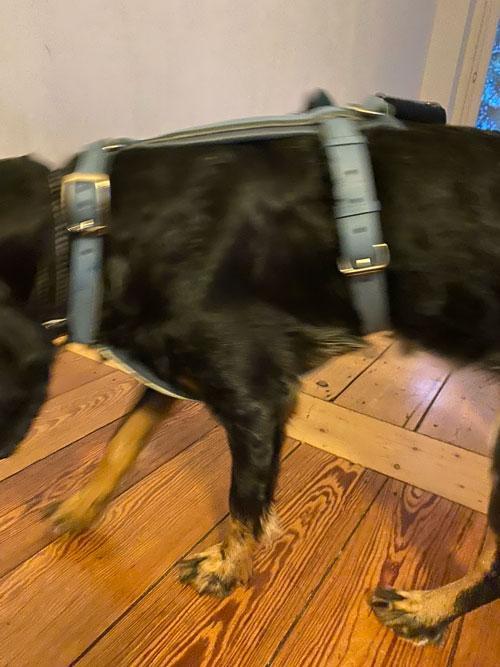
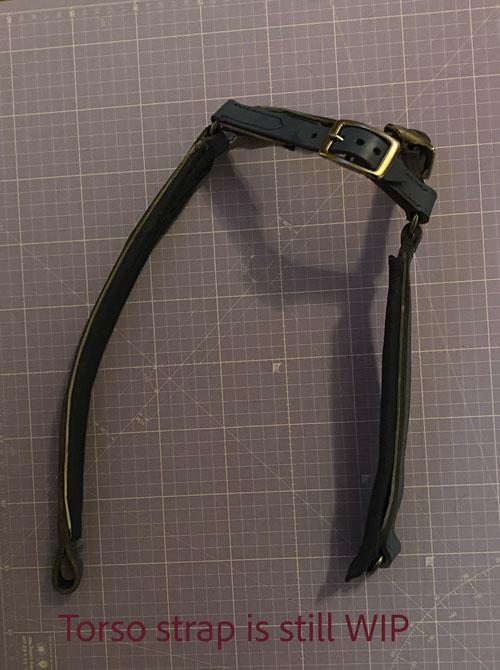
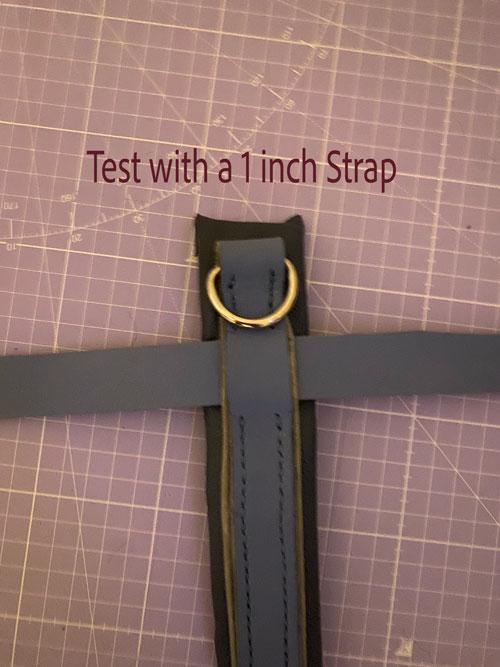
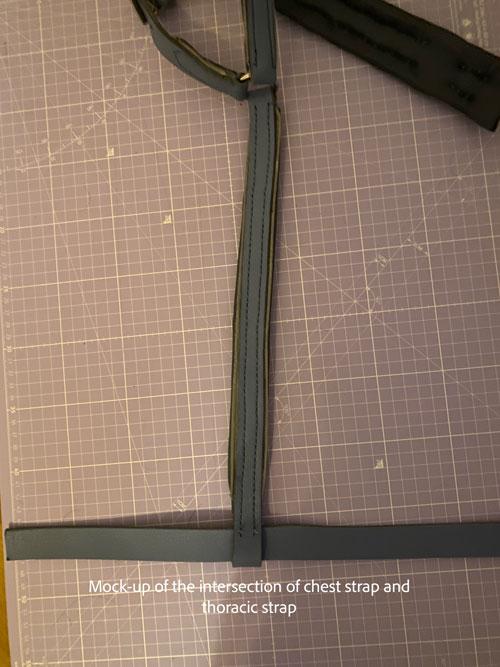
I can only recommend trying that out. We measured my mums dog today and damn! He looks so easy to get a harness for, but when you look at the measurements he is even more of a challenge than Tova. Hope you had a nice new years eve and good start into the new year. ----------------------------------------------------------------------------- Part 3 - Measurements to design In the previous part, we took our measurements. By now, you should have three values for each measurement. For the next steps, we will work with the average of those values. This helps smooth out small inconsistencies and gives us a realistic baseline for design decisions. Measurements alone, however, do not build a harness. Before we translate numbers into leather and straps, we need to talk about harness types—because not every set of measurements works for every design. The goal of this part is not to rank harnesses as “good” or “bad”, but to understand: what each harness type is designed to do where its anatomical limits are and which measurements matter most for each design Only then can we choose the right harness for the dog in front of us. Overview of Common Harness Types 1. The Y-Harness For a long time, this was my go-to harness for most dogs—and in many cases, it still is. However, while researching for this guide, some findings surprised me and made it clear that even the Y-harness is not universally ideal. A typical Y-harness consists of: two neck pieces forming the Y-shape one chest strap one dorsal strap one torso (thoracic) strap, usually opening on the left and right Its main advantage is that, when correctly designed and fitted, it can: keep straps away from the shoulder joint distribute pressure relatively evenly allow good shoulder extension Its biggest risk lies in incorrect vertical placement of the chest and neck straps, which can interfere with shoulder and elbow movement—especially in dogs with long forelimbs or narrow chests. This harness type is highly sensitive to accurate measurements and will be used later in this part as a full worked example. 2. The Chest Strap Harness Chest strap harnesses use a horizontal strap across the chest rather than a Y-shape. They can work well for: dogs with longer legs dogs where the elbow-to-floor distance is large dogs whose anatomy causes Y-straps to sit too high or too low However, they are more prone to: restricting stride extension if placed too low pushing into the shoulder if strap width is poorly chosen This makes leg length and elbow movement critical measurements for this design. 3. Tactical / Working Harnesses These harnesses are commonly used for working dogs, such as guide dogs or service dogs. They are typically: heavier wider more rigid designed to distribute load over a larger surface Their priority is stability and load bearing, not minimal interference. As a result, they are rarely suitable for: young dogs dogs with sensitive shoulders dogs expected to move freely at speed For leatherworkers, these designs require special attention to weight, padding, and strap width, as poor choices can quickly lead to restriction. 4. Step-In Harnesses Step-in harnesses are easy to put on and popular for small dogs. Biomechanically, they often: cross the shoulder area sit close to or directly over the scapula restrict shoulder rotation They may “measure fine” in circumference but still significantly alter movement, especially at the trot. 5. Vest Harnesses Vest harnesses distribute pressure over a large surface area and are often marketed as comfortable. In practice, they: limit skin movement restrict shoulder and spinal motion trap heat hide poor fit behind padding They can be appropriate in very specific cases, but from a biomechanical perspective, they leave little room for precise adjustment. ——————— Now that we have talked about the different harness types, we now need to figure how our measurments translate into each type. 2. Translate Each Measurement Into Design Parameters Take each measurement from Part 2, and show its relevance for each harness type: Measurement Y-Harness Chest Strap Tactical Step-In Vest Elbow-to-floor Determines lowest safe chest strap Determines strap height Safety, clearance Clearance Clearance Shoulder blade width Limits dorsal strap width Limits dorsal or back strap width Width of harness back panel Step-in strap clearance Shoulder padding placement Chest width (elbow-to-elbow) Determines chest strap width Same Same Same Same Torso circumference Stability & snug fit Stability & snug fit Load distribution Fit & security Fit & surface contact Neck circumference Neck straps placement Often secondary Often critical Critical for step-in Neck padding Now, let’s check how that looks for Tova. Here are her measurements. Neck 38.3 Elbow to floor 26 Torso 57 Chest 27.5 Elbow to Elbow 14.5 Back 22.5 They already tell us that she has realtivly long legs in comparision to her Torso. So anyting with a low strap or a step- in is not a good fit. Also she has quite narrow shoulders, this rules out any design requiring a wide dorsal part, so no teactical or vest harness as they would rub and restrict her movement. She also sports a moderate chest width this limits our options for chest straps quiets a bit when we want to avoid intereference with elbow extension. Her Torso gives enough space for a Y-harness or a chest harness, but a vest is too much coverage for her specific anatomy. In .Conclusion: Y-Harness: well-suited if straps are carefully sized and positioned as it allows free shoulder and elbow movement. Chest Strap Harness: possible, but strap height must be checked against elbow-to-floor to avoid interference. Step-In Harness: unsuitable, likely restricts shoulder rotation and interferes with stride. Vest Harness: unsuitable, shoulder clearance too narrow; could rub and restrict movement. Tactical / Working Harness: borderline — width and rigidity may cause pressure points; careful custom adjustment required. Using her measurements like this, we can already rule out designs that don’t fit her biomechanics and focus on the ones that do. Next, we’ll translate these numbers into exact strap lengths and widths for a Y-harness. Step 1: Determining Strap Widths As mentioned in Part 2, Tova has very little space between her shoulder blades. This immediately tells us that any strap wider than 1 inch on the dorsal strap would risk rubbing or restricting her shoulder movement. Because I also plan to pad the harness with plastizote and leather, the final effective width needs to account for that padding. For the best fit: Dorsal strap: 1 inch (carries the most pressure, so slightly wider is okay with padding) Other straps (neck, chest, torso): 3/4 inch (enough clearance and room for padding without restricting movement) Tip: Always measure the space between shoulder blades at full stride — you want straps to move with the dog, not press into the anatomy. This simple width plan ensures the harness is comfortable, safe, and functional while still allowing you to add padding where needed. Step 2: Determining Strap Lengths For each strap, length is calculated not just from raw measurements, but also considering clearance for movement, leather thickness, and adjustment. 1. Neck Straps Measurement: Neck = 38.3 cm Calculation: Start with the neck circumference. Add ~2–3 cm for padding and to allow one finger gap. Add extra 2–3 cm if you plan to include a buckle or adjustable closure. Result for Tova: ~43–44 cm for the full neck piece, I also calculated the buckles and O-Rings into the measure. I decieded for buckles left and right as with her measures the harness does not work as an overhead slip harness and I wanted to have more possibilities for adjusting the harness. I also added 4 inches to both parts of the neck piece for a more easy to work buckle turn. Tip: Ensure straps sit in front of the sternum and do not push into the shoulders. 2. Chest Strap Measurements: Elbow-to-elbow = 14.5 cm, Chest = 27.5 cm, Elbow-to-floor = 26 cm Calculation: Base length = distance between attachment points on neck pieces. Add clearance to sit ~2–3 cm above the elbow path. Include padding allowance (~0.5 cm per side). Result for Tova: ~32–33 cm total length plus 4 inches for buckle turns. Tip: Test fit loosely first; the strap should never touch elbows during stride. 3. Dorsal Strap Measurement: Back (shoulder blade distance) = 22.5 cm Calculation: Length = distance from top of neck straps to thoracic strap. Add 1–2 cm for padding and stitching. Result for Tova: ~24 cm plus 4 inches for turns Tip: Keep it centered along the spine; do not widen — your max measure is really your maximum width measure! 4. Torso / Thoracic Strap Measurement: Torso circumference = 57 cm Calculation: Base length = circumference just behind the forelimbs. Add ~3–4 cm for adjustability. Result for Tova: ~60–61 cm plus 4 inches for turns and I split the part into a shorter part with straps, and a longer one with buckles and looping. Tip: Strap should stay above elbow range, snug but not tight. 5. Sketch up the design Having a clear overview of what you want to do is key, so I can only advise you to make a sketch and take note of your measures. After that you can start on making a road map of the order in which you want to build your harness and get an overview of what you will need. I for example will need 2 x O-rings 1 Dee- ring 4 buckles (2 roller, 2 belt) 3 straps of leather (2x 3/4 inches and 1x 1 inch) 6mm plastizote padding leather (leather cord, reflective tape -> I decided to include reflective piping) looping 1/16 inch wide. I also decided I will post my WIP. You might've noticed, that I wrote this guide a bit in advance and am a bit further along in the construction process. As I splitted the neck piece I now have two pieces. Actually, that was really nice for stitching! This is how it looks without the torso strap, as I am still waiting on some buckles and my new adjustable creaser. This is how the strap around the torso will be joined with the dorsal, padding is still missing to avoid any sliding. And here you can see that I decided for a loop (full leather thickness!, skive started behind the point where both layers meet) to keep flexibility when the leather softens, but I will add some "restruction" by possibly adding some padding left and right, but I will test it's performance on "bare bones" before. I tested the harness progressively during construction. For full-motion testing, I used flat rope in place of the thoracic strap so I could confirm fit and movement before cutting final leather. This made it easy to adjust geometry without locking in strap lengths too early. Part 4 will go more in depth with construction.
-
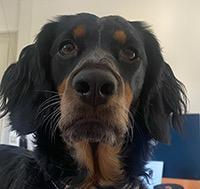
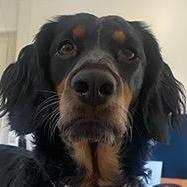
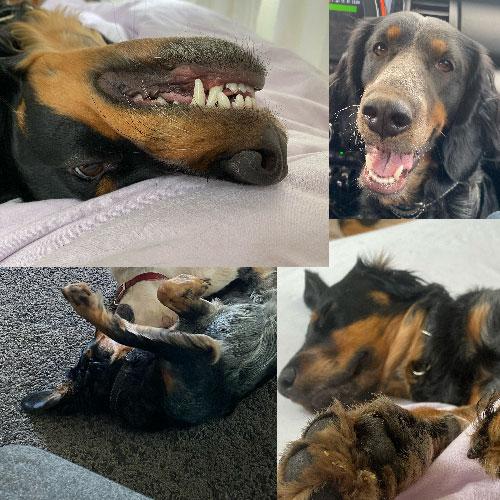
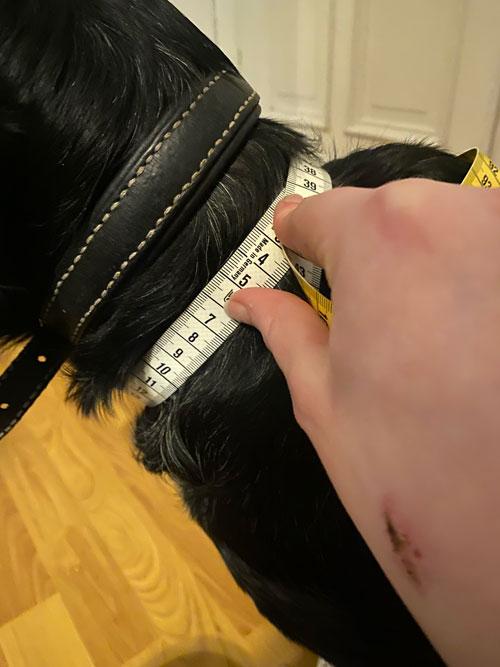
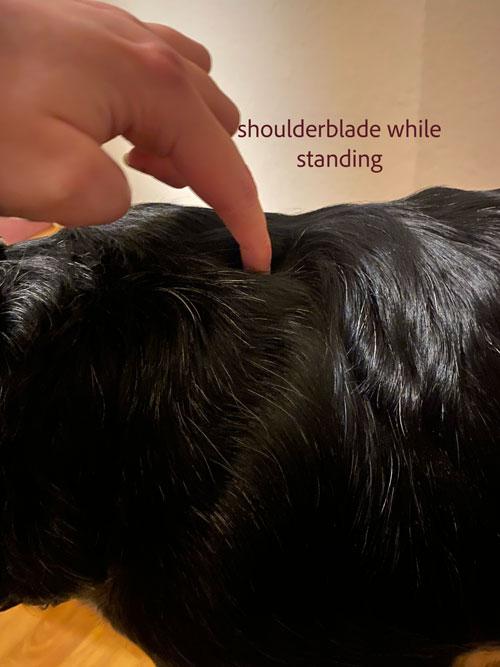
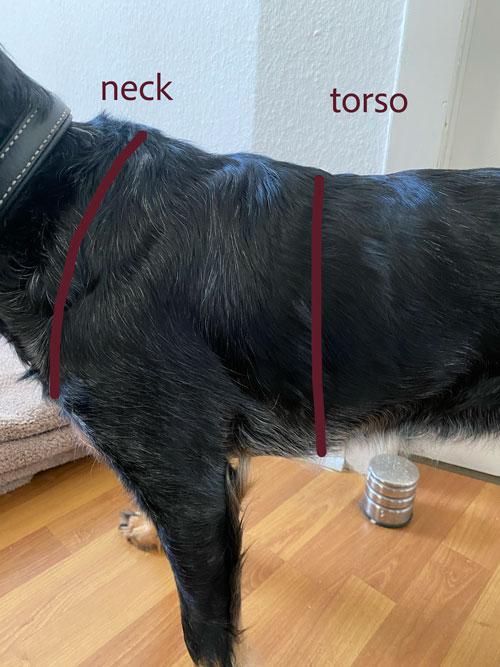
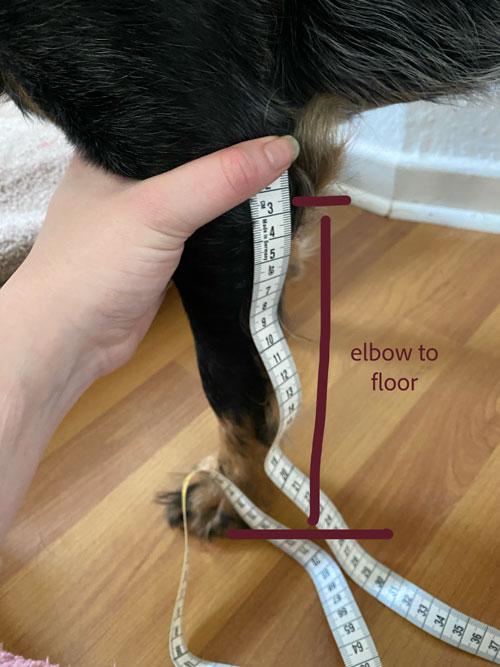
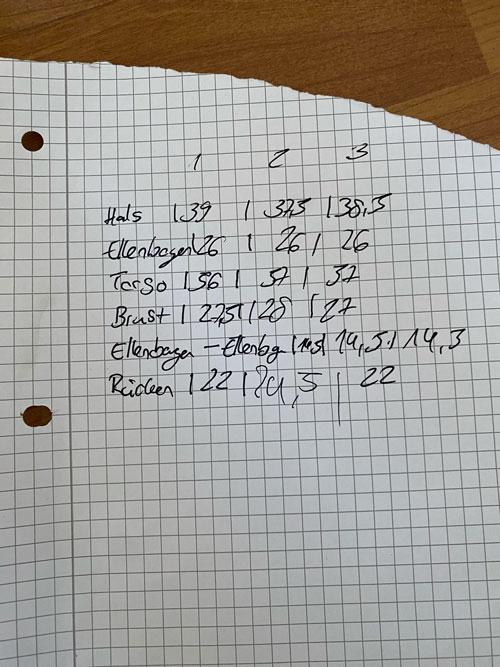
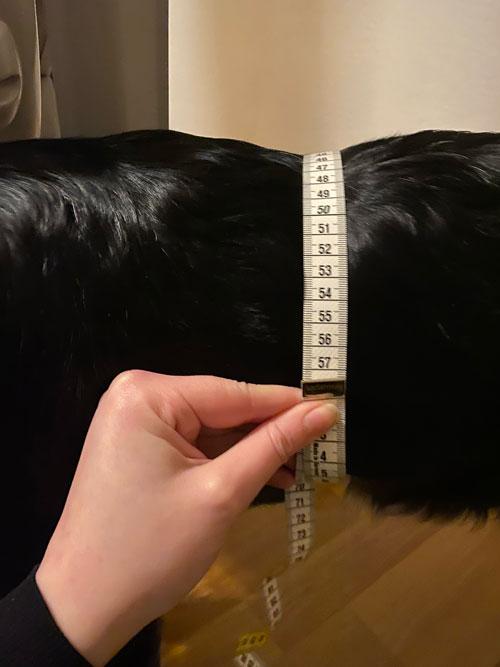
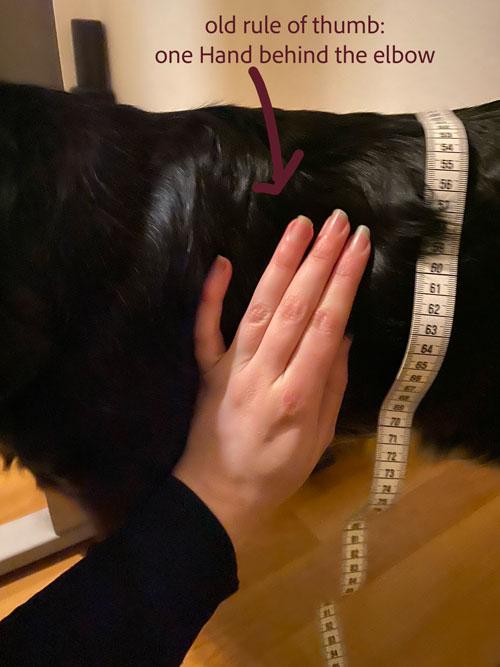
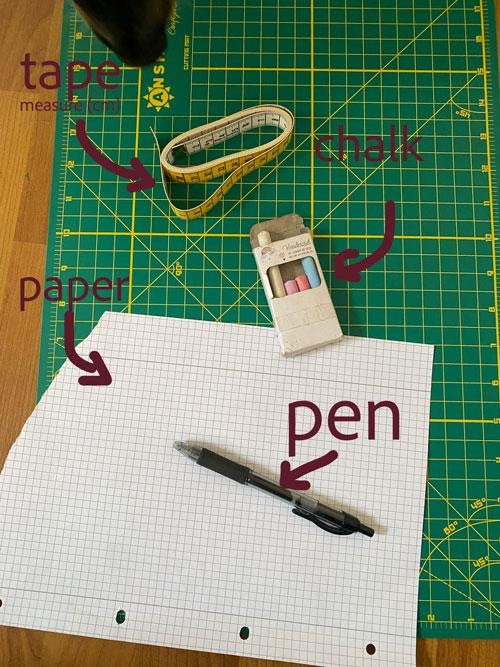
Part 2 – Measuring Your Dog This part is much more hands-on. You will see photos and graphics and get an explanation for every single measurement, so you can fully understand what you are measuring—and why it matters. Before we start, I want to introduce the dog who will be the model for all graphics and pictures in this guide. Meet Tova This is Tova. She is almost three years old and an English Setter mix from Tuscany, Italy. I got her when she was imported to Germany at six months of age. Since then, we’ve been a team—chaotic, playful, and always on the lookout for an adventure. When I got her, I already had years of experience with dogs and their equipment. Still, I quickly realised that I didn’t know everything. It started with collars and ended with constantly ill-fitting harnesses. The harnesses she wore caused discomfort over time, especially for her long back—and that was on me. They were always some unfortunate mix of too large in one place and too small in another, and I didn’t spot the problem early enough. She is the reason I want to do better. So, how do we actually do better? By measuring our dogs correctly. General Measuring Rules - Take each measurement three times - Let your dog move a few steps between measuring rounds - Later, before cutting leather, check each strap length three times - Precision matters. Your dog will thank you. What You’ll Need Chalk (as soft as possible) or any non-toxic, non-permanent marker that shows on fur A flexible tape measure Something to write on Something to write with What We Are Going to Measure Neck circumference (in front of the sternum, below collar position) Elbow to floor Elbow to elbow Distance between the shoulder blades Torso circumference (widest part of the ribcage) Distance from chest to torso Distance from neck to widest part of the ribcage Before Measuring: Position and Anatomy Before taking any measurements, we need to understand the anatomy of the individual dog in front of us. Your dog should stand directly in front of you. I was able to measure Tova on my own, but if your dog is more active, get someone to help hold them calmly. Make sure: all four paws are on the ground the paws are as parallel as possible the dog stands “closed” (equestrians know exactly what I mean) Now grab your chalk—and a good amount of patience. Marking Anatomical Landmarks (This Is the Key Step) 1. Shoulder Line First, locate the shoulder and draw a line along it. In my photos this may be hard to see because Tova has her winter coat and the chalk didn’t show as well as I hoped. If you’re unsure what to look for, Figure 1 will help. Repeat this on both sides, then connect the lines across the neck and chest. 2. Shoulder Blade Positions (Static and Dynamic) Next, locate the shoulder blades and mark each side with a dot or cross. Now lift one front paw as high as your dog normally lifts it while walking. Feel for the shoulder blade again and mark its new position in the same way. This shows you how much the shoulder blade actually moves. 3. Elbow Movement Zone With the paw still lifted, locate the elbow and draw a vertical line marking its range. Repeat this for both sides. 4. Widest Part of the Ribcage Now locate the widest part of the ribcage. Some companies recommend measuring “one hand behind the elbow.” From observing different conformations, I’ve found that this rule of thumb does not consistently hold true. Instead, visually and manually identify the widest point and mark it with a vertical line on both sides. ------------------------------------------------------------------------------------------------------------------------------------------------------------------------ At this point, your dog will look like a child discovered abstract art. Now is also a good moment to calmly reassure your partner or other dog owners or concerned bystanders, that yes—you are completely fine. These chalk lines are our guides. They show us where movement happens and where straps must not interfere. Our motto here is very much work smarter, not harder—especially if your dog is not the calmest individual. Taking the Actual Measurements 1. Neck Circumference Using the shoulder line you drew earlier, measure above this line and around the neck, between the chalk line and the collar position. The tape should sit flat You should be able to slide at least one finger underneath If this measurement does not fit over your dog’s collar, that is not a problem. This will make sense later when we translate measurements into design. 2. Torso Circumference (Widest Ribcage Point) Use the vertical chalk lines marking the widest ribcage point as your guide. Measure all the way around the torso. Keep the tape level and as vertical as possible Now cross-check with the elbow movement lines: there should be at least two finger widths between the torso strap position and the elbow movement zone If not, move the measurement slightly backward. Elbow clearance is non-negotiable. 3. Distance Between the Shoulder Blades Measure the distance between the dynamic shoulder blade markings (the lifted-paw positions). This measurement tells you how wide the dorsal (back) strap is allowed to be. In Tova’s case, I ended up with less than one inch of usable space during movement. This means: the strap must be narrow, padding must be minimal and carefully planned Ignoring this leads to direct scapular restriction. 4. Distance from Chest to Torso (Between the Front Legs) Measure from the chest/sternum area back to the widest ribcage point between the front legs. This measurement defines how long the chest strap is allowed to be without drifting into the elbow movement zone. Measurements That Seem Odd—but Matter a Lot 5. Elbow to Floor Measure from the lowest point of the elbow straight down to the floor. This measurement tells us: how low a chest or Y-strap may sit where vertical restriction begins whether a harness design risks interfering with stride extension This is especially important for chest strap and Y-harness designs as this measure give us an overview of the swing radius of the dog. 6. Elbow to Elbow Measure horizontally from one elbow to the other. This measurement defines: how wide a chest strap or Y-front can be how much lateral freedom the forelimbs need Too narrow causes pressure and rubbing. Too wide pushes straps into the shoulder joint. Now take these measurements another two times until you have 3 measures for each measurement point. Caption: This is written in german and says Neck, Elbow, Torso, Chest, Elbow to Elbow, Back ------------------------------------------------------------------------------------------------------------- Final Note for This Part If a strap crosses a chalk movement zone, it will interfere with movement—no matter how well it “fits” on paper. Measurements are not just numbers. They are boundaries defined by anatomy and motion. In the next part, we’ll use these exact measurements to: choose the appropriate harness type and translate them into a functional design This is where everything starts to come together.


-
Thank you! Ah! Yes, that was definetly a mistake due to sleepiness. My trainer would yell at me as we just had a discussion about martingals and when and when not to use them. 😆 The measurement part, is currently in wirting and I hope to have publish ready this evening. And again thank you! I hope to learn a lot and maybe even find a new calling. I'm literaly sick and tired of pro-bono work by now and constantly having to fix the issues non-certified consultants caused. They get paid a lot of money, I don't even see a cent while doing the work they promised to do but failed to deliver - I don't think I have to say more. 😅
-
Hello everyone, Some of you might already know that I am currently working on a Y-harness for my dog. During my research for this project, I noticed a recurring problem: many people try to build their own harnesses but miss several critical points. At the same time, there are surprisingly few good tutorials that explain not only how to build a harness, but also why certain design choices matter. This guide is my attempt to change that. You are very welcome to contribute—whether by adding points I may have missed or by correcting information if something turns out to be inaccurate. This guide is not intended for training purposes, provides no medical advice, and does not include product comparisons or commercial recommendations. It is a design and fitting guide, grounded as much as possible in biomechanics. I am not a professional—just a science nerd who loves her dog and struggled to find properly fitting harnesses in stores. My goal is to share knowledge and reasoning, so you can make informed choices when designing or fitting a harness for your own dog. In several parts, I will explain how to measure a dog for a harness and, more importantly, the reasoning behind those measurements and design decisions. Before we dive into the topic : a few general words on harness building and materials. When building a harness, always ask about the intended use first, and only then look at the dog and honestly assess whether the harness type you have in mind is suitable. Some harness designs simply do not fit certain dogs—no matter how well they are made. In my opinion, a harness must fit the dog first, and the purpose second. When choosing fittings, always check: breaking strength maximum load overall size and weight A practical rule I follow is: maximum load = dog’s body weight × 4 Scale matters. A Dachshund needs very different (lighter) fittings than a Newfoundland. Oversized hardware adds unnecessary weight and can negatively affect balance and comfort. Leather Choice (This Is Not Optional) For leather harnesses, I recommend: 3–4 mm thickness normal to hard tempered leather (I personally prefer hard) leather from the butt or dorsal (spine) area preferably harness or bridle leather (For my own harness, I use Italian harness leather, double butt with a resin back. (Note: this particular leather is not suitable for equestrian saddlery work, but works well for dog harnesses.)) This type of leather stretches less over time and holds its shape better, which is essential if you want to use the harness for more than a few weeks. Heavily oiled or fat leather is cheaper, yes—but it stretches significantly more and often has a very high breaking strength. In a worst-case scenario, we want the leather to fail before the metal fittings. If a dog gets caught and cannot slip out of the harness, it is safer for the leather to break than for rigid metal to hold indefinitely. For animal welfare reasons: do not use heavily oiled or fat leather for harnesses. Breed, Build, and Development Breed and build must always be considered when fitting a harness. For example: My current dog is long, mid-height, and slender My previous Springer Spaniel was long, sturdy, and rounder My mother’s dog is tall, long, slender, and overbuilt Three dogs—three very different ideal harnesses. Also consider how your dog may change with age. While growth and muscle development cannot be predicted perfectly, ignoring them entirely is a mistake. Some breeds are also more prone to injuries caused by ill-fitted harnesses, which makes proper fitting even more important. Part 1 – Biomechanics As mentioned earlier: a harness has to fit the dog. The other way around is simply impossible. The goal of a harness is to act as a leading device that interferes with the dog’s natural movement as little as possible. To achieve this, we must first understand canine biomechanics. In this section, I reference several open-access scientific sources using APA 7 style, all linked at the end of this part. I will do the same in every following section whenever possible. Harnesses and Their Effect on Movement The way a harness distributes pressure across a dog’s body actively affects gait and overall movement. Research on this topic is not entirely uniform: some studies show changes in spinal movement when a harness is used others show changes in stride length compared to walking on a collar some find little difference under certain conditions What we can safely say is that harness design matters. Many modern harnesses are marketed to restrict “undesirable” movement, such as pulling. This is not a long-term solution. If you are using a harness to prevent pulling, please work with a qualified trainer. The main advantage of a harness is that it removes pressure from the neck and—ideally—distributes it more evenly across the body. Stride Length, Shoulder Freedom, and Body Proportions In a study by Williams et al. (2023), it was shown that the distance from a dog’s elbow to the ground is a key measurement when evaluating how restrictive a harness is on stride length. This has practical consequences: Dogs with longer legs may benefit from a chest-strap harness rather than a Y-harness Smaller breeds often have relatively longer shoulders compared to forelimb length In these dogs, a chest strap may sit too high and actively restrict shoulder movement The conclusion is simple but important: no harness fits every dog. Weight Distribution and the Kinetic Chain A healthy dog carries up to 60% of its body weight on the forelimbs. The spine, shoulders, and limbs function as a single connected kinetic chain (Sürer et al., 2020). Even small changes in one area can alter overall movement patterns, affecting back motion and limb coordination. Irregularities in movement are most easily detected at the trot. An ill-fitted harness can, over time, lead to a shift of weight from the forelimbs to the hindquarters (Williams et al., 2023). One simple indicator for owners is to closely observe their dog’s movement on a collar versus in a harness. Because dogs do not have a clavicle, the shoulder joint is a so-called “false joint,” stabilized primarily by muscle. Poor harness fit can affect both the scapula and the spinous processes of the spine. Compensation and Injury Risk Canine gait can be modeled in three dimensions and is normally symmetrical. This symmetry breaks down when the range of motion of any limb is restricted. A study by Lin et al. (2020) demonstrates that dogs compensate rather than stop moving. Forward motion is maintained by redistributing forces—often until injury occurs. Dogs are very good at hiding discomfort. This makes it our responsibility as owners and builders to ensure that equipment supports healthy movement instead of silently undermining it. This concept is very similar to saddle fitting in horses. A well-fitting saddle that allows the shoulder to glide freely results in smoother, more even movement. Girths and breastplates also offer useful parallels. The thoracic (belly) strap of a harness serves a similar function to a girth: keeping the equipment in place Like a girth, it must allow free elbow movement If it interferes with the elbow, stride length is restricted and weight shifts rearward A breastplate in horses prevents rearward saddle movement; in dog harnesses, the chest strap primarily distributes pressure and stabilizes the harness. Anything positioned in front of the shoulder has the potential to restrict stride extension and must therefore be fitted to the individual dog. This is a common shortcoming of chest-strap harnesses when strap width and placement are poorly chosen. A Final Word on Restriction For those who intentionally want to restrict their dog’s movement using a harness: be aware that restriction worsens under tension. An open-access DAWGAIT dissertation shows that while a dog may appear to move normally at a walk, restrictions become evident at trot and gallop. What feels like “only a little restriction” can quickly turn into a real problem under load. Personally, I use a harness to allow my dog to move freely in front of me. The leash is never tight—it is simply an extension of my arm, used for safety and communication. Our walks are calm, low-stress, and give my dog the freedom to explore while staying secure. I also use harnesses as a secondary safety measure in new or potentially frightening situations, especially with young or insecure dogs. Used thoughtfully and fitted correctly, a harness can be a valuable tool. Used carelessly, it can do long-term harm. In the next part, I’ll show you exactly how I measured my dog for her new harness. I’m still waiting on some new tools, so updates might come a bit slower than I’d like—but I’ll share everything as soon as I can. Sources: Lin, C.-C., Wu, C.-H., Chou, P.-Y., Chen, Y.-C., & Chen, C.-H. (2020). Evaluation of a multibody kinematics optimization method for three-dimensional canine pelvic limb gait analysis. BMC Veterinary Research, 16(1), Article 105. https://doi.org/10.1186/s12917-020-02323-5 Sürer, E., Evangelisti, M. A., Paolini, G., Della Croce, U., & Manunta, M. L. (2020). A canine gait analysis protocol for back movement assessment in German Shepherd dogs. Veterinary Sciences, 7(4), Article 195. https://doi.org/10.3390/vetsci7040195 Williams, E. R., Hunton, V. D., Boyd, J. A., & Carter, A. J. (2023). Effect of harness design on the biomechanics of domestic dogs (Canis lupus familiaris). PeerJ, 11, e14719. https://doi.org/10.7717/peerj.14719 University of Georgia. (n.d.). DAWGAIT: Development and application of an open-source tool for canine gait analysis(Doctoral dissertation). UGA Open Scholar. https://openscholar.uga.edu
-
I get the fear! Starting a business is scary, especially when R&D feels like it’s draining time and money. But here’s the truth: A/B Testing ≠ Huge Stock You don’t need shelves full of products. One prototype, a couple of good phone photos, and you’re ready to test. Especially if you want to test on social media! A/B testing is about interest, not inventory. Perfect for handmade. R&D Isn’t Wasteful — It’s Smart Every business, big or small, starts with prototypes. Sharing early versions, showing the process, or testing reactions isn’t lost effort — it’s efficient. R&D teaches you what will actually sell. There are no shortcuts, and there shouldn’t be. Stop Comparing Handmade to Cheap Imports Mass-manufactured and handmade are two different worlds. Different markets. Different expectations. Different pricing. If you keep attracting people who don’t value handmade work, the issue isn’t your product — it’s your branding and targeting. If People Don’t Care About Your Quality, You’re Aiming at the Wrong Crowd! Handmade was never meant for everyone. So don’t try to sell to “everyone.” It won’t work. How to Define Your Actual Customer Create a clear profile of your ideal customer, like a blue print: Who are they? How old? Income? Style? What do they value? Why your product? Where can you reach them? Example: Luxury Handmade Leather Dog Collar Let’s say you make a premium Italian leather collar with brass hardware. Your customer? Women 25–30 who love luxury fashion. They hear “Italian leather,” and instantly think of designer handbags. They earn 45–50k a year. They want aesthetics, exclusivity, status — for themselves and their pets. You’ll reach them on Instagram, TikTok, and through boutique-style soft launches. They aren't bargain hunters. They want a vibe. Position Yourself Smartly Look at brands in your space and map out the market. Find where you fit — and where you stand out. Your personal USP, if you will. Branding Matters More Than You Think Handmade brands collapse not because the products are bad, but because their story is bland. Have colours. Have a logo that means something. Know your story and say it with confidence. People buy a feeling, not “just a collar.” Tell a Better Story Example: Weak version: “My granddad gave me his watch, strap was broken, I made a new one.” Stronger version: “When I was sixteen, my granddad gave me his watch. I adored the man. When the strap broke, I couldn’t find anything worthy of it — so I made one myself. It fit perfectly. Friends started asking for the same. That’s how this all began, and I still love creating pieces that make people light up when they finally get the strap they’ve dreamed of.” Same facts. Completely different emotional impact. And yes — follow-up matters A simple personal message a month later with cleaning tips or care advice? A small newsletter with new products and maintenance tips? Or at Christmas fairs: offer gift wrapping for a small upcharge in simple paper in your brand colours, sealed with a cheap sticker that carries your logo — instant “premium” feel and almost free advertising. There are so many options. The more personal and creative, the better — and none of it has to be expensive. A sheet of stickers costs what, here in Germany maybe 10€ for 500 pieces? Set a tiny marketing budget and actually plan with it. Small, thoughtful touches go a very long way. That’s how you turn a one-time buyer into a loyal fan who recommends you to everyone. If you still have questions about any of this, feel free to message me. I’m happy to point you in the right direction. ☺️ Best, Tove