JeffGC
Members-
Posts
130 -
Joined
-
Last visited
JeffGC's Achievements

Member (2/4)
-
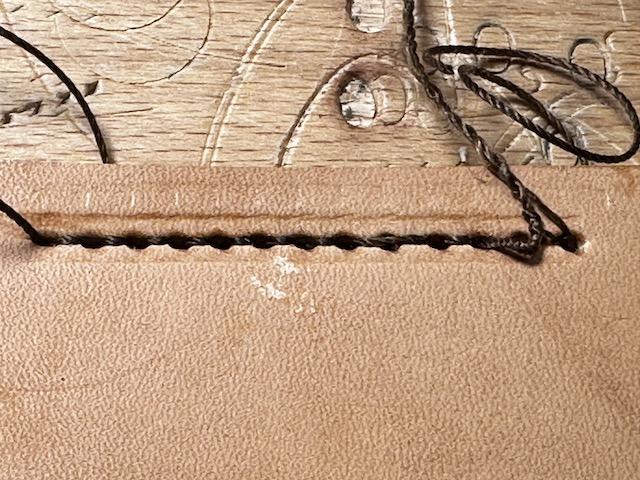
Dwight-Good question and I'm asking it myself! About 99% of the work I do is flat, such as belts and pancake holsters (which are molded after sewing. Occasionally, I'll make a Tom Threepersons holster (Only for really good friends or for myself). These are lined and also have a welt. Also, the belt loop is already sewn in place, not leaving much room. The edge to be sewn is about .500". Since this holster is folded over before sewing, there is a tendency for the sewing area to be slightly canted, resulting in the stitching not being perfectly parallel to the finished edge. As you can see in the attached images, the stitching is fine on the front of the holster but closer to the edge on the back. One solution, which has been the one I've taken, is to flatten the leather with your hand while sewing. On this holster, I wasn't careful enough. Since it was for me, it didn't matter. My plan is to return to the flat plate and be careful when sewing this style of holster!
-
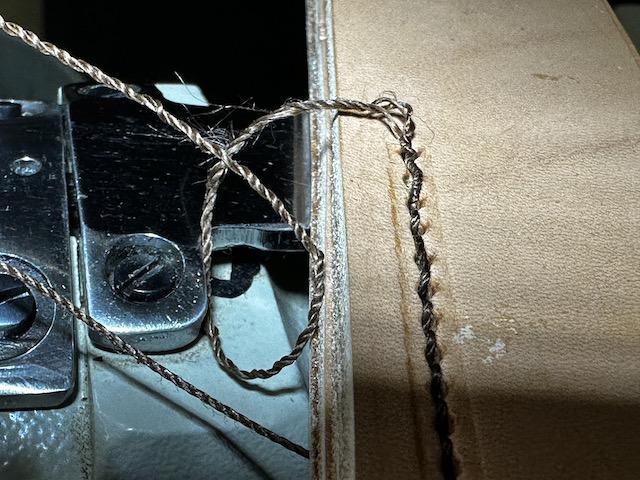
I've had a Cowboy 4500 for about twelve years. I sew holsters and belts and I love the machine. I have not, though, been successful when attempting to use a holster plate. Firstly, I verified that I could leave the feed dog in place; I operated the machine without screwing down the holster plate and saw no movement (image attached). Then I used a new needle. After a few stitches, it will skip a stitch or two and, basically become a complete mess. The top thread becomes twisted and frayed. Images of the thread damage and a row of stitching are attached. If someone can help me, I'd be most grateful. Jeff Chosid
-
I've had a Cowboy 4500 for five or six years and I'm totally pleased with the machine. Recently, I've had a few questions regarding the use of the holster plate; this might be the subject of an additional post. During the last few days, I've watched A LOT of videos on Youtube. A sincere thank you to the companies that have taken the time to produce excellent and informative videos. I have two questions: My machine has a vertical rod (about 4") on the top. It was my understanding that is was necessary to route the thread through it before the adjustable tension disks. When watching the videos, I noticed that most machines didn't have this rod, routing the thread directly from the arm, above the thread, to the tension disks. Thoughts? Timing: Some videos have you move the stitch length to the maximum, while others have you set to zero before checking the relationship of the hook to the needle. Which is best/correct? Thanks for your help. Jeff Chosid
-
The red material was slightly thinner than other bottles and required four coats. I'd guess I spent about an hour in total, but over a couple of days. Jeff
-
-
I’ve spent quite time perfecting my edge finishing. Now, I can produce an edge comparable to the best European manufacturers. I use this system on Hermann Oak “English” Bridle Leather or chrome-tanned leathers. When edging items made with traditional veg-tanned leather (holsters), I use more common burnishing methods. In this post, I’ll address materials, tools and technique. Materials: I’ve settled on Fenice edge paint, specifically the Matte Plus product that is available from Campbell Randall. I prefer the higher viscosity (Plus) product. I have experimented with the primer but have not seen any advantage in its use. This material is extremely flexible and durable. When I first started using the product, I would apply and sand. Now, I use an electric edger. The Fenice product, when dry, is thermoplastic. In other words, it melts with heat. Often, this technique is called “Hot Glazing.” Tools: The European leather houses use electric leather creasers that are quite expensive. If you are interested in one, they are available from Fine Leatherworking or Rocky Mountain Leather Supply. I think Campbell Randall is now offering a less expensive option. I have made my own and it works quite well. All of these parts were purchased from Amazon. Power supply - 3 Amp Variac Variable Transformer, 300va Max, 0-130 Volt Output. Handpiece – Dremel 1550 T2 Versa Tip Multipurpose Tool Kit or Weller SP25NUS Standard Duty LED Soldering Iron. Tips – Brass Leather Soldering Iron Tips I started with the Weller unit and discovered that the tip thread was 10-24. Although the brass tips are 4.5mm, I was able to thread them using a 10-24 die. The Weller unit worked okay. After using it for a few months, I purchased the Dremel tool. It is shorter and allows for better control. The tip thread, though, was slightly smaller (8-32). I carefully drilled the end with a #25 drill and tapped with a 10-24 bottoming tap. My existing brass tips fit perfectly. Applicator – Craftool Pro Edge Dye Roller Pen (Tandy Item #3437-00). This tool is incredible. The Fenice edge paint just flows onto the edge. With a bit of experience, you can maintain a fine edge, even with contrasting colors. Technique: Most of my items are make with two layers of leather. My process is as follows: 1. Sand edges with an oscillating spindle sander (Harbor Freight). I use 1.5”x 4” 80 grit sanding sleeves from Rockler Woodworking. 2. Stitch. 3. Bevel edges. 4. Sand edges with sanding sponges (Harbor Freight). Course, medium and finishing with fine. 5. Apply two coats of Fenice edge paint and allow it to thoroughly dry. 6. Smooth edge with electric edger. 7. Apply final coat of Fenice edge paint. Good luck! Jeff
-
Watch Strap Prototype
JeffGC replied to cjmt's topic in Purses, Wallets, Belts and Miscellaneous Pocket Items
Charlie - I just sent you a PM. Jeff -
My edges are beautiful, following Bob Park's excellent procedure. Still, I have a nagging question. Wouldn't the application of wax, before (under) the top coat, reduce the latter's adhesion? Typically, my second to last step is to burnish the edge with a mixture of paraffin and beeswax. I then finish with Bag Kote, either with an airbrush or wiping on with a sponge. Thoughts will be appreciated. Jeff C.
-
Barry King edgers. Jeff. C.
- 12 replies
-
Bonding Double Layer Belts ?
JeffGC replied to Shooter McGavin's topic in Gun Holsters, Rifle Slings and Knife Sheathes
Use an artists rubber brayer. Jeff C. -
I bought a holster plate and only use it for very specific situations. When creating a folded belt loop, it is sometimes not possible to lay the piece flat against the standard needle plate; i.e., the additional thickness of leather places the work piece at an angle. With the holster plate, the additional height of the center allows the piece to be positioned flat, in relation to the machine and perpendicular to the needle. Jeff C.
-
I just called Osborne regarding the taper problem. It seems that a slight taper is common. The only way to adjust is to shim the blade with shim stock. Jeff C.
-
I'm having the exact problem you have mentioned regarding an Osborne 86. One side is slightly higher than the other. I don't see how to correct the taper without shimming the blade. Any help will be greatly appreciated. Jeff C.
-
Lobo explained the situation perfectly. Either use the correct blue gun or the actual gun. Jeff C.
-
Tom Threepersons For J-Frame
JeffGC replied to JeffGC's topic in Gun Holsters, Rifle Slings and Knife Sheathes
Ferg - I think they are Ahrends.


