JeffGC
-
Posts
130 -
Joined
-
Last visited
Content Type
Profiles
Forums
Events
Blogs
Gallery
Store
Everything posted by JeffGC
-
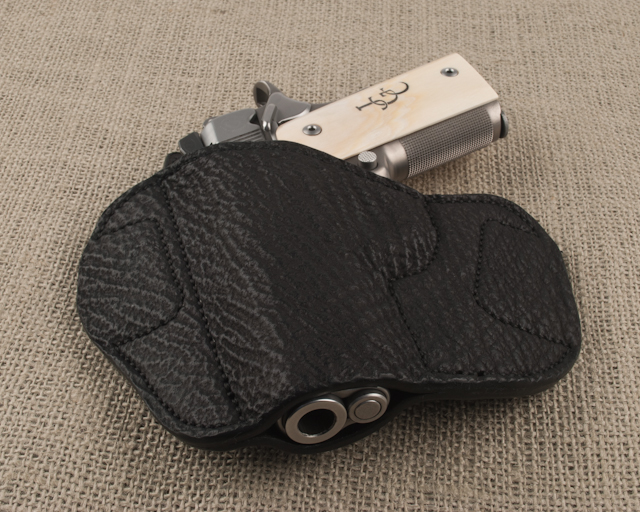
Working With Shark Skin
JeffGC replied to JeffGC's topic in Gun Holsters, Rifle Slings and Knife Sheathes
I've finally made my first holster with shark skin. The shark skin was laminated to 4-5 oz veg tan. The back of the holster was fabricated with two pieces of 4-5 oz veg tan. Regards, Jeff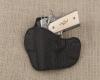

-
Contour Stitch Line
JeffGC replied to cstephens's topic in Gun Holsters, Rifle Slings and Knife Sheathes
Unfortunately, I'm commenting on my own post (above). In the past, I positioned the stitch line at 1/2 the gun width. In my previous post, I mentioned positioning the stitch line closer around the trigger guard. I should have tested this brilliant idea before suggesting it to others. Way too tight. In fact, I could not get the pistol completely into the holster. It was close to impossible to remove! Sorry for the bad advice. Jeff -
Contour Stitch Line
JeffGC replied to cstephens's topic in Gun Holsters, Rifle Slings and Knife Sheathes
Almost all of my holsters are made of two pieces of leather (front and back). I lay the weapon on the paper and then carefully trace it with a pen. So I can get as close as possible to the gun, I use a ball point pen filler; i.e., without the pen casing. I measure the width of the gun with a dial caliper and then mark the stitch line with a pencil compass, adjusted to exactly 1/2 of the measured thickness. I adjust the width depending on the design of the gun. For example, I just made a pattern for a Glock 22. The straight stitch line along the top of the slide is .500". Below the rail, it's a bit less. Around the trigger guard it's .300". Keep in mind that my tracing is slightly oversize due to the thickness of the pen filler. I hope this helps a bit. Jeff -
I have a 12 ton press that I'll sometimes use for forming. I have two 1/2 aluminum plates with 1" natural gum rubber pads. I will only use it with dummy guns for fear of damaging a weapon. After I press, I'll detail bone by hand. The press, alone, does an amazingly good job. I'm not doing any production work so most of my holsters are completely formed by hand. Jeff
-
Hand Pattern Cutting Help
JeffGC replied to cstephens's topic in Gun Holsters, Rifle Slings and Knife Sheathes
I've been making holsters for many years, using a small X-Acto knife (No. 11 blade) for cutting patterns and leather. I still use one for cutting patterns which are typically made of manila file folders or poster board during design development. After I have a finalized design, I make a new pattern on a plastic sheet. I use a small drill bit in a Dremel to mark stitch lines, etc. The best source of plastic sheet is from single layer notebook covers. This past winter, after considerable research on this forum, I bought a head knife. Following the recommendations of a number of members, I contacted Bob Douglas. Having already purchased an awl from him, I was confident I was dealing with a great resource. I purchased an early 1900s Osborne plus one of Bob's large stropping blocks. Life with a head knife has really been a learning experience. With a craft knife, it would normally take a number of passes to completely cut through the leather. With a head knife...one pass. Cutting long straights or tight curves is not difficult with a head knife. Keeping the knife sharp is the major issue. I'm learning and getting better. If you are really committed to leatherwork and are willing to spend the money, buy a head knife. Avoid Tandy and call Bob Douglas. Regards, Jeff -
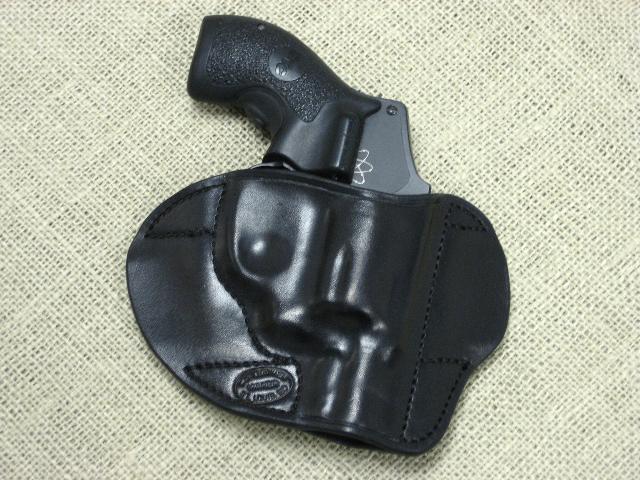
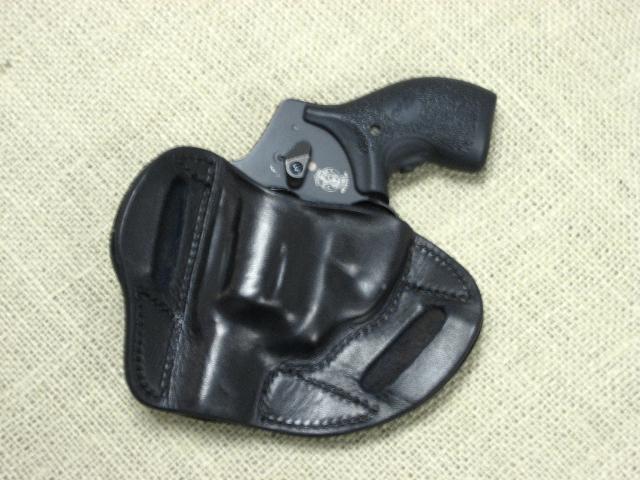
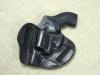
Let's See Your Ccw Type Revolver Holsters
JeffGC replied to Sixer's topic in Gun Holsters, Rifle Slings and Knife Sheathes
This is the third version of an evolving design. V1 had traditional belt slots. V2 looks almost like the holster pictured. V3 (current version) provided slightly more hand clearance when gripping the revolver. I'm comfortable will this design, which is final. The pattern and stitch line is the same for both AirWeight and AirLite revolvers. Boning is different due to the shrouded ejector on the latter. Pictured is a S&W 340PD. This is a great concealment holster, riding tight against one's side. Made from 8/9 oz. Wickett & Craig, dip-dyed in Fiebing's USMC Black. Finished with Fiebing's Bag Kote. Sewn on a Tippmann Boss. Jeff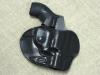
-
I have a Delrin stamp and one from Infinity. The latter is really an impressive tool. Jeff
-
Try Duncan Customs at 989.894.6691 Jeff
-
Shortly, I'm constructing a pancake holster with the front covered with shark skin. I have a few questions for those of you familiar with exotics. I'm planning to attach the shark skin to 4-5 oz. leather using Barge Cement? Acceptable? The shark skin is black. Should I dye the other parts before assembly? Typically, I dip black holsters after assembly. Should I groove before stitching? Any suggestions on grooving such a rough surface? How do I mark stitching lines on the rough, black shark skin? I'm referring to the weapon outline stitch line. Do I burnish edges the same as vegetable tanned leather? Is Bag Kote okay for a top coat? Any suggestions will be greatly appreciated. Jeff
-
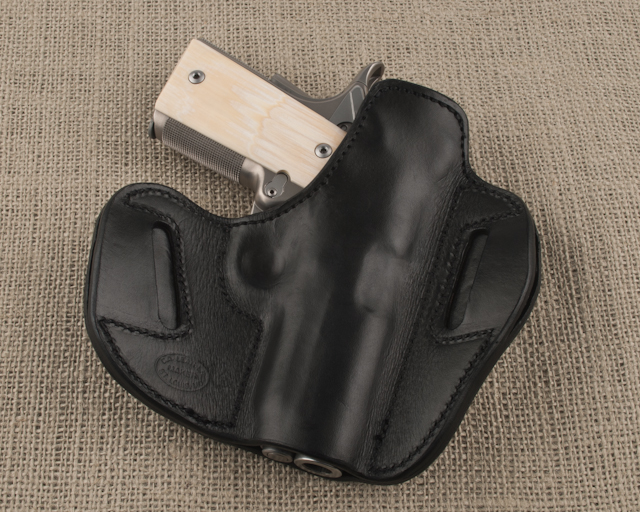
Pancake - Glock 22
JeffGC replied to JeffGC's topic in Gun Holsters, Rifle Slings and Knife Sheathes
The leather is quite thin. I measured it with a caliper and was a bit surprised that it was .118". Jeff -
Pancake - Glock 22
JeffGC replied to JeffGC's topic in Gun Holsters, Rifle Slings and Knife Sheathes
Yesterday, I received some feedback from my LEO friend to whom I gave the holster. I was a bit disappointed by his comments and would like some input on their validity. My hope was that other individuals in his agency would see the holster, be suitably impressed and then order one. When I gave him the holster, I told him I'd want $100 for similar ones. "For $100, you need to use thicker leather." The holster was made of 8 oz. plated Wickett & Craig leather. The mouth does not have a reinforcement. I mentioned this to him, explaining that a reinforcing band would present a thicker cross section at the mouth. "The belt loop portions need to be wider." Is my $100 price out of line? I suspect I'm high. Any comments or suggestions will be greatly appreciated. Jeff -
I think it depends on the products you are using. At one time, I attempted to apply Leather Balm with Atom Wax over Bag Kote. The Leather Balm dissolved the Bag Kote, indicated by the dye color on the cloth. I quit combining what are both finishes. After dyeing, I apply neatsfoot oil and then Bag Kote. If I really like the recipient of the holster, I apply a coat of Renaissance Wax and buff. Jeff
-
I have a Delrin stamp and also an engraved steel stamp from Infinity stamps. The latter was about $150 and you get what you pay for. Jeff
-
Holster Finishes
JeffGC replied to LeatherCaptain's topic in Gun Holsters, Rifle Slings and Knife Sheathes
I've been finishing my holsters as follows: Exterior - Bag Kote applied with a damp sponge. Interior - Leather Sheen applied with a dauber as a final step. Jeff -
Typically, I apply Bag Kote with a sponge dampened with water. Is there an advantage applying with an airbrush? If so, should I use full strength or thin with water? I'm using a Paasche AUTF. Jeff
-
Fiebings Dye
JeffGC replied to BillinOK's topic in Dyes, Antiques, Stains, Glues, Waxes, Finishes and Conditioners.
Every time I call Fiebing's, their suggestion is to switch to their oil dye. If the problem is their spirit dyes, why don't they just correct the issue. Jeff -
H&k P7 Prototype Your Thoughts
JeffGC replied to Denster's topic in Gun Holsters, Rifle Slings and Knife Sheathes
It looks good. I'd prefer to have the upper edge slightly lower so that the user can achieve a complete grip on the firearm before drawing from the holster. My only other comment is one of style. I've experimented with having the crease the same width as the stitch groove or slightly less. To me, the latter looks better. Jeff -
It's not stiffer but seems firmer. It's more difficult to cut. When cased, I don't notice any difference from un-plated leather. Jeff
-
Where Do You Buy Your Belt Clips?
JeffGC replied to lspiers's topic in Gun Holsters, Rifle Slings and Knife Sheathes
Try Albest. Click here: Jeff -
Pancake - Glock 22
JeffGC replied to JeffGC's topic in Gun Holsters, Rifle Slings and Knife Sheathes
I was waiting for this question! A French Curve is a drafting tool. For a full description, go to: French Curve Jeff -
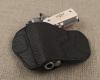
Pocket Holster For J-Frame
JeffGC replied to JeffGC's topic in Gun Holsters, Rifle Slings and Knife Sheathes
I agreed that one should be careful to avoid an AD. Firstly, the trigger-guard is completely covered. Secondly, the pocket for the knife keeps it in place; i.e., not floating around in your pocket. Also, the knife is the most effective hook I've ever seen. It's sometimes difficult to remove the holster from your pocket since the knife catches on the top of the pocket. Jeff -
Pancake - Glock 22
JeffGC replied to JeffGC's topic in Gun Holsters, Rifle Slings and Knife Sheathes
I apply Bag Kote with a dampened sponge. Jeff -
Front Pocket - Lcp
JeffGC replied to JeffGC's topic in Gun Holsters, Rifle Slings and Knife Sheathes
8 oz. plated, from Wickett & Craig. Jeff -
Pancake - Glock 22
JeffGC replied to JeffGC's topic in Gun Holsters, Rifle Slings and Knife Sheathes
Thanks for the comments. My process is not overly sophisticated or complicated. I dunk it in warm water for about five seconds. As soon as the surface water is absorbed, I insert the blue gun and start working with my hands. My boning tools are very basic. I use the back end of an awl handle and a very small, spoon-shaped leather tool. I add the crease with a blunt scribe. I also use a wood clay modeling tool. I leave the blue gun in the holster until dry. Jeff -
Pancake - Glock 22
JeffGC replied to JeffGC's topic in Gun Holsters, Rifle Slings and Knife Sheathes
Recently, my designs have improved. Using French Curves makes a big difference. Thanks for the nice comments. Jeff