Wizcrafts
-
Posts
7,801 -
Joined
-
Last visited
Content Type
Profiles
Forums
Events
Blogs
Gallery
Store
Everything posted by Wizcrafts
-
Johanna; I went to update my pinned topic about leather sewing machines, and all I get if "Could not locate." It appears that all of my work has vanished! Or, something went wrong in the database. Please check into this and let me know if the topic can be retrieved. Thanks, Wiz Feinberg a.k.a: Wizcrafts The update was going to be a link to a YouTube video I uploaded today, showing my walking foot machine in action. Name: Wiz Feinberg - Wizcrafts UserName: Wizcrafts IP Address: 76.122.131.41 Email Address: leatherworks@wizcrafts.net
-
The Type Of Sewing Machine You Need To Sew Leather
Wizcrafts replied to Wizcrafts's topic in Leather Sewing Machines
If you intend to sew leather straps, a walking foot machine makes it so much easier. I have just uploaded a video, to YouTube, of my walking foot machine at work, sewing a rifle sling. ! Read the description for further details about the job being sewn.The next videos will have better closeup details, but this one will show newbies to sewing leather straps how it is supposed to be done. -
Help Me Find A Machine Please....
Wizcrafts replied to billcurley's topic in Leather Sewing Machines
Why don't you give Bob Kovar a call, at Toledo Industrial Sewing Machines. His number is: 866-362-7397. Tell him what you want to sew and the thread size you intend to use and he will find a machine to fit your budget. You are going to want either a roller foot machine or a walking foot machine. Since you intend to sew suede, you'll be able to use a set of walking foot pressor feet with teeth on the bottom. Actually, ask Bob about his portable walking foot machine. It just may do exactly what you are hoping for, at a very reasonable price. Just don't expect a portable to also sew dense belt leather, without modification. -
Head knife, with the blade well sharpened, especially at the tips. I score the surface along the traced cutting line, then dig the tip into the leather and follow along the curves until I reach a straightaway. Then, I roll the curved portion of the head knife along the straightaways, until the end is reached.
-
Toledo Industrial Sewing Machines has parts, threading rods, needles and bobbins, for Singer and Adler shoe patchers, as well as most other industrial sewing machines. Call Bob Kovar, at: 866-362-7397
-
Help Me Learn To Use My Juki Ddl-5550
Wizcrafts replied to Stocksuspension's topic in Leather Sewing Machines
If you install the flat foot with steel rollers inside it you will not have to change the feed dog or cover plate. If you install the actual big rolling wheel, that replaces the pressor foot, you will need the matching single row feed dog and single slot cover plate. These are usually, but not always, sold as a set online. If you intend to use the machine exclusively for leather garments and chaps, a true roller foot set is a must. The wheels are usually available in two diameters. Get the bigger diameter, which is about 1 inch. Bob Kovar, at Toledo Industrial Sewing Machines sells the roller foot conversion set. If you are going to sew a variety of projects, including cloth upholstery, go with a flat foot that has inside rollers protruding from the bottom. As for the poor bottom tension, the cause and answer depends on the type and size of thread you are trying to use, which you did not state. Here are some basics that will affect the bottom stitch appearance. If the bottom tension is too loose the knots may appear on the top of the work. If the bottom tension is too tight, the knots will appear under the work. If the knots are being pulled into the layers, but the stitches are loose on the bottom, too much thread is being released by the bobbin. Tighten the bobbin pressure spring one turn. Try reversing the bobbin, so it feeds against the rotation of the shuttle. This is standard practice to avoid bobbins spinning after the machine slows or stops, thus emptying thread into the shuttle without tension. Buy a bobbin case that has an "anti-backlash" spring inside it. This cures the previous situation. If tightening the bobbin spring cures the loose bottom stitches, but pulls the knots down too far, add top tension until the knots rise inside the layers. The size of your needle can also affect the placement of the knots. If the needle is too small, knots will tend to be on the bottom. If the needle is too big the knots may appear on or near the top. You want the right size needle that feeds the thread without being too loose or to tight. If the top and bottom thread are the same size and the work is dense, go up one needle size, to account for twice the thread thickness in the knots. If you run out of available needle sizes, go down one size in thread, at least in the bobbin. One thing you must keep in mind is that you bought a garment sewing machine. It is not designed or provisioned for properly sewing heavy nylon thread into dense leather. -
Another thought. If indeed the top thread is jumping out of the top tension disks, it may be caused by the shock of take-up and not enough slack in the check spring. Try lengthening the stroke of the check spring (loosen hold down screw and rotate the limiting bracket counterclockwise, that controls the spring's bottom resting position, to lower it). Or, add a bit more pressure to the spring thread guide by rotating it's shaft clockwise (loosen a set screw in the body, turn split shaft clockwise with flat blade screwdriver, tighten the set screw).
-
A Real Bad Word Of A Time W/needle Cutting Thread
Wizcrafts replied to Shorts's topic in Leather Sewing Machines
It sure sounds to me like the needle is too far from the shuttle's pickup point, or the timing is too advanced, or both. But, your mentioning that the loop was very small makes me suspect too much top tension, or too big of a hole, from a too big needle. If you downsize your needle it will move even farther from the pickup point. I had a big Adler flatbed machine for a few weeks and it came equipped with a #200 needle. I bought some #160 needles so I could sew with #138 thread and found that I got constant skipped stitches. I then learned that there is a fixed width spacer screwed onto the inside of the shuttle. That spacer is matched to the needle size and ensures that the point never actually hits the needle. This works fine when both needle and spacer are the same width. But, changing to a narrower needle moves it to the right of the point, which cannot be moved closer due to that spacer block. I was going to gave to buy a thinner spacer to use #160/22 needles, but traded the machine instead. Maybe your machine uses a similar spacer system inside the shuttle? -
I haven't asked about parts for a long time, because I have bought a bunch from Campbell Bosworth. However, I am running out of money for new parts and I still need some miscellaneous parts and accessories for my Union Lockstitch machine. If any of y'all have an extra machine you are using for parts and can let some go, please PM me. Some parts I am looking for include these: #350 skip-a-dee lever #352 washer for above lever #290 bobbins Needles and awls in small and large sizes various, non-standard pressor feet (right toe, left toe, stepping, round reins, pricking, stitch in the ditch) various throat plates, especially a raised holster plate, with a slot for a raised edge guide A raised roller edge guide 4 sided wrenches in various sizes a needle bar with a blade to gouge a channel on the bottom of the leather (goes with ditch foot) The big spring that goes on the take-up arm The thread feeder/guide that goes on the take-up arm Misc. screws and nuts and bolts
-
At Wit's End... Finding A Tacsew T111-155 Manual
Wizcrafts replied to QDaddy's topic in Leather Sewing Machines
Once you get a copy of the manual you will find that you have a pretty decent sewing machine. You can get all kinds of Singer 111 pressor feet and attachments for it. It will take series 135x16 and 135x17 industrial needles, up to #25. It should be able to sew 3/8" of leather, if you apply sufficient top pressure. Look to see if there is a second top pressure screw for the inside pressor foot and adjust it as necessary. I sometimes screw the inner foot tension spring all the way down, then back off the outside foot pressure, to reduce marking tracks on the leather. -
It is very relevant! It indicates that your top thread may be coming out center of the upper tension disks and is just riding freely through their upper edges, which taper away from each other. This in effect leaves zero top tension and 100% bottom tension, hence the rats nest under the work. Make sure that the top thread is looped around the multiple thread guide post holes and exits the lowest hole inline with the tension disks. Pull it into the disks, then around and out of the check spring disk, up to the take-up lever, and down to the needle. Watch the top thread in the disks as you sew. If you see it jump out of the middle of the tension disks, pull it out and wrap it around the guide post one more time. This would have to be a very rigid thread if it is able to jump out of the upper tension disks. Perhaps your top tension may be so tight that the thread is forced out of the middle. Try reducing both the top and bottom spring tensions to half what they currently are.
-
A Real Bad Word Of A Time W/needle Cutting Thread
Wizcrafts replied to Shorts's topic in Leather Sewing Machines
Ah, now we're getting the right info from you! If the loop at the eye of the needle is too small, the hook will miss it, as you noticed. You have three possible things to adjust to fix this problem. There is too much top tension. Loosen the bobbin tension to the minimum that still gives a little pressure on the bobbin spring, then loosen the top tension to match. With less top tension the needle should form a bigger loop, as it begins its ascent. The pickup point is too far from the needle. Move the pickup point a little closer to the needle's eye. The timing is set to early. After moving the pickup point closer, retard it slightly, to allow the needle to move up a tad more, before the point intercepts the loop. You may have to pick off the loop just above the hole in the needle's eye. It might be that the thread you are using is too rigid for the leather you are sewing. It may be that the needle is lifting the leather just as it begins to ascend. More top pressure will stop the lifting. Finally, the needle may be to big for your thread. Try going down one more size. If that makes it worse, go up to the next larger needle. -
A Real Bad Word Of A Time W/needle Cutting Thread
Wizcrafts replied to Shorts's topic in Leather Sewing Machines
First of all, change the needle; it might be bent or chipped. Make sure the thread guide channel is on the left and the eye on the right side of the needle. Check the bobbin thread to ensure that it is tight and is not wound around where it shouldn't be wound. Check the top thread path to make sure the thread is going through all guides and tensioners. Sew a few stitches forward, then backward, without any thread. See if the needle goes directly into the previous holes when sewing in reverse. Make sure there is enough top pressure to keep the leather from lifting with the needle, on the upstroke. That will cause skipped stitches and frayed thread. -
Thanks to everyone who replied, especially the ones regarding printing services. The machine is just going to have to sit in its case until somebody needs one and is willing to pay a fair price for it. I placed it on Craigslist twice and got zero replies. I cannot afford to invest in custom printing for a machine I already have over a hundred dollars in, don't use and can't sell for what I already have in it. It is a lesson too late learned, when I was just getting back into sewing, after 12 years out of the business. I now have two very heavy duty machines that take care of all of my leather, vinyl and denim work. Should any of you come up with replacement decals at a reasonable price, I may consider buying a set. Otherwise, there is no need for any further replies.
-
The Type Of Sewing Machine You Need To Sew Leather
Wizcrafts replied to Wizcrafts's topic in Leather Sewing Machines
This article is now being Tweeted on Twitter. Thanks all! BTW: I am @Wizcrafts on Twitter. My tweets are mostly about computer and website security, malware threats and spam analysis, but I do make the occasional Tweet about my leather and sewing work. Today is my birthday, so I probably won't be posting anything new today. I'll get back to this article later, or tomorrow. I know I have a contract sewing job to do sometime tomorrow. Maybe I'll shoot a couple of pix of my walking foot machine earning me some money. It may help someone who wants to sew similar leather projects. I have shot a few movies of my machines, with my digital camera, but haven't figured out how to convert them from Apple .MOV files into WM .AVI files. I may see if YouTube has a converter and upload them there, for the world to see (in Flash format). -
In addition to using either rubber cement, contact cement, or a spray adhesive, I also use double sided sticky tape to secure two layers for sewing. This tape is available in industrial strength, if you look around at various suppliers. It is very useful along edges and on zippers.
-
The Type Of Sewing Machine You Need To Sew Leather
Wizcrafts replied to Wizcrafts's topic in Leather Sewing Machines
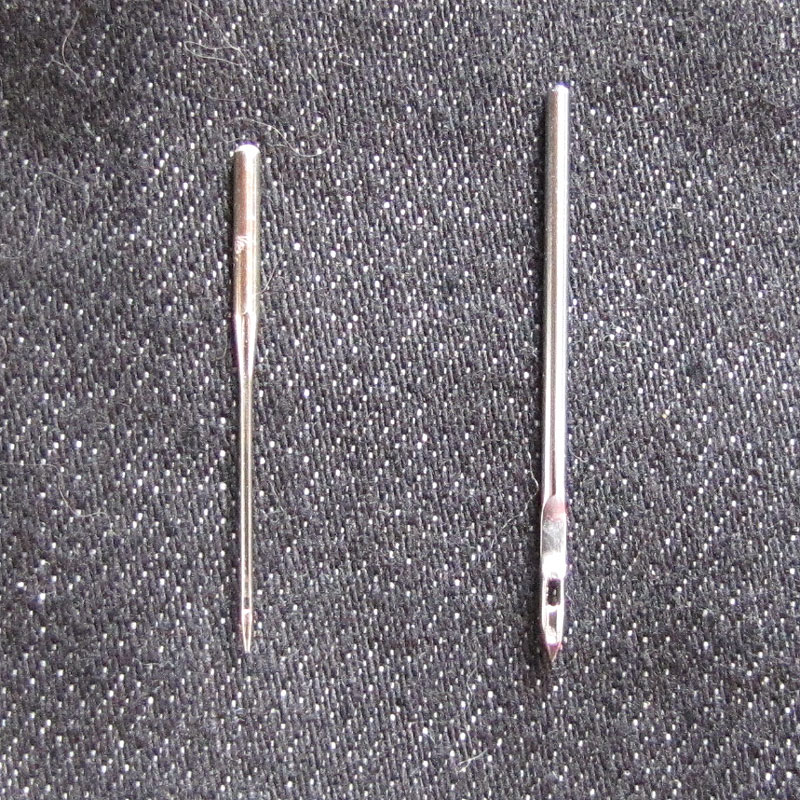
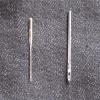
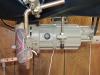
This would be a good time to compare home vs industrial motors and needles. You depend on the turning power of the motor to get the first stitch into your material, and the horsepower determines how easy or hard that will be. Once it gets the machine sewing, almost any home style sewing motor will run a sewing machine at a decent rate of stitches per minute, up to its gearing limit. But, that speed is usually only attainable if you remain within the practical limits of material density, needle and thread size. The bigger the motor, and higher its horsepower rating, the more dense the material it can try to penetrate. Most industrial sewing machines come with either a clutch or servo motor, which is mounted under the work table, which the machine rests on top of. A v-belt connects the pulley on the motor to the pulley cast into the flywheel (handwheel) on the back of the machine. Industrial sewing machines are usually fitted with a motor pulley that best suits the intended work. Upholsters and garment makers want high speed, so they order a large motor pulley, somewhere in the vicinity of 3 to 4 inches diameter, inside the groove. The pulley on the flywheel of garment machines is typically around 4 inches diameter, so these machines are often running at close to 1:1. Industrial clutch motors run at 1725 rpm, at 120 volts, or 3450 rpm at 220 volts (3-phase), so a machine running a 1:1 ration to the motor will sew at that speed. If you were to purchase a used garment sewing machine, even with a 120 volt motor, a 1:1 pulley ration may be uncontrollable for the untrained sewer. A smaller motor pulley is the answer to that problem. Most leather sewing machines are equipped with a 2 inch motor pulley. This not only slows the machine down to a more controllable speed, but doubles the torque. This comes in as very important when you try to sew thick or dense leather, or bio-plastic projects, or plywood covered cases. Furthermore, if you sew anything other than garment/chap leather at the high speeds used in garment machines, the friction will heat the needle to almost red hot, melting the thread, scoring the leather and usually, causing the needle to grab inside the leather, on its way back up. This causes the leather to lift with the needle. When that happens at the moment the bobbin shuttle's pickup point is passing by the eye of the needle, you will get skipped stitches. The bigger the machine, the thicker the intended payload, the larger the needle and thread it uses, the slower it must turn. Therefore, distributors of harness stitching machines often include a speed reducer between the motor and the machine. This reduction is at least 3:1, or more. I have an Adler flatbed harness stitcher that was so geared down and its maximum speed was about 3 stitches per second, or 180 per minute. It sure could punch through 3/4" of belt leather at that speed and gear ratio! Now, on to the pictures. The first photo shows a home sewing machine motor next to a clutch motor. The home motor is rated at 75 watts and has a 1/2" pulley. The industrial motor is a 1/3 hp 300 watt motor, with a 2.25" pulley. The home motor is suitable for driving a home machine through cloth and denim. The industrial clutch motor can sew 3/8" of leather easily with that size pulley. A 2" pulley would give it even more torque. Clutch motors always run at full speed, but they develop their maximum torque when you engage the motor to the machine. You control them by means of a floor pedal, about a foot square, with a rod connecting it to a movable arm protruding down from the bottom of the motor. When you move your toe downwards on the pedal, the clutch begins to engage, turning the machine. Skilled sewers learn to control the motor from barely turning the machine, to full speed. This takes a bit of practice and the amount of toe required to feather the clutch often depends on the density of the material, and inertial resistance of the machine's mechanism. Also, since a clutch motor always runs at full speed, it always consumes electricity. When it runs under load, sewing, it consumes its rated power draw. Most industrial sewing motors come in these ratings, with the smallest meant for garment machines only: 1/4 hp 1/3 hp 1/2 hp 3/4hp These motors have a 3/4" shaft and take pulleys made for them and the narrower, 7/16" v-belts they use. In order to make sewing on industrial machines more controllable, and to reduce the cost of operating the machines on 110 volt circuits, servo control motors were developed. The early generation were prone to premature failure and made a lot of noise as they started up. This has been improved and in some cases, totally overcome, by new controller technologies. Industrial sewing servo motors are available in a range of power capacities from about 1/2, up to 3/4 horsepower. Their wattage ratings vary, from about 300, up to 600 w. The nice thing about all servo motors is that until you press down on the floor pedal, they do not draw more than 1 watt. You can leave a servo motor turned on all the time and not notice it in your electric bill, unless you are actively sewing a lot. One of the shortcomings of many servo motors is a lack of startup torque. While they do produce their rated drive power at full speed, the opposite is true at slow speeds. That is another reason why many leather stitchers ship with a speed reducer pulley under the table. It doubles or triples the slow speed torque, while also reducing the maximum speed to one that won't burn up you leather and thread. There is a new type of servo motor that has been produced, to overcome the problem of low slow speed torque. It is a gear reduction motor, currently marketed under the brand name "SewPro." I have their model 500GR. It features a 2" pulley and a speed limiter knob on the back. It runs at a maximum speed of 1500 rpm. This machine only consumes 300 watts flat out, but has a 3:1 reduction system, giving it the same power as most 3/4 hp servo motors. I have one and love it. I can sew from under 1 stitch per second, to about 10 to 12 stitches per second (depends on the diameter of the flywheel pulley). It is a bit low for upholstery, but not unacceptable. It is perfect for leather, which is what I mostly sew these days. It sews marine vinyl like it is butter. Here is a picture of my SewPro 500GR servo motor, mounted under the table of my 75 pound National 300N walking foot machine: Next, let's compare a couple of needles. The one on the left is a #12 home sewing machine needle, used to sew thin cotton thread into shirts and pants. The needle on the right is a number 25 needle (series 135x16), used to sew up to #277 nylon thread into leather holsters and straps. Home style sewing needles are not usually available in sizes bigger than #18, although I found some #20 on eBay. Series 135x16 (leather point) and 135x17 (ball point) are available in sizes up to #25. As a reference, #69 nylon thread, commonly used in upholstery and marine vinyl sewing, uses a #18 to 20 needle. Stronger results are achieved with #135/138 nylon or polyester thread, which requires a #21 or #22 needle. This leaves out all home machines, including the ones sold on eBay as "industrial strength." Here then, are the home and industrial needles, side by each: Now that you have seen comparisons of the motors and needles used by home and industrial sewing machines, you'll have a better understanding of what is required to sew leather.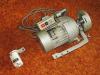
-
The Type Of Sewing Machine You Need To Sew Leather
Wizcrafts replied to Wizcrafts's topic in Leather Sewing Machines
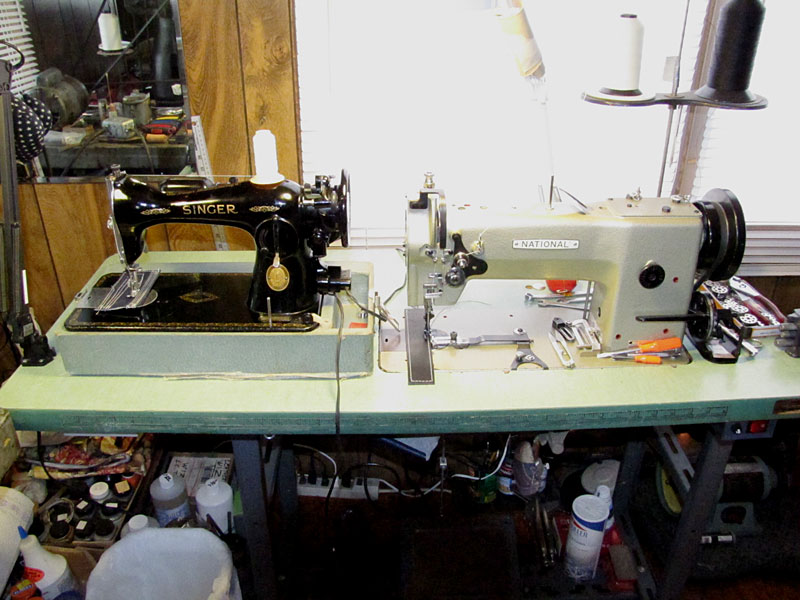
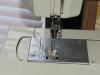
What is the difference between an all metal, "industrial strength" sewing machine and an actual "industrial" machine? The first term is a favorite of eBay sellers to help move out old, refurbished clunkers and antiques. Tell somebody new to sewing that a heavy, all metal machine sews leather, show them a stack of dimes under the presser foot and provide some photos and samples of the leather it can sew, and they will have all the sales they want. Unfortunately for the buyers, most will not be able to sew the type of leather they bought that machine for. I frequently see newbies asking if the old Singer in this or that eBay ad will sew chaps, belts and holsters. It usually starts out with they only want to sew garment leather, but by the second reply the heavy stuff pops into their description. The thinking is understandable: that machine was advertised as being able to sew real leather. Yes, it can sew leather, but only thin garment or light chap leather and not without problems of dragging the top grain on the presser foot. I think that a picture is worth a thousand words, so here is one I took of my Industrial Strength Singer 15-91, fully rebuilt and setup to sew to its best capacity, next to my National 300N walking foot machine (equivalent to a Consew 206RB). Not in its wildest Robot Dreams will that 1953 Singer 15 class machine sew anything much thicker than 1/4", with thread no larger than #69 (maybe #92), without babying the material through the feed mechanism. I know; I tried. I had to install a walking foot attachment to get it to sew marine vinyl, two layers thick, because the material was dragging under the foot. This reduced the maximum clearance to under 1/4." Holding the material tight to keep it aligned caused it to change stitch length or break needles. Sewing leather was not a joy either, just a big hassle and more broken needles. The most aggravating part of sewing with a home machine is the tiny motor that drives the mechanism was bogging down at startup and I had to hand-wheel to help to go. Most so-called "industrial strength" machines have a motor rated at about 1/10th to 1/15th horsepower, 75 to 150 watts. When I finally got a-hold of the National 300N walking foot machine, it came with a 1/3 hp, 1725 rpm, 300 watt clutch motor. It was set-up for sewing upholstery and had a 3" pulley on the motor. It was difficult to control and I know how to operate clutch motors. A phone call to Toledo Industrial Sewing Machines cured that problem. He sold me a SewPro 500GR servo motor, with 3:1 built-in gear reduction and a 2" pulley; the equivalent of a 900 watt motor. I haven't had any control or penetration problems since. This machine will sew over 3/8" of actual leather belting or harness strapping. It uses needles up to number 25 and thread up to #207. I can control the servo motor at any speed, even less than 1 stitch per second. Having the actual industrial walking foot machine allows one to hold back the work and it will still feed without changing stitch length, or popping needles from back tension. You can turn on more top pressure to keep thick and dense leather from lifting under the foot, causing skipped stitches. If you intend to sew everything from leather garments to belts, a real walking foot machine is the best way to go. The feed mechanism is too rough to use on light cloth garments, but works great on denim and vinyl. It walks over seams effortlessly. That's all I have time for now. More to come later on.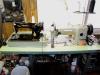
-
The Type Of Sewing Machine You Need To Sew Leather
Wizcrafts replied to Wizcrafts's topic in Leather Sewing Machines
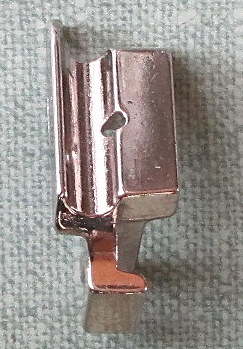
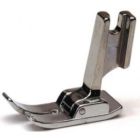
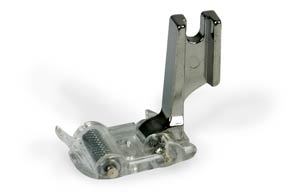
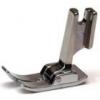
This ditty is about the different types of pressor feet used on home and industrial sewing machines. Using the right foot makes your work feed and stitch better than is otherwise going to be the case. These photos will give you a frame of reference. First, here is a picture of the standard static (flat) pressor foot used on a Kenmore home, or straight-stitch industrial sewing machine: This is what you get with most straight stitch garment machines. Most other home machines come with a straight stitch attachment foot. All older machines, up to the late 1950's tended to be straight stitch only and one needed to attach an add-on mechanism to sew a zig-zag or button hole stitch. Now, they are standard on most home machines and you can buy industrial zig-zag machines as well. Here is a zig-zag pressor foot: This is a cording or welting foot (straight stitch): A roller foot makes it easier to feed sticky material, like vinyl and garment leather. Here is one inexpensive type of roller foot: Here is what eBay sellers tell you is a walking foot, or even feed foot: (kinda looks like an alien bug invader!) This IS a walking foot: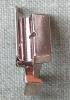
-
The Type Of Sewing Machine You Need To Sew Leather
Wizcrafts replied to Wizcrafts's topic in Leather Sewing Machines
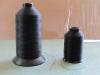
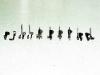
For those of you who are just getting into sewing leather, or are about to move up from a home sewing machine, here is a comparison of the bobbins used in various types of sewing machines. From left to right, front row, we have: Small bobbin shoe patcher (Singer 29-4 and most K series) Large bobbin shoe patcher (Singer 29k172, etc) Class 66 home sewing machine bobbin Class 15 and standard industrial or Kenmore bobbin Large M bobbin Finally, in the back, is a bobbin for a Union Lockstitch Machine. Here is a comparison of a spool of #207 vs #69 nylon thread (1 pound vs 1/4 pound). The #69 thread works in most home and straight stitch, static pressor foot, drop feed industrial sewing machines, with a #16 or #18 needle. To use #207 requires a very heavy duty machine, with a BIG motor, and a #25 needle. When you are choosing a sewing machine, don't just select it because of its price, or local availability, check out its needle, thread and bobbin size capacities.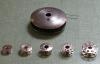
-
The Type Of Sewing Machine You Need To Sew Leather
Wizcrafts replied to Wizcrafts's topic in Leather Sewing Machines
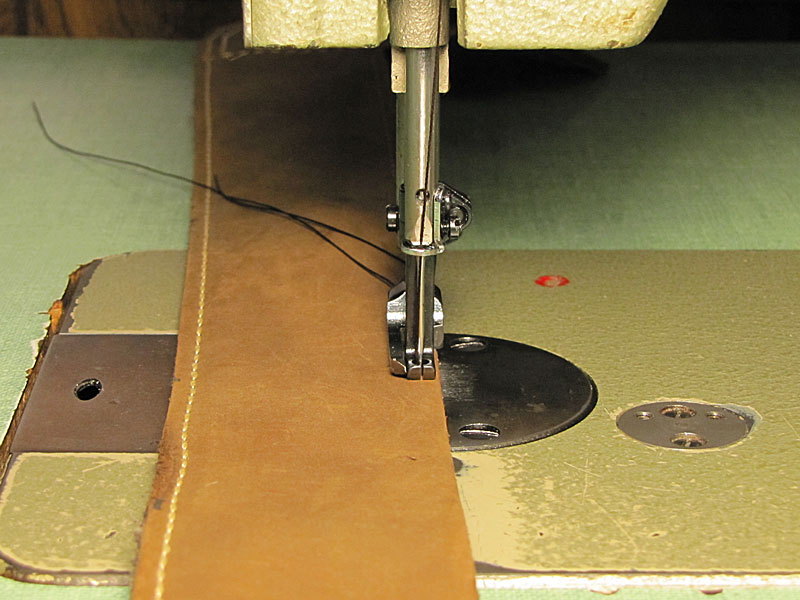
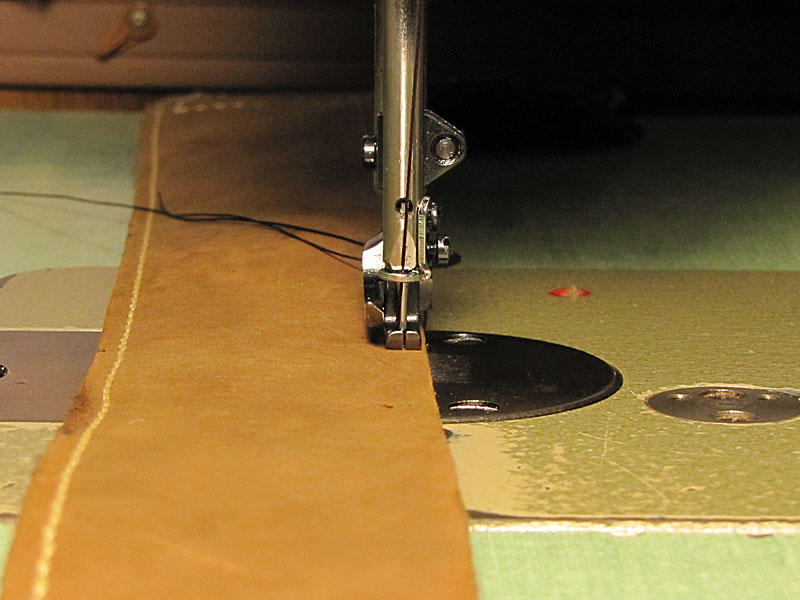
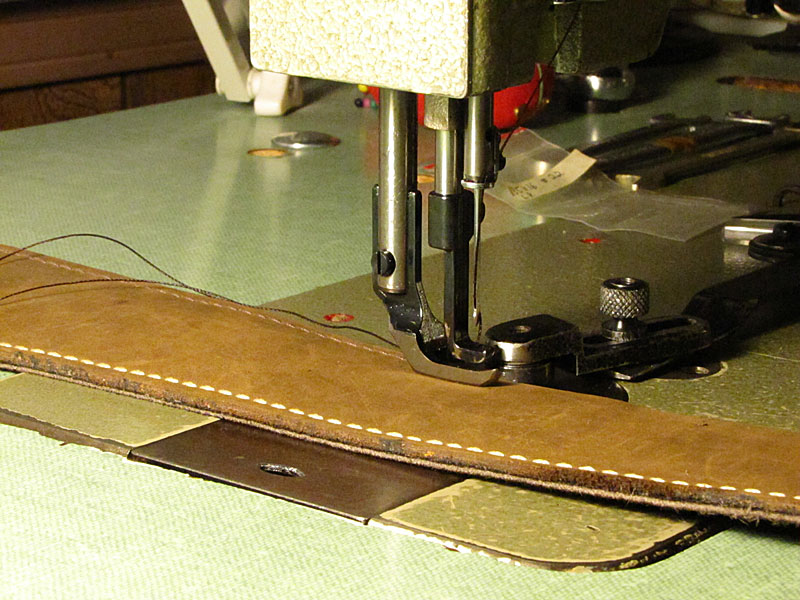
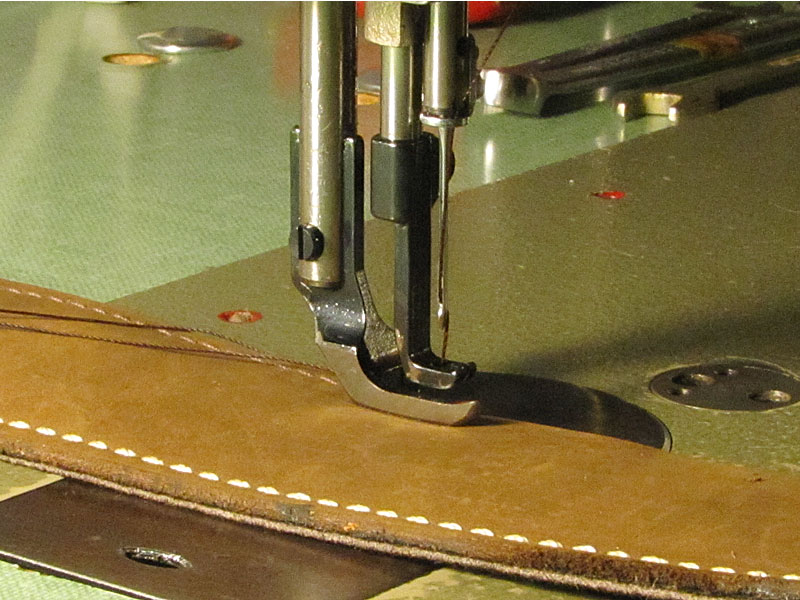
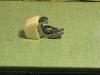
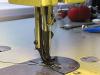
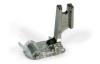
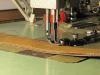
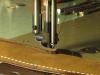
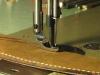
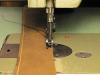
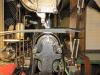
I have finally managed to take a series of photos and reduce them enough to be able to post several in one reply. The following photos are from my National 300N heavy duty walking foot machine. Similar to a Consew 206RB, it is capable of sewing a little over 3/8", depending on the density of the leather and needle and thread sizes. It handles a range of thread from #69, up to #207 - bonded nylon or polyester. It takes series 135x needles from #14 (smaller available, but not recommended), up to #25, max. These photos show it with a #22 leather point needle and #138 Weaver nylon thread (messy), which was used to sew suede lined guitar straps and rifle slings. This is a serious leather and vinyl sewing machine! I have replaced the clutch motor with a servo motor I bought from Bob Kovar, at Toledo Industrial Sewing Machines. It is geared down internally and has a 2" pulley. It produces the equivalent power of a 1/2 to 3/4 hp clutch motor and has a top speed of 1500 rpm. The motor draws no power until you apply the floor pedal to it. One more thing, the bobbins on this type of walking foot machine are known as M style bobbins and are 1 inch in diameter. They have a higher thread carrying capacity than standard industrial machine bobbins. Walking Foot sewing machine, with compound, triple feed. More pressor feet (inner and outer sets) for a compound feed walking foot machine. These are known as 111 series feet, named after the famous Singer 111 walking foot machines, of antiquity (but still in service!). If there is a job to be done that needs a special foot, you can find one for any industrial machine that uses series 111 pressor feet. Last, but not least, here is a close-up, left side view, of my Union Lockstitch needle and awl stitcher sewing about 50 ounces of hard belt leather. The top of the needle is barbed. The thread is fed into the barb through a thread guide and looper arm, that revolves around the lifted needle. The needle then goes down, where a revolving pickup point grabs the loop off the barb, under the throat plate, and carries it around the bobbin shuttle. This machine is capable of some very serious sewing! The photo shows it threaded with #277 bonded nylon, top and bottom, which is in the low range of the weights it can manage. I have sewn with #550 thread on a Union Lockstitch machine!


-
You have a post bed machine, probably with a roller foot and single row feed dog. It was designed to sew the uppers on shoes and moccasins and to make hats (That is what I used mine for, years ago). These machines will handle #69 nylon thread and maybe #92, but probably nothing larger. Size 18 needles with leather points are best for this machine, with #69 thread. Number 16 needles will also feed #69 nylon thread. The bartacker is designed to use #46 thread with a #12 - 14 needle, or #69 nylon thread also, with a #16 - 18 needle. It is used to tack velcro and webbing strips onto vinyl or cloth, or shoe straps. Neither of those machines can sew with #207 thread! The needle size required for that size thread is #24 or #25, neither of which will fit into those machines. If the post machine is in good working condition and you keep it oiled, it will sew soft leather hats, pouches and shoe uppers, up to maybe 3/16" thickness, but only with #92 thread, maximum. I believe that the post machine uses series DBx1/1728 needles, which are the same ones used in most straight stitch industrial garment sewing machines. The are available in both ball and leatherpoint, in packs of 10 or boxes of 100, at reasonable prices, in sizes up to about #20.
-
How To Sew Bullets Loops With Machine
Wizcrafts replied to buffalocuir's topic in Leather Sewing Machines
I don't have an Artisan. I do sew bullet loops with my walking foot machine, or my Union Lockstitch machine. On the walking foot machine, I install my right toe pressor foot set (no left toe and narrow inner and outer feet). The foot works normally when sewing the diagonal stitches under each loop. Then, it allows me to sew right up to the edge of the newly formed loop, which I hold down by hand, with a suitable Craftool inside it. The Union Lockstitch is actually better at doing this, because it has no inside foot at all. It may also be possible to use a welting foot set to sew bullet loops. My set is 1/4" and is too narrow to cover the loop of even a 22 calibre round, covered in 4 oz leather. I'm guessing that a 5/16" or 3/8" (or metric equivalent) welting foot would do the job and allow you to sew right against the right formed edge of each loop. -
Most leather garments and chaps are best sewn on a flat bed, roller or walking foot machine. Harness, bridles, leashes, saddlebags and holsters are best sewn on a cylinder arm machine, with a walking or jumping foot and needle feed.
-
Natalie; There is another brand you should look into: The Cowboy line of stitchers sold by Bob Kovar, at Toledo Industrial Sewing Machines. He is a member of this forum. His phone number is: 866-362-7397. The Cowboy stitchers are every bit as good as the others who were thinking about, but they have an additional advantage: the Cowboy machines all have stainless steel throat plates and pressor feet, to prevent darkening moist veg-tan leather. Some folks like to sew with the leather still wet from stamping or shaping it and the plain steel feet on most machines may tarnish light colored moist leather. His prices are neck and neck with the others of this category of machine. Bob also sells other brands of new and used industrial sewing machines. All of these machines will do decorative stitching, because they all come equipped with easily controllable servo motors and speed reducers. You can get a table attachment for the cylinder arm stitchers, to keep the material flat for decorative stitching and flat work. Each company sells their own table attachment. If you have a lot of flat work and decorative stitching, ask about the Cowboy or Cobra line of flatbed machines. They sell for about one third of what an Adler goes for. There are other brands you can investigate, including Techsew, sold by Raphael Sewing Machines. Greg, from Keystone Sewing, also has some nice stitchers, from Consew, Juki, Highlead and other makers, plus some really neat motors.