Wizcrafts
-
Posts
7,801 -
Joined
-
Last visited
Content Type
Profiles
Forums
Events
Blogs
Gallery
Store
Everything posted by Wizcrafts
-
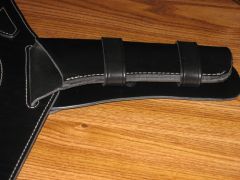
From the album: Gun Leather
This holster is entirely hand made from black dye struck belt leather from Siegel of California. It has a center filler along the outside edge. It is approximately 1/2" thick along the outside edge. It was sewn on a Union Lockstitch Machine, using a #2 needle, a #2 1/2 awl and #277 white bonded nylon thread on top and black nylon in the bobbin.© © Wizcrafts 2010
-
White stitched Western drop loop gun belt and holster
Wizcrafts posted a gallery image in Our Leatherwork Galleries

From the album: Gun Leather
This is a Western style drop loop gunbelt and holster for a single action revolver. It was cut by hand from 10 oz black dye struck leather obtained from Siegel Leather of California. The belt is lined with thin black garment leather. The billet end was not cut as it will be sized to the customer upon delivery. The holster has a center filler along the outside edge. It is approximately 1/2" thick along the outside edge. The entire job was sewn on a Union Lockstitch Machine, using a #2 needle, a #2 1/2 awl and #277 white bonded nylon thread on top and black nylon in the bobbin.© © Wizcrafts 2010
-
Off Topic Security Warning! I noticed that several of our members have posted their email addresses in replies on this topic and others. You good folks need to know that spammers send out robot programs whose sole purpose is to scour web pages for email addresses. Every email address that is recognized by these bots is harvested and sent home to a spam database. Your freely posted email accounts will then be spammed. Your harvested email addresses will not just be used to send you spam, but will also be forged in the "From" and "Reply to" fields of spam sent to others. This means you will get bounces or be accused of spamming by recipients unfamiliar with how spammers conduct their campaigns. How to avoid having email addresses harvested You can prevent most email harvester bots from acquiring your posted email addresses by obfuscating them. This means that you need to use spaces, extra words to be removed, substitute the word AT for the @ symbol and use the word DOT instead of a period in your address. The more obfuscated the address is the less likely it is to get harvested. Example: yourname at yourISP dot com (Remove the spaces and convert the AT and DOT) This does make a little more work for people who want to email something legitimate to you, but it may keep a previously un-spammed account from getting into a spam database through a forum posting. For better security you should only list your email account in your profile and tell other members to use the link in the forum posts or your profile to send you email or private messages. Only members have access to this feature. This adds to the work that a spammer must do to reach you and most don't have the time to do so, or even read English as their native language. Another mistake that can cause your email address and those of your friends to be harvested is to send a group mailing using the C.C. field for the recipients. If just one recipient has a malware infection that includes an email harvester, every name in the CC list will be harvested. Instead of CC, use the BCC field. The recipients will only see their own name and the words Unspecified Recipients in the TO field. This is much safer than exposing your entire group of friends to spambots. I have been involved in the anti-spam community for a decade and I see these mistakes frequently. The results are always the same.
-
You're welcome Hipshot! Let us know what you find after you disassemble the head and pressor foot drive assembly. Once you build up all clearances to factory specs the machine will do a fine job on most projects under 1/4" thick. Just remember, the machine was made to sew boots, not belts.
-
Todd; The feed dog is mounted on a plate with two screws. You can loosen those screws and reposition the feed dog slightly, hopefully until the needle is in the dead center on the downstroke. If the feed dog plate cannot be moved to place the needle in the center (f.b,l,r), try loosening the screws on the fork mounted to the rear axle, that moves the feed dog forward and backward. Reposition it accordingly (f,b,l,r) and lock it down. The height of the feed dog is controlled by a separate fork on the front axle. By moving it up or down you will raise or lower the maximum protrusion. If the rear fork cannot adjust the feed dog to center it, the gears driving the rear axle might be misaligned, toward the bottom rear of the machine.
-
The brass shims are a temporary fix for a worn out drive puck. It is best to have a welder braze some bronze welding rod onto the puck, then reshape and polish it for the best fit at all normal angles of deflection, as the drive assembly moves up and down. This will add years of regular service to the machine, well beyond the life of a brass shim (brass is a soft metal). I did the task myself with a propane torch, fitted with a "hot" pinpoint nozzle, not the spreader nozzle. Clamp the part in a big vise, apply the flame directly to the worn puck until it turns red, then touch the end of a bronze welding rod to it. Do this to apply an even layer to the puck. Let it cool, then try it for fit. If it is too large begin filing away weld until you get a good, but tight fit. Buff the puck to a high polish with a buffing wheel and compound, until it fits into the ring without slop or binding. Slightly round the side edges to allow it to rotate inside the ring, 360 degrees. This will yield the maximum possible stitch length, for many years, before the bronze wears down. Steel weld would be even better, but is a little trickier to shape and polish.
-
Should I Keep My Roller Foot Machine?
Wizcrafts replied to carolb's topic in Leather Sewing Machines
Carol in Caro; I use a #18 or #19 needle with #69 thread; #20 or 21 with #92 thread and a #22 or #23 needle with #138 thread. I recommend Schmetz leather point needles. Use the smallest size that does the job and places the knots well into the leather. Read the sizing trick article in this forum's sticky topics to choose the best needle for a given size of thread. You should ask Bob Kovar, in Toledo (866-362-7397), about needles for your Adler. Some of them are setup with shims inside the shuttle case, limiting the minimum and maximum needle sizes. He has shims in various sizes if you need to change over. You will want diamond or oval point leather sewing needles. -
You're most welcome! Once you have cleaned and oiled the Singer, you should replace the old clutch motor with a new DC gear reduction servo motor with a 2" pulley. Get a V belt in the length that allows the motor to be in the middle of the adjuster screw range, with normal tightness (1/2" deflection in the middle). Bob Kovar of Toledo Industrial Sewing Machines sells these motors. I have one and like it just fine. It has plenty of startup torque and can be controlled from a few rpm to 1500 rpm. It is a bolt on replacement for a standard clutch motor with a three point mounting bracket. If your motor is mounted differently you will need to drill 3 new bolt holes through the table.
-
I corrected your spelling in the quote. You must have been tired when you typed it. That happens to me too. I have owned several 29-4 Singer Patchers and I can tell you that if moving the regulator down doesn't increase the stitch length, on material less than 1/8" thick, the puck inside the rotating feed driver is probably shot. It could also be due to the pressor foot teeth being filed or ground down, or too much top or bottom thread tension. One of the machines I bought had a worn out driver puck and I had to braze bronze onto it and reshape it to restore the normal range of stitch adjustment. The puck is inside the bottom rotating ring, on the round head of the machine. The butterfly knobs are on that ring. The puck moves inside a channel in the ring, as it goes up and down. A pivot point inside the ring assembly allows the pressor foot to go forward and backward, with the up/down motion. As the little round shaped puck wears out, the stitch length becomes shorter and shorter.
-
Should I Keep My Roller Foot Machine?
Wizcrafts replied to carolb's topic in Leather Sewing Machines
Carol; I recommend that you keep the 44-whatever machine, with the roller foot. It is designed to sew leather. The 96K40 is a tailors' machine, meant to sew gabardine, cotton and polyester garments. All of the tension components are probably thinner on the 96K than on the 44. To effectively sew soft leather you must have either a walking foot or a roller foot. Otherwise the leather will drag on the pressor foot. You will want to keep the machine that has the strongest parts and gives more pressure to the roller and the top thread. FWIIW: I had a 96K40 that was converted into a roller foot machine. It was great for making leather vests and pants, using a #18 Schmetz leather point needle, with #69 bonded nylon thread. It was of no further use on any other leather projects, especially belts. It couldn't lit high enough to sew on or over the thick seams of jeans. -
A Singer 111 is a whole nuther story. I couldn't see the pressor foot in your photo, so I went by the model number you gave us. That is one of their first walking foot machines. It can sew a solid 1/4" of belt leather, and maybe a little more. It can handle #138 thread, top and bottom and takes the common 135x16/17 industrial needle system, which tops out with a #25 needle. Parts and accessories are readily available for all of the 111 series machines.
-
Ummm? Please Help Me Figure Out What This Thing Is!
Wizcrafts replied to bigo5552000's topic in Leather Sewing Machines
Not a chance in Hades. Been there, failed to do that! You should redirect your search for a true leather stitcher, such as those sold by several dealers who are members of this forum. Figure out the maximum thickness you expect to sew, then contact each one for advice and prices. Expect to pay over $1200 for an entry level holster machine, set-up and capable of sewing almost 1/2", to around $2500 or more for a much better quality machine capable of sewing 3/4 inch. These machines can all use #346 bonded nylon or polyester thread and number 26 or 27 needles. Big machines do big work! -
Not really, unless you change the Singer's pressor foot into a roller foot assembly. You will be limited to #69 bonded nylon thread and will probably have to ensure that no folded seams exceed 1/4". Since you already have the machine there is nothing to lose in experimenting with different pressor feet and feed dogs.
-
Ummm? Please Help Me Figure Out What This Thing Is!
Wizcrafts replied to bigo5552000's topic in Leather Sewing Machines
BTW: The pressor foot on the machine in the photos is a left toe zipper foot. It is specifically made to sew close to the teeth of zippers. -
Ummm? Please Help Me Figure Out What This Thing Is!
Wizcrafts replied to bigo5552000's topic in Leather Sewing Machines
Are you looking for a tailoring machine, or a leather sewing machine? The 96K40 is a tailoring machine. You can buy the roller foot conversion package from Atlas Levy, on eBay. It comprises of three parts and a screw. There is a video down the page showing you how to change the three items to convert a straight stitch machine into a roller foot machine. The video shows the foot in action, sewing up to 4 layers of garment leather, which is the limit it can handle. If you are wanting to sew harder or thicker leather, this is not the machine for you. Also, the 96K40 is manually oiled. Find all of the oil holes and keep the machine oiled frequently. Use sewing machine oil, not 3 in 1 oil! Wipe the dripping oil from the oil pan occasionally, to prevent it from overflowing onto your legs. -
The Singer is made to topstitch parts on shirts and underwear, while the Pfaff chainstitch machine is designed to sew the inside seams on shirts and underwear.
-
Ummm? Please Help Me Figure Out What This Thing Is!
Wizcrafts replied to bigo5552000's topic in Leather Sewing Machines
That looks like a 96K40 tailors' machine. I had one from 1986 until 2005. It is useful for sewing leather vests after you replace the pressor foot, throat plate and feed dog with a roller foot conversion. It uses system 1728? needles, available up to size 21 and is able to sew with up to #92 thread. The pressor foot lift determines the sewing capacity, which is usually 1/4". You might be able to trick up the foot a tad more, to allow you to sew 5/16", but that is pushing the machine beyond its design limits. Do not consider the 96K to be a leather sewing machine, just because somebody has sewn leather on one. This was actually my first industrial machine purchase. After going through a half dozen other machines and several thousand wasted dollars, I finally bought a true heavy duty compound feed walking foot machine, then a Union Lockstitch machine and have never looked back since. Point of interest: My Father was a Tailor and had a 96K40 in his shop. I learned to sew on it. He used it to hem pants, coats and other garments, for customers needing alterations. -
Yes, the bottom teeth will leave some marks. They can be rubbed out or smoothed with a plastic or bone slicking tool, or a modeling spoon. Another trick to get rid of tooth marks is to flip the holster upside down on a hard surface and tap along the stitch lines with a cobblers hammer. This sets the thread well into both surfaces and removes most tooth marks. This would be followed by edging and final finishes. I suggested that the O.P. drive from Cleveland to Toledo, to try out various machines with his own leather. That way he will get the best machine for the job, appearance and available money.
-
Both Bob Kovar and I have mentioned in our replies that the Tacsew 111 will not handle thread sizes larger than #T135/V138, without grief. We are both referring to bonded nylon thread. Number 135/138 bonded nylon thread has a breaking point of about 24 pounds of pull and can be sewn using a #22 needle. This is technically adequate for a pancake style holster with a gently drawn gun, but not for a competition or police holster, where a tightly secured weapon may be drawn quickly and without finesse, in a life or death situation. For these you should use at least #277 bonded nylon or bonded polyester. The bonded 277 thread has a tensile strength of about 45 pounds and is thick enough to give a solid appearance to the stitches. This thread size requires a #24 or #25 needle. Most commercial holsters are sewn together with either #346 bonded thread, or 5 cord waxed linen thread (requires a needle and awl stitcher). This presents a solid, professional top appearance which will withstand years of use and abuse. The waxed linen thread has the advantage of being locked at every stitch, by the wax hardening in the knots. If one stitch breaks, the rest usually stay put, just like happens on leather soles of shoes (sewn with 6 cord bees-waxed linen thread). The thread and needle sizes I am referring to are usually beyond the normal handling capability of upholstery machines. For instance, I have a souped up walking foot machine (Consew 206RB clone), paired to a special gear reduction servo motor. When I install a #25 needle and thread it with #277 thread, the needle can barely penetrate 2 layers of 9-10 oz belt leather, at slow speed. After a few stitches the needle tends to get caught in the leather and either skips stitches, melts the thread, or bunches it up underneath. A heavy duty leather stitcher, like a 45 class, or 441 class machine, is built with stronger bearings, casings, moving/take-up parts, bigger pressor and needle bars, heavier top pressure and tension disk springs and a huge bobbin, which sits inside a large shuttle case that has sufficient clearance for #346 thread in the bobbin and for the top thread and big needles. These machines will penetrate thick, hard leather, with a big needle, threaded with thick thread, without binding or breaking parts. The extra heavy top pressure spring with hold the foot down on the leather, as the needle withdraws to form the stitch, preventing skipped stitches. These machine usually are equipped with a lube pot on top, which are meant to keep the top thread lubricated and to provide cooling of the needle, which gets seriously hot going through so much leather. Such machines are designed to sew maximum thicknesses of 7/16" (45 class) up to 3/4" (441 class), depending on the model and how the needle/pressor foot/feet is/are setup. All of the new super heavy leather stitchers come with a 1/2 or 3/4 hp servo motor and a speed reducer, for serious punching power. There is no way for an upholstery sewing machine to match the handling capability of a designated leather stitcher. Yes, they will sew 3/8" if adjusted to raise high. Yes, they can sew with #207 top thread and maybe even #277, with #138/207 in the bobbin, which hopefully is a large M size bobbin. But, they are more likely to have problems sewing into 3/8" with #207 thread than a bigger machine like the ones described above, which can sew with #346 thread, into well beyond 3/8" of belt or bridle leather.
-
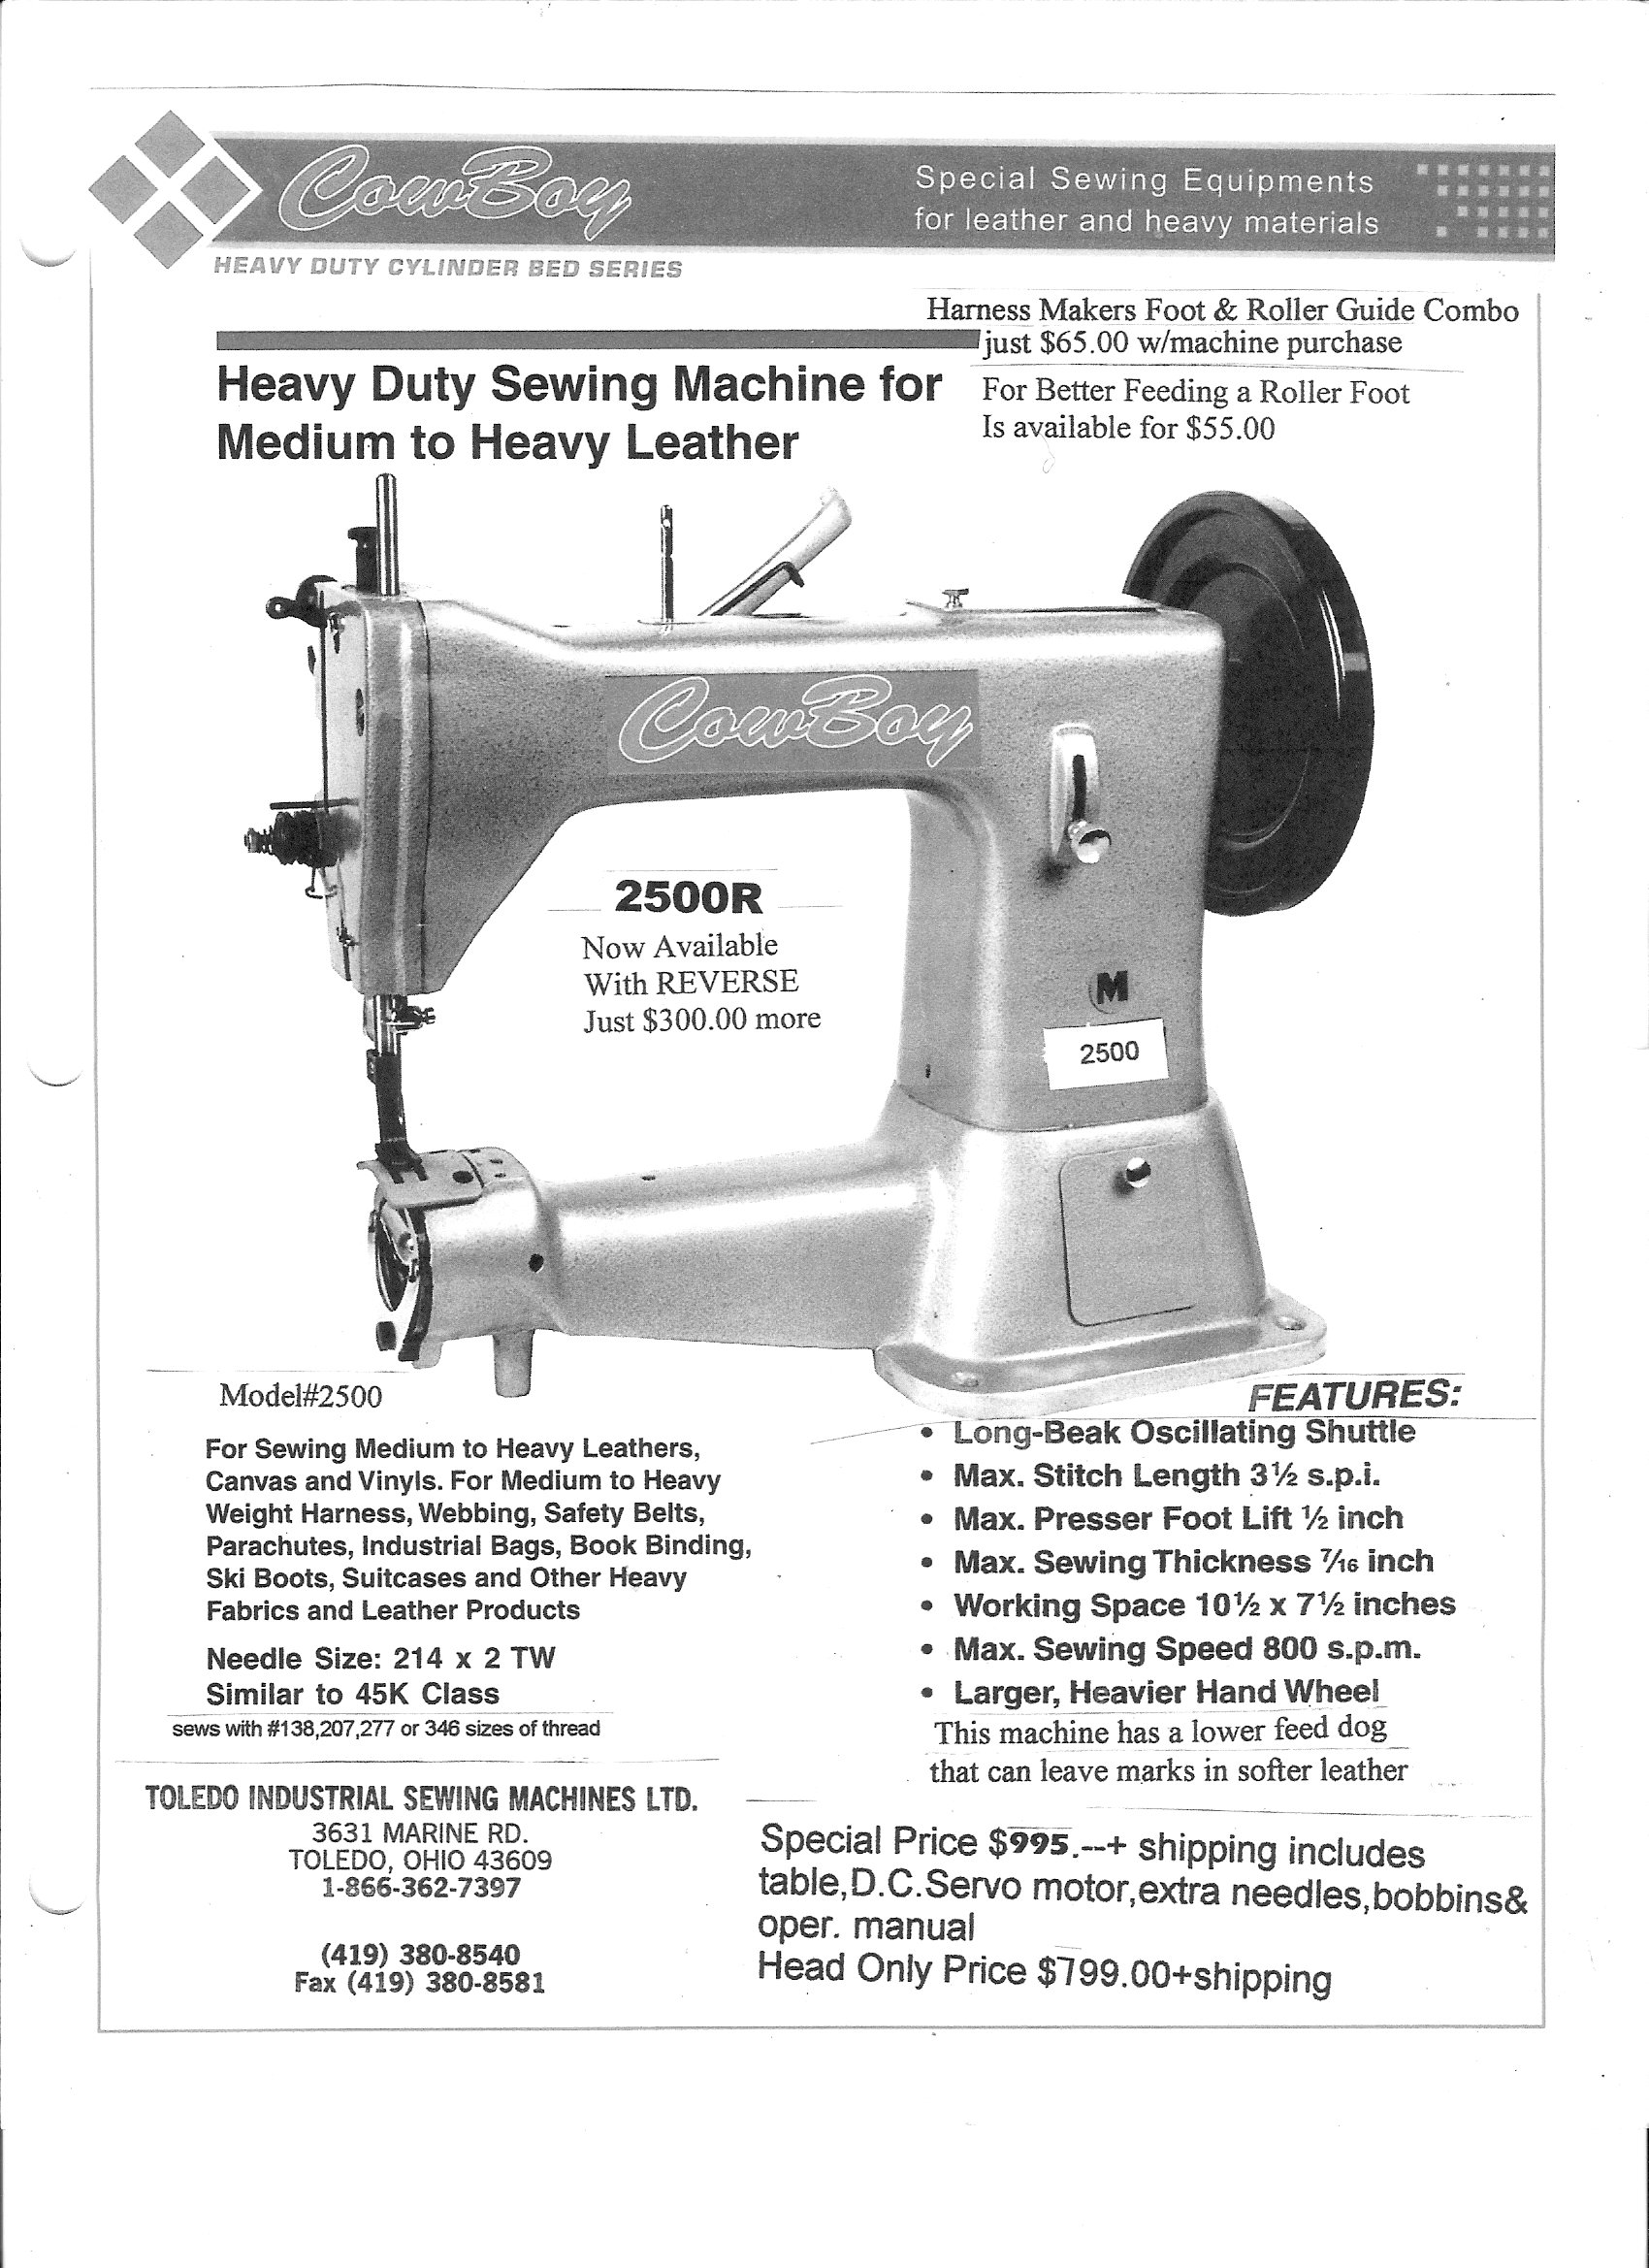
You are talking about an upholstery walking foot machine, based on the decades old Singer 111w155 series, which is the grandfather of today's walking foot machines. It not built for sewing thick leather or thick thread. It is just a few hundred dollars cheaper that the real leather stitcher I suggested you ask about (Cowboy 2500). Our dealers specialize in machines that are actually capable of feeding and sewing thick leather with heavy thread. Ebay sewing machine vendors do not usually carry such machines. Here is a scan I made from a product sheet for the Cowboy 2500, which should be perfect for making the holsters you described. There are optional pressor feet and a swing-down edge guide available at a reasonable price. They should have one setup to try out, at Toledo Industrial Sewing Machines. I don't know if the prices in the scanned sheet are still in effect, or are lower or higher now. I got this flyer about a year ago.
-
The 29k2 should be fine for small runs of mocs. You will be limited to smaller thread sizes (#92 top and & #69/92 bobbin), which should not be a problem for mocs. I don't know about mucs. The machine you asked about is almost a century old shoe patcher. It has a tiny bobbin and produces very short stitches once you exceed 1/8" of leather. If the foot drive mechanism is worn out you may not get better than 7 or 8 stitches per inch. Its thickness limit is 1/4" under the foot. If you can try the machine before you buy it, do so. If the drive puck is worn out (very short stitches at max setting) and the moving parts are rusty, pass on it. If the seller wants more than $100 - $200, pass on it.
-
Deanimator; The advice you are receiving, about the sewing machines better suited to holster making, comes from lots of experience. We are trying to save you the time, frustration and expense of working your way up to the machine you needed all along. The type of machine I suggested is really only suitable for flat leather sewing, where the bottom can have tooth marks without ruining the job. If you cannot have teeth marks from the feed dog you will need to move up further, to a compound feed walking foot, or needle and jumping foot machine. If you can gather together a couple of grand, you can buy a new heavy cylinder arm machine capable of sewing up to 3/4". If one thousand becomes your limit, get the strongest machine you can find. It should be a dedicated leather sewing machine, not an upholstery machine and definitely not a garment machine or home machine. If you have never sewn with an industrial machine you may have trouble operating one with a clutch motor. Instead, buy one with a servo motor installed. Some setups have a speed reducer between the motor and machine flywheel. Another type, sold by Bob Kovar, in Toledo, has a built-in speed reducer. I bought one and like it a lot. It really punches through thick leather and is very easy to control with the floor pedal. Since you are already in Ohio, Toledo Industrial Sewing Machines should be a logical choice. Bob Kovar, the owner, is the US dealer for the Cowboy line of heavy leather stitchers. He also has many used machines (not Cowboy) in stock. Take some leather there and try you out some machines!
-
You are going to need to at least double the amount you wanted to spend to get an entry level industrial machine that is suitable for "low to medium volume" production of the holsters you have described. Your least expensive machine is based on the ancient Singer 45K series cylinder arm machines that have long cylindrical bobbins and a flat pressor foot. A Cowboy 2500 is reasonably priced around a grand and can sew up to almost 1/2" of leather, with #346 thread and a #26 needle. It is a bottom feed, straight stitch machine, with a non-walking flat foot, a heavy top pressure spring, plus beefed up thread tension and take-up parts. Such a machine will sew the types of holsters you described. Contact Bob Kovar, at Toledo Industrial Sewing Machines, at 866-362-7397, for more details and the actual price.
-
Eddie; From your answers and your last statement, it is my opinion that you require a "square feed" stitcher. I don't know all of the machines that have this system, but I do know that the Union Lockstitch, Campbell-Randall and the Luberto Classic all have square feed and a jump foot. If you get a chance you might try getting in touch with Mr. Luberto (1-800-419-9898) about his Classic stitchers, which resemble the old Number 9 machines. The feed is done entirely by the needle, which is pulled straight back, after penetrating all layers, with the pressor foot up. The pressor foot comes down, then the needle moves up and out. Because the needle movement is not pivoting, but is square, or straight back, all layers move at exactly the same speed. This includes gradual transitions, as well as instant layer increases. I believe that that long out-of-production Ferdinand Bull machines also used a square feed and jump foot. I don't know of any other machines currently in production that work that way, aside from the ones mentioned earlier. I think of these machines as thickness/layer agnostic. BTW: Campbell-Bosworth (1-800-223-6018) is the current owner of the Union Lockstitch machine name, and is the supplier of all parts and accessories for them.
-
The answers to the following questions will help us provide you the the best recommendations. 1: What are you sewing on the ULS machines? 2: Are you using any special pressor feet (stitch-in-the-ditch, stepping, cording), or just the stock feet? 3: Are you using a flat or a raised throat plate? 4: What type (linen+wax, nylon, polyester) and size of thread (numbers or cords) are you using? 5: What range of thicknesses are you sewing on the ULS machines? 6: Are you sewing through plywood, sole leather, or rawhide? 7: How much space does your work require to the right of the needle and awl (to the inside of the machine)? 8: Are you using a swing away roller edge guide on the throat plates? 9: Are you sewing with the clutch feathered, or geared down, or at full speed (800 spi)? If it turns out you are sewing with a standard pressor foot and throat plate, into harness, bridle or skirting leather, at or under 3/4", you might be able to switch to a major cylinder arm walking foot machine. They are available from dealers who are members of this forum and come in a variety of arm lengths, with various pressor feet and throat plates used for anything from belts, to bridles, to holsters. Some may even have stitch-in-the-ditch pressor feet available. They also have various speed and motor packages to suit your work. These machines go by brand names such as Adler, Cobra, Cowboy, Techsew and Toro (by Artisan), among others. All are new and fully supported and have plenty of accessories available for special jobs. Once I see your answers I will try to offer more suggestions. If it turns out you really do need a needle and awl stitcher, the only good option remains Campbell-Randall-Bosworth. They are used by Freedman Harness, day in and day out, to produce show harness for the most demanding clientele. They are huge, slow, hold tons of thread (linen+lax wax or bonded polyester), and sew the most beautiful stitch you will ever see.