ClayB
-
Posts
2,063 -
Joined
-
Last visited
Content Type
Profiles
Forums
Events
Blogs
Gallery
Store
Everything posted by ClayB
-
Kathy, It states in the rules that you HAVE to have pictures! Well, it would if we had any rules. Or then again, maybe not, once in awhile it's good that there aren't pictures So you have an X ray of that broken arm. Now wouldn't that make an interesting leather project???? I am thinking embossed applique in the style of Peter Main. You could even use your own x ray to back the leather as you carve! Ok, it's still early and I shouldn't be typing yet.
-
Hi Betty and welcome to the forum. We're glad to have you here. The Saddle Maker's Shop Manual is a book that a lot of people have recommended as a really good source for people wanting to learn to build saddles. I have a copy, and I know a lot of the saddle makers here do too. I am sure there will be others that will want to contact you a get a copy. I hid your email address behind your name so you wont get spammed, but people can still find it there if they want to get a hold of you. Clay
-
You always come up with the neatest stuff Freak. I really like what you did on the back with the 2 different kinds of basketweave. That's just cool! The natural roo lace really sets it off too. Sure glad the finish turned out. I was scared to death something would go terribly wrong and you could blame me. Now get busy on that Lioness for the challenge!! Clay
-

Monthly Figure Carving Challenge
ClayB replied to ClayB's topic in Special Events, Contests and Classes
Horsehairbraider, For not having done any figure carving before, that is pretty dang good. Who told you that it was okay to make the pattern smaller though? Smaller patterns mean bigger magnifying lenses, at least for me. Really thin leather like that makes any carving more difficult, cutting without going through, and tooling to get depth without cutting through again. That probably explains why some of your cuts look really deep. It does look like you got some nice depth though, especially on the mouth and ear. You can see several different levels of depth in those areas. On the nose, I can see knife cuts, and then it looks like you might have used a pear shader instead of beveling. The cuts stand out. To eliminate that, I wouldn't cut the lines, just trace them and then use the pear shader to create the shape. Then I would use a modeling tool to blend the pear shader impressions out. I think it would look a little better if you would add a lot more hair, closer together. The direction and length look good, just need more of it. You are off to a really good start. Thanks for playing along and sharing your picture. (NOTE: I am not really comfortable doing critiques like this, and hope I everyone knows I am just trying to point out things I think might help) -
Hey Skip, Congrats on getting as far as you have! I bet there are a few more of us that have had thoughts of writting something, but not gotten as far as you have. I hope that things work out so you can get it published.
-
Hey Marlon, Sounds like you had a great class. Did you make a project at all or did Peter just demonstrate some of his cool techniques? If you made something, you have to post pictures, there's a rule! I hope someday to take a class from Peter, but it never seems to work out.
-
Hey Mike, You did a really nice job on the dog, especially capturing the facial expression. I find straight on faces hard to do, but you got it. It really looks like she got caught doing something she wasn't supposed to be doing. Thanks for sharing the pictures and glad there wasn't a boo boo on this one.
-
The new model he had made has slots to put the blade in for left or right hand use. Bruce suggested I try Jim's lace beveler out and when Jim watched me struggling to use the right handed model, he called whoever makes these things right on the spot and asked if they could be made for left handed use. I was pretty impressed that he would do that. Most times us lefties just have to get used to doing things backwards. He's a good guy to do business with.
-
Monthly Figure Carving Challenge
ClayB replied to ClayB's topic in Special Events, Contests and Classes
Tiwnoaks, this is actually the pattern for February. Since the topic was brought up, I decided to go ahead and announce it a little early. So everyone has a few weeks to play with it. I'll post a new pattern around the 1st of March since it looks like there is enough interest in this to keep it going for awhile. I have worked up a tutorial on embossing (on a different pattern than this) and mailed it to Johanna. I hope I did it in a format that wont be difficult for her to put it up here on the forum someday when she is sitting around with nothing to do. (wish there was a smiley of someone hiding behind a tree) Froghunter, you dont have to be experienced at embossing to give a critique on my picture. If there is something you think might have looked better done differently, just say so. That's the whole purpose here, that we can discuss the pattern and how it's carved. Your picture looks pretty good, especially if you haven't been carving very long. I think by using a pear shader, you could get more muscle structure to show, making it look less flat. Study how Tina did that in her picture. Also look at how she did the wrinkles above the nose and eye. Some of those lines shouldn't be cut too deeply, or maybe not at all. Beveling them or pear shading them will give you the shape that you want there, and always be careful as to which side to bevel. I remember having a lot of trouble trying to figure that out in any pattern when I was starting out. When Regis goes back and looks at the completed pictures, I think he will see what I mean there too. -
Yup Marlon, Jim Linnell told me that in Sheridan last spring too. Tony Laier was snatching up a bunch of old Craftools from way back and they said that they were doing what you just mentioned. I don't know a time frame for when they will be in production, but it will be great when they get going.
-
I just happened to see that paper laying around in the shop a few days ago. It's dated 4/07 so hopefully the prices are still fairly current. The small beveler was $70 and the large one is $90. I think the small one is mostly for lace, and the larger one also does saddle strings and stuff like that. Jim Downey PO Box 30 Skull Valley, AZ 86338 928 442 3638 He also sells kangaroo lace in a lot of different colors including foils and Robert Black's knotting and braiding DVD's.
-
Hey Marlon, I am not sure what it is called. I just told Clay Miller that I had heard they had some new leather that was supposed to be pretty good and I wanted to try it. It is a pretty pale color and it does carve really nice. I did the pattern for our current monthly challenge on it, and it embossed really nice too. So whatever they call it, it's nice stuff. Clay
-
Monthly Figure Carving Challenge
ClayB replied to ClayB's topic in Special Events, Contests and Classes
There you go Regis, that's what I was hoping for. I thought about taking pictures and showing how I carved mine, but in a way, I think that would defeat the purpose because then it would be easier to just do it the same way. If you look at the uncolored picture Tina posted, she beveled fairly heavily around the side of the nose, the large wrinkle above the nose and below the jaw. When I carved it, I wanted a softer line in these areas so I used a pear shader to do the beveling instead of a traditional beveler. It gives a rounder impression, softer than the beveler. As I have said before, neither way is right or wrong, just different. I don't know how Tina did the hair on her's, but I drew mine on with the pointed end of my modeling tool. It can also be done with a hair blade, a multi blade knife, a sewing needle or awl, a pointed beveler, and probably several ways I have not seen before. On Froghunter's and your picture, you both put in whiskers which I see I left out. While yours are just dots, and Froghunter cut in the whiskers, either way works. In both of yours, one tooth looks large and out of proportion to me, so I am guessing that is a problem that might need to be addressed in the pattern. I also see that when Tina drew out the pattern, she put in a line on the far side of the mouth that wasn't on her original picture. These are all the different kinds of things that I was hoping to see come out of this, different ways of handling the same pattern, none wrong or right. -
Monthly Figure Carving Challenge
ClayB replied to ClayB's topic in Special Events, Contests and Classes
Hi Regis, Anything to do with this challenge can go here. I was hoping for some discussion on the pattern, the carving process, anything at all that might help anyone out. There was some discussion back when Tina first posted her project in the Critique my work section, and then some of my discussion with her went to PM's. I'll check with her and see if we can bring some of that back into this area. By talking about what we like and don't like, where we are having problems, etc., I think we can all learn more. If we just all post pictures of what we have done and tell each other "nice job", we aren't going to get the full benifit out of this that I was hoping for. CLay -
Monthly Figure Carving Challenge
ClayB replied to ClayB's topic in Special Events, Contests and Classes
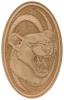
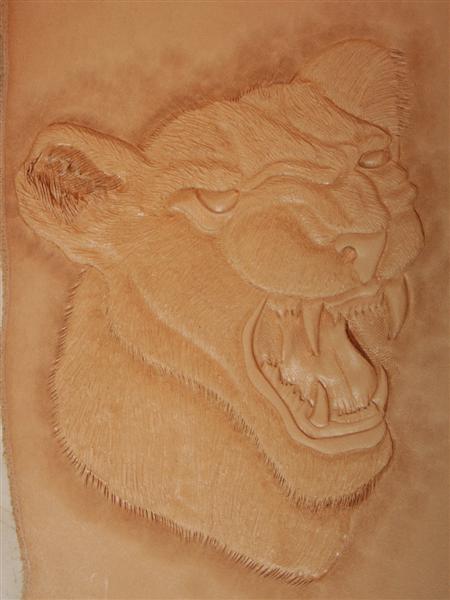
The colored pictures of the lion by Tina and Froghunter are great. I am not going to attempt to color mine. I did decide to try and make mine 3-D. Not sure if I am done yet, but here is where it's at right now.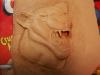
-
Just go to the calendar at the bottom of the main forum page and click on the Bianchi class. The info is there.
-
Not sure if this is what you were looking for, but Paul Burnett is working on a series of lessons called Designing with Stamping Tools. If that is what you were thinking of check out this his website, Paintingcow.com
-
Many years ago, I made a scrap book cover for my mom and while dying the background, I spilled a big drop of dark brown dye right in the middle of the carving. My mom didn't care. She still has the scrapbook and people see it all the time. I have tried to get it back from her, but that's not going to happen. The carving wasn't all that great on it way back then either. I'd just count it as a lesson and I'm sure you can find a friend or relative that would be happy with it.
-
Check out the links here for lots of suppliers of tools, leather and related items. Links to leatherland If anyone has a supplier that isn't listed here, send us the contact info.
-
Hi Carl, You can get Herman Oak from several dealers without a sales tax license. Go here for the list off thier website Hidecrafter used to carry a lower grade of HO and labeled it as American Value brand. I dont know if they are still carrying it, but I really liked it for price and quality. Tandy is also selling a new tannage of leather that is supposed to be the same or similar to the Live Oak brand they carried way back when. I just got a side of that from Clay Miller at the Rapid City store and it really carves nice. It reminds me a lot of Wickett and Craig (which is also really nice leather)
-
Bob does make tools and they are really nice, but you might need a warning so you don't get sticker shock. Bob's tools are expensive. You probably wouldn't want to just go out and buy a whole set from him (if you can afford to do that, get me a set too, PLEASE). I try and order tools for a certain purpose you cant get anywhere else, or the ones that I use a LOT. Even so, I only get a few a year. Bob is a great guy, a really good artist and teacher, and makes some really nice tools.
-
I think the general rule has been to cut and bevel the formost objects first, then proceed to the farther back objects. By doing it that way, you don't smash down the things in front when you bevel the things behind them. Beveling small objects will be difficult with large bevelers. You will probably want narrower bevelers for them. You can also use the figure carving bevelers in smaller areas, or don't bevel at all but use a modeling tool instead. If you are doing floral work, the steep angle bevelers used in Sheridan style carving are a big help. I don't think Craftool (Tandy) makes a steep angle beveler. Hidecrafter has a set in there Pro line of tools that I like for a mid level tool. They are checkered. Other than that you will have to either go to a custom tool maker or modify or make your own. There are people here that have experience with doing that. For tips on beveling, checkout Paul Burnett's October free online lessons here Painting Cow Robert Beard also has some good information on beveling at Pro Series tools Hope some of this helps.
-
Monthly Figure Carving Challenge
ClayB replied to ClayB's topic in Special Events, Contests and Classes
Johanna, You are asking me if is would help to convert a file? The cold there in Ohio must REALLY be affecting you! Do whatever will make things easier for everyone, that's your job, LOL (the smileys dont seem to be working or I'd insert an appropriate one here) -
Hi Syd, Glad to have you with us here on the forum. The coloring in that picture is from the tooling. The color is something that happens when the moisture is just right in the leather you are carving. Some leather will burnish (color from tooling) better than others. All the tools, bevelers, pear shaders etc will give your leather color. I was hoping nobody would ask what tool numbers I used on that. I did that a long time ago and didn't write the numbers down. They aren't all that important anyway. From the picture, I would say it is a smooth pear shader. There are a lot of different numbers, mostly they represent different sizes. I would suggest you pick a medium sized one and start with that, or if you have a beginner set of tools, the one in there should work. Tools with lines or checkers on them will also give you a different look, but will also give color. There are some posts on the forum about different ways to case (wet) your leather. You might want to try a few different ways and see which one works best for you. It will depend some on the leather you are using too. Some of the leather out of kits isn't going to work as well as other leather and probably wont give you the color you see in that floral carving. Hope that helps some, and if it doesn't don't be scared to ask again. There are lots of people here that will try and help you out.
-
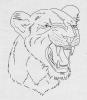
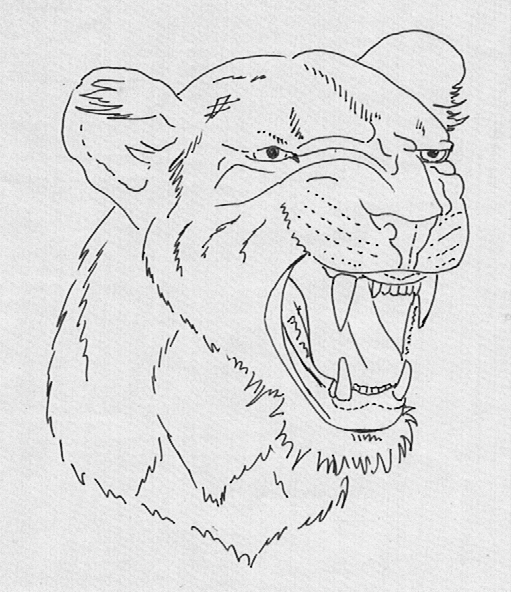
I have decided that instead of another contest that isn't really a contest (no judging, no winners etc.) I am going to propose a monthly carving challenge. I will pick a pattern and post it here. Anyone interested in participating can take that pattern and carve it in any way they like. You can change the pattern if there is something you don't like. You can add background if you like. Then carve it however you like. Remember, there is NO one correct way to carve these patterns. Once you have it carved, we'd would like you to post a picture of it. When the pictures are posted, critique, comments, questions are all encouraged. If you like something about how someone carved thier pattern, let them know. If there is something you don't like, let us know why. If you have questions about why someone did this, why they didn't do that, what if you tried this, just ask. I think by discussing the different projects, we can all learn something new. I am sure some people are going to think that some of these patterns are going to be too hard. I would like to encourage you to try them anyway. Bruce Johnson has mentioned doing things "outside your comfort zone". I think you have to do that if you want to improve and there will be people here that will help with any problems you have. I will try and vary the subject matter and difficulty of the patterns each month. I have several figure carving patterns right now, but hope to have a floral pattern to do this with soon. If there is interest, I'd like to do one of each every month. The pattern for this first challenge was given to us by Tina. She posted a picture of her "Lioness with PMS" a week or so ago. I really liked this pattern because I could see so many different ways it could be carved. She agreed to let us use this pattern and I'd like to thank her for that. I hope some of you will give this pattern a try and share your carving with us. Here is Tina's picture of how she first carved her lion. And here is my first attempt at the pattern. I hope we can have some fun and learn something from this.