ClayB
-
Posts
2,063 -
Joined
-
Last visited
Content Type
Profiles
Forums
Events
Blogs
Gallery
Store
Everything posted by ClayB
-
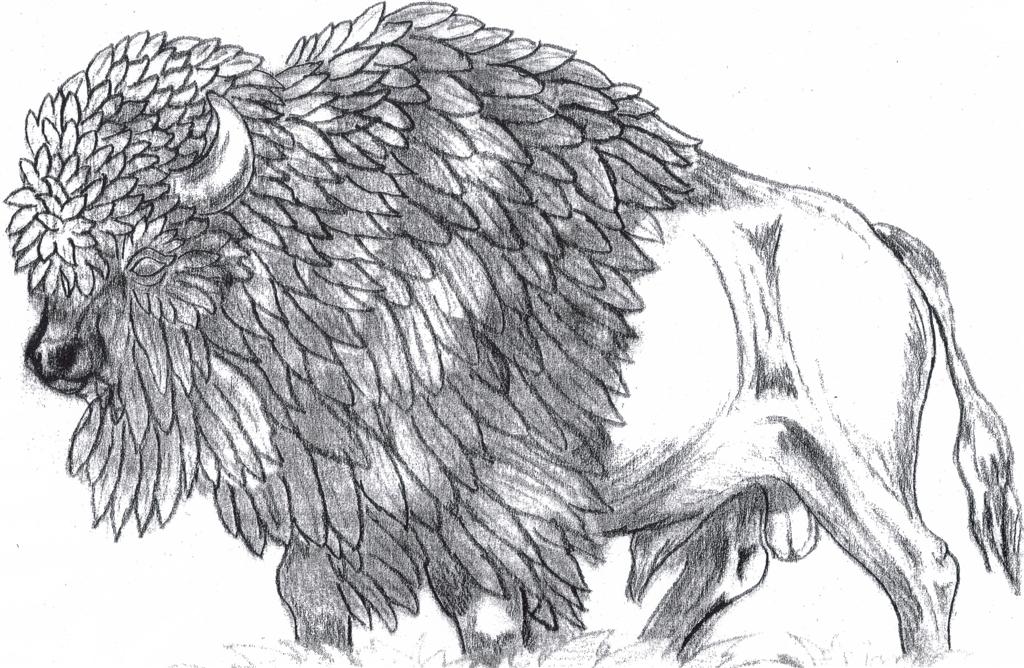
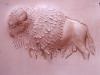
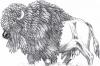
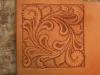
I showed this picture before the crash, and was asked if I did a tutorial on it. I hadn't, but decided to carve it again, and I am trying to remember to take pictures and write down what I am doing as I go. Not sure when it will be finished, but I'll post the how to when I get it done. For now, here is the pattern, and the buffalo carved. I got the idea from the tattoo book that Tandy is selling. The hair on that buffalo reminded me of feathers, so I decided, why not?
-

My "Arty" leather collars and such...
ClayB replied to Tina's topic in Collars, Cuffs, Leashes and Leads
That goes for me too, Tina. Wherever you put the pictures on the forum, you do great work! -
Freak, You can just give it a light coat of neatsfoot oil. Let that soak in and even out over night, then give it a coat of Neat Lac, rubbed in well with a piece of sheepskin. That will darken the leather a little, but I think it gives a nice look. Clay
-
I got this in the mail today from the Leathercraft Guild in California. It was third place in thier fundraising raffle last month, an original Christine Stanley carved wallet. It's gonna look good on my wall next to some of my other leatherwork from the masters. I sure do love those leather related raffles! Wish I was that lucky in the lottery.
-
Hey Freak, that's pretty cool! How do you come up with your ideas? I would have never thought you could do that with a pebble backgrounder. The music was a neat touch. By the way, those initials match my initials, just in case you didn't realize that. :D Clay
-
Carl, Thanks for adding the info on the scrolls. I meant to mention Paul's website too. He has a lot of good tips on when, where, and how to use different tools. Be sure to sign up for Paul's free lessons at Painting Cow
-
Dave, Usually I do it the same way you do, bevel after cutting, then cam, veiner, etc. But that is the way that Jim has been teaching it in his kids classes. It does seem to work better that way for certain things. It's just hard for me to change the order that I have become used to doing them. I think back when I started, by beveling first, I could understand the pattern better. By using the cams and shaders and vieners first though, you seem to get better definition in your patterns. Maybe someone else can better explain why.
-
My "Arty" leather collars and such...
ClayB replied to Tina's topic in Collars, Cuffs, Leashes and Leads
The pictures that were posted yesterday were lost again last night when the forum went down. They will need to be posted one more time. Hopefully that will be the last time. Johanna and Kate have done an amazing job fixing what wasn't supposed to be fixable and saving what wasn't supposed to be salvagable. Just be patient for a while longer, and it sounds like most of what was lost might be back (but it could take a couple weeks) In other posts here on the forum, it was announced that any pictures posted since October were lost and should be re-posted if you can. If you want to be able to see the adult section of the forum, you need to send a PM to Johanna. The forum is set up to be family friendly, and that section is made available only by request. Clay -
A filigree blade is like an angle blade, but the angle is steeper. It was designed to filigree, which is cutting out the background areas of a floral carving instead of using a background tool. You would then put a different color of leather behind it to give a contrast. The colored leather would show through where the back ground areas were cut out. There used to be a lot of belts made that way. I think the filigree blade is probably also used for fine detail work on some carvings.
-
Might also be http://hidecrafter.com/
-
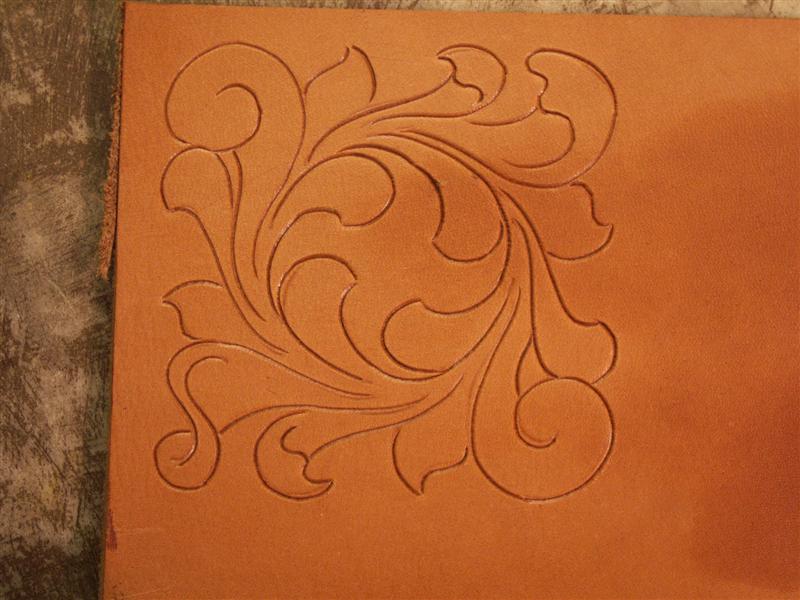
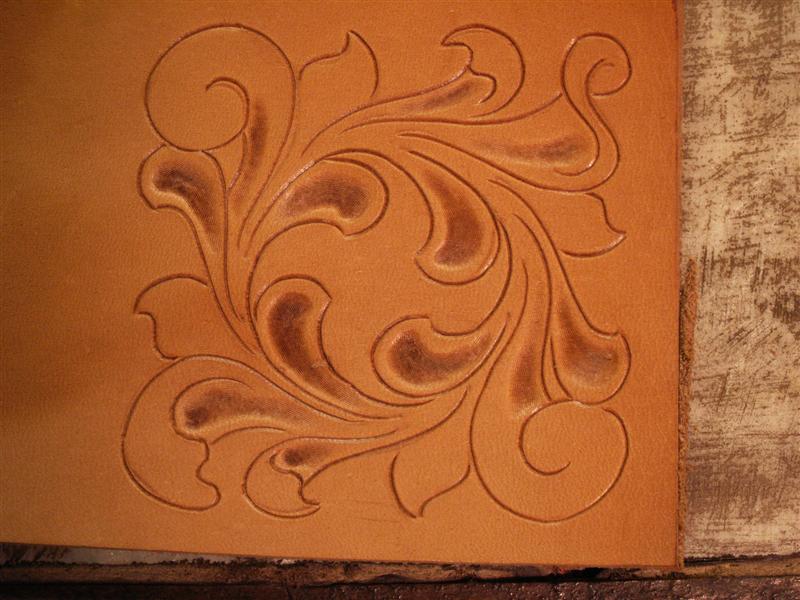
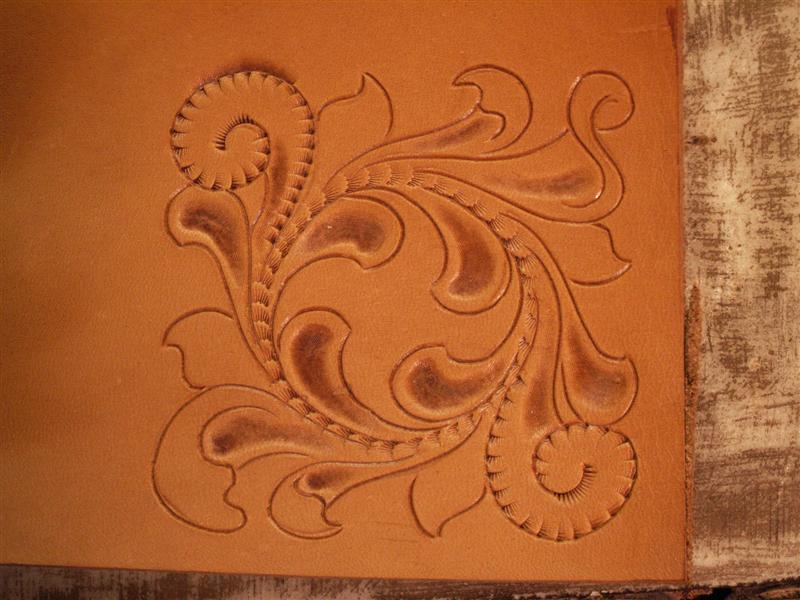
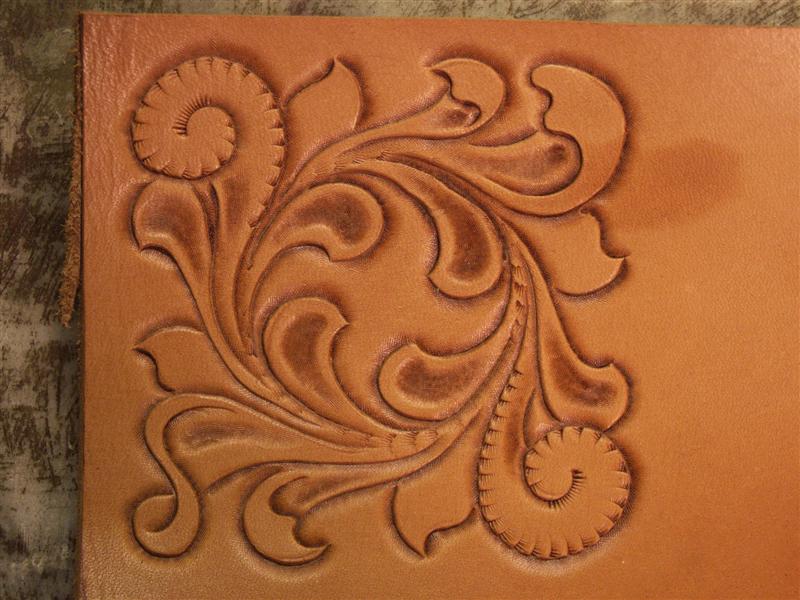
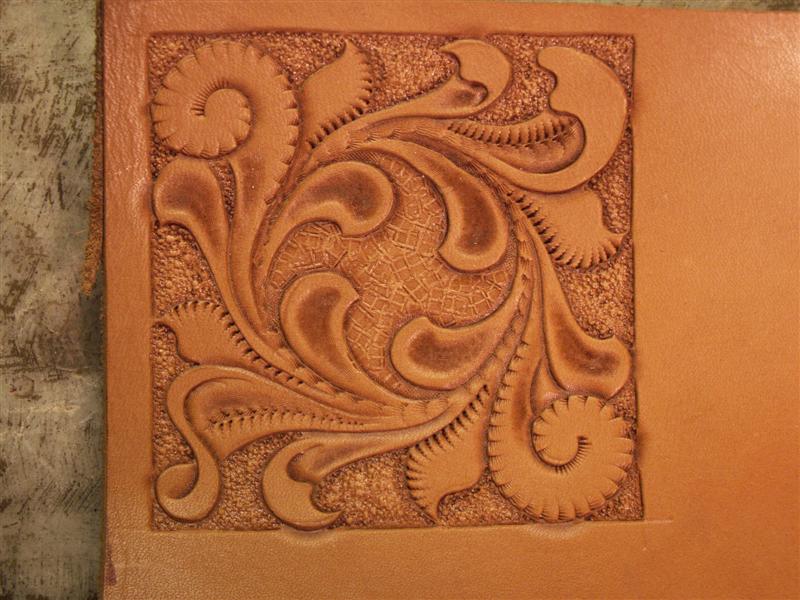
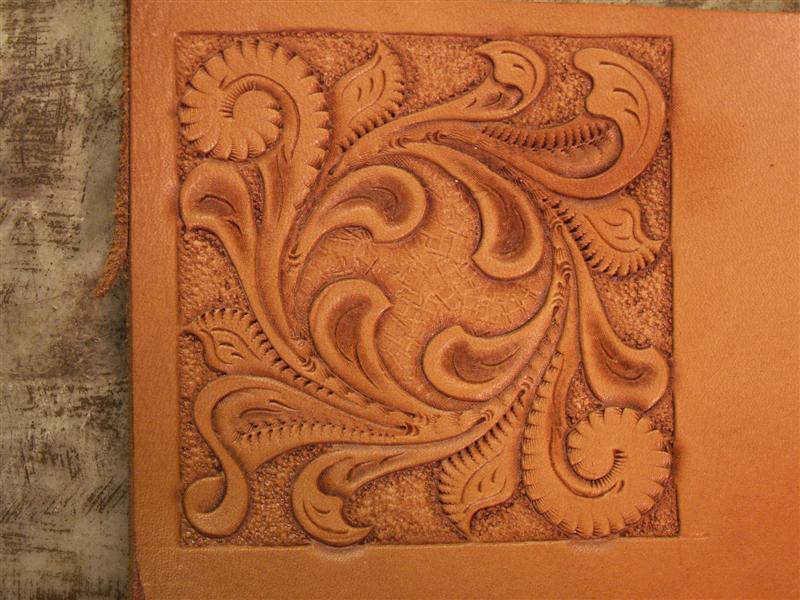
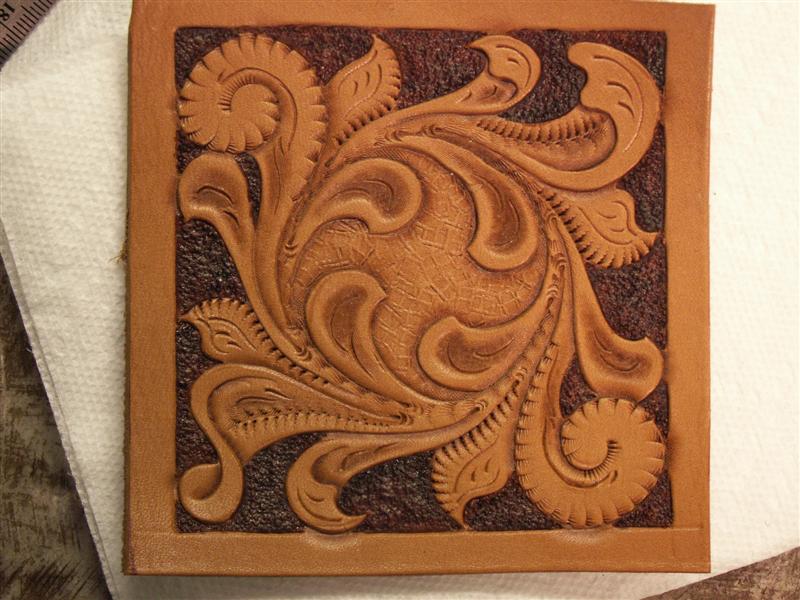
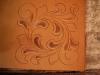
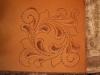
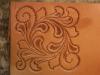
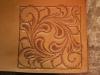
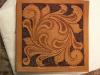
Johanna says things are fixed and we can post pictures again. I am going to start with this short How To. I am working on an in depth one on figure carving too, but want to see how this one goes first. These pictures show how I carved a simple floral pattern. The first picture shows the pattern carved with the swivel knife. You can see that where cuts meet, there is a small gap, the cuts do not meet. Where cuts end, try to lessen the pressure on the knife, letting the cuts fade out instead of ending abruptly. This picture shows the addition of pear shading. I like to use the pear shader in the center of the leaves and scrolls, leaving a ridge around the edge. Start the shading heavy at the top, and walk the shader down the length of the leaf. Lessen the pressure as you go, fading out the impression as you get to the bottom of the leaf. A camoflage tool is used on the center of the scroll. It is also used on the outside edge of the scroll. Tilt the tool so only part of the tool impression is left on the leather. Space the impressions evenly down the length of the scroll. I also used the camoflage tool around what would be the stem in the center of the pattern. The pattern is now beveled. Try and walk your beveler to get even impressions. You can go over your beveling more than once to smooth it out, or smooth out tool marks with a modeling tool. A veiner was use on the outer edge of the buds. It is also used on one side of the vien on the large leaves. A camoflage tool is used on the opposite side of the vien. Be careful to keep impressions as evenly spaced as possible. Also lean the tool, using one edge of the tool to make the impression. Now the outside of the pattern is backgrounded. I used a pebble background tool. Try and make your impressions even. (also try not to miss a spot, as I did) In the center of the pattern, I used a matting tool to get a different effect. Now add decorative cuts with your swivel knife. Some of mine look more like butcher cuts. These take a lot of practice to make them look good and I need more. I dyed the background with a dark spirit dye then finished with a coat of Tan Kote.


-
Leather jewelry with Cheryl Smeja at Shake Rag Alley Center for the Arts, 18 Shake Rag St., Mineral Point WI 53565. 608-987-3292
-
Beginning leather tooling classes with Cheryl Smeja at Shake Rag Alley Center for the Arts, 18 Shake Rag St., Mineral Point WI 53565. 608-987-3292
-
I think the quick case that Bruce mentions is just wetting your leather and letting it come back to it's original color, but still cool to the touch. That's what is usually done in classes because you dont have time to do the soaking, bagging, sitting for a few hours method. I agree with Bruce, the old fashioned method does have it's advantages if you have time to plan in advance. A lot of how you choose to case depends on your leather. When I helped out at the kids class in Sheridan last spring, that leather out of those kits dried out really quickly and we were constantly adding water. I think soaking and bagging that leather would have helped it a bunch. I have been using mostly Herman Oak leather and I can get pretty good results with quick casing, but I still think it's better to bag it if you have time. You are going to get better burnish when tooling, and you will be able to carve and stamp a lot longer without re-wetting. That's my thought anyway. Clay
-
I had absoltely nothing to do with getting the forum back up and running. That's way out of my league. I could probably mess something up pretty easy, but doing the tech stuff... um.. no way. Kate and Johanna deserve a standing ovation at the very least for all the work they did. It must have been pretty tense for the last few days, and still might be for a while until every thing is back to normal, but I have every confidence that these ladies will get it done. I missed this place as much as anyone and hope to have a couple new how to's posted tomorrow. Clay
-
I went through my tool rack and here would be my suggestions to start out with. Others might have a different list. Bevelers: smooth B200 or 203, checkered B701, 198, and 936 You could add angle lined bevelers 193 and 194 and undercut bevelers B60 and B892 A cam like C431 A seeder like S705 A veiner or two, V407 and 463 Backgrounder A104 Stop H905 Mulefoot U849 or 859 Pear shaders smooth 206 of 703 and a smaller one like 233 or 972. A vertical lined one like 207, horzontal lined like 211, checkered like 213 and I like a narrow lined one like 368. Basket stamp X511 and border stamp N305 If you think you will do any figure caving add the bevelers F890, F891, and F895, pointed bevelers F902, 910, and 976 and a matter like F898 or 899. If you can afford to spend a little more, I'd substitute the Hidecrafter Pro series bevelers PB 011, 012 and 013 for the checkered bevelers. The PB 018 for a veiner. The PA 003 and 004 for back grounders. The PX 001 for the basket stamp.
-
That could be a concern, and is something that I didn't think about. I took the new tool out of the package marked Pro Modeling Tool, small/lg undercut. It is shaped almost exactly like a regular pro petal tool but is not real sharp. It has a pretty good grip on it, and if held like a pencil, the other tip is going to be above the back of your hand, not to say that there still isn't a chance for an accident. I is always a good idea to be safe so your warning is sure a good idea. I do have a couple regular spoon modelers that I have sharpened the ends on for certain uses, and your precautions would apply to them as well. I took a few pictures of the tool and will post them here. This one shows the large end compared to a Pro Petal tool


-
Another place to get ball modelers is from Norm Lynds Here is the info Norm gave me last time I talked to him. Norm makes some really nice tools. The heavy duty ones I make from ball bearings mounted on a shaft and put in a turned handle. I can make these in jsut about any size, but 1/4, 3/8, and 1/2" plus a 3/8" tapered point covers just about everything. Also, I can make smaller ones, say 1/8, and 3/16" and put them in a modeler handle. The prices are $15 each for the single ones and $20 for a modeler handle with 2 embossing ends.
-
garment patterns and clothes making
ClayB replied to leatheroo's topic in Clothing, Jackets, Vests and Chaps
Oh come on Caroline, you should have let them think it was you! You might have had to put a towel over your keyboard to catch all the drool though Really nice work you did there. Clay -
Jim Linnell sent me some of Tandy's new modeling tools for prizes for our current carving contest. There is one that has a small ball on one end and a larger ball on the other. Another of them is called a small/large undercut. It isn't real sharp, but I don't think it would take much to make it work like a Pro Petal tool. There is also a small/fine round spoon and a med/large round spoon. There is also a med/large pointed spoon and the last one is a tracing stylus. These all have nicely shaped rubber handles. The tools look like they will work really well for a lot of different things so you might want to check them out. I have heard a few other people that have them say they work a lot better than the old versions.
-
I am going to try and add a few pictures from a piece of leather Peter Main sent me when I ordered a modeling spoon from him. All of the tooling on this piece was done with nothing but a modeling tool. The piece of leather was not all that big, and his writting is so small you can barely read it, so I tried to zoom in with several shots. You can use a modeling spoon as a beveler or pear shader especially in small areas where it's difficult to get into with regular tools.You can clean up choppy beveling with it. You can round the edges of your cut and beveled lines making them less sharp. It's a great tool to clean up all your tooling and give it a more finished look. The first pictures are modeling to shape an eyeball. Here it is cut, lightly Then the corners are pushed in with the tip of the modeling tool Then you model the top and bottom of the eyeball itself (left side of picture), and the wrinkles above and below the eye (right side of picture) Then smooth and round the ball. Here is a dog's nose done with the modeling tool And here is an oak leaf where all the beveling and shading are done with a modeling tool. On this last picture, you can see where the right side of the center vien has been smoothed out with the modeling tool, and the left side still has a ridge.


-
Cleverpony, Welcome to the forum and thanks for sharing pics right off the bat. A couple of us have posted lessons on how we carve oak leaves here on the forum and if you check them out, you may get some ideas. They aren't exactly the same style as you have tried, but the techniques will work for yours too. You can see the lessons here http://www.leatherworker.net/forum/index.php?showtopic=1948 and here http://www.leatherworker.net/forum/index.php?showtopic=2123 We are also in the process of having an oak leaf carving contest (sort of) that really isn't a competition, but more of a way to get as many people as possible to post pictures of the styles of leaves they like to carve. You may be able to get a lot of ideas from those once the contest is over and all the pictures are posted here. You are welcome to enter the contest with your project if you wish. If after checking out the tutorials here on the forum you still have questions, fire away and we will try and help you out. Clay
-
how many net members attended the Wickenburg AZ classes and show?
ClayB replied to skipj's topic in Leatherwork Conversation
I didn't go last year, but am considering it this year. My boss will be on vacation at the time, so I guess that means I will too, and my wife got the week off just in case. She also gets pretty cheap plane tickets on Great Lakes and it looks like they now fly into Phoenix, so things are falling into place. -
Hi Pip, Your idea sounds great. I hope you share pictures of your cover when you are finished. I have plans to try something like that too, where you could change out the notebook when it is full. So many ideas, so little time.
-
Hi Kevin, I asked that question to my wife and she said you write things in them you want to keep forever, like a journal. Or put pictures in them, or things like that, not use them for grocery lists etc. You could put new pages in them, but to do that you would have to cut off the binding and do it over. Glad you liked them.