amuckart
-
Posts
577 -
Joined
-
Last visited
Content Type
Profiles
Forums
Events
Blogs
Gallery
Store
Everything posted by amuckart
-
How Do You Photograph Belts And Guitar Straps?
amuckart replied to UKRay's topic in Leather Photography
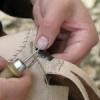
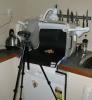
Hi Ray, There are four things you need. A decent camera, a decent tripod, a light box, and good software. Almost any modern digital camera will do the job, but you want one with a "programmed autofocus" mode. That allows you better control over flash and exposure without requiring fully manual mode that you only tend to get on high-end cameras. You won't get decent shots in this kind of situation with fully automatic mode. You don't need a cable release or remote, just set the camera to 2 second self-timer so you're not touching it and causing shake when you take the picture. The beauty of using a digital camera for this is that you can take a hundred shots of something and pick the one or two that work. You don't need a hugely expensive high-end tripod, but don't waste time with cheap flimsy things. The one I have is a decent portable tripod but it isn't stable enough to do long exposures without shaking, even when I'm not touching the camera. You want to avoid using the builtin flash, so your exposure times are going to be longer. If you can get a tripod that allows the camera to be mounted underneath pointing down you'll find that useful for this kind of work. You can build a light box quite easily. Google has lots of info on them. I made mine out of a 60lt plastic wheelie-crate that I store the paper and lights in when I'm not using it. It's not perfect, but it works pretty well. The major thing is to use 1550nm 'daylight' bulbs in the lights and to play around with the white balance of the pictures. Having a white card somewhere in shot you can crop out later is useful. Google's picasa app is a good free application for correcting white balance and doing basic edits. You don't need photoshop for basic product photos Here's the light box I use: The major thing I want to change is to make it so I can take photos looking straight down into the box. It's a lot easier to get the object set up in a box like that. Here are some pictures from it. I'm still getting too-bright highlights on some parts, but it still works a lot better than I could do otherwise. I keep some matte finish light card stock loosely rolled up in the box to use as backgrounds. You can also use fabric or felt. The key is not to use anything shiny and to have it be a smooth curve from the top-rear corner of the box to the front-bottom corner of the box so there aren't any sharp corners in the background of the shot. If you want any more info, please ask. I'm not an expert on these but I've managed to make it work Ok.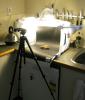
-
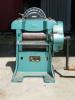
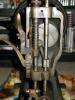
Hi Bruce, Thanks for that. I've actually started taking the machine apart now mostly to understand how it works since I've never had one before. It's a good thing I did because parts of it are quite worn and one of the castings is cracked. The four screws on the top are just structural. The adjustment seems to be done on the lower roller from underneath. It looks like the reason it won't adjust down to zero is because of wear in the cams that set the height of the upper roller, so I'm going to have to shim it somehow. I'm still curious about the maker. It's odd to find a company that has no hits on google.
-
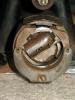
Hi all, I've got what appears to be a hand-cranked 6" splitter, marked "H. Sørensen & Co. A/S, Mas*scratches*fabrik, Glostrup Denmark" It is also marked with "Type: 128 NR. 2000". I'm wondering if anyone has seen one of these before. Googling for the maker isn't turning up anything useful. It adjusts by a lever on top and has a wing nut to tighten at a given depth. It doesn't seem to adjust right down to 0 though, is that normal for this type of machine or do I need to adjust something somewhere? The guage on top goes down to zero, but there's still 3-4mm gap between the rollers at that point. I'm going to be taking it apart anyway because it has quite a bit of fine surface rust on the rollers and blade and is completely blunt so if anyone has general hints on rebuilding a crank splitter I'd love to hear them. Thanks.
-
I can't help you with the repainting issue because I don't know enough about it, but if you've got rust problems with the machine I can't recommend evapo-rust highly enough. It's not cheap, but it works amazingly well and it doesn't strip nickel/chrome plating or paint or anything else other than rust and oxide bluing finishes. I've got no connection with the product or company at all, I'm just someone who's used it on two machines so far with great success.
-
I'm working backwards through this thread right now so I don't reply to things that are already covered. I've got a small collection of 12 or so curved awls for various things, mostly old Barnsley and King awls but by far the nicest was made by Dick Anderson at Thornapple River Boots. That said, when I'm making medieval shoes I use what they did, which is a straight awl. Curved awls are a post-medieval thing. Back in The Day™ they used straight awls even for tunnel stitching. It's quite doable but it's a very different technique than using a curved awl (which I'm not very good at). All the shoes on my blog were sewn with straight awls I made myself out of random bits of tool steel. Mostly old allen keys I chopped the bent bit off of, threw in a drill mounted in a vice and went after with a dremel while it was spinning. Man, I hope there aren't any machinists on here, that'll probably give them conniptions The awls I use are round, tapered with a slight chisel point and a mirror polish. They're not quite the same as the shape of medieval awls but my forging skills aren't up to reproducing those yet. I haven't used anything but linen for a while. With a good hand wax it locks up way tighter than I can get with synthetic and if you ply up your own cords you can tune the thickness to exactly what you need for the seam you're building. Personally I don't use a pricking wheel, I just eyeball things. I've only got one and it's 13SPI which is a lot finer than I need for most things. Extant medieval shoes show the natural slight variations in stitch length that comes with an awl-as-you-go technique done by eye. Still, I mostly manage fairly tidy seams on things. Not in medieval work, no. Distinct outsoles don't start being used on new shoes as a matter of course until the very late 15th century/early 16th century. There are oddities of shoes with built up soles, but they're oddities. The vast majority of medieval footwear was single soled. Sometimes you see ones that have had repair soles put on but that's often a pretty temporary and crudely-done repair. I tallow my shoes, but there really isn't a lot you can do to make a medieval shoe waterproof. If you walk in the wet and mud you're going to get damp feet after a while. Pattens are the real answer, and they aren't nearly common enough in reenactment IMO. It may be that they had specially heavily curried leather in medieval times for use as shoe soles but I'm not aware of any research to back that idea up.
-
Hi Ray, What style of boots are you looking to pattern? Do you want knee high lace ups or thigh-high fold-over and buckle types? I don't have patterns for them per-se but I can have a go at explaining how I generate patterns.
-
Hey cool, people link to that? That's me, so if you've got any questions about shoe stuff you think I might be able to help with, feel free to PM me or start a thread with questions and PM me that it's there and I'll do my best. The blog will get updated again once I've finished moving it to a new platform on it's own domain.
-
Suze, Since it sounds like you're a SCAdian, if you find someone in your local group who has a copy of Shoes and Pattens and/or Leather and Leatherworking in Anglo-Scandinavian and Medieval York both of them have examples of embroidered leather shoes. In shoes at least it's not done the way you might think, it's tunnel stitched through the leather rather than stabbed. If you don't have the books I can have a go at a small sample just with plain linen to give you the idea. It's only really good for doing stripes but until you get into the renaissance and rapier hangers it's the only example of true embroidery on leather I know of. Even the rapier hangers aren't really embroidered per-se, they just have fairly fine decorative stitching on them.
-
I'm no old-timer, but seeing as I came at this from the shoe side of things that's how I've learned too, except that I use split nylon fishing line instead of boar bristles. I used needles and synthetic thread for maybe three projects before I moved on to linen and 'bristles'. The bristles take a bit of practice to put on but now that I'm used to it I can't go back to needles.
-
Hi all, My background is in making reproduction medieval shoes and they called this stuff code back then. It's been a long time since I've hand stitched anything without it, but I ply up my own cords out of single-strand #10 linen and put bristles on them rather than using this newfangled poly stuff and harness needles Poly's hard to taper and I don't think you build good tight round closed seams in a shoe with needles. Anyway, some time ago I wrote up how I make up code or hand wax as modern shoemakers call it, on my blog along with photos at http://wherearetheel...aking-code.html If it'd help in terms of search etc, I can always transcribe that content directly into the forum. As I say in the blog post, I was poured about twice as much as I should have in each pour so in the photos I'm pulling a bit too much and it didn't really mix properly. This is the mix that works for me, with the beeswax I have, and the rosin I have. It pays to experiment a bit and write down your ratios as you go, but make it up in decent size batches so once you get it right you've got enough to last you for a while. The made up wax will dry out over time as the volatiles evaporate out. Storing it in a ziploc baggie, or even better a jar of water stops this. I've also been working on a recipe using proper black pitch rendered down from stockholm tar that's probably closer to what the medieval guys used, but I doubt it'd be much use for saddlery work being as it's awful messy. I'd advise against using oil or tallow to cut the rosin with. It can go from rock hard to a gooey mess in the space of one or two drops if you get it wrong. With a good mix I can build a seam then take a knife and cut off the externally visible parts of every stitch and still need pliers to pull the leather apart. When it comes apart there will be these hard little 'pegs' of waxed thread filling the holes. I hope that's of some help to folk on here. I'm getting an awful lot out of this forum, so thanks to everyone who makes it such a useful place.
-
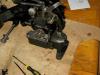
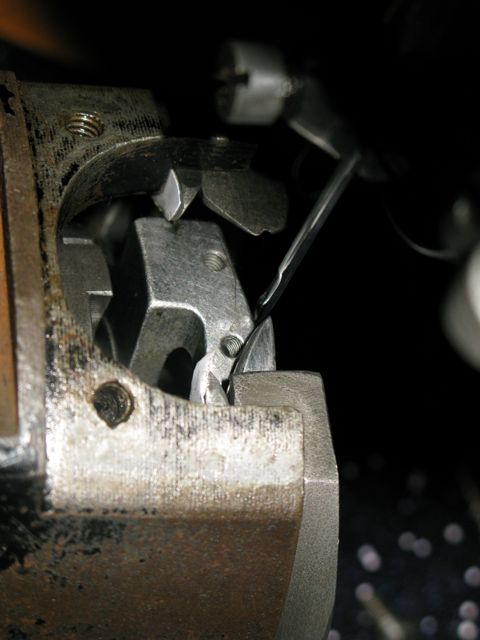
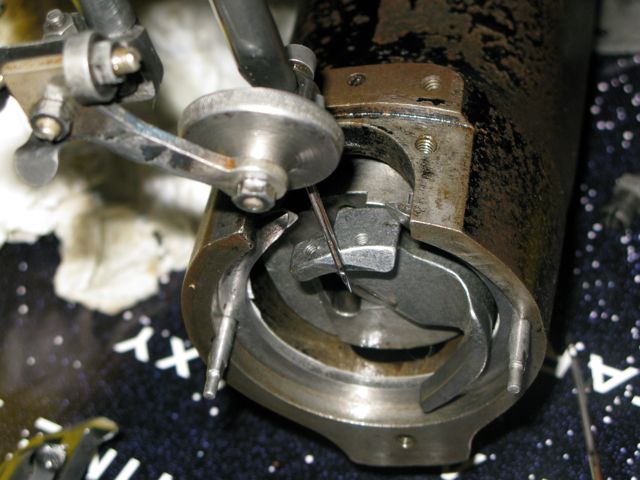
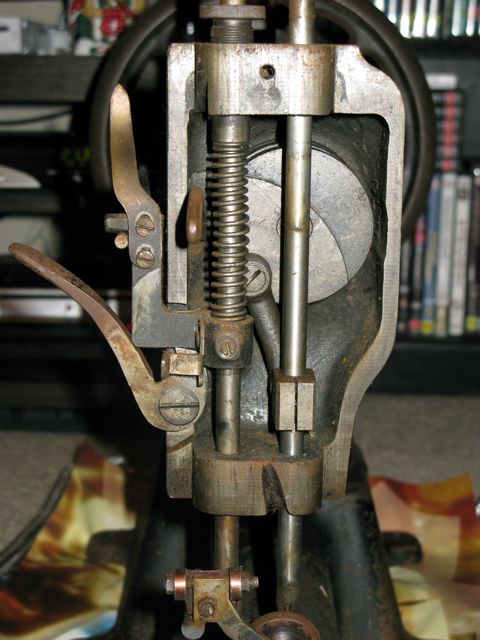
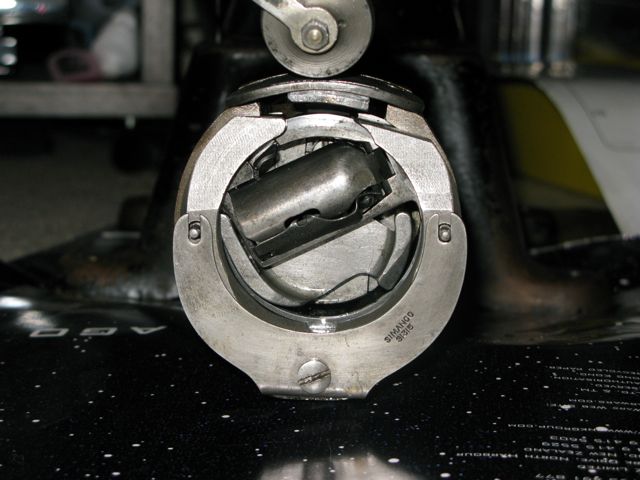
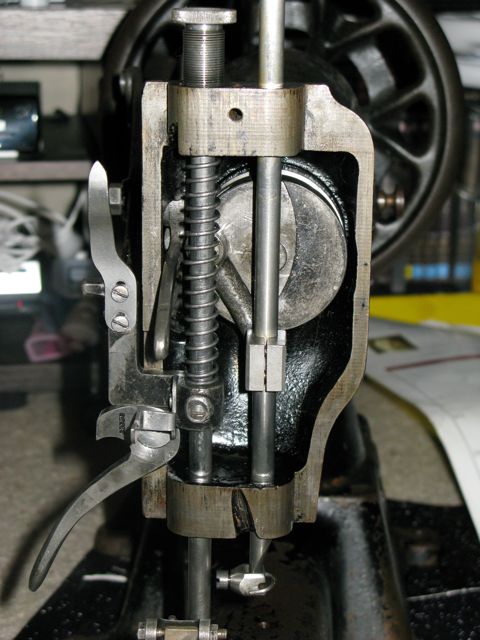
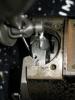
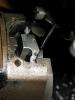
Another question about this machine which I'll stick here rather than start a new topic on - I'm wondering if I'm missing a bit of the shuttle carrier. There are two screw holes in it that were empty when I got the machine and I can't figure out what they're for. The shuttle doesn't seem to be the part #98608 "Shuttle Driver and Feed Raising Cam" listed in the parts manual from parts.singerco.com, but that manual also talks about the part only being suitable for the shuttle #98608 "not with the old style Shuttles". Given that my machine is a 1915 model, I'm wondering if what I've got is the "old style" shuttle driver and shuttle it mentions, presumably meaning I'll have to replace both parts if I want to replace the shuttle Here are some pictures showing the screw holes: I can't see how these could be for grub screws because there doesn't seem to be an appropriate bearing surface on the shuttle hook for them to mate with. Is there a part that goes on here that I'm missing? Thanks.
-
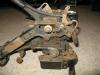
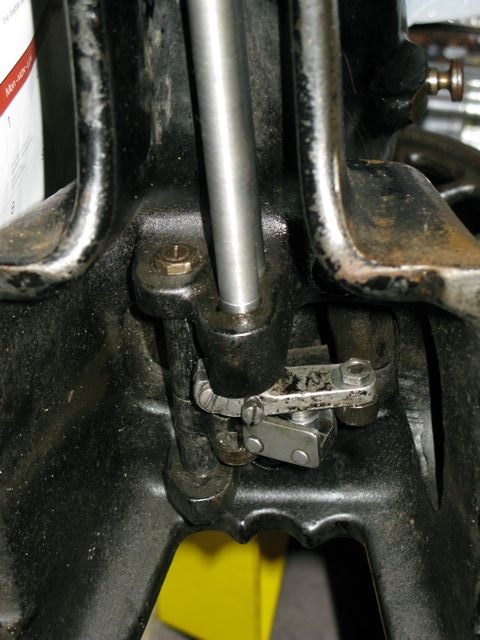
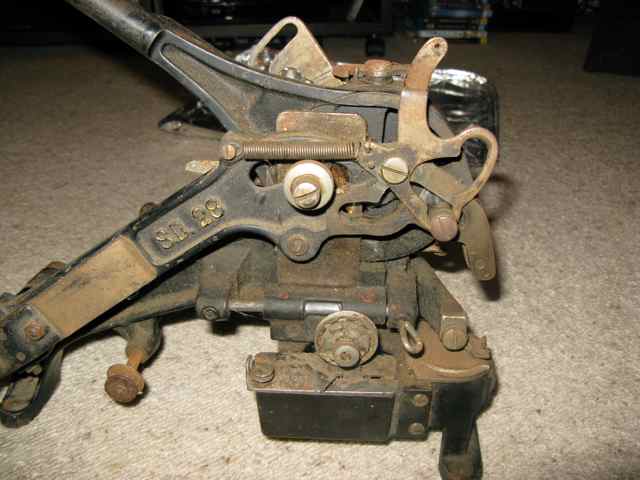
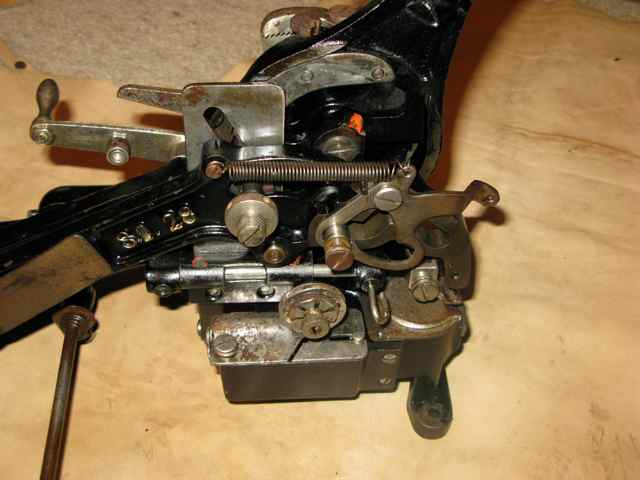
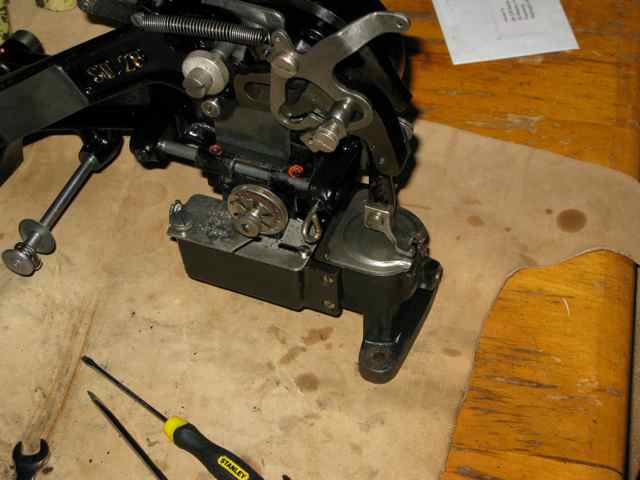
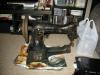
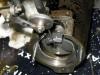
Hi all, I'm working on a 45K25 I picked up recently for NZ$200. It's been in someones garage for the last several years and looks like it's had some slightly 'interesting' work done on it in the past. A lot of the screws and bolt heads are a bit damaged and the grub screw holding the hand wheel on is totally wrecked and needs grinding out with a dremel. The connecting rod that actuates the shuttle was disconnected when I got it and the machine didn't turn over cleanly when I reconnected it. Turns out this is because there was a grub screw in it that was way too long and was grinding on an adjacent part as it osscilated. The main drive shaft and cams etc seem tight, there's no slop in the needle bar or anything so I left those bits alone. I've stripped the bottom half of the machine and cleaned it up. Here are some before/after shots: Now it's pretty much all back together and it turns over smoothly. It needs a new feed dog and needle plate at least, and I want to get a wax pot for it, but I want to make sure it's going to sew before I start forking out for more parts for it. I think the timing is fixed on this machine so I've adjusted the needle bar height but I'm concerned that there seems to be quite a bit of slop in the shuttle. Forward to back is fairly tight but there's quite a bit of rotational slop in the shuttle. It picks up the top thread Ok, but it seems to catch let the loop go cleanly. I'm not sure if this is a timing issue where the shuttle is starting the anticlockwise oscilation before the thread take-up has started or if it's because the shuttle is munted. Is a bit of rotational slop normal for this type of machine, or do I need a new shuttle and/or shuttle carrier? I'm also wondering if the clones of this machine like the Techsew GA-5 are sufficiently parts-compatible that I could use screws for one of those to replace some of the damaged ones on my machine. I dont' really know what thread types the 45K is using, but being a 1905 british-made machine it seems likely that they're some flavour of imperial but I have no idea what. Does anyone know if the GA-5 machine needle plates and feed dogs will go onto an original 45K25 as well? Thanks in advance.

-
Thanks DJ, I appreciate the explanation.
-
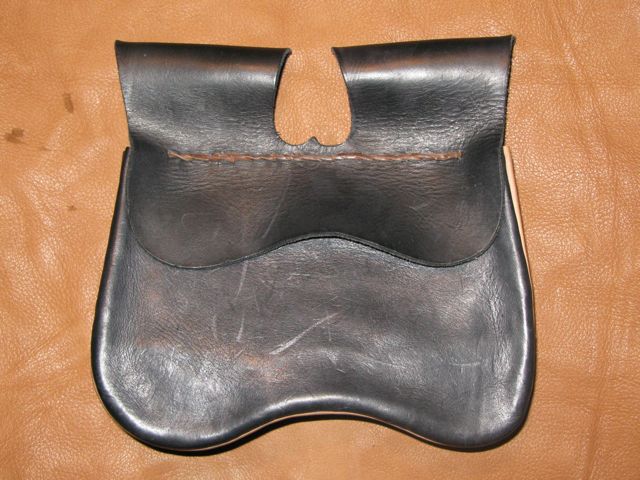
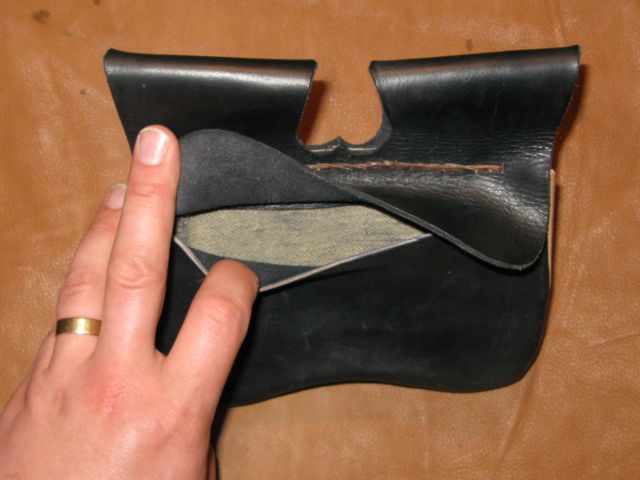
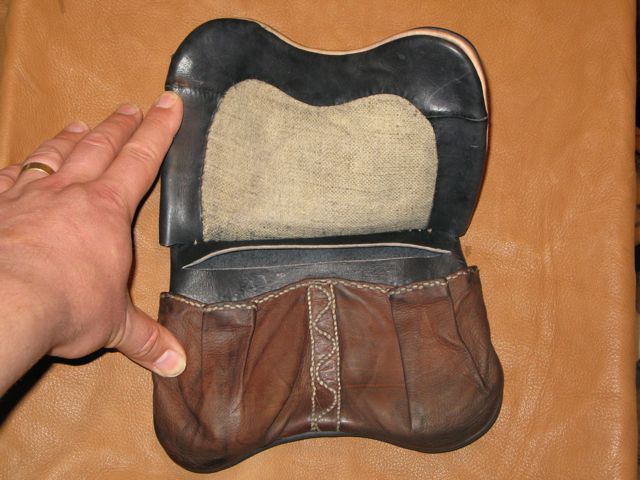
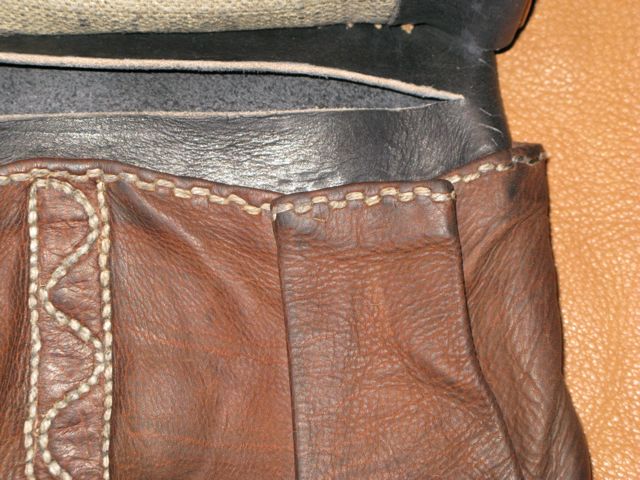
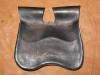
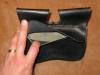
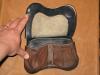
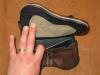
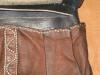
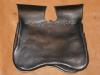
Hi all, Here's my first go at a purse based on an example in Olaf Goubitz' book Purses in Pieces. 1.5-2mm veg tan yearling for the body of the purse and a sample bit of calfskin from Pergamena for the pouchlets on the front. The calfskin is thin but incredibly strong and supple. It is expensive but quite possibly the nicest leather I've ever worked with. Unfortunately I didn't have a bit enough piece to make three pouchlets as per the original and they aren't quite as open at the top as they should be so I haven't installed the drawstrings yet. Front. No strap or buckle yet because I don't have an appropriate buckle right now. Access to the front compartment under the small flap. The rear of the compartment is textile as per the originals. I used a bit of linen canvas, which is a bit too heavy. Next time I'll use some heavy apron weight stuff. Lifting the front compartment shows the pouchlets on the front of the back compartment. The leather reinforcing around the edge of the linen is whip stitched on the inside so the sewing doesn't show. Access to the rear compartment Looking down into the pouchlets. You can also see the folded welt in the front compartment here. It adds a bit of decoration and a little bit more internal volume to the compartment. There are no gussets in this style of purse. Side view showing the folded welt and the way the leather for the pouchlets is sewn into the side seam before the purse compartment is turned. Decorative stitching on the pouchlets. I only got this right on one of them but the alternating stitch decoration on the edge is done by controlling the lay of the threads in the stitch not by moving the awl holes. Back view of the purse. I didn't quite get the shapes right after I turned them but it's not as bad as this picture makes it look. The back compartment should also be slightly smaller than the front as per the originals.

-
Hi Jim, Yes, thanks. I've got the manuals so I can (I hope!) figure out where all the bits are supposed to go again, it's just getting them all in the correct rotational aligment that I'm worried about. Still, I can take it to a professional for that part as you say. Of course, it's a moot point at the moment because there's one part I simply cannot get to shift so I'm a bit stuck trying to get the thing apart right now
-
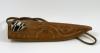
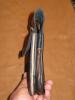
Sorry if this is a daft question, but how is this tool used? Do you start with square straps and compress them round?
-
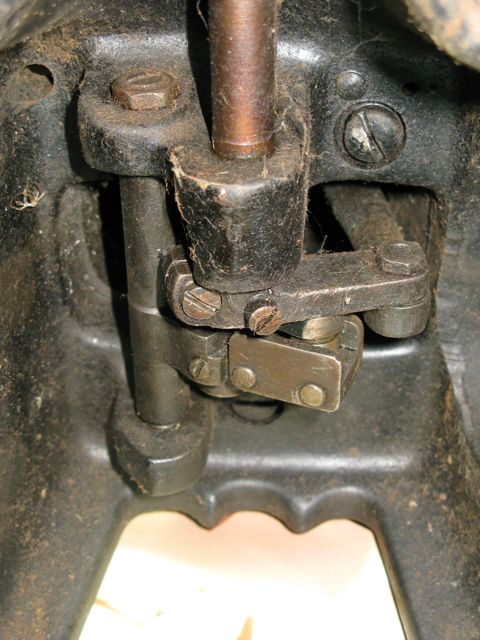
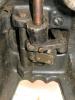
Hi all, I've bought an old 45k21 pretty cheap. It's complete, but not in the best condition. One major problem with it is that the linkage between the main crankshaft and the shuttle carrier bar had been disconnected when I got it. The parts are there, but when I reconnect them something is sticking pretty badly at some point in the rotation of the handwheel. I'm stripping the machine to clean the rust and gunk off and check the parts for wear etc. I'm taking lots of photographs and notes as I go but because it wasn't fully assembled and running when I got it I have very little confidence that I can get it back together with the timing correct. I know where all the bits go etc and I'm keeping an extensive photographic record of the disassembly so getting it back together intially isn't a problem but how do I get everything back into alignment again? Assuming a pile of parts and knowledge of roughly how they go together but not the exact rotational relationship between each part on the shaft etc is there a procedure to follow for getting a machine like this running again? Thanks.
-
G'day Tony, That's the way I'm leaning, if I can get it, which is by no means certain. Much as I want it, I'm also slightly wary of getting a machine whose parts are so expensive (says the guy who just bought an A.1 as a fixer-upper!) I don't reckon I'd get far off the wharf before my VW sank unfortunately, otherwise I'd take you up on that! Cheers.
-
Hi all, machinery question from someone new to the board. I've read pretty much the whole archive of this board over the last couple of days and I'm looking at possibly buying a heavy-duty machine. The things I've got options on at the moment are a Singer 7-9 that goes, a 7-5 that needs some work and perhaps a Pearson No.6. I think the Singers are very overpriced at NZ$2k for the 7-9 and NZ$1800 for the 7-5. I think that's way too much given that they are in far from mint condition and don't have their original stands and the 7-5 needs parts replacing before it'll sew, but I'm willing to be corrected. The Pearson is in "been in a shed for the last 10 years" condition; rusted all over to a greater or lesser extent, and there's not much of its original paint left. It needs stripping and repainting at the very least, and may need parts. I can do that, provided I don't have to spend a fortune on parts. Obviously the Pearson is worth more than the Singers, but that's ok. I can stretch to it, but don't have the money for a new machine like a 441 clone and I've never seen a used one for sale here. Ignoring the relative aesthetic merits of the machines and the fact that the Singers need motors, are they even comparable in terms of what they will do or are they suited to totally different sorts of work? If they'll do the same sort of work, can the Singer machines produce the sort of stitch quality the Pearson seems to be known for? Are parts for the Singers available any more? Any other useful information on them would be much appreciated. Neither comes with manuals but I can find manuals for whichever one I might end up with. Many thanks.
-
Hi all, I'm hoping someone on the forum can help me. I've bought an A1 online and I need to pick it up but it's a 3 hour drive away so if I can't fit it in my car first time around it gets pretty annoying. What I need to figure out is what I'm going to need to get the head off the table (aside from a vat of WD-40 ) and whether the table itself can be reduced to small enough parts to get in the back of my small station wagon or if I need to borrow a mate's ute. The person I bought it off can't take more pictures because they've stuffed their camera. Thanks in advance.
-
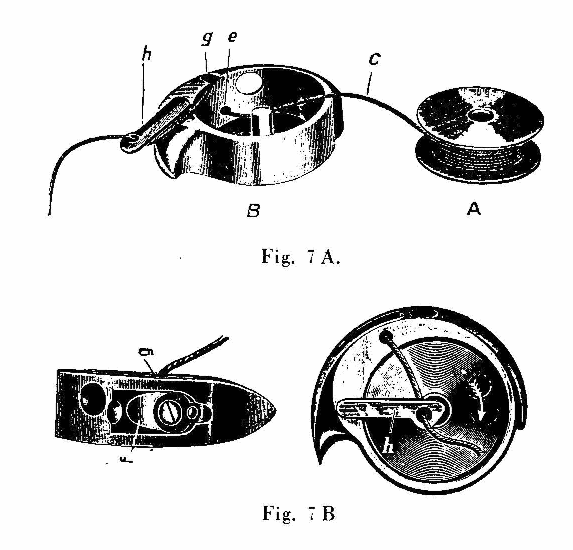
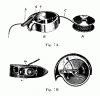
Here's an upper-thread threading digram from the Pedersen #308 (which was a J&R clone) manual: Note the thread going through the wax pot. These machines are designed to use liquid stitching wax on the upper thread and pitched thread on the spool. If you use modern nylon thread in them you'll cut grooves in the thread path and the tension springs, which will eventually ruin the machine. You could probably use prewaxed cotton or linen in them Ok, but I haven't yet gotten thread samples of good thread for mine. Here's the bobbin threading instructions: I hope that helps.

-
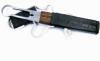
These are fantastic little machines, but infuriatingly difficult to find needles for any more. Pedersen made a clone, the Model #308 which is part-for-part compatible, but the last manufacturer of needles Groz Beckert in Germany no longer makes them and the only size they have in stock are the gigantic #8's. Parts can still be had, if you've got enough money. I'm waiting on a quote to get some manufactured. I've just finished restoring one from "been in a shed for 20 years" back to working condition, but I haven't yet got needles for it. If I can get a supply of needles then I'll go whole hog and get the plating restored as well and find replacement bobbin winder etc. Here's my one: As I got it: After first strip and degrease/clean After stripping the rust and properly cleaning it: