SimonJester753
-
Posts
133 -
Joined
-
Last visited
Content Type
Profiles
Forums
Events
Blogs
Gallery
Store
Everything posted by SimonJester753
-
I just had a custom stamp made by Phillips Engraving Co., Contact:Alex Porterfieldleatherstamps@phillipsengraving.comwww.phillipsengraving.comToll Free: 1-888-369-6906 They just need clean black and white images, preferably in digital format.
-
Is there a difference in the holding power between rapid rivets set with a hand set and a mallet and ones set with a bench mounted press?
-
If it helps clarify, this is what I'm using for my black latigo: http://www.tandyleatherfactory.com/search/searchresults/9056-05.aspx?feature=Product_3&kw=latigo+side I've ordered some brown latigo straps from them as well and they seem quite different, (less oily and the finish does not go as deep). Mostly I'm concerned if the image would fade with time if the leather is not the right kind. Or if it takes a stamped image well, should I expect it to hold up? After I cut my straps I rub in mink oil, then aussie cream, then rub a block of beeswax over the surface and buff it to a matte finish.
-
I've heard that veg tanned is "the only" leather to use for stamping. I bought some stamps I like. I've got latigo. I tried the stamp on the latigo, no wetting before stamping. The impression is quite good– nice and sharp, clean. So why not stamp on latigo? Will it eventually "fade"?
-
Works fine in Apple's Safari on a Mac. Nice site. Things load quickly, which is important. And I learned about vinagroon black! I'm currently working with black latigo, but when that runs out I might try some undyed leather and finish it as needed.
-
Thanks!
-
What Do I Need To Cut Leather? - Newbie Alert!
SimonJester753 replied to SouthernCross's topic in Leather Tools
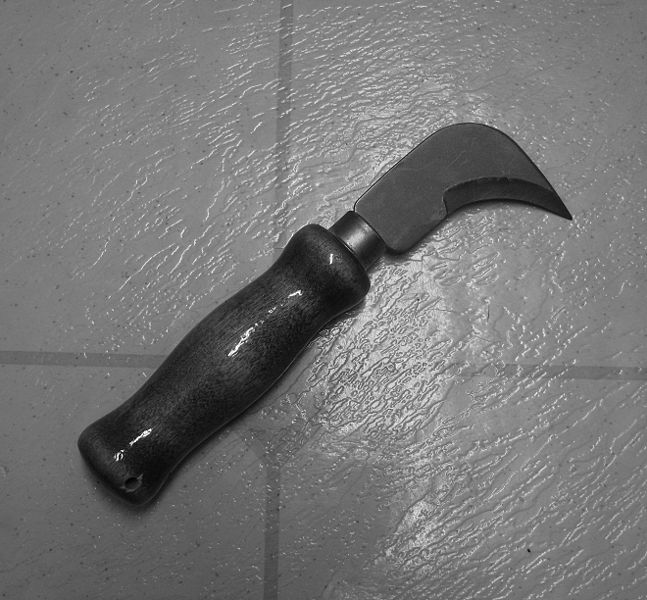
Thanks! I thought you'd cut by pulling rather than pushing. My father used to install floor covering and he used a knife like this on linoleum.
-
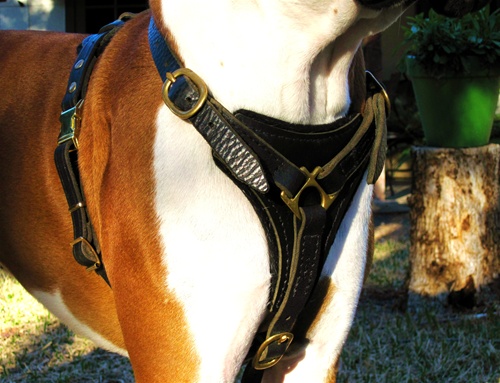
It looks like it's padded, correct? What are the padding and lining made from? Beautiful work and dogs!
-
What Do I Need To Cut Leather? - Newbie Alert!
SimonJester753 replied to SouthernCross's topic in Leather Tools
Are there any good videos showing a head knife in use? I'm good at learning by watching. I learned more about cross country skiing from watching videos of it being done right than by reading about it. -
Do you clamp the leather when you're using the Dremel on it, or do you hold the leather in one hand and the leather in the other? I've been feeling like edge finishing would go better if I clamped it between 2 boards with just enough of the edge sticking out to get the edge done.
-
Thanks! I don't think I have to worry about my dye line, as I'm using black latigo, so I think I'll dye first as I'm using water based dye and I'd like it sealed in as much as possible. I was wondering if my edge beveler needs sharpening and googled for instructions and came across another forum where you explained how it's done. You say you use "round bottom" bevelers. I've never liked the flat bottom beveler I have. Where do you get the round bottom ones?
-
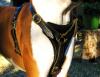
I'm looking for a book or online source for diagrams of how to run the straps on a harness like the one in the picture. I'm interested in the adjustable strap that goes around the torso. I assume there's a conway buckle used for adjusting the fit of the strap, but I'd love a diagram of exactly how you run the straps.
-
Notice in the lower image, you can see the hardware on the back of the "door knocker". It's not a chicago screw. It's used in carpentry. I wouldn't be surprised if it was a drawer pull of some kind. If you use this for a dog collar, it could unscrew, (the pronged nut would stay anchored in the leather and the drawer pull could spin). If you still want to use it, get Red loctite threadlock adhesive and install it using that. I still wouldn't trust it to hold a leash, maybe ID tag.
-
I had a potential customer request a dog collar with honey bee conchos on it. Has anyone seen such a thing? I've seen a dragonfly, but that's the only insect.
-
http://www.dogids.com/beauty-and-the-bold-collar.html I'm looking for the metal plates that are on the collar in the link above. I don't know if they'd be considered a concho, but I have not seen them on any site that sells conchos. Anyone know where to find them? Anyone know what they're called?
-
Thanks for the article. I have a few questions. It seems as if this is the type of finishing you'd do on a belt or wallet. Would this be the type of finish you'd use on something that was going to get exposed to rain, dirt, etc? Why wouldn't you dye the edge after edging it?
-
I've got this skiver: http://tinyurl.com/2cd2a8v I find it hard to control– either I'm not cutting anything or I'm cutting too much. Are there different skivers? Any tips on using this one?
-
I have little leather experience, but I'm a graphic artist. If the choice is to match the color, but risk it not holding up to use, perhaps you might want to color the edge to match the color of the horse, using a durable edge treatment.
-
How Do I Cut Straps From A Side?
SimonJester753 replied to SimonJester753's topic in How Do I Do That?
Thanks one and all for your help. I let the leather sit on my bench overnight so it would flatten out more. That seemed to help. I scribed a straight line, then put a cutting board under the leather and cut it with a utility knife. I then used the strap cutter to cut the cutoff down to a 1" strap, so I had little waste. Then I took 1/8" off the side so it would have a more perfect edge. Biggest lesson– If it's not working, back off. Ask questions. Take your time. -
Society of Creative Anachronism
SimonJester753 replied to OutBackP's topic in Leatherwork Conversation
A friend is an inactive member. I went to one of their battle practices in NYC a number of years ago. They met in Union Square park and would go at it pretty hard. Weapons did not have sharp metal edges, but they hit hard and the armor had to work, not just look pretty. -
How Do I Cut Straps From A Side?
SimonJester753 replied to SimonJester753's topic in How Do I Do That?
I thought I had it worked out. My work bench is 8.5' long and has a laminate counter top, so I put the leather on the bench and lined it up with the edge to that what I wanted to cut off was hanging over the edge. I put my stone slab in the middle to help keep it from moving, and I put "C" clamps on the ends. Then I took my utility knife and held the blade flush with the edge and ran it down the length of the bench. The leather rippled a bit in the middle, so I took about an extra 1/8" off. Then I took my 3' long straight edge and flushed it with the bench and scribed a straight line the length of the hide. I took the strap cutter and opened it up wide and tried to follow the line, (as they saw to do in the instructions that came with the cutter). Either the blade was dull or the screws that hold it were not tight, because the blade popped out and the cutter wobbled a bit and so that cut was no good, either. I also noticed that the strap cutter was marking the leather as I cut. I think it's nap time. I'll tackle this when I'm not so mad at it. Maybe I'll wait till a friend comes over to hold it flat as I cut. -
I've been buying latigo straps, and reducing them in width as needed with a strap cutter. I bought a side and forgot to ask them to straight edge it for me. I just unrolled it. There are some odd "peninsula" shaped pieces around the edges. Should I just cut them off before I begin? Should I cut the straps lengthwise, or from spine to belly? When I'm done cutting what I need, should I roll it up, or hang it on the wall flat? My strap cutter came with instructions on how to use it to straight edge a side, but they did not seem very clear to me, (I'll review them). Would it be wrong to lay it out on a flat surface and use a utility knife and a long steel ruler to make a straight edge to work from? In addition to some cuts that go through the leather around the edges, there's one or 2 in the center. Is this normal?
-
If it's still on the plexi, and you can't peel it off, I'd carefully drip rubber cement thinner between the leather and plexi and start peeling them apart. I don't know what effect the thinner will have on leather. I've used it as a graphic artist to separate paper from illustration board without damaging either. If you've already gotten it off the plexi, then you need a rubber cement pickup. They sell them in art supply stores, along with the thinner. Just rub the pickup over the area covered in rubber cement and it will pull the cement up. Paper is less porous than leather, so it may take some doing. I'm guessing the cement melted the plexi a bit. Keep in mind, I just started working with leather, but I've got years of working with rubber cement.
-
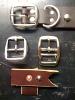
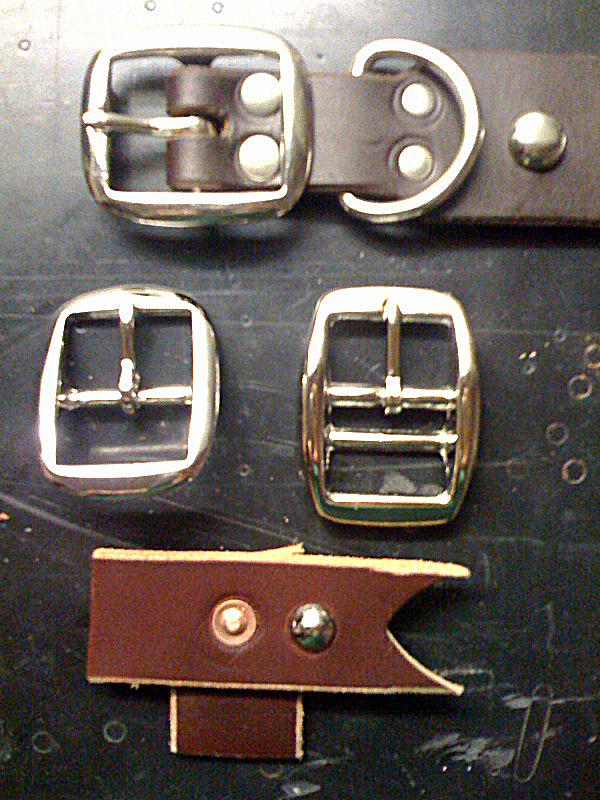
Thanks for the info. So the only reason I can see for a double bar buckle rather than a single center bar would be it saves a step in manufacturing, as you don't have to punch a slot for the tine to go through. Other than style, why would you sew leather, rather than rivet? I've seen a website from a German company that makes nice dog collars that are sewn. Their text says that leather tears at rivet points, so they sew. I have a cheap sewn dog leash, and with rough use, (my dog bites the leash), the stitches were failing. I'd think thread would fail before a rivet. I'd also think that the holes made to sew through would amount to a perforation, which could cause a failure as easily as a rivet hole. Here's a picture of the collar.

-
I normally make my dog collars with 1" bridle buckles that have a single center bar. I thought I'd try 1" double bar buckles as it would be stronger with no slot cut in the strap. The double bar buckles look like they might be kind of a tight squeeze to get the straps through. I got them from Tandy, so I don't think they were meant for nylon webbing. What would be the reason for choosing one over the other? I normally use rapid rivets to fasten my buckles to my straps, like in the top of the photo. I saw a harness that used copper rivets. instead of putting 2 rivets across the width of the strap, they put one copper rivet in the center. Is this the usual way? Finally, did I do a good job on my copper test rivet at the bottom of the photo?