


Bob Blea
-
Posts
1,771 -
Joined
-
Last visited
Content Type
Profiles
Forums
Events
Blogs
Gallery
Store
Everything posted by Bob Blea
-

How Do You Store Big Pieces Of Cased Leather?
Bob Blea replied to Bob Blea's topic in How Do I Do That?
You do great work so maybe there is something to soaking it that long. And the whole time you are working on it you don't refrigerate the piece? Thanks again, Bob -
How Do You Store Big Pieces Of Cased Leather?
Bob Blea replied to Bob Blea's topic in How Do I Do That?
Hi Harag, Yes, it is the Listerine you find in the stores. Many people here swear by it. However, I've also been told by some pretty good authorities (Bob Park) that it's just the alcohol that is helping. That's why I just put alcohol in my casing solution. Also, I didn't want my leather smelling like listerine.... I case pretty much like you do, but I used to do it like Benlilly does. I do make sure my leather is very wet before setting it out to case. In my mind, letting it soak till all the bubbles stop coming out just makes it take longer to dry out but I may be wrong about that. I've heard on many saddle makers who do great work that case that way. Thanks, Bob -
How Do You Store Big Pieces Of Cased Leather?
Bob Blea replied to Bob Blea's topic in How Do I Do That?
Thanks Jimbob, I'm thinking like you that it was discoloration too. Just didn't seem right that mold would pop up like that after only a few days except that I let that piece sit out at room temperature more than I usually do. It was a brand new stamp that may have had something on it, or maybe I got something on my hands. I'm hoping that's all it was. I had never heard that the acids still in the leather resisted mold formation but that does kind of make sense. I clean up that piece and put it back in the fridge in a new bag, and so far no more mold. -
How Do You Store Big Pieces Of Cased Leather?
Bob Blea replied to Bob Blea's topic in How Do I Do That?
Thanks again all. Based on all the experienced advice here I'm just going to keep it bagged and just try to work it through quickly. I don't use the Saran Wrap method but I do keep the parts I'm not working on inside the bag and also use a piece of plastic to cover parts I'm not working on, and it works pretty well. When working things that I keep in the fridge I've gone for several weeks before finishing, so hopefully if I'm quick now I can get it done without any problems. -
How Do You Store Big Pieces Of Cased Leather?
Bob Blea replied to Bob Blea's topic in How Do I Do That?
Thanks Benlilly and Cyberthrasher. If I can work so quickly that I can finish in the next few days I wouldn't worry to much about mold either. But, life has a tendency to get in the way. Having the leather on ice would buy me extra time. I normally leave stuff in the fridge for a couple of weeks sometimes without any problems, but just this week I had a problem with a piece of leather that had only been casing a few days. It looked a little like mold but it only showed up where my hand had been resting on the leather while using a brand new basket stamp. It may have been residual steel filings that caused the discoloration, but I'm treating it like it was mold. It's got me a little gun shy now. Thanks for the input! Bob -
How Do You Store Big Pieces Of Cased Leather?
Bob Blea replied to Bob Blea's topic in How Do I Do That?
Thanks Mike, great idea! I'm not sure I have a cooler big enough to fit this but I might. I had thought about using it somehow but hadn't thought of using tupperware as a spacer like that. I will see if I can make the leather fit the big styrofoam cooler I have. I don't need long term storage, just something to keep it cool during the day. If I come up with a neat solution I'll post it here. You've got me thinking of a rig that might make this work and guarantee no contact with the ice. If anyone else has solutions let me know. Bob -
Hello, I am starting on a large notebook. It will hold a legal size writing pad, the front cover will have a floral carving and the back with have a basket stamp covering it. Also, it will all be one single piece of leather, measuring roughly 16 x 21 inches. It's not huge but it will take a while to tool and stamp. I work a day job so evenings are the only times I get to work on projects, and normally I store smaller projects in the fridge when not tooling. However, this one is too big to fit. There's all that unecessary food in the way but the wife and kids won't let me get rid of it. And even if I did the door would still hit it. So my question to everyone out there is this: When faced with a piece of cased leather that is too big for cold storage, do you have any tricks for how you handle it? I'm just planning on a couple of late nights and hopefully a lot of time on Saturday to get this done quickly before any mold gets a chance to grow. I added a little alcohol to the casing solution this time in an attempt to give some mold resistance. But does anyone have a storage solution for large parts to keep them cool until you can get back to working on them? Thanks in advance for any advice, Bob
-
Just a question on this subject: I think I was told that using denatured alcohol prior to carving leather made the leather surface harder and made using a swivel knife harder because it is difficult to cut. Is that true, or am I thinking of oxalic acid that does this? thanks, Bob
-
Gum Tragacanth - Eco Vs Fiebings/other
Bob Blea replied to jeremyqmartin's topic in How Do I Do That?
I just recently tried Quik Slik from Sheridan Leather Outfitters and was amazed at how much easier it was. Just like treybecca I am sold on it now. Bob -
Hello and welcome to the forum! I don't have a sewing machine myself (yet) but what I'm thinking about getting is a Tippman Boss. It's manually driven but can sew heavy leather and doesn't cost as much as a motorized machine. However, I do hand sew on occasion and I just use a very sharp awl and a stiching wheel to lay out the holes. I can make them pretty uniform that way, but if I wanted the spacing more uniform I would get a pricking iron, which can mark holes in a row with all the same spacing between them. You still need to finish each hole with an awl but they will be spaced evenly, and it's a lot cheaper than any machine. Just takes more time. Bob
-
I find that the longer I leave the antique on the resist, the more it colors it. I've gotten very light tooling sometimes when I remove it quickly, but not always. I haven't been able to get that light tooling / dark background consistently yet. You might want to try a darker antique than what you are using to get the backgrounded areas to look really dark. Bob
-
I'm also a Leatherwranglers SK-3 user, and think they are great. I upgraded from a Tandy knife to the SK-3 and haven't looked back. Their knife blade material is different from the standard hardend tool steel that most good knife manufacturers use. They found a steel alloy that is used in the medical field due to it's corrosion resistance. Paul Zalesak did a lot of reseach and found the reason you need to strop your swivel knife so much is because the residual acids and chemicals in the leather react with the blade causing microscopic pitting and buildup on the blade's edge. You feel this as drag when you are trying to cut leather. Stropping rubs off the build up and polishes out the tiny pits. The beauty of the material Paul uses is that it resists this corrosion very well, and you don't have to strop or sharpen very often. These blades work great and are worth every penny, at least in my opinion. You can get a Leather Wranglers blade that will fit in your Tandy knife barrel. All of their blades have a flat shaft but if you contact them they can make one that has a round shaft that will fit an existing knife. Regarding blade size, I started off with a 1/4 blade in my SK-3, but after taking a class with Bob Park he convinced me to work with a larger blade. His argument is that while a small narrow blade makes it easy to do some of the fine detail cuts and curves, it covers up bad carving techniques and doesn't make you learn to hold and handle the knife properly. He recommends starting with a wider flat blade (3/8 inch or 1/2 inch) and once proficient in it's use, working to narrower blades and angled blades. I now use a 3/8 wide blade in the SK-3 for general carving and I have a Barry King swivel knife with a 3/8 inch blade that is thicker than the SK-3's blade for my decorative cuts. I just find the thicker (more standard) Barry King blade is making better cuts in my somewhat inexperienced hands than the thin SK-3 one. Like Aaron said above, the SK-3 is very sharp and it makes very fine cuts and I've always struggled with getting good decorative cuts from it. However, there are a lot of pros out there that use it for making decorative cuts and theirs look great, so it's just my not knowing how to do them well. For me personally, I find the bigger blade easier to make nice open decorative cuts. Hope this helps, Bob
-
Leather Tool Roll
Bob Blea replied to Dangerous Beans's topic in Purses, Wallets, Belts and Miscellaneous Pocket Items
Very nice work! I have been wanting to make a tool roll for my stamping tools. You've given me a completely different idea about what I might want to make. Thank you for sharing! Bob -
Hi Grandpa, I know what you are going through. The modern Tandy pine tree tools are thicker than the original ones. What Al Stohlman worked with appear to be a bit thinner than what Tandy supplied recently and I found them very hard to work with. I just recently got a set of pine tree tools from Robert Beard and they are 1000% better. Now I can make something that looks like a tree, however they do take practice and skill to make even with a good tool. I was able to talk to Robert Beard about these tools at the Sheridan show and even he admitted they take skill to make a good looking tree, so don't feel bad that your first attempts aren't looking that great. I found there are a lot of subtleties in how you tip the tools to create different lengths of branches, and you also need a small matting tool to get between the branches and matt out the parts that aren't supposed to be part of the tree. I'd keep an eye out for the old craftool pine tree tools. In the meantime practice the the modern ones to try and get the look down. Bob
-
American Leather Direct (ALD) has a pretty neat tool on their web site that shows what parts of the hide you are getting when you order a piece of hide. It makes it so you can see what part of the animal you are getting, but it doesn't show actual lengths since animals vary in size. http://www.aleatherd.com/cuts.html However, if you go to the button on the top of the page entitled 'Yield' (http://www.aleatherd.com/performance.html) they do show you what generally to expect as far as size, and they give you some handy tips about quality of the leather. Bob
-
I think you did a great job highlighting the carving. They look great! Bob
-
New Wallet
Bob Blea replied to jayjay's topic in Purses, Wallets, Belts and Miscellaneous Pocket Items
Looks good, like the carving of the revolvers. Bob -
You are absolutely right Paul. I just bought some new stamps from him including an amazing basket weave stamp. I think it is going to quickly become my favorite. Bob
-
Is Anyone Really Satisfied With Their Work?
Bob Blea replied to shooter55's topic in Leatherwork Conversation
I still have a LOT of room to improve and like Cyberthrasher I look at each thing I make critically, looking for what I can improve on next time. There is always lots I can improve on. If I don't do that I won't get better and I want to make the best product I can. But, I also have feedback from my customers that are thrilled with my work, so I'm probably doing a good job BUT I know I can do better. If I ever get to the point where I don't feel like I can improve, I've stopped growing and then I'm just producing, and that isn't as much fun. Bob -
The late Paul Burnett had some really creative designs that he stamped in leather this way. His website (www.paintingcow.com) still sells some of his books and home study courses on the subject. I don't have any of these but would like to get one, and they might be what you are looking for. Check out the books section and the home study course section too. Bob
-
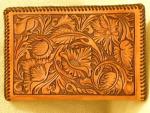
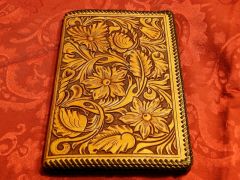
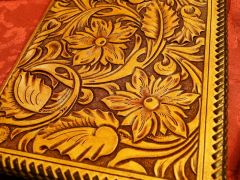 Hi Mike, Thanks for the compliment. The biggest differences you will see is how you shade the leaves and flower petals. In the Sheridan style, you always use the thumbprint / shader so there is a little ridge between the edge of the leaf or flower petal and where the thumbprint shades it. In the Northwest style, you actually have the thumbprint extend over the edge of the leaf or petal. The particular flower on this notebook isn't the best example, but it you look at the leaves you'll see I take the thumbprint right over the edge of the leaf. The other big difference is more use of leaves in the design and less of the circular pattern flow you typically see in Sheridan style. Notice how the pattern in this uses many leaves, and those leaves aren't contained inside a circle like you would typically see in Sheridan. The leaves are a bigger part of the overall pattern, and to me it looks a little more like a growing vine with lots of growth. Also, in NW style the pattern flow is more of a S curve than the circular flow that Sheridan uses. This is a pretty subtle difference (and at the things I've looked at it's hard for me to tell the difference) but again I think it's more representative of lush vine growth. I think in general the NW style is trying to be closer to how the plants growing in the wet Pacific NW look versus the more stylized plants in Sheridan style. That's just how I see it though. Another couple of differences. I am told (haven't actually seen examples) that it is or was traditional in NW style to background with a fine checkered matter as opposed to bargrounding. I happen to like bargrounding so I stick to that. Also, I have noted several makers who use a thin wiggly line veiner (I think it's called a wiggler) in place of the decorative cuts on the vine work. It might have been just a way to avoid doing decorative cuts, but I've seen quite a few examples of this and I'm going to try it on a project. I might like it. Let me know if any of this doesn't make sense! Bob
 -
 Thanks!
 -
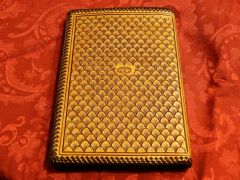 Hi tkirwan, These pattern is done with two stamps from Bary King, a seashell and a seashell filler. You can see both in the Geometrics section of his website. The seashell is stamped first over the whole back of the notebook, then I go back through and stamp the filler at the base of each shell. Or, you can leave out the filler and you end up with an effect that looks like scales. It's an easy tool to run and covers a large area quickly. Bob
 -
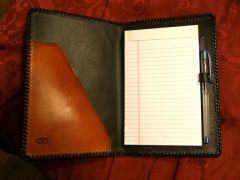
From the album: Northwest Style Floral Notebook
Inside I typically put a simple pocket and a pen keeper, though I have made them to whatever the customer would like.