


Shooter McGavin
-
Posts
785 -
Joined
-
Last visited
Content Type
Profiles
Forums
Events
Blogs
Gallery
Store
Everything posted by Shooter McGavin
-
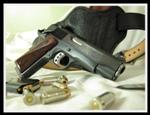
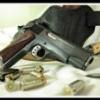 great work on the boning detail! 1911's are to me one of the hardest guns to get that level of detail on. What thickness of leather did you use? It still bugs me that you dont run an edge line on the "end" parts of the holster though
 -
Walther Pps Dummy Gun?
Shooter McGavin replied to Shooter McGavin's topic in Gun Holsters, Rifle Slings and Knife Sheathes
Called Duncans, they wont have any for 4-6 weeks. Rings doesnt offer the PPS dummy gun. grrrrr -
Walther Pps Dummy Gun?
Shooter McGavin replied to Shooter McGavin's topic in Gun Holsters, Rifle Slings and Knife Sheathes
It's not on their inventory list when I checked yesterday. Still wouldnt be a bad idea to give them a yell though. -
Anyone know anypolace where I can buy a PPS dummy gun at? or.. Anyone kind enough to let me borrow/ rent one for a couple of weeks? Thanks Dan
-
I think the oil black will be blacker if you dye with oil blue first. I started with eco-flo water based black, then moved to USMC black, then to oil black, which is all I use now. I still keep some USMC black around for a quick edge dye or something but otherwise it stays in the bottle. When using the USMC black it seems like you could buff it forever and still be getting black on your rag. the oil black barely bleeds off at all on me.
-
Any other makers here ever make something for a friend or a customer that you really wanted to keep for yourself? Every once in a while I make one that speaks to me for whatever reason. It's happened twice this past week. One is an elephant trimmed Glock Compact pancake holster in all black. Still in progress so no pics. The other is an IWB for the same gun. Again, nothing really fancy, I just really like it. So I cant be the only weirdo who thinks this way. Post of pics or tell the stories of the ones you didnt want to let go of.
-
DM, I have used the Micro Compact blue gun for a holster that the fella carries a New Agent in and it is fine.
-
Another Nice Group
Shooter McGavin replied to Eaglestroker's topic in Gun Holsters, Rifle Slings and Knife Sheathes
While they are all nice, I really really really like the first one. ( long barreled revolver ) -
Mike, Can you post or send me some finished pics of holsters done in oxblood? I have a few bottles but so far only use them to mix my black cherry dye. I'd like to see how it looks oiled and sealed out of the bottle though. Thanks!
-
New One Finished Today
Shooter McGavin replied to mattsh's topic in Gun Holsters, Rifle Slings and Knife Sheathes
Looks good. I really like the contrast of the rough out leather with the "normal" leather. -
"How the heck do I set these snaps?" is a question that seems to come up pretty frequently. So I've put together a quick photo tutorial on the way I do it. Theres lots of other ways that will work, this is just the cheapest, and most reliable, way that I've personally found. I've tried pliers, presses, punches, hopes, dreams, and cuss words. This is my solution. Not meant to be the definitive "snap setting" thread, but it's a nifty way to do it with tools one may already own. Photos were taken with a camera phone so please forgive the quality. Photo 1: Tools used. Counterclockwise from top: Hammer, Tandy snap setting tool, 5/16 hole punch, sharpened center punch or prick punch, handheld bevel tool, dampened belt loop, other piece from Tandy snap set tool kit, button and socket pieces of the snap. Notice post hole has already been punched in belt loop with 1/8" hole punch. Photo 2: Button side of snap pushed through hole in belt loop, bevel tool used to press damp leather into recess of button. I just happen to have the bevel tool handy, you can use just about anything though. Photo 3: Place the socket over the button post, and use the 5/16 hole punch and hammer to lightly tap the socket into the leather, compressing the damp leather and seating the socket firmly. The curved piece from the snap set tool kit should be under the assembly at this time. Photo 4: Button post protruding through socket. Photo 5: Use the center punch and hammer to flare the post. Photo 6: Post is now flared. This makes the job of the roll crimper tool easier. Photo 7: Use the hammer and roll crimper tool to roll crimp the post to the socket. This same process is used to set the eyelet and stud. Hope this helps somebody. I know setting these dang snaps was a major headache when I first started messing with leather. I've spent hundreds of dollars on snap setting tools to come around to this method. A photo tutorial such as this would have been priceless. Dan
-
If you can dip dye it, do so. Otherwise I'd load it into some sort of sprayer. My experience with the spirit dyes in any color except black is that it can be hard to acheive a solid, un-blotchy dye job with a sponge or dauber.
-
Well, I've been kicking this around for a few months, then seen Lobos thread today on the 12 gauge pump shotgun rig, and thought it might be time to actually do something with my project. So anyway, I happen to own a Rossi Squire double barrel 12 gauge with 8 inch barrels and a pistol grip. And yes, it's all legit so no worries. I'd like to wear this thing to some BBQ's just for the fun of it and mainly because a bunch of fellas I picnic with once a year at a local gun gathering have been telling me for years that I need to wear it to the picnic. I was thinking something along the lines of a slim-jim or mexican loop holster. Wondering if anyone has seen anything similar or made something that they would like to share. This would not be for sale, but would be for my personal, occasional use. Thanks! Dan
-
Snap Quality
Shooter McGavin replied to JeffGC's topic in Gun Holsters, Rifle Slings and Knife Sheathes
I've wanted to punch through glass block windows while trying to set snaps. Tried a wide variety of snaps, tool, methods, presses, pliers, hopes, prayers, curse words, and bloodied fingers. The only way I've found to get consistent results is to make sure the post on the cap is pressed down into the cap itself. Some manufacturers seem to do this already, the ones I buy from Tandy certainly do not. I then dampen the leather where the snap will go, place the cap through the punched hole, then place the socket in position. Using a short section of 5/16 steel brake line and a hammer, I seat the socket into the leather, and the leather into the cap. Next I use a heavily tapered center punch and slightly expand the post on the cap. Once it is expanded, I use the cheapy setting tool from Tandy to roll form the post. I get very little deflection using this method and the roll crimps are always nice and strong. The same basic method is use for setting the eyelet to the stud. I no longer fear the snaps. -
Made On For Myself For A Change
Shooter McGavin replied to Denster's topic in Gun Holsters, Rifle Slings and Knife Sheathes
Cool! Where do you get your shark? The stuff I've been getting looks way different than that. -
Need "inlay" Advice
Shooter McGavin replied to Shooter McGavin's topic in Gun Holsters, Rifle Slings and Knife Sheathes
Thanks for the advice from everyone. Here was the final result. Buddy was very happy! -
A New Shark/horsehide Belt
Shooter McGavin replied to JRCHolsters's topic in Gun Holsters, Rifle Slings and Knife Sheathes
I love it! -
New P220 Iwb Holster
Shooter McGavin replied to Shooter McGavin's topic in Gun Holsters, Rifle Slings and Knife Sheathes
I forgot to snap pics of the inside. Sorry -
Need "inlay" Advice
Shooter McGavin replied to Shooter McGavin's topic in Gun Holsters, Rifle Slings and Knife Sheathes
mmirob: yep, thats the style I typically do as well. I guess we can call it an "overlay"? Is that beavertail? Also, that belt is sharp as all getout. I agree. The stuff these guys posted in here is amazing! Simply amazing. -
New P220 Iwb Holster
Shooter McGavin replied to Shooter McGavin's topic in Gun Holsters, Rifle Slings and Knife Sheathes
I generally do all my dye work after the holster has been wet molded and dried in the hot box. I use wool daubers for the most part, however, when there are stitched on panels such as this, I get as close as I can with the dauber then finish with a 3/8 wide flat artists brush. That lets you get in under the edges of the panel some if they are properly rounded and burnished. For the edges I use burlap wrapped around a wood slicker and saturated with the yellow paste saddle soap. After they are nice and smooth I use that same artists brush to apply whatever dye I use on the edges, in this case it was black. This was made with Hermann Oak leather purchased from Springfield Leather. Thanks! -
Derringer Pocket Holster
Shooter McGavin replied to Sanch's topic in Gun Holsters, Rifle Slings and Knife Sheathes
Sorry for your misfortune. Look at it as an opportunity presented to you to rebuild bigger and better. -
Triple Ostrich Inlay!
Shooter McGavin replied to Sixer's topic in Gun Holsters, Rifle Slings and Knife Sheathes
Dude what are you talking about, that holster is sweet! Great job on the thumb break as well. What color did you dye the bovine leather? Looks like a cordovan but mine always comes out way darker than that. -
Derringer Pocket Holster
Shooter McGavin replied to Sanch's topic in Gun Holsters, Rifle Slings and Knife Sheathes
Nice. I really like the shape. -
Old Style Cross Draw Rig
Shooter McGavin replied to katsass's topic in Gun Holsters, Rifle Slings and Knife Sheathes
Very cool! I just recently picked up one of those el cheapo "Rough Rider" 22's and now have the hankerin to make something like this for it. Dont know where I'd wear it without getting laughed out of town though. -
Need "inlay" Advice
Shooter McGavin replied to Shooter McGavin's topic in Gun Holsters, Rifle Slings and Knife Sheathes
I ended up using the 7-8 for the front layer and the 3-4 for the inside layer. Hopefully I can stitch it tomorrow. Fella needs it by the 30th for a BBQ. I hope it turns out OK, I'm honestly a bit nervous on this one.